
What I learned After 6 Years of Building an Overland-Focused Toyota 4Runner – General Cost, Part Selection and What to Consider
It’s been over six years since we bought our 2014 Trail Edition 4Runner. Since then, we have spent many weekends building and planning for our overland-focused 4Runner build. Looking back, there are some things I would have done differently, and also some things I wouldn’t have changed for the world. Building out this 4Runner over the last six years has been a total learning experience, for both my technical automotive skills as well as general preparedness off the road. Building this rig has taught me a lot about patience in general.
Throughout this journey, I’ve learned about the intricate details of many 4Runner and Toyota-specific mods. About 95% of these mods I have personally installed and can firmly advise which parts you should allocate a healthy budget towards and alternatively, parts you can go cheap on. However, no build is the exact same and what works great for one rig might not work so well for another; high price point or not. If I have one single point of advice, it’s research. I suggest you research a topic in detail before fully committing to one specific modification (thankfully we have a massive community on Trail4R.com to help with that).
Looking Back

There have been some mods I could have gone without. Some modifications add unneeded weight, stress on the chassis, and some even remove the functional elements that are so desired when buying a 4Runner in the first place. There have also been some mods that I felt were a “must-have” which have been ruled out over the years. I found that I simply didn’t need to buy a few parts I have on the 4Runner for my personal style of travel.
Finally, looking at my next build, I may steer away from some of the more time-consuming installs due to the fact that the workload and install process simply didn’t merit the functional benefit. Regardless of the parts I have on the rig, this has been an awesome learning experience over the last 6 years building out this 5th Gen.
What can you expect from this post?
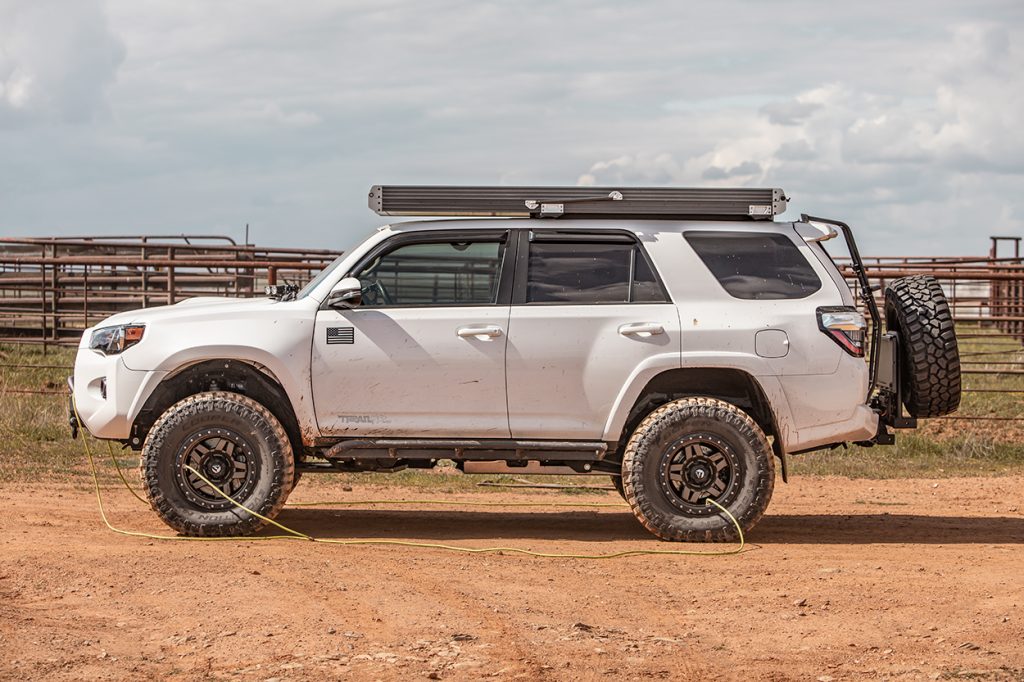
For this post, I wanted to break down the parts and accessories I have on the white 4Runner pictured here. Then notate whether I would choose those parts again or perhaps what parts I would choose in their place or for that category as a whole. It really depends on your travel style and the intended goal of your build.
First, determine the type of build you are going for; an Overland Build, Off-Road Build, Rock Crawler, Weekend Warrior, Etc.? Plan out your build just like a business plan and execute accordingly dependant on the budget and wants vs. needs.
Your build should be calculated and thought out – not spur of the moment purchases with an “I hope this works out” mentality. Looking back, I had a few of those – like fiberglass fenders and retrofitting headlights. Those are things I could have done without. Let’s just say the juice wasn’t worth the squeeze.
My Background

My first 4Runner (and first auto) was a 1999 SR5 4×4 Imperial Jade Green 4Runner that I had in high school. Since then I fell in love with the platform and knew that the 4Runner would be my platform of choice forever. Fast forward almost 20 years and that prediction came true. I have only ever owned 4Runners and five of them so far – with more on the way. It’s safe to say I love the Toyota 4Runner. I also own a 2nd Gen Tacoma DCSB on full 2.25″ JD Fab LT, 934 Chromoly caged plunging CV axles +300M shafts, double shear lower control arm, and upper control arm mounts, triple bypass secondary shocks, a 200 series Land Cruiser steering rack, 37s and more. My point? I’ve built a few trucks now.
I know what I am doing, and I like Toyotas.
Overview

This post will include all the big mods on the 4Runner, and what to consider for that category.
I will also go into detail on that part’s category, how important that part is, and whether or not it was worth it for my specific style of travel. This will come down to many factors; weight, cost, daily driving functionality, off-road performance, on-road performance, etc.
My Build Goals:
My build goals are based on my daily lifestyle. To give you some context, I like weekend trips, wheeling, rock-crawling, and constantly moving around more than staying put for days at a time. I don’t really care about daily driving habits because I have three Toyota trucks, a crossover, and my office is literally across the street from my office.
The Trail4R Overland 4Runner Build
Platform

We bought a 2014 Toyota Trail Edition Premium 4Runner (2017+ referred to as the TRD off-road) brand new with the intention of exploring the great outdoors more often. Our TEP is equipped with a rear e-Locker, KDSS, crawl control, factory remote start, SofTex® Interior, red-stitched seats, and many other “high-end” features. Since then we have owned 2 additional 5th Gen 4Runners; one 2017 SR5 and another 2016 TEP w/ KDSS.
Trail Takeaway
If you are planning on really taking your build the distance, you don’t need a TRD Pro or even the TRD Off-Road Premium (ORP). The biggest difference between the two is KDSS – which is optional on the TRD off-Road. I have gone over this a few times but KDSS makes the on-road performance much better (less body roll, nose dive, better cornering, etc.).
With KDSS though, you lose wheel travel from your suspension off-road compared to a non-KDSS rig, even more so if you’re running mid-travel coilovers. If you’re planning on keeping your rig on-road with the occasional fire-road, KDSS is great. If you plan on wheeling extremely hard, and I mean extremely hard (massive rocks, and other large washed-out terrain types), you may want to avoid a 4Runner with KDSS. Some of my friends (TSO – Trail Standard Offroad) have removed KDSS in order to get more suspension travel for the front & rear. KDSS features an electronically controlled and hydraulically run interconnected sway bar system. On the passenger side front and rear, KDSS features a fixed point, on the other; a hydraulic ram. Once you upgrade your coilovers to mid-travel and/or extended travel coilovers, you start to lose down travel on the passenger side. On the driver side rear, if the axle fully droops, the swaybar will contact the panhard bar. Owners solve this issue with Icon track bars, Sonoran Steel track bars, KDSS spacer drop bracket, and other mods. Don’t get me wrong, you can still wheel pretty hard with KDSS but you are limited in your suspension’s wheel travel. That is a FACT. However, will all that said, both of my 4Runners (2014 TEP, and 2016 TEP) have featured KDSS and I have wheeled pretty hard in both of them. Not Rubicon hard, but through many trails. KDSS can take you through Hell Hole Reservoir, Snake Lake/Gold Lake, Wheeler Lake in Colorado, Hells Revenge in Utah, Signal Peak in Tahoe, and many others. Ask me how I know.
With all that said, if you plan on long-traveling your 4Runner, just buy an SR5 without KDSS.
An SR5 Premium is a great option for many drivers, and you can ultimately make an SR5 look like a pro (if you like that look) with a few mods; TRD skid plate, TRD Grille, black badges, TRD seats, etc. You can literally add every TRD Pro part onto an SR5. You can even wrap an SR5 in Cement, Quicksand, Army Green, or any other Pro color. Don’t feel like you need to buy a Pro or ORP just to have a nice 4Runner. I have seen many SR5P builds look nicer than Pros and ORPs. It’s all in how you build it.
So where should you start with your Overland-Built 4Runner?
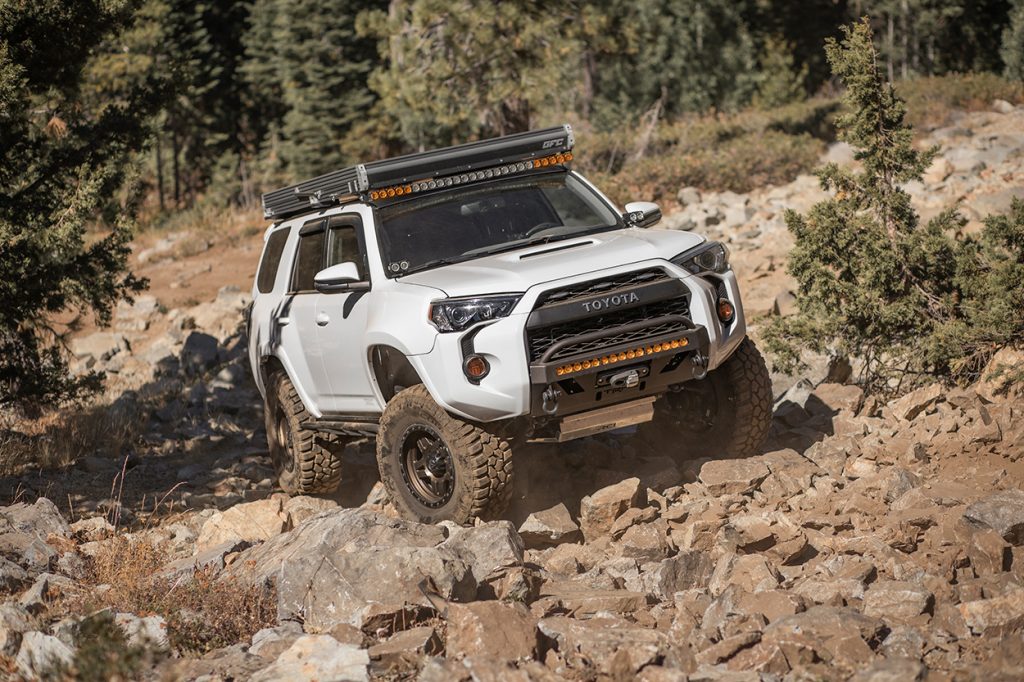
Tires

I like to tell people the tires are the most important part of your build. Yes, more important than suspension. With a set of really nice mud terrains or all-terrains, you can take your 4Runner more places and get through more terrain than a 4Runner on Bridgestone Duelers with a 3″ lift.
From Highway and All-Terrain to Hybrids and Mud Terrains, I’ve run it all. We left the showroom floor with a set of 31″ Nitto Terra Grapplers. Next, we ran the good ol’ BFG KO2 in the classic 285/70R17 (32.7″). From there we made the jump to a 34″ Toyo Extreme AT 2 (285/75R17). Then we jumped to a 35″ Cooper Evolution MT (35X12.5R17).
Looking back at these sizes, the 34″ Toyos were the best all-around tire for my needs; great on-road and off-road. On-road our milage dropped to 13MPG but they offered everything I needed and more off-road (which was more important for my style of exploring).
Once I jumped to the 35″ tires, my gas mileage dropped to 10MPG and the low-end torque was severely affected. With 35″ tires, you can expect 0-60 in about 3 days. Ok, I am joking but in all seriousness, big tires add more rotational mass which puts stress on the rig. The 4Runner’s factory 3.73 ring and pinon need to complete more rotations in order for the larger tires to complete one full tire rotation. This means bigger tires cause more stress on the ring gear, pinion gear, driveshaft, the chassis, and generally speaking the CV axles, boots, tie-rods, and other IFS components.
Trail Takeaway?
If the 4Runner was my daily driver but I wanted to explore moderate trails often, I would have stayed on 34″ tires. Either 285/75R17 or 295/70R17 are both great options for the 4Runner. You still retain most of your low-end torque while seeing only minimal MPG loss compared to 31″ tires and you don’t need to trim all that much. 35″ tires are for the guys who want a trail-focused rig and are prepared to pay the price of extreme trimming, massive MPG loss, possible fiberglass, upgrading tie-rods, and recommended upgrading CV axles.
Ring & Pinon

Big tires lead to this section.
One of the second most important mods when looking at building an Overland rig is regearing. Now, this all depends on your goals and where you expect your 4Runner to take you. This does not apply to every Overland build however, anything over a 33″ tire warrants the need for new gears. The factory 3.73 gears are designed for the rotational mass of a 31″ tire and can realistically handle a 32″ tire for the life of the vehicle; however, I know guys that re-gear down to 4.56 gears at large 32″. 4.11 gears would be the better fit for 33″ – 34″ tires, however, no companies currently offer a 4.11 gear ratio for our 3rd member. When you jump to a 33″ – I recommend running 4.56 gears. Once you jump to 34″ – 35″ tires, running a 4.88 gear ratio is recommend (it’s recommended by NitroGear).
Trail Takeaway
This is one of those modifications I wish I had done early on. After wheeling hard with the 34″ tires, I started to get notice high-idle while slow crawling rocks. After I re-geared to 4.88 Nitro Gears my rock crawling was noticeably more controlled and less stressful. On-road, the gears offered less gear hunting on grades and more accurate shift points on the freeway.
Wheeling hard on 34″ tires was also really hard on my ring and pinion gears. When we dropped the 3rd member at 35K miles, the oil was really dark, and thick – almost like a soot texture from the gears grinding and over-working. If you are running larger tires, consider a re-gear asap or change your differential oil often. Re-gearing was one of the best mods I added to the truck.
Resources for Regearing:
Suspension

After the last 6 years, I have run many different systems; Bilstein 6112s/5100s, Icon Stage 2, Falcons by TeraFlex, ProComp spacers, Ekstrom shims, OME Nitrochargers, and most recently the OME BP-51s. All Bilsteins have digressive valving which makes their shocks stiffer than stock (better handling) on-road. However, when you compare the Icons digressive shock valving to Bilsteins – the Icons are much stiffer; almost too stiff on road. For what it’s worth, I think the OME BP-51s are the best value suspension system on the market – or at least from what I have experienced so far. The BP-51s offer fully adjustable rebound/compression damping so if you want a plush on-road shock or a stiff more controlled shock – you can have it. We have the BP-51s mounted on our MGM 4Runner Jade and they have been great so far.
Trail Takeaway
I see a lot of people buy King shocks just to buy Kings. You probably don’t need Kings unless you plan on going long travel, want custom length shocks, or specifically want a linear valving curve. Kings are expensive but they do have a stout reputation for offering the best valving curve on the market. It really depends on your goals and it’s hard to give advice on this one because everyone has a different goal. If you plan on wheeling hard, buy a lift kit or shock with a threaded shock body for ride height adjustments, and if you can find a system with compression and rebound adjustments, that’s a plus.
Great adjustable shock bodies include the OME BP-51, Fox with DSC (dual speed compression) adjusters, Icon CDC (Compression Damping Control), Kings, and many others. If you plan on mild wheeling, fire-roads, and overlanding – going with a Bilstein 6112/5100 or OME Nitrochargers would be fine.
Rock Sliders

Rock sliders are a must-have on any build that is trail-focused or even rigs attempting easy to mild trails. The factory running boards on the 4Runner hang low and can easily be damaged on the trail. I can’t count how many times my rock sliders have collided on boulders saving my rocker panels and body. They also protect your rig off the trail.
Rock sliders prevent door dings when you are crawling at the mall. Rock sliders are the armor that will take most of the hits when off-roading. From getting high-centered to having your kick out push you away from big boulders, rock sliders are lifesavers. This is usually one of the first mods I throw on any truck.
Trail Takeaway
I recommend upgrading to a set of steel rock sliders as one of the earlier mods on any overland rig. I run the C4 fabrication rock sliders and have those on all the 5th gen 4Runners I’ve owned plus my 2nd Gen Tacoma. I am a big fan of C4 Fabrication, Caleb (the owner), and his whole team. They have killer engineering behind all their products. The designs are awesome and the customer service is pretty solid as well. But as with everything, there are plenty of options out there.
Winch

If you have any intentions of rock crawling, wheeling through advanced terrain, or have plans on adventuring without any other rigs, you need a winch. If you go off-roading, it’s only a matter of time before you get stuck, especially in the snow. You have two options here; dig yourself out or use a winch.
Over the last few years of running a winch, I have managed to successfully self-recover my rig well over 10+ times. Without a winch, I would have been stuck by myself in the middle of nowhere ultimately putting my family and myself at risk. I remember my dad telling me when I was young that his winch was one of his go-to accessories. From pulling trees to lifting heavy items around the house and recovering your truck from being stuck, a good winch is always worth its weight (pun intended).
Trail Takeaway
I have run the Smittybilt X20 and used it at least 4-5 times a year. Whether that’s for wheeling or something else, the winch has come in handy many times. My girl actually ran over the wired remote on the trail during a recovery one time and it barely cracked. I also just got the new Smittybilt XRC Gen3 Winch mounted and it appears to be a pretty impressive unit as well.
Whether you go with Smittybilt, Warn, Comeup, or any other brand – I really encourage anyone on the trail to equip their rig with a winch. This is what I would consider “best practice”. Too many people on the trail these days head out unprepared, get stuck, and clog up the trail. Please do your research before you hit a trail and come prepared with either a winch or lots of good recovery gear.
Do not go off-roading if you are not prepared. Do not be “THAT GUY”!
Power
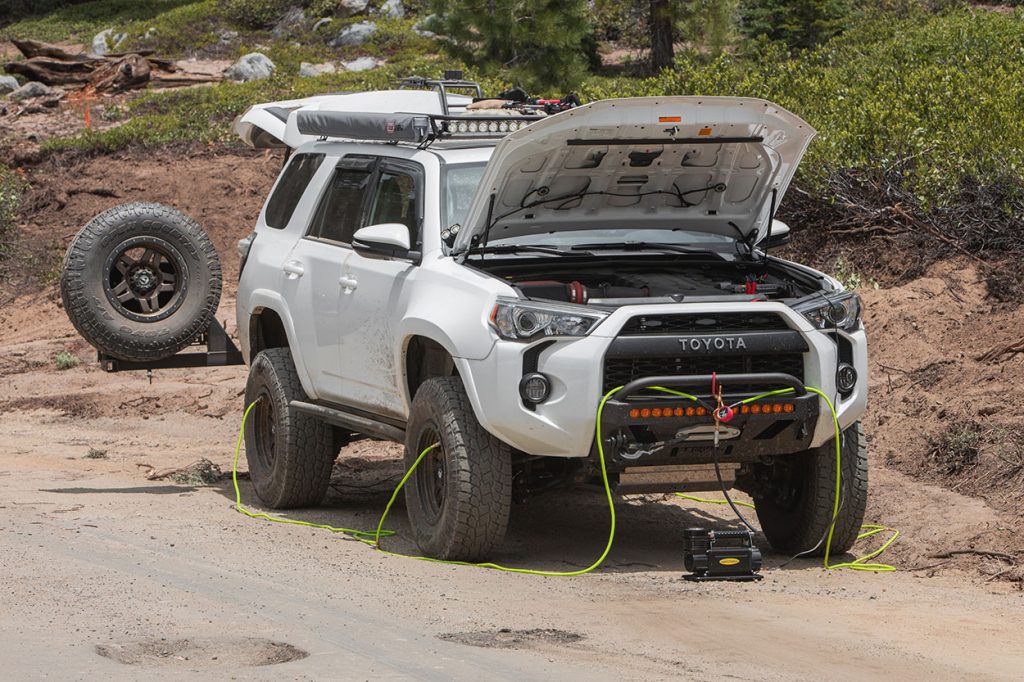
Having a reliable battery is important when you’re running lots of accessories. It’s also important if you’re camping in extremely cold conditions. Running an upgraded AGM battery with high-rated CCA (cold cranking amps) can be the difference of whether or not your battery starts in the morning after a cold night camping and powering gear. If you are building a rig, you typically need reliable power.
Trail Takeaway
I have run an Odyssey Group 31 and Group 34, along with a Northstar Group 27. I sold the Odyssey Group 31 because of the terminal placement and it was a little too heavy. I like the Odyssey Group 34 because it’s a drop-in battery (with the tray) and packs the needed power you would expect from an AGM. It’s powered the white 4Runner for four years now and still going strong. I recently charged it with the CTEK battery charger and maintainer to keep its constant voltage around 13v. The Northstar Group 27 is a bit heavy like the Group 31 but a direct drop-in battery. That has powered Jade’s accessories for a little over a year running the Pro6 M-Rack Lights, FLEX ERA 3s, WeBoost, Midland, and so much more. The Group 27 has been my favorite so far because it fits perfectly and offers the most power a simple drop-in can offer with correct terminal placement.
Switch

Switches and accessory trays mounted in the engine bay might be one of my favorite modifications because they keep wires organized. Switch panels and trays offer a user-friendly method for wiring lights and other powered accessories. Because most switch panels have relays and fuses’ built-in, you don’t need to wire harnesses with bulky relays and inline fuse leads.
Trail Takeaway
After running a Switch-Pros 9100 and a DIY switch panel that I built, I can firmly say this is one of the first mods I would add when building a truck, next to tires and rock sliders. The Switch-Pro is nice but pretty expensive ($500) for what it is. You can build switches for much cheaper ($100 plus parts).
Amazon has many pre-built control boxes with relays and fuses pre-wired. I ran one of these on Jade and it’s been kick-ass. My only regret is that it’s a 6-gang-switch, not an 8-gang switch. If I have learned one thing about building a truck it’s that they are a never-ending process so plan for your build to never end.
Even if you think “I am done” you aren’t. Most of us will never be “done”. Look at buying a switch with at least 8-switches and if you can afford it, look at the Switch-Pros RCR-Force 12 (12 switches). You might think 12 is overkill now but it’s better to have it and not need it than to need it and not have it.
Exterior Lighting

When the day turns into night, all you have is your accessory lights.
The factory headlights on the 4Runner provide minimal forward-facing lighting. That’s why most of us upgrade our headlights as one of the first mods we do. Next to upgraded headlights, you have off-road accessory lights. Often overdone and overhyped, off-road accessory lights are a controversial topic. You can easily get to the “that’s too much” phase where your build starts to gain lights… just because. I have wired just about every light imaginable; rock lights, ditch lights, scene lights, fog lights, reverse lights, and mounted lights in all the other places like roof racks, front bumpers, and much more. The options are endless for lighting.
Trail Takeaway
One of my favorite light modifications on the white build was the KC Cyclone rock lights because they are great for lighting up the campsite or working on/around your truck at night. My only suggestion would be to go amber here, not white as they are easier on the eyes and keep the bugs away.
Another favorite is the under-hood light kit which is also a cyclone kit by KC. I can’t count how many times I have flicked both the rock lights and under-hood lights on when working on or around the 4Runner. Next to those lights would be the forward-facing light bars and my ditch lights; FLEX duals on the A-pillar, a FLEX 30″ amber and FLEX 50″ white/amber.
These are all pretty kick-ass lights and provide an astronomical output, although they come with a hefty price tag. My advice here is that you probably don’t “need” a 50″ light bar for your build, but you already knew that. Go into the forward lighting game with headlights first and go from there. You don’t want to get caught up in the “light bars before lockers” slogan where you end up with a bunch of expensive lights and no drivetrain support.
Interior Lighting
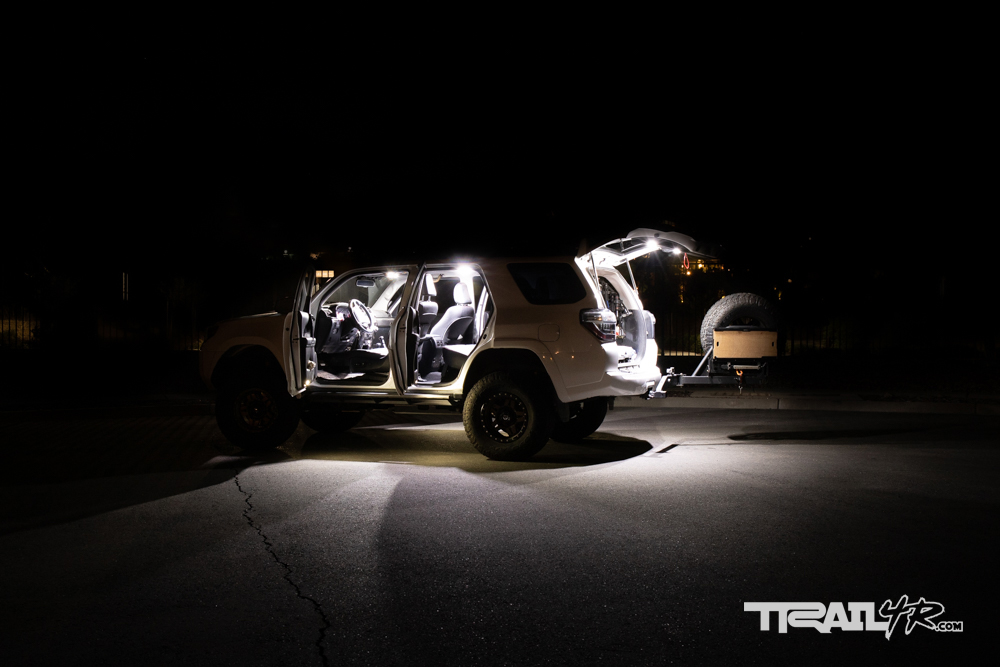
Adding interior lights to the 4Runner has been nice but not a “must-have” modification. Interior lights can be helpful for daily driving and around camp depending on which light setup you’re running. I have directly wired Baja dome lights in the cargo area, installed many brands of interior LED bulbs, and even swapped in new housings using the CTH interior LED light kit. Having aftermarket LED lights in the cabin is very helpful when it’s dark out especially considering the factory incandescent bulbs are pretty weak.
Trail Takeaway
There are plenty of options to consider for interior lighting. I would stick with higher-end brands like VLEDs and Xenon Depot as they are usually a bit higher-quality and carry a better warranty – compared to cheapo brands on Amazon. This section of your build is pretty straightforward.
Front Bumper
I wouldn’t necessarily consider a bumper a “must-have” but front bumpers may help increase your approach angle and can prevent severe trail damage to your body. You have the option of running steel or aluminum and each has its benefits. Steel is much stronger, doesn’t damage easily but it might rust over time. Aluminum offers lightweight characteristics but can’t withstand big hits. Aluminum can get beat up very fast with a few encounters on the rocks.
Trail Takeaway
Consider a low-profile bumper with the optional high clearance cut to save on weight. Additionally, if you want to avoid weight at all costs (which is very smart), consider adding a hidden winch mount system instead of a bumper. At the end of the day, a winch is the most important front-end mod you can do anyway and everything else is for the most part just extra weight. It really depends on how hard you intend on wheeling though. If you are looking to push it hard on technical trails, protect your 4Runner with a nice steel bumper, if it’s mild Overlanding you’re looking to do, skip the bumper and get a hidden-winch.
Rear Bumper or Tire Swing?

The debate between a full rear bumper and/or tire swing. What’s better? I don’t think one is really better than the other, it depends on your goals. To me, it comes down to weight vs. extreme protection. I decided to go with a tire swing out as opposed to a full-width steel bumper to save on the weight. I have been running the RIGd UltraSwing V01 for about 2 years now and it has taken me through all types of terrain. Full-width bumpers are great as they offer a ton of accessory mounting options, however so does the UltraSwing. If you take a look at the RIGd website, you will see that they offer a mounting solution for just about every off-road and Overland accessory you can imagine. The UltraSwing isn’t going to do much in the way of rear-end protection other than hard bottom out protection on the departure, however, I have pushed this thing through some technical trails and it has superseded my expectations in terms of clearance, and durability.
Trail Takeaway
If you are considering a full-width rear bumper it should be steel as aluminum doesn’t hold up well under large impacts. With that said, you better expect to wheel your truck extremely hard to warrant the weight. That’s about 300-400lbs in the rear (loaded with gear and accessories) so you should only install a rear bumper if you are expecting to slam your rear-end down on ledges and large rocks. If you plan on wheeling extremely hard, go with a steel bumper, if you plan on moderate-advanced technical trails, the RIGd UltraSwing or any other tire carrier should take you there and back – all with saving weight along the way.
Rooftop Tent
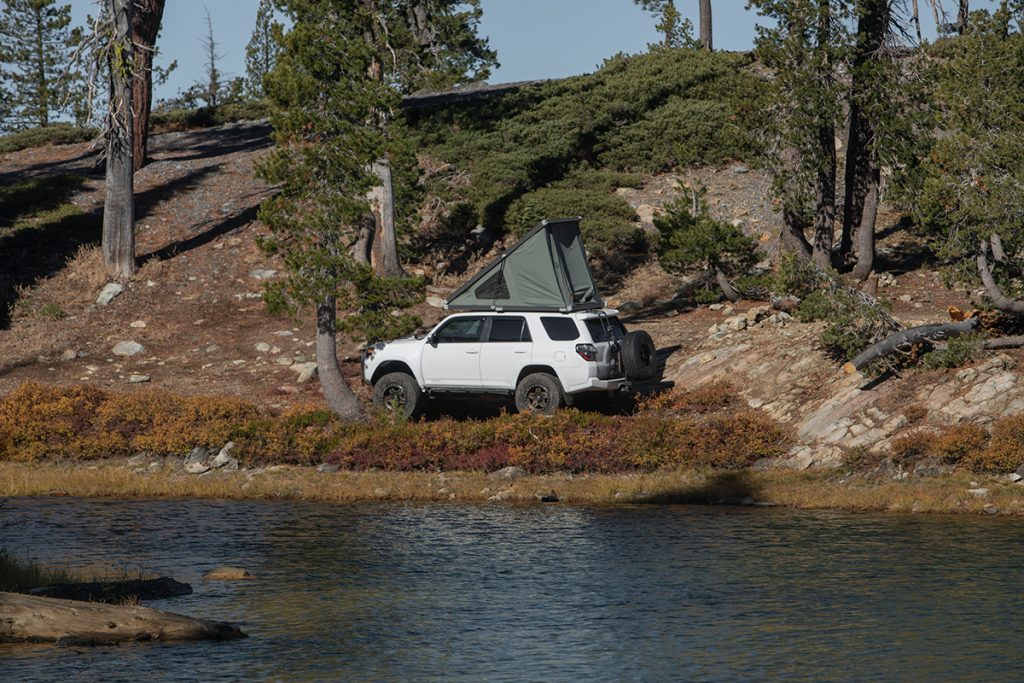
Ahh, the infamous rooftop tent. Now synonymous with the word “overlanding”. They make setting up camp a breeze, especially with something like the GFC. The GFC has been used about 5-6 times over 2 years and has been pretty impressive. I really like its ease of use and design. Rooftop tents allow you to set up camp quickly and move from location to location efficiently. The only downside to a tent is weight and possibly fitment inside your garage. Depending on how often you plan on camping will depend on the type and style you buy.
Trail Takeaway
There are many brands out there to choose from. From high-end brands like GFC, James Bourroud, and the AutoHome to more affordable tents like Smittybilt, Body Armor, and Roofnest, there sure are lots of options to choose from. Before you jump into any tent, it’s important to know that each tent has unique design specs, mounting specs, and elements that set it apart. A great resource when shopping for rooftop tents is the Spirit of 1876. They are incredibly knowledgeable when it comes to many brands of RTTs.
Roof Rack

Once again, we keep adding the potential for more weight. Roof racks can be a lifesaver on one hand or overtake your build with added weight on another. Roof racks are great if you rely on them for the occasional luggage, storage box carrier along with carrying your recovery boards, Hi-Lift Jack, and other large recovery essentials. I ran a full-length aluminum roof rack and mounted many accessories over the years, some permanent and some temporary. My advice would be to avoid permanently mounting anything to your roof rack for weight and theft purposes; recovery boards, jacks, water storage, storage boxes, awning, RTT, etc.
Trail Takeaway
If you must have a full-length or even 3/4 rack, I would consider going with a CNC-style roof rack (50lbs) over a Gobi-style roof rack (70lbs) as you can shed a few lbs. Before spending the money for a rack, consider what accessories you want to run and if you are going to run an RTT or not. Some roof racks work great with all accessories and some do not. For example, some racks make it difficult to mount awnings, and rooftop tents while some design brackets just for these items. You really need to do some deep research on which rack is compatible with the tent, awning, and accessories you plan on running. And, don’t always take the website’s word for it, find someone running the tent, rack, awning, or accessory on Trail4Runner, a forum, or social and ask them about how they mounted it. CNC racks are growing in popularity because they are light, and offer lots of universal accessory mounts but again, do your research before you fully commit.
Performance

We really need all the performance mods we can get but that doesn’t mean you should buy a supercharger out of the gates. I flew down to Ventura, met with the team at Magnuson and test drove the supercharged 4Runner when they first released it. And although it was a huge performance boost over stock, I didn’t feel like the price justified the HP gains. I would rather put that budget towards locking and re-gearing both differentials. But…. if I had an extra $6k lying around, I would definitely buy a supercharger.
Trail Takeaway
If the budget permits then by all means buy a supercharger. If not, stick with the everyday performance mods; exhaust, intake, coil packs, headers, etc. These are going to offer very little actual RWHP (rear wheel horsepower) but may enhance your driving experience which might be enough for your specific style of driving. And for what it’s worth, the Pedal Commander or Sprint Booster are both pretty cool options for reducing that pedal lag. Even though they don’t offer actual HP gains, they are still worth the spend.
Gears and lockers > Supercharger.
Recovery Gear & EDC
This is one area you can’t skimp on. Whether you are running 31″ all terrains or 35″ mud terrains, you need good recovery gear. Over the years I have run high-quality recovery gear along with some random one-off Amazon-branded recovery gear essentials. They have all paid for themselves and some. If you can afford it, spend money on high-quality stuff as the WLL (working load limit) and breaking strength is likely much higher than the private label brands on Amazon or eBay.
Trail Takeaway
You don’t need every piece of recovery gear out there but you should be prepared. Being unprepared and getting yourself stuck is what causes problems on the trail. Well over half the trucks that get stuck on the trail are inexperienced and unprepared vehicles, both from a technical driving perspective along with the driver lacking the proper gear.
If you are going to explore any trail but you haven’t been on before, expect the unexpected. Every off-road build or even mild overland-focused daily driver should carry the common off-road and overland essentials or be equipped with at least the following; properly rated recovery points, snatch strap, soft or hard shackles, tree saver strap, winch extension strap, and most importantly a winch.
If you can’t afford a winch, please carry the other items with you. Please do not go off-road unless you are mentally and physically prepared to get stuck… because eventually, you will.
Camp Kitchen, Refrigerators, and Food Storage

There are plenty of options offered for the weekend warrior or the extended overland traveler. From fully-equipped teardrop trailers and drawer systems to creative camp kitchens such as the Nomad Kitchen – the choices are endless. We have been running the RIGd Ultra Swing with a dropdown stove table, Front Runner storage boxes, a Truck Vault drawer system, and on top of that, we have run a few types of refrigerators. For our style of travel, it’s done very well. If you spend more than a week out or want something more efficient, you may want to invest in something a little more “kitchen-focused” like the Goose Gear Kitchen and Drawer System.
Trail Takeaway
I have found that not every trip warrants a refrigerator and that refrigerators, in general, take up a lot of space. Instead of looking at a full-size fridge, consider a drawer-style refrigerator. They weigh less and take up less space than full size and maximizing space and keeping the weight low are my two main goals when building an overland rig. I have run three different refrigerators; two private label brands, like this one and a Dometic. The Dometic is by far the nicest and has the most features, but it comes with a high price. If you have the money, buy the Dometic. Dometic was at one point manufacturing ARB refrigerators along with many other popular brands on the market. If you are conscious of the price, then consider other budget-friendly overland refrigerator options, even though they don’t pack all the bells and whistles, they still get the job done.
Final Thoughts

Weight is the enemy.
If you take one thing away from this post, it’s that you don’t need everything on this list and avoid extra weight at all costs.
Great tires, rock sliders, a winch, and great recovery gear are definitely on my “must-have” list. Looking back, if I were to avoid anything it would fiberglass fenders and retrofitting my headlights. These are two mods that I would strongly recommend either hiring a professional to do or just avoiding them in general. I say avoid them because they are just a lot of work.
If you are looking to build out an overland rig, first decide whether or not it’s your daily driver. If it’s your daily driver, try to avoid adding large tires and heavy mods such as drawer systems, rooftop tents, and steel armor accessories. If your intentions are to only use your 4Runner as a trail-focused or overland-focused rig, you still need to weigh the pros and cons of added weight but you can always go a little harder on steel armor and bigger tires.
If you got this far, this white 4Runner is for sale as we have three other builds going right now and not enough garage space to store this one. I would love to keep this rig but it has to go. It’s sitting on 50K miles, regeared, locked F/R, 35″ tires, Fiberglass, GFC, TruckVault Drawers, and so much more. It’s really nice. Contact me if you want to buy it – serious emails only.
No one hear is looking to long travel a 4runner. KDSS should be encouraged as it is superior to non KDSS, but you make it sound otherwise. It increases wheel travel, NOT decreases it for anyone stock to a modest lift.
What a great writeup from years of experience. thank you! Such a great read
weird question but how did u put the widebody on the 4runner? where do you ,ook to buy the widebody?
Those are fiberglass fenders: https://trail4runner.com/2019/05/18/adv-fiberglass-fenders-5th-gen-4runner/
I am in the process of buying a new 4Runner that I would like to build for overlanding and I was hoping you could provide some input prior to purchase. I was pretty much set on buying a TRD Pro, but the more research I do I am thinking the TRD Pro is probably a waste of money if I plan to do new suspension, wheels, and tires. Do you agree with this thought? I am now leaning towards a TRD Off Road Premium and now need to decide w/ or w/o KDSS? What are your thoughts on this decision?
Amazing that you’ve had KDSS equipped 4runner for 6 years yet you don’t know what KDSS does, and you’re actually giving wrong info/advice to potential buyers.
Paul, please re-read that section as I detailed this one out for you and others potentially looking to buy a rig. It’s great advice from someone who has had multiple 4″ lift kits on two KDSS rigs. Not sure how much experience you have with KDSS but after 8 years now of experience with two KDSS rigs, I can comfortably say KDSS absolutely limits wheel travel – especially on the passenger side! That is a fact. There is no arguing with that statement AT ALL. I have seen it happen many times on the trail where my passenger front and passenger rear just don’t droop as far as their counterpart. It’s not just me, I talk to many friends with KDSS that face the same situation. Not sure where you are getting your information from? Maybe the Toyota brochure that says “KDSS is great for offroad”? To some extent, Toyota is correct in their quote for stock rigs that see mild fire roads and moderate wheeling. Yeah KDSS is great but it’s not built for mid-travel or even long-travel suspension systems. For the guys who actually wheel and install 2.5″ + lift kits – it actually prevents wheel travel… again even more so on the passenger side due to the fixed link on the KDSS hydraulic sytem. Is KDSS still great offroad? YES. Does it limit wheel travel on the passenger side? YES.
Not sure what point you’re trying to make other than just being rude. Maybe re-read that section again on KDSS and let me know exactly what point you’re trying to make here. Thanks,
this is where you sound like an idiot, “For the guys who actually wheel and install 2.5″ + lift kits – “. Those are the fools, 2” is all you need to provide max wheel articulation without turning your truck into a one purpose off roader. Your saying anyone else doesnt “actually wheel”…lol
Brenan,
Thank you again for all the information you provide; especially for those of us new to the 4runner platform. I run the ICON Stage 7 on my 2020 TRD ORP w/KDSS adding the 3″ springs in the rear for the added “kitchen and RTT” weight and find that my front, even when dialed up on the CDCV stull tuck and rub up front.
How much is too much when dialing in the front coil over? ORW says it’s at a nominal lift position but I’d like to raise the front a tad more. Can the front be adjusted to raise the lift or should I invest in spacers? The front to rear rake is definitely noticeable and I’d like to minimize and open the front wheel opening a bit for better clearance when I tuck.
Thanks again for all the info; a solid cornucopia and wealth of knowledge!
Mark
Brenan;
I had $7K laying around and had my local Toyota dealer (they do side custom work) install the Magnuson supercharger and it was worth the money!, The hidden winch front bumper what was the cost and can you provide me the name of the parts that you purchased I like that look thanks
Great article BTW
Jeff Pattek
This is the C4 Fabrication LoPro Bumper.
Great article! I’m a mom with an SR5 I’m throwing on some 33” Toyo mud terrains. I love that Off-road look but obviously don’t got off-roading hahaha after reading this I have a better idea on what to do and not do. I love a full equipped beastie looking 4runner but I didn’t think about the weight 😳 I still want the roof rack and ladder. Do you think that will add a lot of weight? What do you recommend? Looking more for occasional use and more for style. Can’t wait till it’s done! You’re right about the tires alone making a huge difference.
A rack and ladder won’t make that much of a difference in terms of weight and performance. You are talking about 50-80lbs right there. It’s when you start adding heavy items like a rear bumper (300lbs+), a tire swing with a tire (150lbs+), front bumpers loaded with lights, rooftop tents that weigh 150lbs+, 35″ tires are also heavy, etc. You will be fine with a few lightweight aluminum modifications here and there.
Awesome thank you!
Great article. A wealth of information!
Can you comment on the lift height for this white 4Runner? Considering TRD Off Road model and understand there are limits to the lift on ones with KDSS. Love how yours looks. And any thoughts on whether KDSS is even necessary for a weekend warrior.
It’s actually sitting at 4.5″ of lift but because of all the weight, it sits lower. KDSS is great for a daily driver, and weekend warrior for sure. It’s a great system for someone who doesn’t wheel very hard.
Love your front bumper and light kit installed on it. Can you provide manufacturer and model for both. This forum is awesome.
This is all KC stuff on Brenans rig here. Early model FLEX lights. They are coming out with new FLEX lights soon. The bumper is the C4 Fabrication LoPro. Yeah I found this forum/blog last year. Love it.
BG,
Great read man and better site. Appreciate checking in and seeing this as I start my 4Runner’s journey!
Awesome, thanks for reading man! Thank you for the kind words, dude! Cheers,
Thanks for not only taking the time to chronicle all of this information, but for all you have done to create and maintain the best 4Runner resource online. I’ve learned so much from these articles/reviews and have been able to make wise purchases based off of your information. Thanks, B!
Brad, man thank you!!! I super appreciate that. It wouldn’t be possible without our entire team of writers and comments like this. Thank you man!
What works on the rock roads of Colorado:
Real rock rails
Real skids
AT or MT tires
Solid suspension lift
What doesn’t:
Body lifts
Overly large tires
Heavy stuff up high that raises the center of gravity
Great write up and thanks for the honest thoughts!
Thanks dude!
Where was this 2 years ago!! Kidding, Great article Brenan and a great resource for those just starting out. Thanks!
Haha, I know. It’s been in the works for a while now!
Great article! Cheers!
Great article Brenan. I have a 2011 4Runner with KDSS and I agree that it does improve on-road handling (less body roll), but the whole point of it is that it disconnects the swaybar below 12 mph so that you can get increased wheel travel. I get between 1.5 and 2 inches of extra articulation in the front and rear when compared to a non-KDSS 4Runner with stock swaybars. Some people don’t like it because it limits you to about a 3-inch lift and because it adds to the complexity of the suspension, but I find that it works really well.
That’s the first I am hearing someone say KDSS gets more articulation than non-KDSS. Where does Toyota mention this 12mph disconnecting sway bar verbiage? KDSS is actually a series of hydraulic lines interconnected at one fixed point and one hydraulic ram. The fixed point does not disconnect and neither does the hydraulic ram. I searched the web and was unable to find any definitive information on this disconnecting topic you speak of. That KDSS fixed point actually limits down-travel on the passenger side both front and rear. Can you help me understand exactly where you got this information on increased articulation and the disconnecting sway bar? Thanks!
Here are some more videos that explain how KDSS works. Although it is great at improving on-road handling, it was specifically designed to also improve off-road articulation. It is very different from the X-REAS suspension.
Toyota Land Cruiser 150 – KDSS (Kinetic Dynamic Suspension System)https://www.youtube.com/watch?v=NLF6n3nMwww
Toyota Kinetic Dynamic Suspension System (KDSS)https://www.youtube.com/watch?v=bb7B6h_CNyU
It never actually disconnects, but the valve between the front and rear hydraulic cylinders opens up below 12.5 mph and allows free flow of hydraulic fluid between them. If the left front wheel is compressed upwards, it allow the hydraulic cylinder in the left rear to extend downwards, effectively disconnecting the swaybar. This is easy to see by just running your vehicle up on ramps located under the right front and left rear. KDSS was designed to reduce body roll on-road while also allowing for increased articulation off-road.
This video from Toyota USA explains it pretty well.
How Does Toyota’s Suspension System Work? Great for Off-Roading and On-Roading | Toyotahttps://www.youtube.com/watch?v=SkPCvB7WY5Y
Greate Article Brenan, No mention of Skid plates. How necessary is this mod for the weekender off grid camping lite wheeler? Thx
I run Budbuilt 3/16″ stainless skids front to back. They’re worth the weight.
/2006 4Runner
Yeah that’s a section that I should have included. I’ll go back and add that. Skid plates really depend on your intended trails. Steel Vs. Aluminum is a big topic and what you intend attempting is important as well. I like the transmission, t-case, and gas tank skid over engine skids because that’s where I have high-centered the most. Engine skids more or less protect the radiator – that’s it. Yeah they look cool but other skids like the gas tank skid and even the diff skid are much more functional. I’ll go back and speak on this section. Sorry I missed this one.
Great article Brenan. Super helpful information, as I’m in the early stages of building. When you added a locker to the front diff, did you upgrade other components of the drivetrain (CV axles, etc.) or was the front end strong enough to run on stock drivetrain components with the locker?
I added the gears/locker at the same time – no other upgrades to the drivetrain. If I were to continue with this build, I would look further into LT & extended RCV axles, or at minimum, no LT and stock length chromoly CV axles. I don’t think our CVs or tie rods are strong enough to support that of the bigger tires and a locked front differential that we all commonly add. The risk of snapping or breaking either comes with the price of wanting a locked front diff and bigger tires. If the budget permits, I would recommend upgrading the CVs all day. I think someone also needs to offer a bigger steering rack swap kit for us and larger diameter tie rods. The steering is the weakest point in my opinion. Locked front diffs demand the need for stronger CVs for sure but bigger tires and turning hard off ledges and rocks can snap our weak tie rods as well. To answer your question, no it’s not strong enough and other parts need to be added to fully support the strength of a locked front diff. You really need to be careful when locking the front. Things can break quicker if parts aren’t backed by larger – more compatible drivetrain components.
I was going to run a locker in the front, but my shop (SDHQ, awesome shop) told me, in much more intelligent and descriptive terms, that the front end components are not strong enough stock to handle the demands of locking the differential. Rear is fine, but front end stock is not.
My front locker is great for plowing through deep (2’+) snow and snowplow piles. Otherwise, it’s only needed when it’s really needed.
Agree. 100%
To clarify a bit, it’s not like it’ll break front end components right away. Rather, it’s will decrease the lifespan of the components much quicker. Think of it like upgrading the 4runner tires from 31 to 33. The extra wear and tear is there, but it is somewhat minimal. Going further to 35 puts a lot more stress into the components, especially compared to the smaller relative increase in diameter. Further going to 37 (let’s say it was possible while keeping moving geometry stock) would further decrease lifespan much much more.
I’ve had prior trucks with a locked front. In just about every case (maybe all, I can’t remember), I could have gotten through the obstacle with more careful line selection, or using my winch. Yeah, those may take a bit more time, but imagine how much time a broken diff or steering component would take to deal with on the trail. It won’t exactly be the easiest terrain to do a trail repair on if you have to use the locker.
running the usual 285/70r17 setup and was putting off a re-gear until I run these tires down and go to a true 33″…you mention the 4.56 ratio being ideal for a 33″ such as the 295/70r17, would you say the jump to a 4.88 ratio occurs at the 285/75r17 (33.8″) size and up? In your review of the cooper’s I know you mentioned 295/70 being your fav tire size on the 4runner and its prob the route i’m leaning when I do go bigger, think it makes sense to just bite the bullet and regear to 4.56 now with my 285/70s?
I’m running 33″ KO2’s with 4.88. This was recommended to me by Nitro Gears. I have daily driven it for a couple years with the 4.88 and I love it!
Man, that’s a great question. Many outcomes here depending on exact size and ratio. There is a really good chart on this website for tire size and gear ratios that point out the difference in RPMs from stock. It’s really up to you and dependent on your intended drivability. The 295/70 tire size can go either way; 4.88s or 4.56, it really depends on your driving style. If you have a daily driver and off-road occasionally (95% on-road and 5% off-road) then maybe go 4.56 gears. If you go off-road more often or you find yourself in the mountains driving up lots of hills where you need lots of torque then maybe go with the 4.88s. The higher numerical number (4.88) the less stress you put on your drivetrain and the more torque you get but you may be limited to a lower “top speed” on the freeway. With the lower numerical number (4.56) you will see better MPGs and faster speeds with fewer RPMs but you wouldn’t have the low-end torque control for rock-crawling. Really up to you but if I was a betting man, I would bet that most late-model 4Runners are daily drivers so the 4.56s are likely the better “on paper” answer.
Going into buying and building right now. This is helpful. Thanks for stressing the weight. And I didn’t know re-gearing was so important. This really helps. Thank you so much dude. Bookmarked and will reference again.
Yeah Chase, these builds can add up fast. Try to keep them light – especially if it’s your daily driver. And re-gearing is super important. A must for bigger tires.