
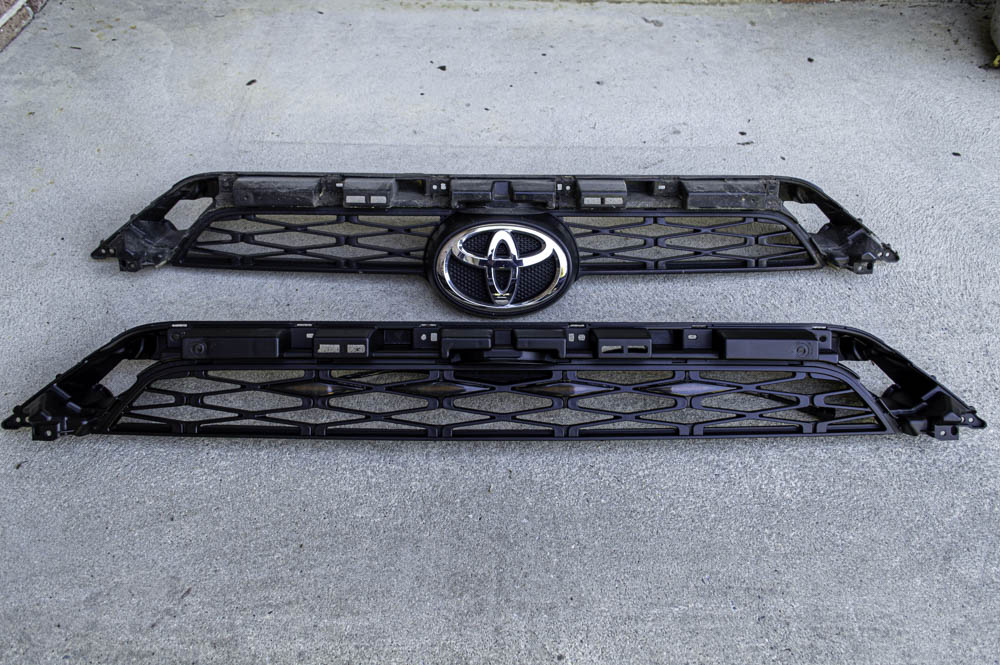
A new front grill can make a huge difference in the appearance of a vehicle. Adding a TRD Pro style grill is pretty common among 4Runner owners and I think it really gives the front end a more aggressive look.
Although there are many different companies that offer pro-style grills, I would highly recommend choosing Toyota Pro Shop. They sell a quality pro grill for a great price that is quick and easy to install. They also carry a few different raptor light kits that will really set your 4Runner apart from those with a stock front end.
Find It Online:
- TRD Pro Grille: Check Price
- Molded Raptor Lights: Check Price
Tools & Materials:
- Clip Removal Tool: Check Price
- Plastic Pry Tools: Check Price
- 10 mm Socket Wrench
- Phillips Head Screwdriver
- Painter’s Tape
- Fuse Puller or Pliers
- Wire Cutter
- Crimpers/Pliers
- 16-14 Gauge Ring Terminal
Table Of Contents
Step 1. Remove Radiator Cover

First things first, the stock grill has to go. Open the hood and remove the radiator cover.
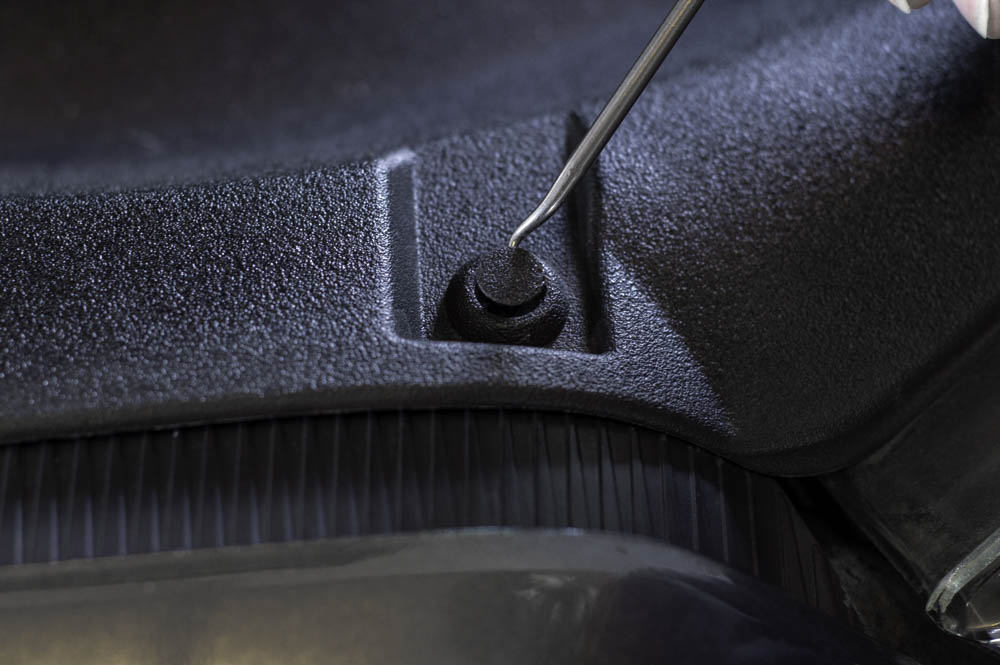
It is held on by 13 clips, as noted in the picture above. Using a trim pick or actual plastic clip removal tools, lift up the center of the clip and it should pull right out.
Step 2. Remove Top Portion of Grill
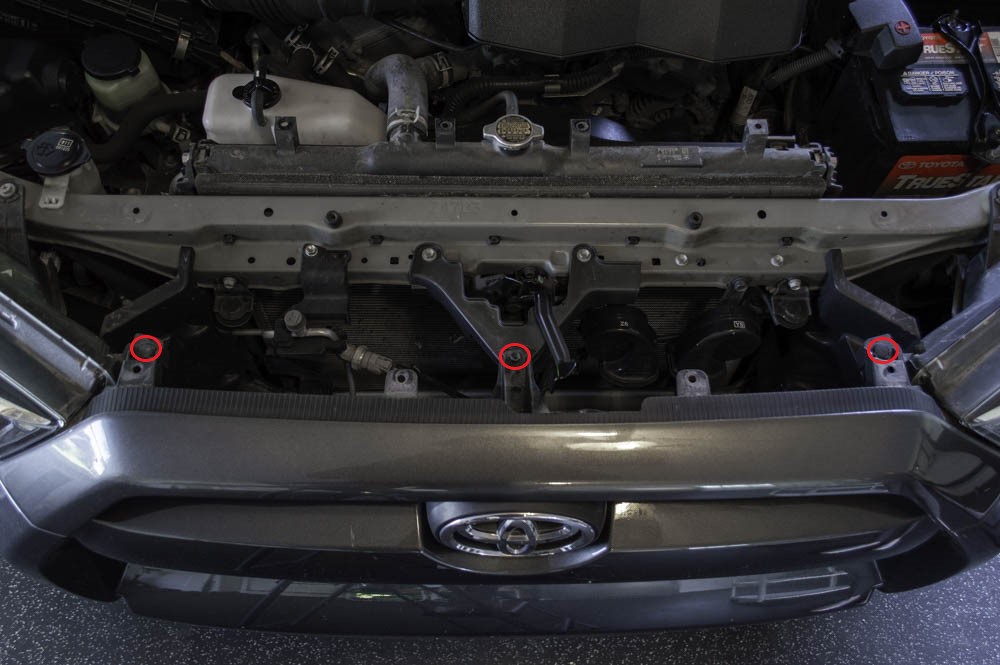
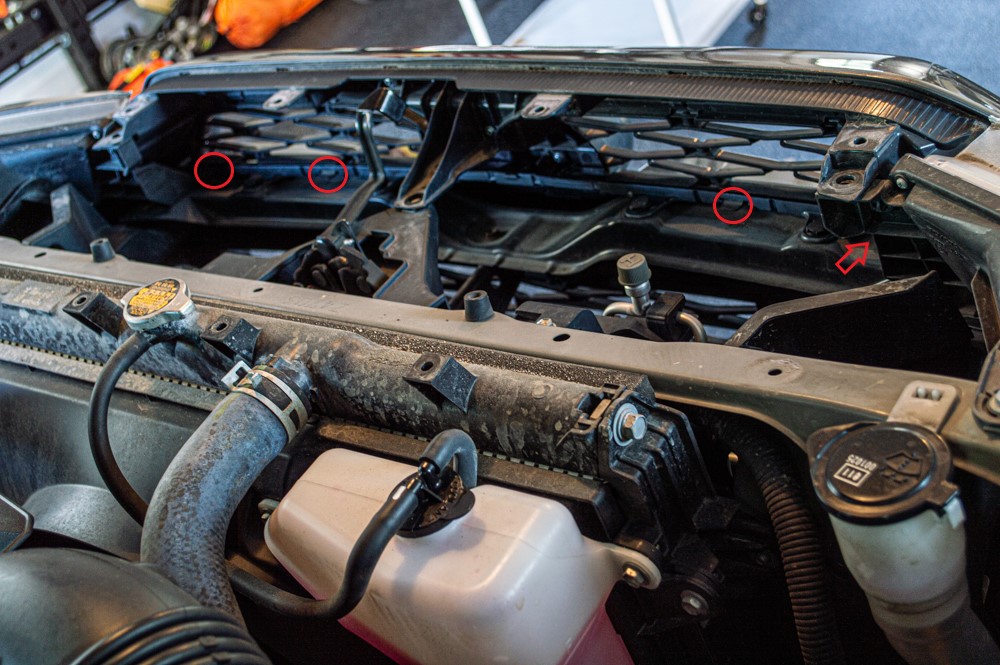
The top portion of the grill is connected with one 10 mm bolt, two removable clips, and four tabs. In the picture above, you can see the location of the removable clips and the 10 mm bolt. In the photo below, you can see where the release tabs are located.
If you’re doing this solo, it’s easiest to lean over the grill and release the tabs as you pull the top portion of the grill towards your body.
If you have someone to help, one of you can apply pressure away from the vehicle as the other is lifting up on the release tabs.
Step 3. Remove Top Grill Mesh
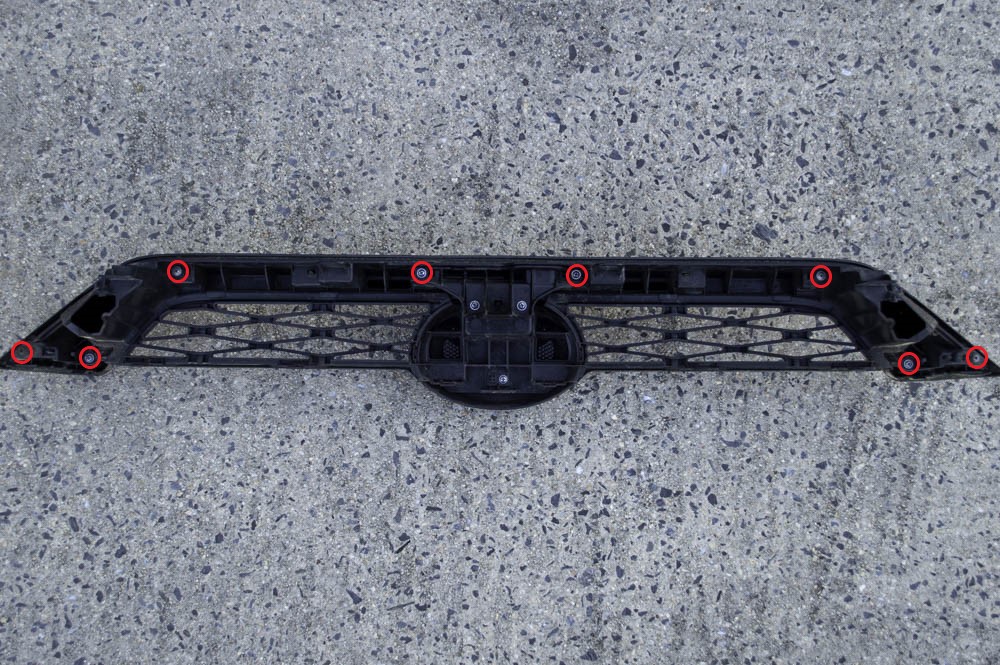
There are 8 screws holding the grill mesh on the top bar of the grill. Remove these with a Phillips head screwdriver.
In order to keep your paint finish free of scratches, make sure to set the grill mesh and top bar on a soft surface while you remove the screws. Set aside the top bar of the grill while you complete Step 4.
Step 4. Prepare New Grill Mesh
I chose the 4-piece smoked amber raptor light kit to go along with the pro grill. This kit from Toyota Pro Shop is as close to plug and play as you can get.
First, you will need to figure out how you want your lights oriented as this can be customized in several different ways. I chose to do all four in a row with no spacing on the top row.
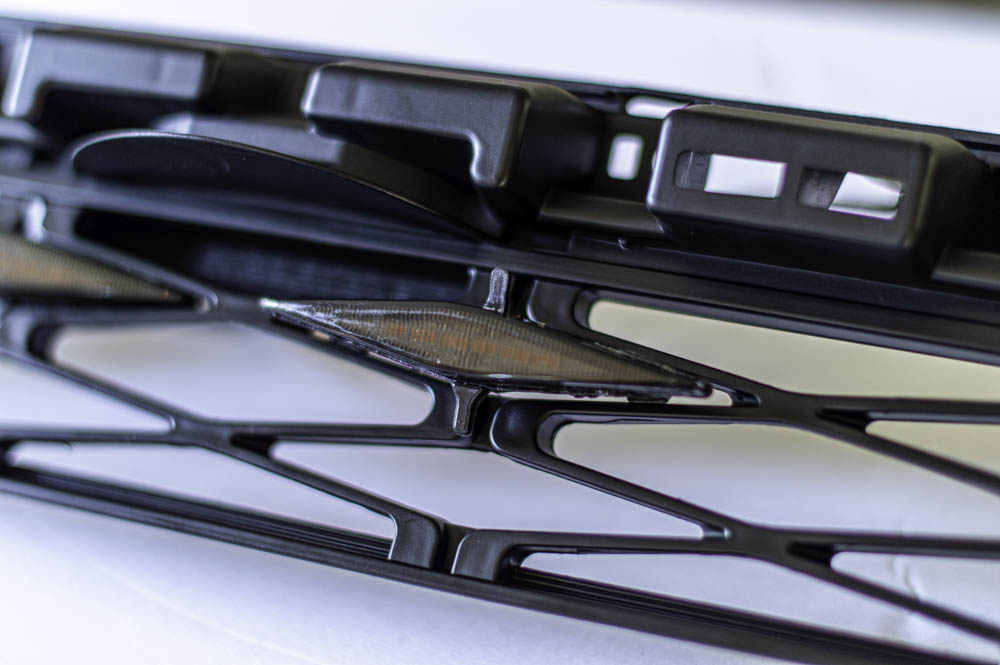
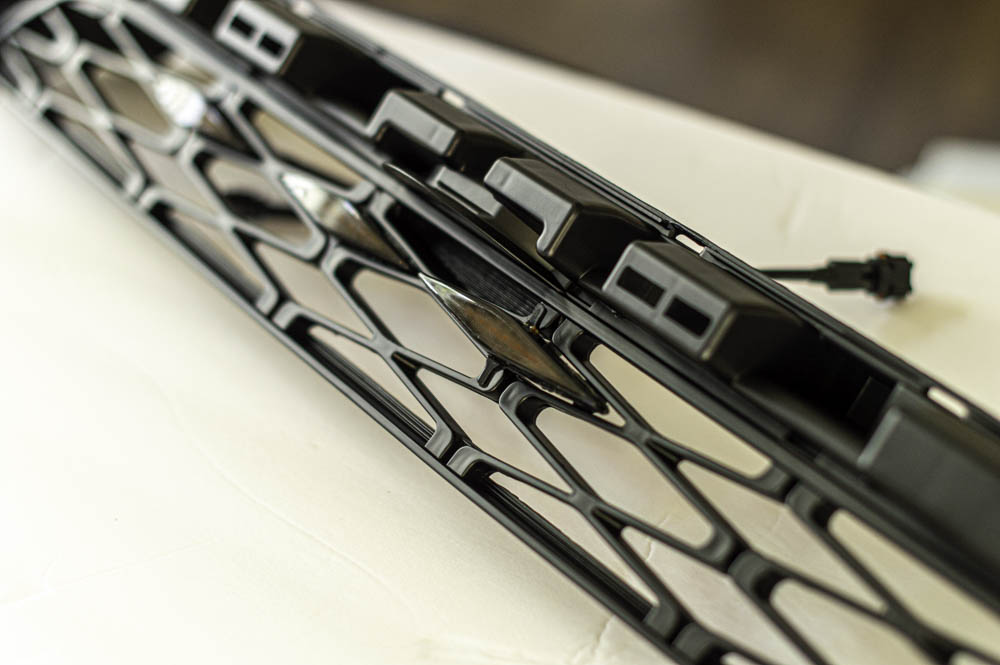
Second, feed the wire through the grill portion where the light will be attached, line up the light and the pegs as you can see in the photo above, and push it into place. The lights should securely click into place thanks to the clips built onto the back. Continue this process for all lights that you have to install.
Step 5. Install New Grill Mesh
Take your new top grill mesh and fasten it to the top bar of the grill using the same 8 screws that you removed from the old grill mesh in Step 3. Again, make sure to put down a cloth or towel under the grill bar so you don’t scratch any paint while screwing it back together.
Repeat Step 2 in reverse order to re-install the top assembly. Push the whole assembly back onto the front of the 4Runner and ensure the four tabs latch back into place. Then reinstall the two clips on either end. You won’t need the 10 mm bolt anymore.
Step 6. Assemble Mid Bar Cover
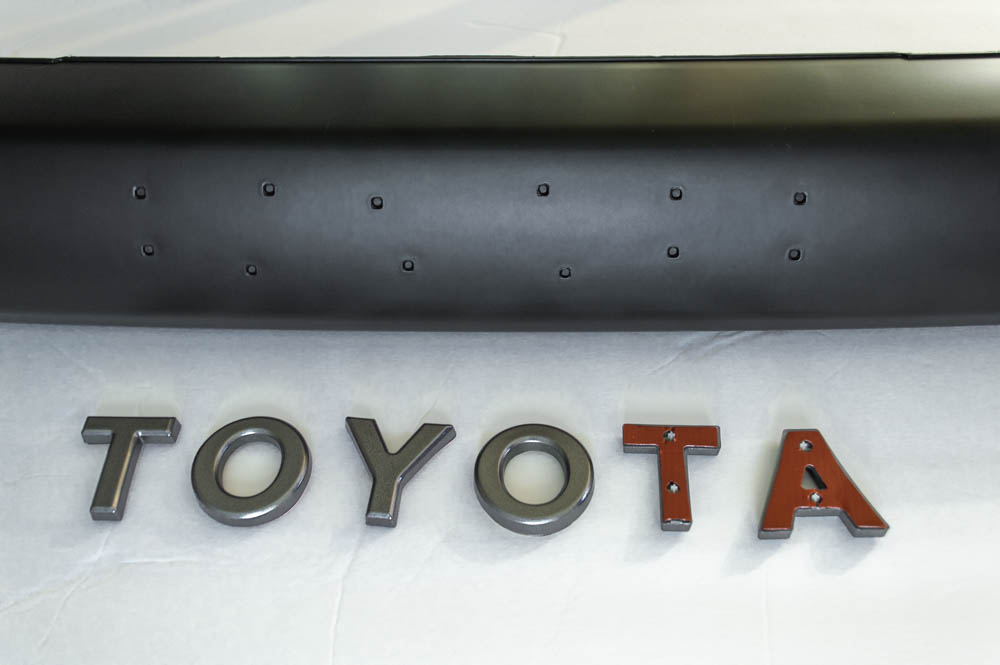
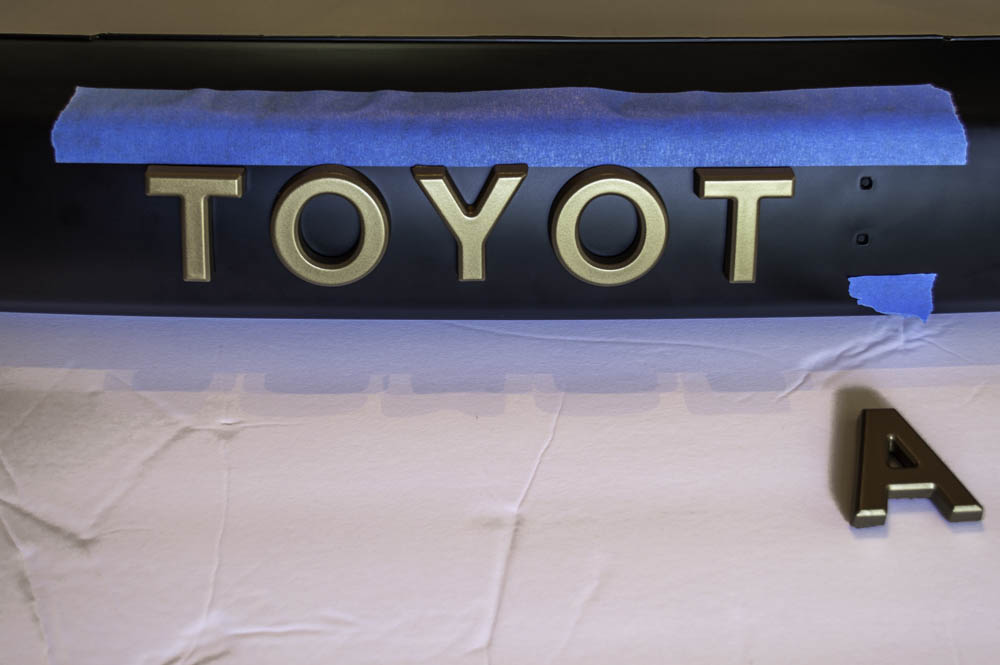
The middle bar of the grill will be covered with the new black plastic piece. The letters for this piece come separately, so you will have to install them yourself. Luckily there are indentations on the plastic cover and pegs on the letters to help align them.
The most challenging part of assembling the mid bar cover is the wiggle room between the pegs and indentations. I recommend using some painter’s tape to keep your letters on the same line while installing, as shown in the photo below.
Bonus Feature: Since the letters come separate, you have the ability to customize them before installation. If you really want an accent color on your vehicle, now is the time to make it your own! The vision I have for our 4Runner includes gold/bronze accents, so I painted my letters before installing them.
Step 7. Install Mid Bar Cover
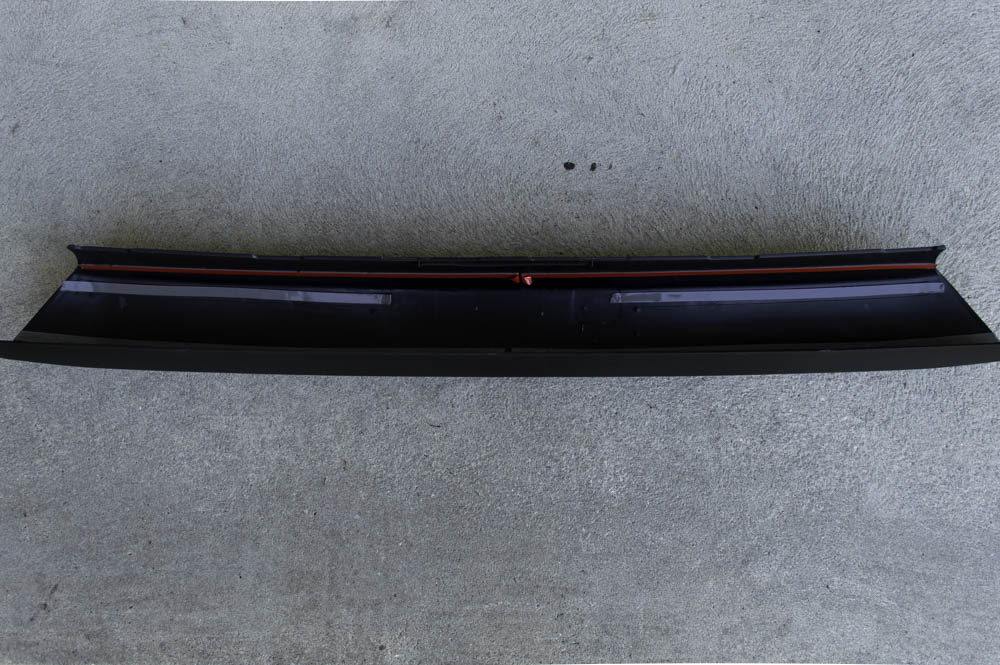
The mid bar cover is affixed to the existing bar by several pieces of double-sided adhesive foam strips. You can see in the picture above there is red protective tape over the adhesive that needs to be removed before installation.
This is where I would highly recommend getting a second set of hands. The new cover fits very snug over the existing bar. I tried to install it on my own, but it got stuck halfway on because the adhesive strips made contact. Luckily it’s not a once and done adhesive, but I did have to reposition them after I pulled it off. The cover has some flexibility, so with two people you can get the bottom of the cover in place under the bar and have four hands pull up on the top of the cover. This will allow enough space to keep the adhesive strips from sticking before the cover is fully in place.
I would also recommend using some painter’s tape to mark the midpoint of the existing bar and the new cover so that you can keep it perfectly centered while sliding it on.
Step 8. Set Up Wiring
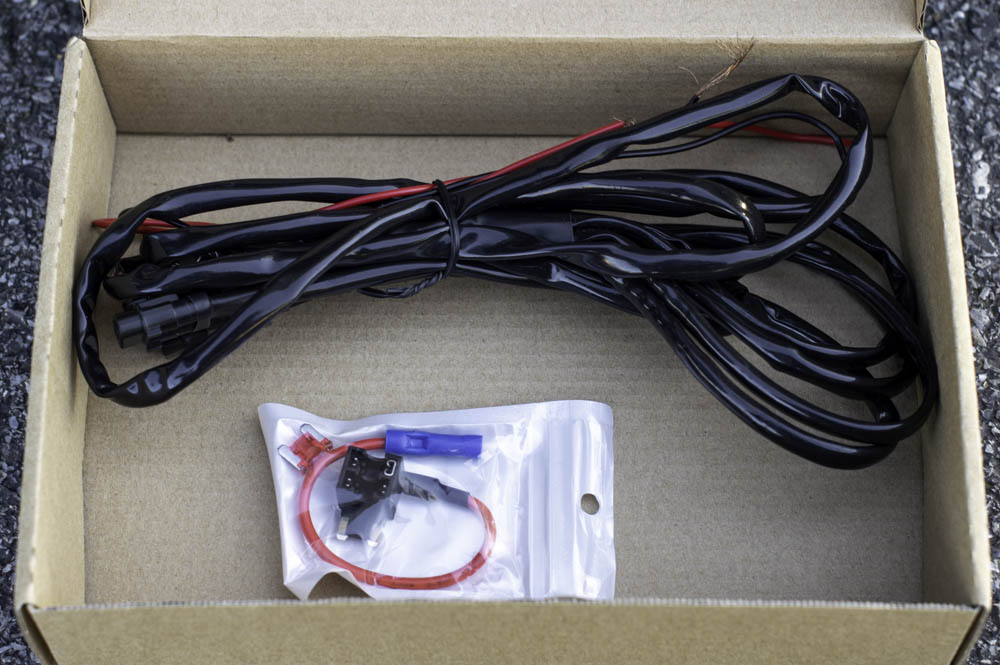
This kit comes with an add-a-fuse to plug in the lights. One end of the wiring is already wired up to plug into the raptor lights, while the other end has the red (hot) and black (neutral/ground) wires. You will need to leave enough of the red copper wire exposed, approximately ½”, and insert it into the blue crimp connector on the add-a-fuse.
If you have crimpers, use them to close the crimp connector, otherwise, a set of pliers will do. Make sure to give your wire a slight tug to make sure the crimp is holding the wire.
Do the same thing with the black wire, leaving about ½” of exposed wire, and insert into the ring terminal. Make sure you can see some of the wire out towards the opening of the ring. Crimp the connection closed and give a slight tug again to ensure it is secure.
Finally, add the provided fuse into either one of the slots on the add-a-fuse.
Step 9. Connect Raptor Light Wiring
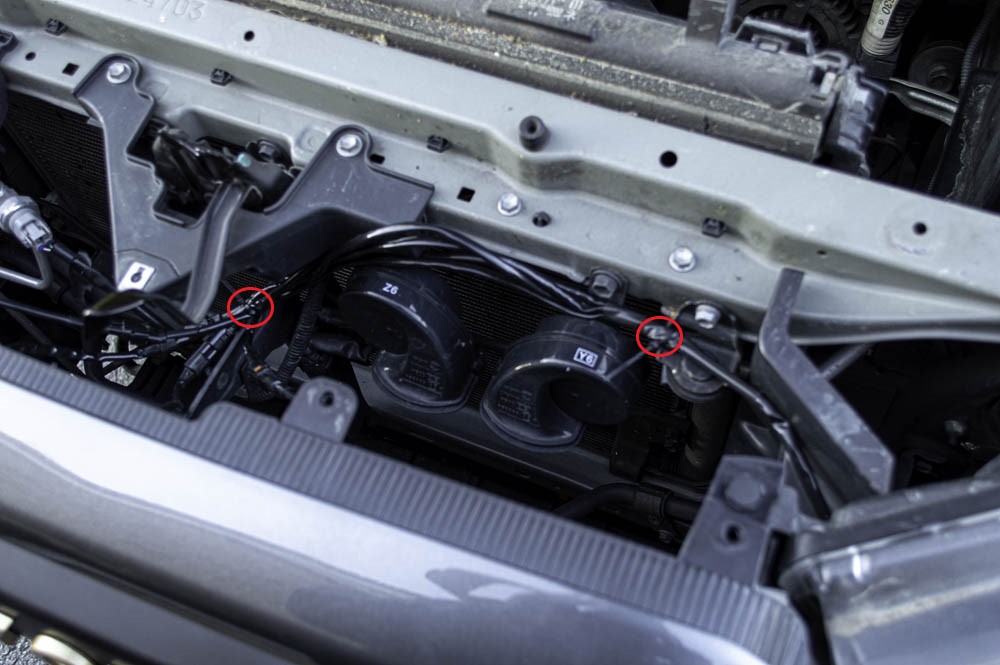
Start by plugging the lights into the wiring harness. Once they’re all connected, feed your wires through to the right side of the engine bay to your fuse box. I like to keep my wires neat, tidy, and as tucked away as possible.
As I fed my wires along with the frame, I used a couple of zip ties to keep it secure and out of the way.
Step 10. Wire into Fusebox
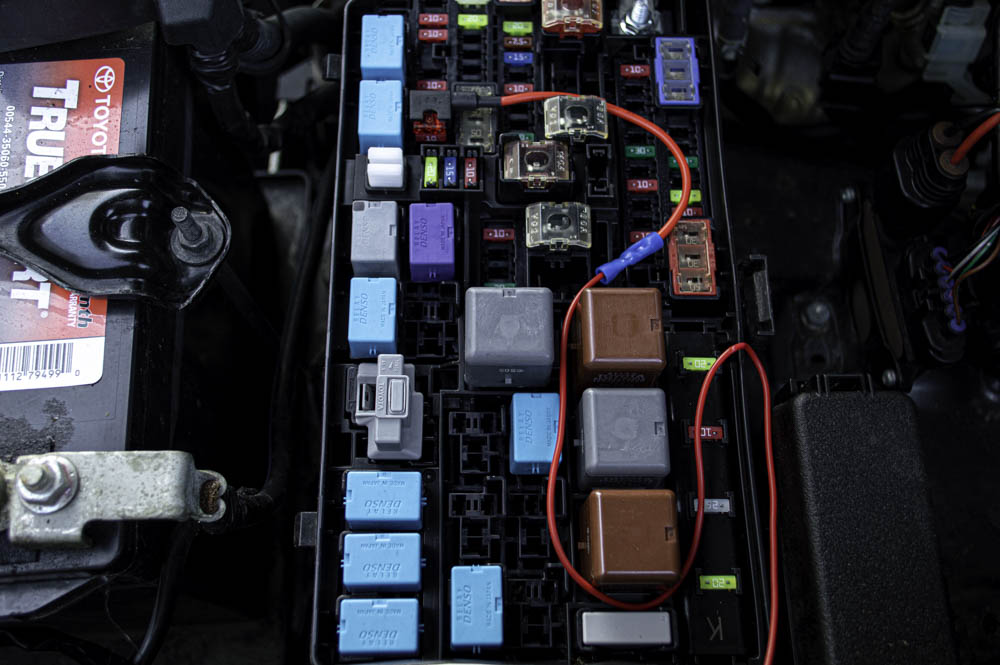
Now that all of the wiring is connected, run the red wire around to the fuse box in the engine bay. There are a couple of fuses you can use depending on when you want the raptor lights to turn on, such as:
- Constantly On – Use the 10A INJ fuse
- Turn on with Headlights only – Use either 10A H-LP RH-LO or H-LP LH-LO fuse
I chose to set them up to come on with the headlights, so I pulled the H-LP LH-LO fuse, inserted it into the open slot on the add-a-fuse, and plugged the add-a-fuse back into the open slot in the fuse box.
I actually made a small notch in the top of the fuse box wall where the wire will pass through. It’s just small enough so that the wire doesn’t get completely pinched and the lid can securely latch.
Step 11. Connect Ground Wire
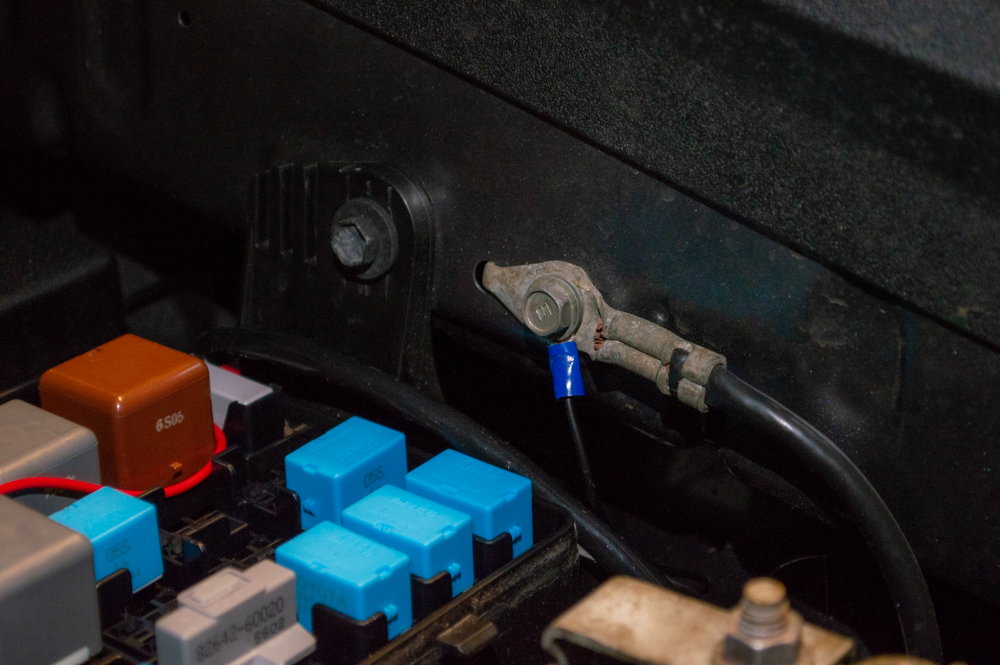
The last piece of the puzzle is connecting the ground wire. There is a bolt on the frame where the battery’s ground wire connects. Unscrew the bolt, slip the ring connector over the bolt, and re-install it.
Before you close everything up, turn on your vehicle to test that the lights come on with the right lights that you chose from Step 10. Once you confirm it’s all working correctly, you can close up the fuse box, tuck any slack in the wiring out of the way, and then your project is complete!
Final Thoughts

The pro grill is a simple, inexpensive mod that will make a big difference in the appearance of your 4Runner.
Toyota Pro Shop’s kit is very good quality, easy to install, and looks really great. Installation should not take much longer than an hour, so it’s something that could be done in the evening. I also really like that Toyota Pro Shop offers multiple types of raptor lights. I prefer a more subtle look, which is why I chose the smoked lens.
Overall, this is a great upgrade for the cost and I’d highly recommend it as one of the first cosmetic mods you do.
If you use the Add-circuit fuse cable, you must put the removed fuse in the open slot on the cable else there is no power to the circuit you are tapping in to. That’s why a lot of folks are saying their car doesn’t start! Add the removed fuse into the cable spare slot and lights and car will work!
I’m also annoyed that the 2020 4R TRD PRO now using C-type micro fuses so you have to go out and get a mini fuse to add into the spare slot. You can’t use the original fuse!
I also can’t close my fuse cover in the engine back once I add the cable to the INJ 3.0 slot so the lights come on when ignition is in position 3.
My new grille doesn’t have 4 tabs it has 6. Two in the center where there are no cutouts for a tab?? Wtf yotaverse won’t answer my email
What paint did you use?
Question. When you say that you wired your raptor lights to only come on when your headlights are on does that mean that your day running lights are turned off? In other words, if I wire my raptor lights according to the way you did will they turn on if I’m running my day lights?
I’m in the same situation, I would like my raptor lights to come on w/ the DRL’s, seems the most reasonable thing to do. Did you ever get an answer or find out something about this?
I Installed the orange (x4) raptor lights yesterday on a 2020 black 4Runner TRD OFFROAD. The “10A H-LP RH-LO or H-LP LH-LO fuse” location does not work on this model… engine does not start. I ended up using the “10A INJ fuse” and everything is now operating normally. I am very happy with the final result. We’ll have to see how long they last or if they leak/break? The led’s are very bright, but do not project much light. They lights do not appear to distract oncoming drivers either.
I bought this for my 21 model and the grill fits pretty good. However since they modified the fuse box since the 2015, I wasn’t able to fit the add-a-fuse in the H-LP fuse slots and had to go with the 10A INJ fuse. Unfortunately when I try to start up my 4Runner with the fuse plugged in, the engine doesn’t turn over. Any thoughts on how I can have my raptor lights on and be able to start my vehicle at the same time?
Hmm, this whole new fuse box is really messing with stuff. That’s odd that the engine doesn’t turn over when it’s in the 10A INJ fuse. It might be silly but make sure that all three of the fuses are pushed in completely. If there are other fuses underneath your add a fuse it might have trouble snapping in. Why doesn’t if fit on the headlight fuses?
For the 2021 model, which fuse am I using if I only want them on when the headlights are on, not the engine? Also, is there a way to have them only turn on when fogs are on and not headlights?
Hey Patrick, so the fuses I mention should still be there in your 2021 model, just in a different location than my 2015 fuse box. Check the diagram on the bottom of your fuse box lid to locate either of the 10A fuses for the headlights, labeled as H-LP RH-LO or H-LP LH-LO. That will only turn on the raptor lights when your headlights turn on, and that is how mine is set up. As for the fog lights, I’m not sure on that one. According to diagrams for my 2015, the fog light fuse is in the cab fuse box, so any wiring would have to come through the firewall. It seems like it’d be easier to settle for always on or just headlights. Unless you feel comfortable splicing the wiring into the fog lights yourself.
What about how to wire the raptor lights to the DRL’s???
Your article says 2020-2021 models, with the TRD Pro grille. But I have been seeing quite a few reviews from the different websites that carry these same raptor lights saying that these kits are not working with the new fuse box layout for the newer model years.
Have a 2021, any incites on the matter?
Thank you for your time!
Hey Bren, my model is a 2015, so I can’t say with 100% certainty that this is correct, but I did some digging and research and here’s what I found. Even though the fuse box layout is different, the fuses I mentioned in the article should still be there, check the diagram on the bottom of the fuse box lid to locate them. I have also heard that the lid might not close completely due to the wire coming out of the box, which was the case with my lid as well. I made a small ‘v’ shaped notch in the top of the fuse box wall so the wire could sit down in it. Now I know that essentially ‘breaks’ the seal but I am comfortable with what I did. My wire fills the notch completely, so the notch is very small, just enough to get the clips to latch again. If you can’t find those fuses on your diagram come back and let me know!
The Raptor lights are dope but I just do not like the Pro grille. I see a lot of people making this swap and the plastic just looks so cheap. I prefer the OEM grille on the TRD Off Road
I have seen others rough up the plastic, prime, paint, and clear coat the grille, and you can’t tell any difference but beauty is in the eye of the beholder 😉
I purchased the heritage grille and my light arrived today 😜 I also keep all my stock parts on hand in-case I want to mix things up. Keep’m spinning folks 🤘🏾
Yeah, to each their own! Everyone has their own style. I would agree though, plastic is almost always cheap, but since this is purely cosmetic, as long as it stays on I’m happy!