
If Brenan’s 4Runner has caught your eye, here is a DIY for the front lower valance. In my opinion, it gives it more of the “Stormtrooper” look, especially for the trendy black on white 4Runners.
First things first, you need to have a front bumper lower valance to the color of your liking. It comes in two stock colors: a glossy silver or a satin black. Both valances are plastic. Both of these valances are not a matte finish. If you are looking for matte, you will have to paint/wrap them yourself.
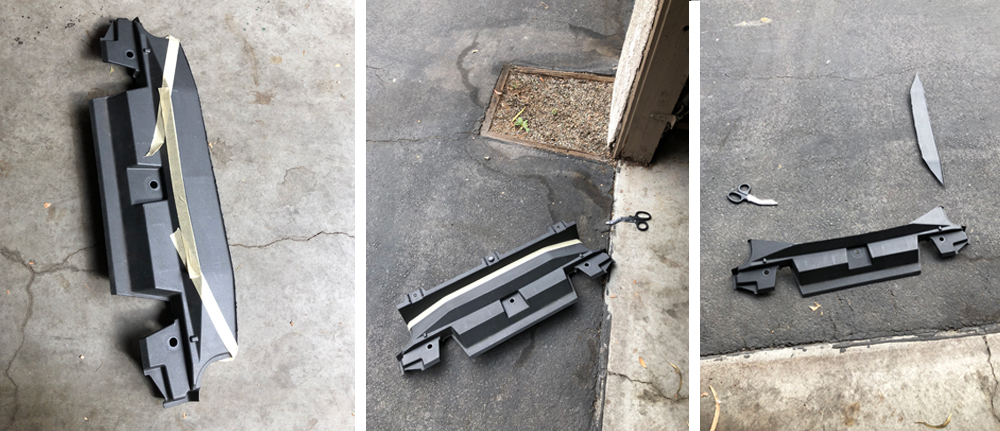
You can buy the front lower valance on eBay or from your local Toyota dealership. I bought two, one to play with in silver and one in black. These bumper valances typically do not come with the bumper clips, so you need to purchase them separately. There are 17 total clips that hold the 4Runner front bumper valance in place.
I will show you how to install a valance on your stock front bumper if you do not already have one on first, and then we will jump into blacking out the valance with vinyl, finally, we will show you how to cover the little white strip with vinyl just above the front bumper valance.
Table Of Contents
Adding a Front Bumper Valance to 5th Gen 4Runner
What you need for adding a Front Valance
Note on the Valance. This seller has had the 4Runner for multiple years. So, if this Valance link does not “fit” your 4Runner, just search his products. You will find your year eventually.
- The Valance – Silver Version (Needs to be wrapped)
- Matte Vinyl Wrap – 3’x5′ roll of vinyl (Check Price)
- Carbon Fiber Vinyl Wrap – 3’x5′ roll of vinyl (Check Price)
- Metric Socket Set
- Basic Tools
- Dremel – THE Dremel (Check Price)
- Plastic Pry Tools – The best set (Check Price)
The front bumper valance is held on by 17 clips, which fit through the bumper. Yes, this means you need to drill holes in your bumper. This might be painful to think about, but very easy to do.
First, let’s take off the bumper
- Step-by-step instructions to remove the front bumper. You can find that here.
After you have the Bumper Removed
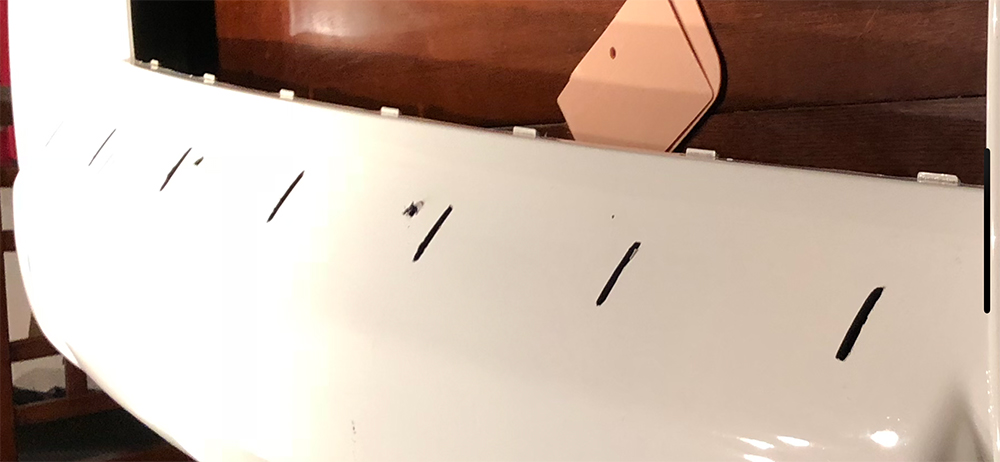
The holes that you have to drill are already indented on the back of the bumper, which you will see after you take the bumper off. There are 17 indentations, as there are 17 clips. I would recommend using masking tape to guide around each hole so that you can use them as markers for drilling the holes.
You will drill/dremel the holes through the back of the bumper, as you can see the indentations only on the back of the bumper.
Two people are recommended to remove and reinstall; however, it is not impossible to do it with one, as I did myself. Here is my front bumper removed.
If you look closely, you will notice my less-than-amateur experience at drilling into the bumper. I used an entry-level Dremel and a small spinning saw bit.
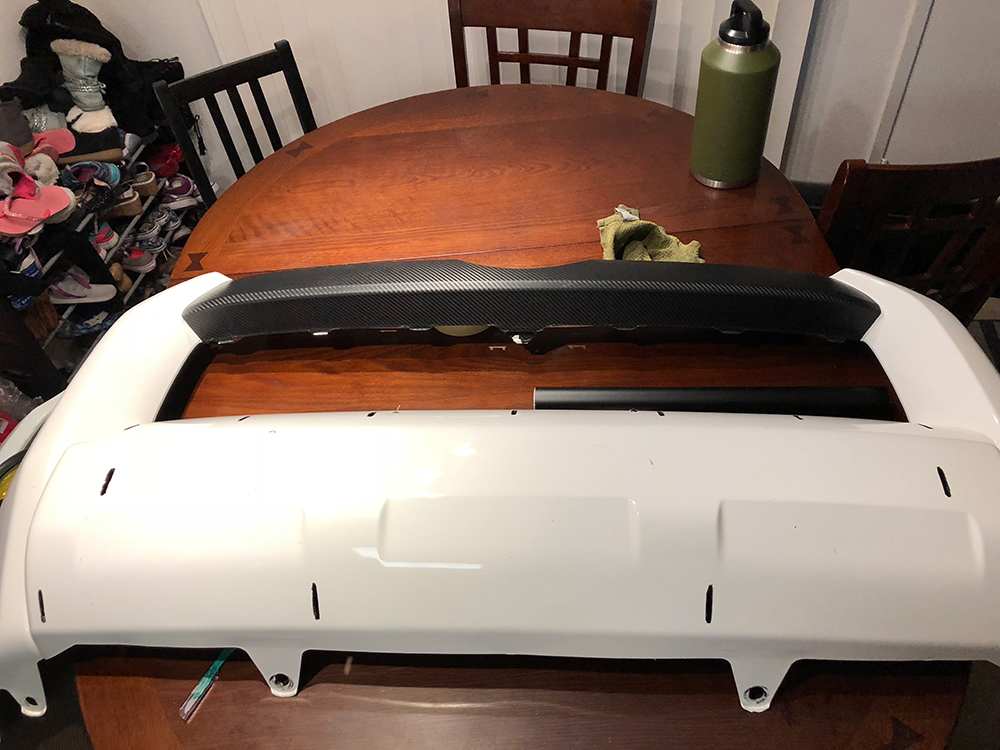
The bit I used is the same as the one in the bottom left of the picture. After drilling the holes, you can fit the lower valance.

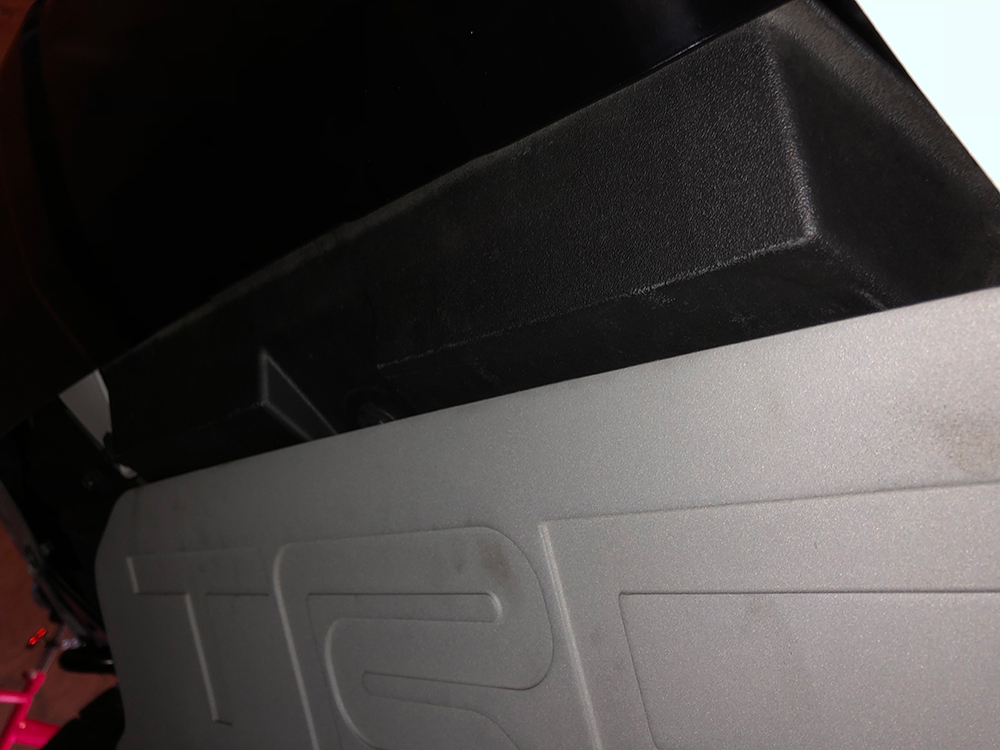
In the end, I used the black valance, and used black vinyl behind the valance to close the white gap, as you see above the black valance on my above fitting. Before we go into closing the white gap, let me show you my first option.
Blacking out Front Valance
I tried a dry carbon vinyl on my silver valance first. YouTube the skills and instructions regarding vinyl wrapping, and it is an easy trait to master. I purchased the dry carbon vinyl from Amazon. Search for carbon fiber vinyl, and there are many to choose from. For a 3×5-foot wrap, you shouldn’t spend more than $25.
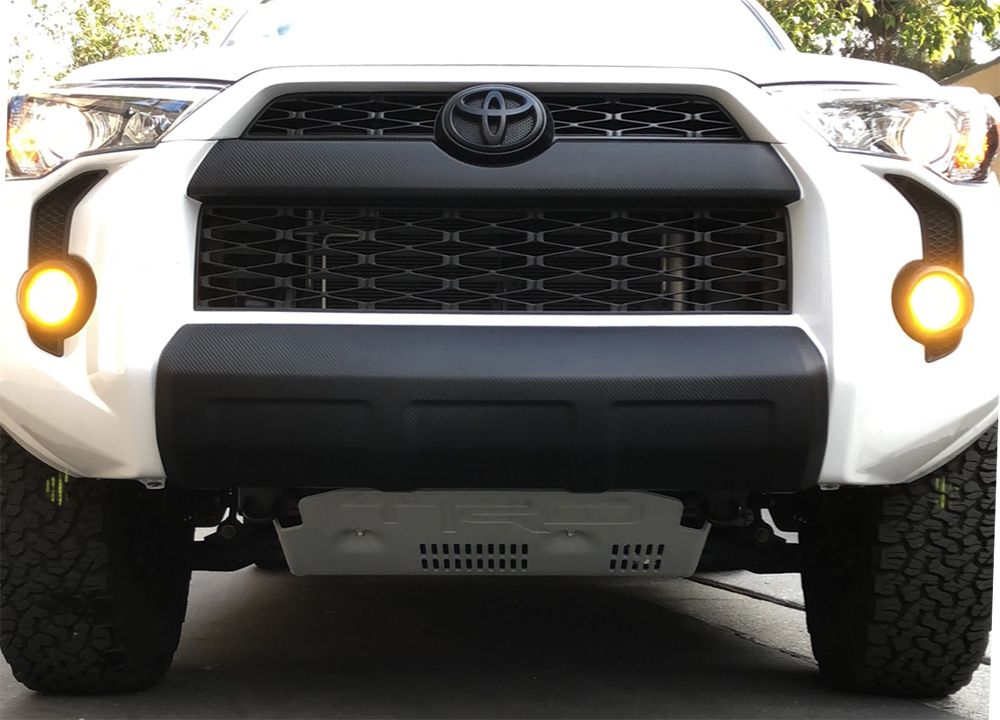
Now, after you drill your holes, customize your front valance, it is time to clip them onto your bumper and reinstall your bumper to your car. This is as simple as removing it. The most difficult part is reconnecting the fog lights, which are probably at a beginner’s level for installation at about 2/5 in difficulty. Here is the end result for a dry carbon front valance.
Blacking Out White Strip on 4Runner Bumper

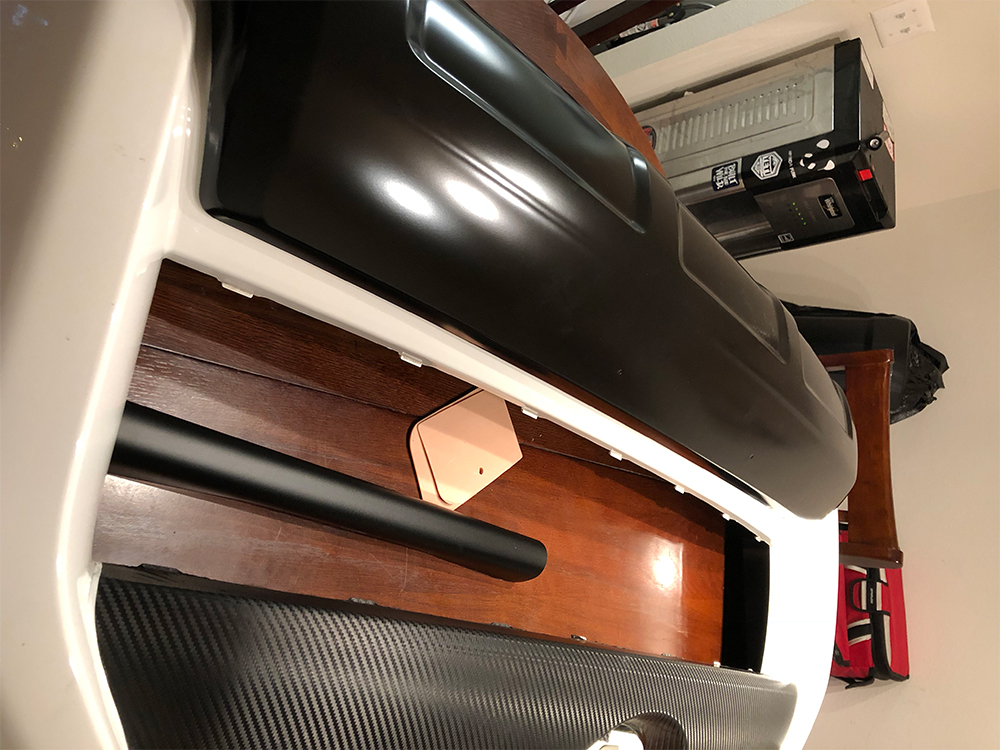
I loved the look; however, that white gap between the top of the front valance and the bottom of the lower grille mesh bothered me. Fear not, that white gap is easy to close. I went with black vinyl behind a black valance, as installing a dry carbon vinyl would give my OCD self a headache trying to align the front bumper’s dry carbon pattern with the front valance’s dry carbon pattern.
Appropriately drill the bumper enough that the front lower valance will fit well. After the holes are drilled and the fitting is finished, it is time to add black vinyl BEHIND the valance, and ON the front bumper.
Next is a little tricky. I used a piece of vinyl 1 foot wide (vinyl sticker measures approximately 3 feet tall. Now, it is only 1-2 feet of vinyl that will show after this is all finished. You have the choice to install all of the front bumper vinyl now or later.
Now, to add the black behind the valance. All you need is vinyl.
Remember, vinyl is very forgiving, so no matter how you screw it up (as long as there are no holes in the vinyl), you may remove and reinstall the vinyl as many times as you like. Just remember, you “shorten” the life and strength of the vinyl, the more you heat it up (with a blow dryer or a heat gun).
Now, to vinyl the bumper, which in my opinion is the most difficult part of this install. Simply remove the screws on the rear/inside of the front bumper.
There are 6 screws, and they are located on the bottom of the lower grille mesh. After you remove the screws a metal plate behind the grille will come off as well. After this, you can easily pop off the grille mesh afterward.
*I apologize for my lack of pictures in this DIY. Now that the grille mesh is OFF, you can turn the bumper over, facing the painted area. We will be working on the part of the bumper above the drilled holes and below where the grille mesh sits. First, clean the area with soap and water.
This will allow the vinyl to stick on properly and withstand your off-roading adventures, along with the unpredictable weather. Next (after properly researching DIY car vinyl wrap guides and videos online and on YouTube), you may begin vinyl wrapping.
I have yet to master the tricks of vinyl wrapping; however, I will say that patience and a heat gun (or blow dryer that can push hot air) will do the trick to avoid bubbles and creases.
Remember, we are only vinyl wrapping a small area of the bumper, approximately 6 inches from the bottom of the lower grille mesh downward. Expect your bumper to look weird at first, as only 1/4 of the lower bumper will be wrapped black, but remember that nobody will know what is below, once the valance is installed.
Now, after laying on the vinyl and cutting it to try to match the shape of your bumper, I recommend purchasing this white pinstripe tape.
There are different colors of this pinstripe, and this example is obviously for a white 4R. This pinstripe is an excellent tool to outline the uneven cutting edges of the vinyl you laid down. If you do not perfect the outline of the vinyl to your bumper, don’t fear. You may run the pinstripe down the edge, and it will appear as if it is a straight cut.
Trimming OEM Plastics Under Bumper
I custom-cut the plastic piece that sits in front of the stock skid plate so that it would fit between my TRD skid plate and the front bumper. Here is a DIY on that.
Firstly, I used masking tape to guide the area to cut. I went ahead and cut through the indented piece with a pair of medical shears. Medical shears can cut through a lot of tough material. Next, I made another cut through the piece I had already cut through. I did this so that debris would not get trapped between the radiator and this plastic skid plate. Instead, the debris would fall through and into the TRD skid plate and hopefully out onto the ground.
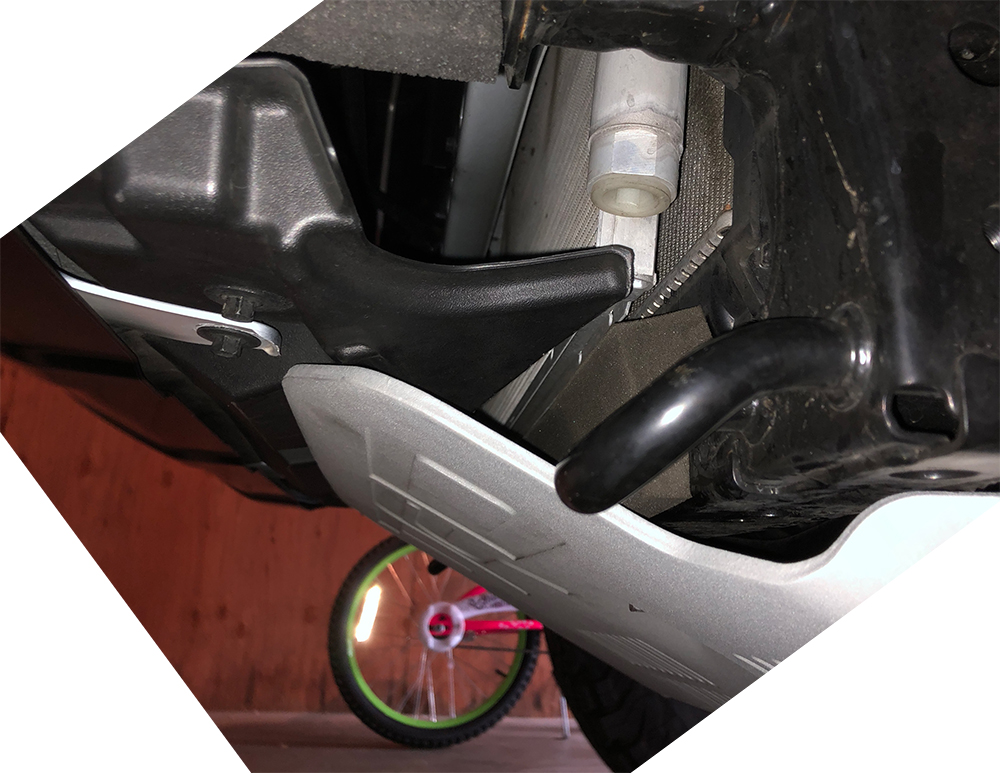
Next, you must remove the TRD skid plate completely to install this plastic piece. What I did was insert the front of the plastic piece between the front bumper and the front bumper lower valance so that it is “sandwiched” between the black valance and the white bumper. It allows little to no room for debris to go into the bumper. Simply drill the piece of plastic with the 3 stock bolts. Then install the TRD skid plate and voila!. You closed the empty gap between the skid plate and the front bumper!
Final Result

This install may take 2-3 hours, depending on your level of expertise in vinyl wrapping. It takes about 20 minutes to remove the front bumper, and probably 30-45 minutes dremeling in the holes, then another 20 minutes to reinstall the bumper.
I just want to swap the silver valences for black, are the clips re-usable?
Yes, they are reusable, if you’re careful not to break them off.
I Plasti-dipped both front and back valance and can’t tell its plate-dip, did it 4yrs ago and still looks almost new. I have touched up here and there but still can’t tell unless you are looking couple inches away.
The vinyl link you have is for Matte Black.
Is that what you have one Jade? Jades definitely the closest match Ive seen.
I want to make sure the wrap is as close to the Pro Grille color as possible. Have seen a few shots of the Satin Flat Black and from the photos I cant tell.
Thanks for everything you do here for the community.
Hi Brenan. I have a 2015 4 runner. The silver/gray rear bumper cover got banged up in a parking lot. To save money I ordered the part on line. I also purchased a new set of clips. Now I need help installing it. Can you help me please? Thanks in advance Lisa B. You can email me the instructions.
where can i purchase a valence for sr5 4 runner?
2018 4 runner
I have a SR5. Where can you get the clips to attach the valance?
How do you wrap that middle white bar just below the emblem? That looks awesome but difficult.
That portion of the bumper is attached to the entire bumper. Plasti-dip or wrap is going to be your best option here is as well. Or, just buy the TRD Pro Grille or the TSO Grille.
What is the difference between the two?
I’m thinking about simply taking my valences off (front and back) and getting them painted with a truck bed type coating like Line-X for durability. Thoughts??
I have seen a few 4Runners do that. Looks good.
That’s what I have. Far more durable and looks awesome.
I just took my front and rear valences off and had the Line-xd. Better solution than wrapping.
Do you remember the brand of the carbon fiber vinyl? Really like the look, it doesn’t look that glossy.
Wondering how you wrapped the center divider? Did you do it yourself as well? Do you have any photos? looks fairly straightforward other that the round indent for the emblem. However, my first wrap attempt on my valance was an epic fail. Had both valences painted at the body shop for $150….looks great, satin black. @bc4runner
I’m curious how you did this as well; seems like round indent would make wrapping challenging.
Love the look of the blacked out valance. Thanks for the info!
I dont know if u answered this question already but just wondering how about blacking out the rear valence?
Steve,
Good question. We have not covered that step by step install yet. Looks like we need to get someone on this asap! I would follow a similar process in removing the rear valance that sits on the back and then wrapping it in vinyl. It should be an incredibly similar process to the process above. But, you never know.
I blacked out the valances, and it completely changes the look of the truck! @theroamingredrunner
Roseva,
Yeah, blacking out the front bumper valance is the way to go. And, getting that thin white strip in between the bumper and grill. It all makes for an awesome look to the 4Runner.
Wonder if I could find the Trail version of the 4Runner valance cheaper and then paint it?
Zach,
Yeah, the trail version of the bumper valance is the one pictured in these shots. The SR5 does not have the valance. So if you have an SR5, you need to buy this valance and then dremel some sections out for the tabs.
I’ve looked on amazon, the satin black they sell matches more of a matte black paint. However you can barely tell the difference unless you actually know that there is a vinyl piece under the valance. Otherwise, most bystanders wouldn’t be able to tell that the valance even comes off.
Do they have vinyl on satin black that will leave the same finish as the regular black valence?
Awesome post! I was looking for options to black mine out!
Thank you!