
LED Turn Signals with Load Resistors to Fix Hyperflash on 5th Gen 4R
Continuing right along with the LED swap on the 4Runner, we have the LED turn signal switchbacks going in.
With this mod, you will turn your parking light into a brighter white, and the turn signal into a brighter amber light. The Alla bulbs claim to be the “brightest on the market”. I find this hard to believe but we will see what happens. Both the amber turn signal LEDs and the white parking light LEDs are extremely bright, though. After this mod, you can use your parking light as your daytime running lights.
Most LED turn signal bulbs (7444NA) will hyper flash after you install them. This is because the LED bulbs are drawing less power than your factory incandescent bulbs. If you were to install LEDs without the load resistors, the 4Runner would basically assume the bulb is dead due to the lower power consumption, thus causing the LED bulb to flash repeatedly.
To install LED turn signal switchback bulbs on the 4Runner, you either need to find a switchback bulb that has a load resistor or hyper flash module built in or you need to buy a set of load resistors to quick splice the wires together. As of now, there are no 7444NA/7443 anti-flicker bulbs. If you find one, please comment below. For LED turn signal bulbs without splicing resistors, there are the VLEDs V6 Triton for around $150. You can buy these with a resistor adaptor which brings you to almost $200. Compare this to $30 for the products in the post here.
The 7443 Switchback LED Bulbs
- 7443 Switchback LED Bulbs – Check Price

Quick note, our bulb is the 7444NA, but the 7443 among others are compatible.
The bulbs in this post are the Alla bulbs, which look identical to the Diode Dynamics 7443 HP24 Switchback Dual-Color LEDs. There is absolutely no difference in appearance between the Alla bulbs and the Diode Dynamic bulbs at first glance. Maybe the diodes are of “higher quality” on the Diode Dynamics? As my dad would always say; Hard tellin’, not knowin’. We are going to buy a set of the DD bulbs as well, and install those in one 4Runner and then compare against the Alla bulbs on another 4Runner. A lot of work for some switchback LEDs, but hey that is what we are here for, right?
The Load Resistors
- 50W 6Ohm LED Load Resistors – Check Today’s Price

If you are looking to swap the turn signal incandescents with LED switchbacks, you will need a set of load resistors to prevent hyper flashing. Resistors are designed to provide a certain amount of resistance in the electrical circuit traveling through your factory wiring to the LED bulb. In this case, the resistor will reduce current flow and adjust signal levels for voltage. This resistor is 50W 6Ohm (that is 6 Ohms).
The load resistors come with four quick splice connectors (T-taps) that need to be spliced to the positive and negative wiring. Quick splice connectors are used as a quick way to splice an electrical circuit into your existing wires. All you do is insert your factory wire, then your second wire, clamp down with a standard set of pliers, and then close the insulating flap.
Potential Problems with T-Tap quick splice connectors
T-Taps strip back the insulation on wiring in order to make a connection. There is no guarantee that this connection is going to be perfect. Even if the T-tap you are using is the right size, you still may face problems. You have three scenarios, and more as time goes on.
- T-tap slices the insulation perfectly which makes a perfect connection
- T-tap slices into the wire cutting strands of the actual wire
- T-tap doesn’t slice enough of the insulation and makes a poor connection and possibly no connection.
With all of these scenarios, the quick splice connectors may lead to oxidation and corrosion due to common nature elements, obviously, the latter two escalating the situation even faster. This may cause your connection/wire to become brittle over time and less conductive. This is on the extreme of installing LED switchbacks/ resistors and quick splice connections but it is important to know.
If you are going to add resistors and do not want to use the T-taps, you can always strip the insulation and solder the wiring together on both the negative and positive connections. This may take a little more patients but not by much. You just need the right tools a little bit of practice.
Switchback LEDs – Tool Check

- Drill with 3/32 bit
- Compact Screwdriver
- Wire cutter/ Crimpers
- Plastic Pry Tools
- Scissors
- 10mm socket/ wrench
- #6 3/8″ or 1/2″ Screws (3/8″ better option)
- 50W 6Ohm LED Load Resistors – Check Price
- 7443 Switchback LED Bulbs – Check Today’s Price
The plastic pry tools, wire cutters, and scissors are optional but they help. You may need to cut back some of the electrical sleave coving the wires that run to the turn signal socket.
Install Step 1: Pull back fender liner
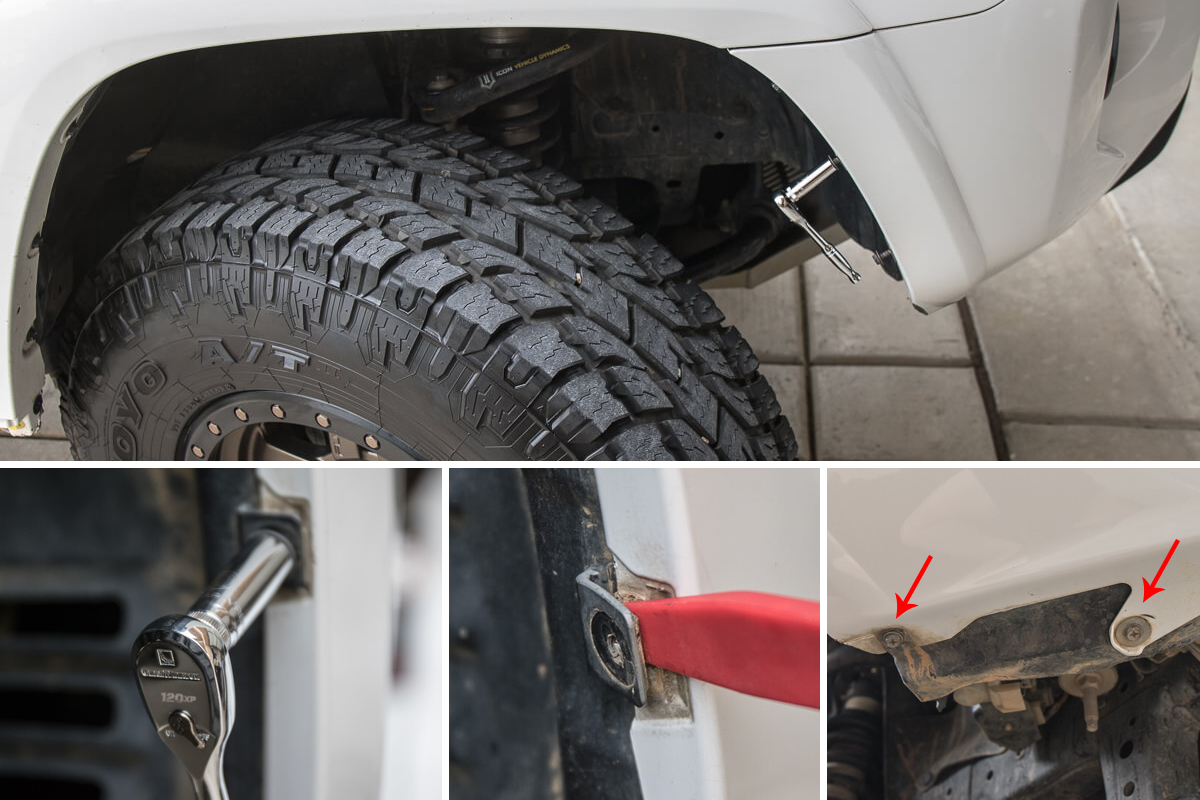
Crank your steering wheel as far as you can. There is very little room to work with when swapping this bulb out. The more room you have, the more comfortable the install will be. Looking back, I might have even removed the tire. It’s tight.
Step 2: Tie back fender liner and locate turn signal bulb

Grab some string and tie back your fender liner to your upper control arms. This will allow you to focus on the bulb and the T-Taps instead of pushing back the fender liner with your shoulder or arm.
Step 3: Prepare Load Resistor & T-Taps

Get a grasp of how the T-Taps work and where the wires go. They are very simple, just understand how they work before you start clamping the T-Taps down.
Take a look at the bottom of the page, we drafted a diagram that will help you understand. It would have been nice if we had this before our install.
Step 4: Drill Hole to Mount Load Resistors

You have a few options for mounting the load resistors.
IMPORTANT: The load resistors will get extremely hot!
- Mount the resistor to the firewall using a single screw
- Mount the resistor on 3m and stick the 3m on the firewall
- Mount the resistor on a metal bracket and then 3m the bracket to the firewall
- Mount the resistor on a metal bracket and then screw bracket to the firewall
I did not like the 3m option as there have been stories of resistors melting 3m tape. These resistors get very hot. I would recommend going with option 1 or 4. I went with option 1.
You can see in the image above where I drilled a hole into the firewall. I drilled a hole in the top corner of where the embossed area is on the firewall.
Step 5: Mounting Load Resistors 5th Gen 4Runner

After you drill a hole in the firewall, take a file and scrape off any excess metal. Take your #6 3/8″ or 1/2″ (3/8″ screw is a better option) screw and place it through the hole in your resistor and then place the resistor in location. Grab a compact screwdriver and start threading down your screw. I wanted to mount the resistor before splicing the wires. It was one less thing that was hanging in the way.
Step 6: T-Taps for Load Resistors on Turn Signal

T-Taps, as mentioned above are a debated topic but they are needed for this install unless you know how to solder. Even if you know how to solder, this is a tricky spot to solder. Access with two hands in this location is difficult. If there was an easy way to remove the entire turn signal light assembly, I would have soldered the wires together on the table then put everything back together, and skipped over the T-Taps. There is no quick and easy way to remove the turn light assembly.
With that being said, we used T-Taps.
Start with the turn signal wire (blue on the passenger side and yellow on driver side). Place the outside of the T-Tap over the blue wire, then feed the red wire from the resistor into the T-Tap on the inside (SEE DIAGRAM BELOW). After you have secured both wires into the T-Tap, thumb press the T-Tap tight.
Step 7: Splice Turn Signal Wire with Load Resistor Wire

Once you have verified proper alignment of both wires, clamp down and splice the wires.
Step 8: T-Taps for Load Resistors on Ground

Repeat the above process with the ground wire.
Step 9: Testing Turn Signal

Once you have spliced together the turn signal wire and the ground wire, test your turn signals. If they are hyper flashing, you need to pull off both T-Taps and see where your splice missed.
We didn’t have a problem the first time, you should be fine.
Step 10: Repeat Process on Driver Side

Repeat the entire process on the driver side.
NOTE: The turn signal wire on the passenger side is yellow.
We removed the battery in order to drill a hole in the firewall for the driver side. We mounted the load resistor in the exact same location as the passenger side. After you splice the yellow wire and the ground wire to the load resistors, install your battery and test the lights.
Load Resistors Diagram for Front Turn Signals on 5th Gen 4Runner

Close up on the Bulbs


This is insanely confusing:
“Start with the turn signal wire (blue on the passenger side and yellow on driver side).”
and then a couple lines down:
“NOTE: The turn signal wire on the passenger side is yellow.”
It’s the BLUE wire.
I’d love to meet the Toyota engineer who designed the access to these lights so I can give him a good swift kick in the gonads.
Thanks for the write up! I changed it up a little…I pulled the harness into the engine bay on both sides and did my splicing there and then pulled them back into the wheel well. I also used weatherproof splice/taps…not sure how much better they will be, but they were $3 at autozone. You have to slide the battery over on the driver’s side, but it’s just 2 10mm bolts on the hold-down and then it slides easily. I hope the resistors and led’s last a long time!
Josh, very nice. Yeah, ours are still kicking strong.
I installed mine the other day without the resistor since the hyper flash isn’t a bother. But now my driver side won’t work. Put back in the incandescent bulb and it lights up but won’t flash. Checked the fuses and they are all good any idea about where a turn relay might be? I did order another set of LED switchbacks
Saw another install video that ended up using the 3M tape, but I still don’t trust it.
I have my LEDs I just keep pushing off the install. I think I’m gonna take my tires off to get some room. I have big hands/arms and my tires are bigger than stock, so there’s even less room than normal
I’m still looking for 7444 LED does not require load resistors. Really annoyed about the idea taping into factory wires. Also, I go off road and see high water from time to time. Still going to pray for one to come out soon. LASFIT 7440 has one with a built in load resistor but nothing for 7444 yet.
Just ordered LASFIT turn signal LED for 7444 supposedly, they should be here by Saturday and I’ll report back with how they work!
How are the Lastfit ones? Any hyperflash? Concerns on longevity without the external resistors?
So. Yes I do have hyper flash, not sure if I got a bad Batch or if it’s just the amount of time with them on. They’re good for a quick turn, but 2-5 mins + they may begin to hyper flash. That’s what mine did. I might order DD or Alla LED bulb and just install load resistors.
LASFIT 7440 W21W WY21W LED… https://www.amazon.com/dp/B07CMSD8CS
Just installed these, they don’t require resistors and are really, I mean really bright!
Can I use this bulb just for a replacement of the corner lights? I can’t stand the amber reflectors around the chrome. Thanks.
Bending pin #2 of the relay in the socket box disables high beam DRL and completes the look.
http://www.toyota-4runner.org/1978748-post53.html
Now you have park light as DRL and turn signal, have high beam LED.
Brenan/All – just wondering if there is a Flasher Module on the 4Runner that could be swapped out for a LED Specific Module to resolve hyper flash? Would that eliminate the need for the resistors and all the T-Tap risks?
I used Philips 7443 Ultinon LED bulbs for park and signal lights. I see hyper flashing arrow signs on the console but they look fine from outside. The weird part is, concole arrows do not hyper flash for hazard sygnal (activates the signal lights).
Put it in the same spot you showed in your install. Realized after I installed it that I had not engaged the T snaps good enough so now I have to dig back in there with needle nose pliers and crimp harder =)
Oh ouch! Have fun getting back in there. : )
These were a bear to install. Im a bigger guy with bigger hands and no matter how much I pulled back the fender liner the space was tight. In the end I got it done and they both work but it took much longer to install than I anticipated.
If you ever are doing a project that requires a total removal of the front bumper/facia, that would probably be the time to do a project like this. Unfortunately we all arent in the market for removing bumpers haha.
Thanks for the pics, they were helpful.
Jason, yeah I agree. It was tight, to say the least. Where did you mount the resistors?
I did the switchback mod on my runner. I enjoy the results. Being that I am not too electronically inclined I had my buddy help me out. Wasn’t too bad to install.
The hardest part of my install was caused me a minor heart attack. I thought the bulb was secured in the socket and I screwed it back on the housing. As soon as I did it the bulb popped out and was stuck in the housing. It took a lot of cursing and about ten different contraptions to get it out.
Just had the same thing happen to me. As I was trying to secure the bulb into the housing, the bulb popped out and just felling the housing. Any advice on how to get the bulb out?!?
I made a tool to fish it out. I used a straw and a string to form a noose type deal similar to how animal control catches dogs and what not. Basically, thread the string through the straw by the middle of the string. Tape one end to the straw. You should now be able to pull the loose end of the string to tighten the loop at the end. After a considerable amount of prayer and also cursing and tearing my hands and arms up, I got lucky and caught the bulb. Be very patient – but the tool worked for me.
If that doesn’t make sense let me know I’ll try to explain another way.
Thanks for the reply. I went slightly lower tech: two pipe cleaners and a wad of chewing gum. Worked like a charm! First try, I got it to come right out.
Don’t want to need to do that ever again. 😅
Nice. I tried some soldering wire with a wad of duct tape but had no luck. Glad you got it out. It’s a terrible sound when it first clunks in the light housing. Ugh. Enjoy the mod
*fell into
Damn, that just gave me a minor heart attack. It was a tight area to work in for sure. What bulbs and resistors did you use?