
ADV Fiberglass Fenders Step by Step Install on 5th Gen 4Runner
When I think Fiberglass Fenders, what comes to mind is this epic BJ Baldwin video racing through the streets of Mexico or even his grand tour through Cuba, both are straight Hoonigan status.
As I started shopping for a set of Fiberglass fenders, I began to picture my soon to be long-travel 4Runner soaring over cracked sidewalk city streets headed to the beach where Dan Bilzerian is waiting for me with a chopper full of hot chicks.
Oh and then I woke up…
In all seriousness, we all have a common goal when looking into a set of fiberglass fenders for our 5th gen 4Runner and that is usually to run bigger tires.
When we install bigger tires, it usually opens up a world of common rubbing issues. From the body mounts and the fender liners to trimming the body and the damn pinch welds, there is always something rubbing. There is no science to what, when, where and why tires cause the rubbing, they just do and every situation is different.
There are tons of different tire sizes out there. From tall and skinny to short and wide, if you are running bigger tires, you will likely need to get your hands dirty with some wheel well modifications.
So why Fiberglass Fenders?
Again, fiberglass fenders are typically used for running bigger tires. They offer a larger flare and a larger rise which allows for more uptravel without rubbing.
- Fender Flare: Flare is how much the fenders stick out (horizontally). When a company mentions a 2″ flare, that means the fenders stick out 2″ past the OE fenders, making more room for uptravel with more room to the side. You may want a wider fender flare if you have wider tires.
- Fender Rise: Rise is how much the fenders push up (vertically). When a company mentions a 2″ rise, that means the fenders are being pushed up 2″ past OE fenders, making more room for uptravel. You may want more fender rise if you have taller tires.
Fiberglass Fender Installation Overview
Patience. More Patience, and then a little patience.
This install is not for the faint of heart.
Faint of heart definition: Lacking the courage to face something difficult or dangerous. – Webster
To start, this installation requires sanding or use of a Dremel on the fiberglass in multiple areas.
ADV produces their fiberglass fenders as close to OE steel thickness as possible. Although it must be known that fiberglass will always be thicker than steel, which is why there will be sanding needed in certain areas.
Where to sand?
- The backside of the fenders where the fender and windshield apex area meet (A-Pillar)
- The top mounting point where the hood latch closes
- Where the fender meets the headlight
- Opening clip holes
- Opening bolt holes
Your goal is to sand the fenders down to material thickness (of the stock steel fenders in that same area) so that the fenders sit properly in that area.
There are many working parts on this installation. From making sure your door, and hood open and shut correctly to looking at your 4Runner from the front and seeing clean bumper/headlight lines, this is one install that takes patience.
Why the need for sanding?
ADV Fiberglass grinds down their fenders to clean up the headlight area at the last stage of manufacturing. It is important that they leave extra material there in the production process so their guys don’t grind too far. This would cause severe fitment issues if gone too far in.
ADV allows you, the customer, the ability to sand down the excess material in the headlight section and slip the headlight in for perfect headlight lines.
Finally, you will need to adjust areas of the front of the bumper so that the fenders line up properly.
If you can get your lines just right, the fenders will make for a great fit and look somewhat OEM, aside from the badass flare and rise you just added.
At first, we didn’t go far enough on the sanding and were unable to get the right fitment. We had to come back the following weekend and go deeper on the sanding in order to get our headlights positioned perfectly.
Preferred Tools for Installation
You will need to drill all your own holes into the fiberglass for bolts and the plastic OE square clips. Because of this, you will need to file out square shapes in the fiberglass. See below for a list of tools we used to get the right fitment on these locations along with the exterior of the fenders.
- Sanding tools
- Dremel: Check price
- Sanding bits: Check price
- Fiberglass respirator: Check price
- Half-round file: Check price
- Square edge file: Check price
- Mini square files (plastic tabs): Check price
- Metric sockets
- Socket Extensions
- Power Drill
- Drill Bits
- Flashlight/headlamp
- Diagonal cutting pliers
- Safety glasses: Check price
- Zip-Ties
- Painters Tape
Southern California Installers:
- ADV Fiberglass (Advanced Fiberglass Concepts)
- Simons Auto Body Laguna Hills
- Bodyshop Laguna Niguel
Northern California Installers:
- http://www.bertoluccis.com/
- https://www.facebook.com/Elite-Auto-Body-336238353234820/ (3210 51st Ave Sacramento, California 95823)
- NorCal 1
Fiberglass Fenders Install
If you are unsure about this installation, take it to a professional. This was by far the most challenging thing I have ever done to the 4Runner. Working with fiberglass is not easy by any means and can get very frustrating. Especially on a hot summer day in the garage.
If a shop charges $350-450 to do the installation, let them. If on the other hand, you want to get your hands dirty, put your respirator mask on and lets jump into it.
Remove all Push Tabs and Connecting Grille Bolts

You will need to remove the front grille in order to check fitment. This will be a consistent back and forth process in order to check the headlight and fender area fitment.
Remove every push tab and bolt that is connecting your front grille to the front-end. If you are unfamiliar with this process, check out this step by step bumper removal install.
Remove weather stripping

There are push tabs and bolts along the top with one main connecting tab in the back that you will need to pop off. Remove all of these.
You can leave the push tab/plastic clip in the back in place but remove the plastic cover
Remove All Fender Liner Bolts and Lower Bumper Bolts

Remove the inner liner fender bolts and the lower bumper bolts. I have already removed a few bolts from my bumper so your setup may be different here.
Note: Disconnect any forward facing wires you might have. This includes fog lights, forward facing camera, lightbars, winch accessories, etc.
Gently Pull Sides of Bumper Off & Set Aside

Once the front fender liner bolts have been removed, gently pull sides of bumper off. Proceed to remove the entire front bumper and set aside.
Once your wires and forward facing light connections are removed, proceed to remove the front bumper.
Remove bumper side support & two Remaining Fender Bolts

Remove the bolts holding the push clips and bumper support in place. You may need to pull firmly on the bumper support in order for it to come apart from the factory fenders.
Remove the remaining two bolts holding the OE fenders in place.
Remove Fender Top Bolts and Plastic Hood A-Pillar Cap

Remove all top bolts and push clips holding the OE fenders in. Then, remove the plastic A-Pillar hood cap.
Remove Bottom Fender Bolt & Inner Door Fender Bolt

Remove the bottom fender bolt and the inner door fender bolt. You will need to open the passenger or driver door in order to access the inside bolt. You will also need at 6″ or 9″ extension in order to reach the bolt.
Remove the factory fenders
You have a couple of options here.
- Remove the fenders with fender liners intact.
- Remove the fenders and destroy the factory fender liners.
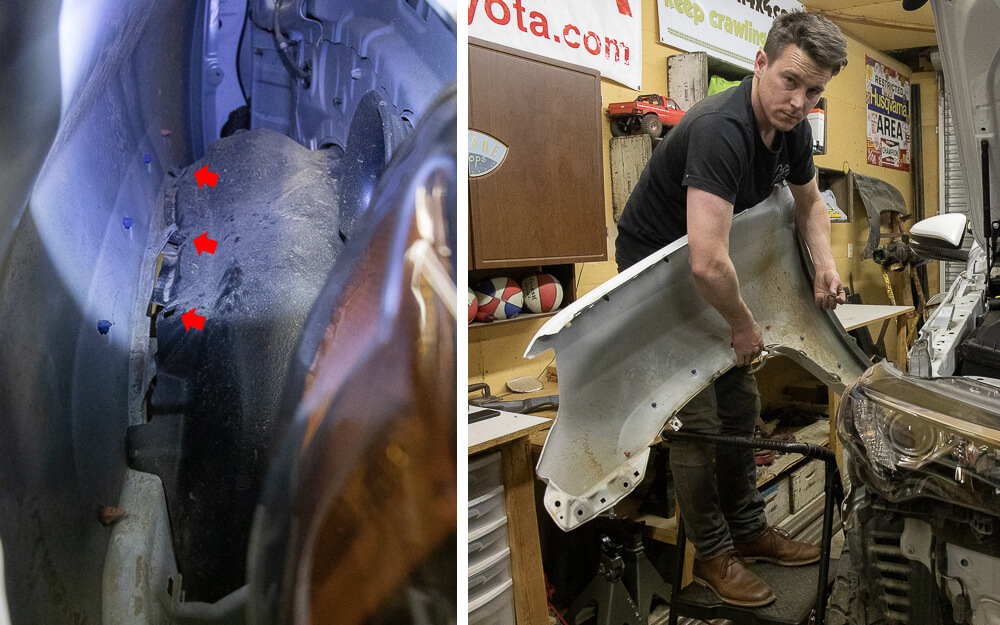
Option 1 shown (passenger):
This was time-consuming and rather irritating. We spent about 30-40 min being delicate with the square-shaped OE push clips (image left) in order to keep the fender liners intact, in case we ever wanted to reinstall the factory fenders. You need to reach your arm through a very tight opening with a set of bent pliers to push and depress the secured clips, in order to break loose. For the square push clips, you need to depress and twist. The window of depression and twist is very minimal. Expect deep cuts up the inside of your arm and raw fingers with this method.
Option 2 not shown (driver):
Not the most graceful of methods but it was worth it. I just grabbed the fender liner where a push tab was located at the fender and ripped it off from beneath. Yes, it ruined my fender liner but it took all of 2 minutes and left no cuts on the inside of my arms. The factory fenders remained unharmed. If the time comes where I want to swap my factory fenders back in, I can buy a set of replacement fender liners and trim accordingly.
Remove the factory fenders (Fender Liner & Plastic Clips)

Again, this was the process of removing each plastic push tab/clip. And, although we have one perfectly fine fender liner, it was not easy. Also, with this method, the actual push tabs/clips get destroyed in the process (image left).
With that said, you should probably take the latter approach and rip the liners off.
Position Fiberglass Fenders
Once you have the old fenders off, position your new fiberglass fenders into place.
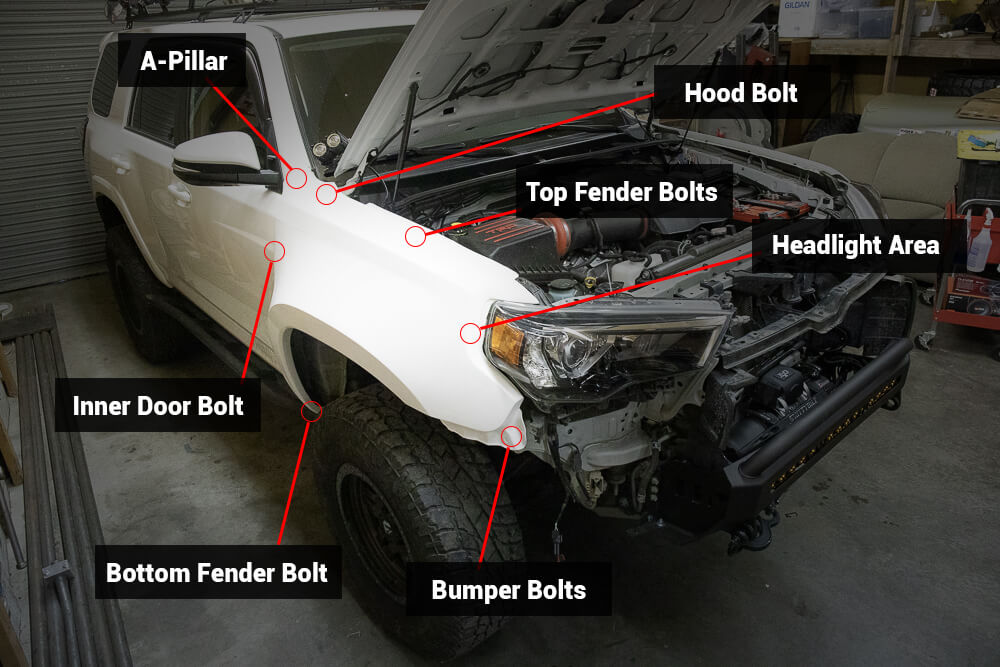
Fiberglass Fender Terms
- A-Pillar
- Hood Bolt
- Top Fender Bolts
- Headlight Area
- Bumper Bolts
- Bottom Fender Bolt
- Inner Door Bolt
These are the main areas you need to consider when installing the fenders. There is a lot of time needed to test each mounting point so that the correlating points line up. I am sure ADV has this down to an exact science when it comes to an install, but if this is your first time installing fiberglass fenders, its a day of patience. Or, in our case, 3 days.
The process is simple:
- Test fender fitment
- Measure and mark for sanding
- Sanding
- Repeat
Please read through this whole post first before attempting the install.
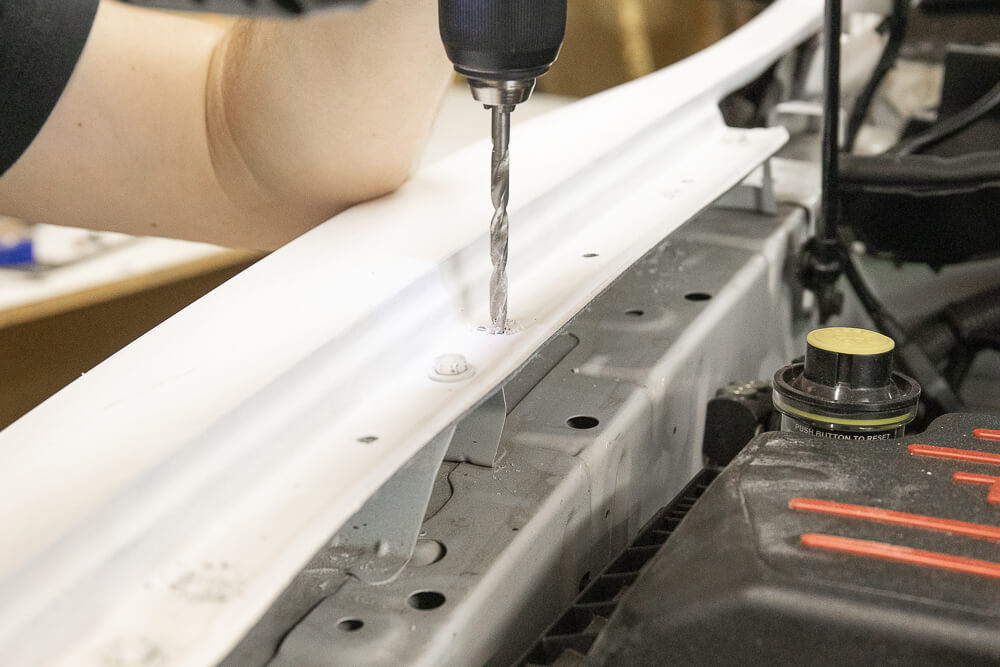
Fiberglass Install – Align and Drill Hood Bolt Hole

This is where two people will come in handy.
Start at the hood latch bolt.
Note: The whole time you are testing, open and close your door to ensure clearance.
While one person is holding the hood latch bolt and the bottom fender bolt in place, you want another person holding and aligning the headlight area in place. While the fenders are lined up with the correct mounting points, mark the drill spots and proceed to drill a pilot hole.
Align and Drill Holes for Bumper Support

Again, while you have two people holding the fenders in place, proceed to mark holes in the bumper support area. You need to mark holes for the bumper support bracket tabs and then drill those holes out.
You will have 5 holes in total.
The two square-shaped sharpie marks above will need to be drilled out first and then filed down with a small square edge file in order to fit the square clips on the bumper support.
The remaining three holes need to be drilled out in order for the bolts to connect the fender to the frame (see below).
Align and Drill Holes for Fenders to Body

These two bolts connect the fenders to the body. The last bolt hole in the top right connects the bumper support and fenders to line up tight with the front bumper.
Position Bumper Support to Fender & Bumper

Positioning fiberglass fenders are going to be a little different than factory fenders.
They are very stiff and don’t allow for much play. It’s important to line up all mounting holes so that everything lines up.
Our bolt hole in our fender didn’t quite line up with our bumper support so we drilled it out using a 3/4″ bit.
Headlight Area Adjustments

Depending on where your bumper sits, you may need to push the bumper out in order to line up with the fenders.
We added a longer bolt, two washers, and a small bushing. With this, our fenders lined up closely with the fenders, however, we did not get the bumper to line up “perfectly” with the fenders.
It’s important to note that the fenders are not OEM but given some patience, you can get these pretty close to the factory lines.
Re-Position Fiberglass Fenders Into Place & Connect Bumper

For the headlight area, you want to continuously test.
Also important to note, this will not be perfect until you finish sanding. And even after you finish sanding, you may need to come back and adjust (open up) the bolt holes in order to adjust the alignment of the entire fenders.
Once you start sanding, everything starts to line up pretty well.
Drill Top Fender Bolt Holes
The last holes that need to be drilled are the top fender bolts. There are bolt holes and weather stripping push clip holes that need to be drilled up top here.
Note: Open and close your doors to ensure clearance here.
Fiberglass Fender Sanding Tools

Although you can probably finish this without a Dremel, I wouldn’t want to try. The Dremel made the sanding go much faster and we were able to get incredibly precise sanding.
You will need to sand multiple areas and possibly widen out bolt holes to adjust fitment. If you have fine and rough sanding tips, along with a curved point sanding tip, the process will go much faster.
Sanding A-Pillar Area

Grab a pencil or another tool to mark your lines. As you place the fenders against your A-Pillar, you will notice they rub.
Mark the spots that the fenders are rubbing on the pillar and then remove the fiberglass fenders for sanding.
Note: Open and close your door to ensure clearance once you place your fenders back in place.
Sanding Inside of A-Pillar Close Up

You can use a rough grit sanding bit for the start of each sanding process. Once you get down to the 1/8″ – 1/16″ mark, you can move to a finer grit sanding bit.
Gently start sanding off portions of the fiberglass on your marked lines. Return to the fenders to the vehicle and check fitment.
Repeat this process until you achieve a perfect fit.
Fiberglass Fender Sanding

Sanding Headlight Area
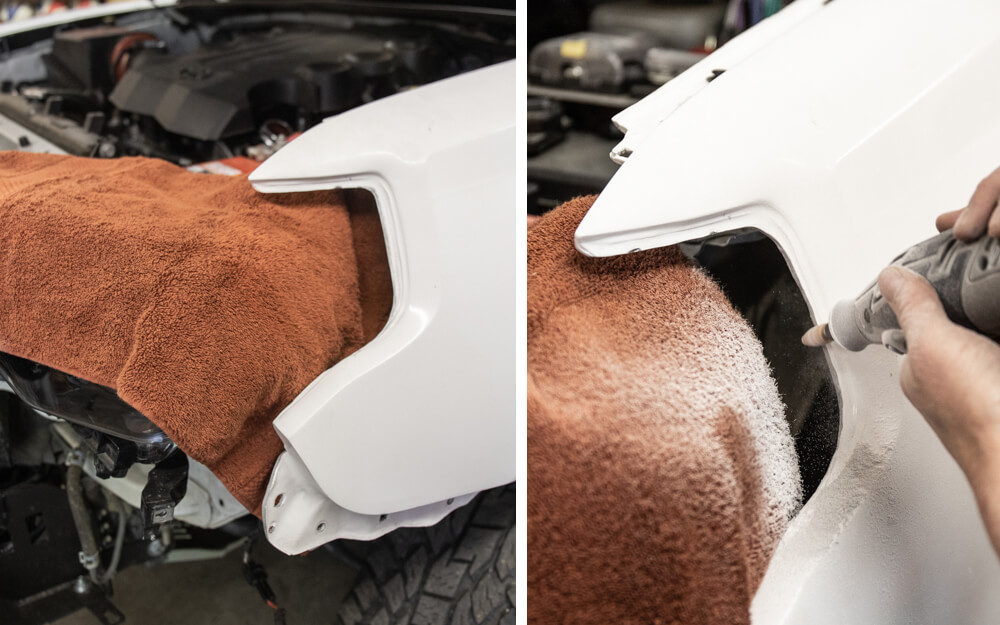
Without sanding, the headlight will contact the excess fiberglass.
You will need to mark these points, proceed to sand and then repeat the process.
This was a long process on the first side and then we started to understand how and where the headlight wanted to slide in.
Again, be patient and the fenders will come together close to your factory fenders.
Sanding (Opening) Bolt Holes for Better Fitment

If you need to adjust (shift) the fenders, it helps to open up bolt holes along the top, hood latch, bottom bolt, and inner door bolt.
Once you have these holes opened up 1/8″ or even 1/4″ more, you can shift the fenders into place and then lock them down using the factory 10mm bolts.
The hood latch bolt and the bottom fender bolt seemed to be good anchor points for fitment checks all the way around.
Check Front Door Clearance & New Fender Line

Once you have all locations aligned and your bolts are tigthend down, check your fender and door line.
Note: Open and close your door to ensure clearance.
Check New Hood Line

Proceed to check your final hood lines.
Note: You should be checking these lines throughout the entire process, both horizontally and vertically.
Second Note: Your truck has a hood height adjustment knob that you can turn to push your hood up. If your fenders are a little higher than the hood, just adjust this knob to the desired height until the fenders and hood are lined up.
Check New Headlight & Bumper Lines

Again, you should be checking these lines as you go.
The headlight area lines are going to be the most challenging. You have quite a few lines all trying to match up in one location.
Fiberglass Fenders – Before and After

I took off the hood guard/protector so we could see a better before and after line.
Well here it is, the before and after ADV Fiberglass Fenders on the 5th Gen 4Runner. WOW.
ADV Fiberglass Fenders Final

Our Thoughts?
If you have a severe lack of patience or very little experience working on your truck, this install is not for you.
To pay a shop or someone with fiberglass experience, you are looking at $350-$450 for the installation and another $600-$900 to finish and paint the fenders. This is on top of the $600 cost of the fenders. Out the door, you are looking at close to $2000 if you want color matched fenders.
If you have an extra $400 to pay an expert for the installation, go for it, it would be worth every penny. If I had to do it again, I would highly consider paying a fiberglass expert to do this job. But, I also have a hard time letting other people touch my truck so it’s a close call.
Previous experience with fiberglass would obviously be preferred but not needed. Even though this was my first experience with fiberglass, I got the hang of it pretty quick.
The install was frustrating at times but the end result was worth it.
Once we need new tires, we will move up to 35″ Toyos, Coopers, or BFGs.
Anyone do anything to cover up the air intake hole a bit from rocks and water?
Where Can I order the finders?
Did you ever add larger tires? How did they fit?
What brand roof rack is that? Very unique.
Stellar Built: https://trail4runner.com/2019/01/02/custom-stellar-built-roof-rack/
Brenan,
Please post some photos of your revised Rad Rubber liners when you receive and install them. If they fit and stay in place then I will order a set for my TRD Pro if Rad Rubber kept your mold.
I know Eddie from Rad Rubber Design will have my mold for sure. I will update that other article when the new liners come in. Eddie just sent me a picture of the new materials yesterday so I should have the slimmer, lighter 1/16″ nitrile liners on here soon!
Brenan,
Any photos available of your thinner liner install?
Coming soon, I just received the thinner one in the mail yesterday.
Bumping. Curious to see these liners! Edit**** read further down page lol
Brenan,
What did you use for wheel well liners with the new fiberglass fenders?
Michael, I created some rubber fender liners with the help of Rad Rubber Design.