
This install will be done on the 2016 SR5, the third 4Runner in our family. The Pro Comp leveling kit is one of the largest available, and anything bigger would require upgrading the suspension.
With so many options for leveling kits, it’s up to you to choose what fits your daily and off-road needs.
For now, we’re sticking with this simple leveling kit on the 2016 SR5, primarily for city driving. Let’s see how the install goes.
Find It Online
- Pro Comp Model #65210K (Check Price)
- Similar Kit for 2018+ (Check Price)
- Front lift method: Strut Spacers
- Rear lift method: Coil Spring Spacers
- Max Tire Size: 33 Inch
With Shocks
- Front Coilover: Bilstein 47-259768 B8 (6112)
- Rear Shock: Bilstein 33-187174 (5100)
Limited Edition with XREAS (Front Level)
- 1.5″ Spacer = Exactly Level (Check Price)
- 2.0″ Spacer = 1/8″ Higher in the front (Check Price)
Table Of Contents
Video Overview
1. Measure Front & Rear

This is an optional step, but it helps to determine if you executed the spacer kit install correctly. Measure the height from your hub to the body on the front and rear. Note these numbers as you will measure again after the lift is complete. Make sure that your numbers match up with your leveling kits numbers.
2. Lift and Jack Stands

After you crack your lug nuts, lift your 4Runner with a Jack and then place Jack Stands under your frame. You will want a decent amount of room to work with underneath so try to get your jack stands as high as possible.
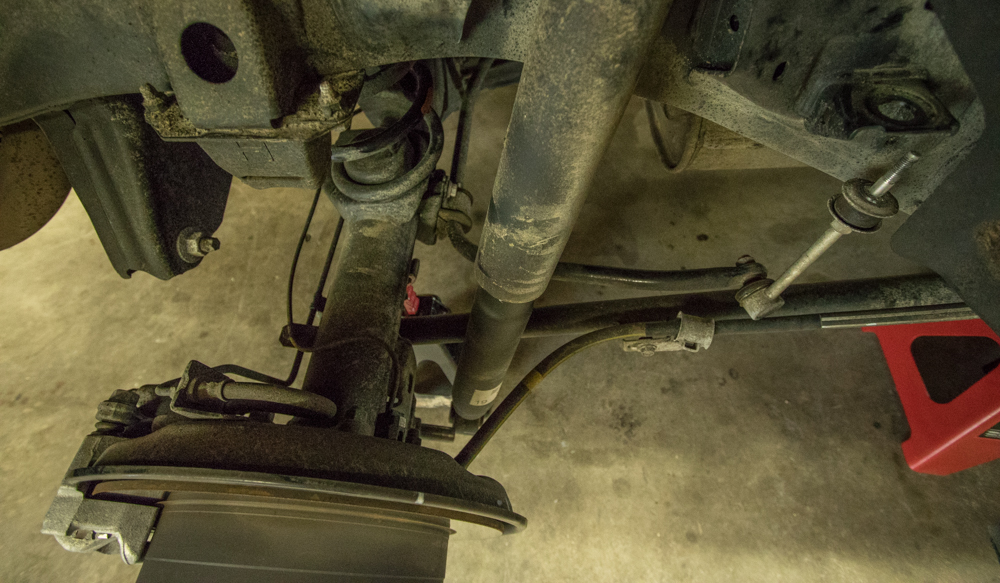
3. Loosen Front Strut Assembly (Top of Strut)

You want to loosen most bolts on your front strut assembly for this leveling kit install. It doesn’t really matter which order you do this. We started with the top and worked our way down. Start with the top of the front strut bolts by loosening them.
4. Loosen Strut Assembly

Moving towards the bottom of the strut assembly, you will find 5 additional bolts:
- Cam Bolts X 2
- Strut Bolt X 1
- Lower Control Arm (LCA) Knuckle Mount Bolts X 2
Just crack and loosen these bolts for now. We will be removing them later.
5. Remove Skid Plate

Removing skid plate requires the removal of 6 bolts. There are 2 10mm bolts, 4 12mm bolts, and one plastic cap. Unscrew these bolts and remove the skid plate. There are two tabs on the skid plate that lock into the frame. This will take some skill maneuvering through this but if you have two people, it should go quicker.
6. Save Hardware OEM Skid Plate

Place your skid plate to the side. Unless you want to throw it away, you will be using all OEM parts to put it back together.
7. Knock Out Strut Bolt

Using a rubber mallet and a punch, knock your strut bolt out.
8. Support Lower Control Arm with Jack

While the lower control arm (LCA) is still connected to the knuckle, support it with a jack. By doing this, you can support the lower control arm while unbolting the knuckle mount.
9. Remove Lower Control Arm Knuckle Mount Bolts

Remove both lower control arm knuckle mount bolts.
10. Remove Front Strut

Once you have removed the lower control arm knuckle mount bolts and all other connected bolts, drop out the front strut. When dropping out the front strut, you may need to wiggle things around a bit. They can be stubborn.
11. Secure Strut Spacer to Front Strut

Place your new front strut spacer leveling kit on top of the OEM Strut or aftermarket struts if you have them. Using the OEM hardware, bolt down the front strut spacer leveling kit on top of the strut. You are now ready to re-install the front strut back into place.
12. Insert Front Strut Assembly

Lift your front strut assembly yup through the upper control arm (UCA) and into place. Lightly screw bolts back down securing the front strut into place.
Please note that we installed the front strut but we did not line up the strut with the lower control arm. Be aware that there is a correct placement of the strut back into and onto the lower control arm.
13. Tighten LCA Knuckle Bolts

Once you have everything in place, jack up the lower control arm. By jacking up the lower control arm, you can align everything much easier and it takes less manpower. Continue to tightening your LCA knuckle bolts along with your strut bolts. Use your torque wrench with the appropriate torque.
14. Tighten Cam Bolts with Torque Wrench

Be sure to torque down both cam bolts.
15. Replace Skid Plate

Once you have all bolts torqued down, replace your skid plate with the OEM hardware and provided pacer hardware.
16. Rear Coil Spring Spacer

Yeah, buddy! Let’s get started on the rear coil spring spacer kit! It’s already looking better. : )
17. Unbolt Rear Shock & Sway Bar
Unbolt your rear shocks and sway bars.
18. Remove Rear Coil Spring

Here is the tricky part. Removing the rear coil spring take a bit of maneuvering with the rear axle. Place a jack stand under one side of your differential and press down on the other. This will give you the ability to pop out the rear coil spring.
19. Rear Coil Spring Leveling Kit Spacer


Pictured below is exactly how you should place the rear coil spring spacer leveling kit on top of the coil spring. Lip down folks, lip down!!
20. Installing Rear Coil Spring Spacer

To install the rear coil spring spacer, place it on top of the rear coil spring and reassemble the assembly. It will be tighter with the added 2″ above the coil. This step requires at least two people—one to press down on the rear axle while another lifts the opposite end, allowing the coil spring with spacer to fit.
Once both rear coil spring spacers are in place, secure everything by bolting down the rear shocks and tightening the sway bars. After that, you can reinstall the tires and head to the tire/alignment shop.
Finished Product
The Pro Comp spacer leveling kit (front and rear) is a great option for those looking for a mild lift at an affordable price. While it’s not a full lift kit, it provides a better stance with easy installation. There are many other lift and leveling kits to choose from, depending on your desired look and feel. For $250-$350, this kit offers a noticeable lift at a great value.
Options for running coil overs and rear shocks:
- Rear: Bilstein 5100 33-187174
- Front Option 1 (Struts Only): 5100 24-196499
- Front Option 2 (coil overs): 6112s – 47-259768 (This Coilover is adjustable from 0-2.5″ which means you can run the front strut spacer at 0″ or remove the front spacer and adjust the front coil overs to 2.5″)
2016 SR5 Before

2016 SR5 After

Hello I have that exact make abs model . 2016 sr5 4 runner but I already have the 20 in tires. Looking to do the same lift as you. Can you send me a link or the kit you used . Please and thanks
spending additional 5min and throwing torque specs into your article would make it complete, dont you agree?
otherwise, whoever tries do it, following your receipe ends up bitchin at you and hopes for someone to do it right (without a need to reach for other sources)…
Just search “Torque Specs” in the search bar for a table of all specs.
Also, find the link here: https://trail4runner.com/2020/06/17/5th-gen-4runner-torque-specs/
last thing i wanna be doing in the middle of the project is searching for missing details in article im relying on.
also, there is nothing about spacers that needs to be installed between diff and front crossframe (also torque link you mentioned above does not have torque specs for that specific joint)…
so… whoever is about to do this project – do your homework before, find other sources, because above guide is inclompete and you’ll be scrolling your phone with dirty hands, looking for missing info that author forgot (or something…?) to mention.
seriously peter? if you read this article, and do no other research before starting the job, that’s not on Brenan. That’s on YOU. If you don’t find this helpful, move along buddy.
Peter, it’s actually called a crossmember but I understand what you’re saying. Sorry, you didn’t find the post above super helpful. I will do my best to include the torque spec for every nut and bolt in each post moving forward. It’s good advice man, it really is. Thank you for bringing this up.
truly appreciated.
thank you
just wanted to ask what is the best leveling kit for 4runner trail with kdss?and what is the best offset for the rims/wheels to get..planning to get fuel vapor with -12 offset..thanks
Am I able to run a A bilstein 5100 lift set to 1inch lift, then add this pro comp nitro spacer kit on top of that? I’m trying to get around a 5inch lift to make room for bigger tires and not have to do a body mount chop. Or am I just better off going with the 6inch drop bracket lifts that pro comp or fabtech makes??
I’ve been getting conflicting information about the compatibility with a 2019 TRD Pro and haven’t been able to get Pro Comp on the phone. I’d like to be able to maintain as much of the stock suspension but up my tire size a bit (285/70R17) with the Pro SEMA wheels. Can anyone tell me if this Pro Comp kit is compatible with the 19 TRD Pro?
I just installed this kit on my 2019 TRD Off Road with KDSS. Didn’t realize until after we had started taking the fronts apart, that the sway bar was going to need to get unbolted from the LCA. Spent almost as much time getting the sway bar back on than we did getting the struts out and back in. If there’s an easier way around this, it would be great for the next guy to know. But I didn’t see a way around it since the sway bar is bolted directly to the LCA. Maybe getting a spring compressor to avoid dropping the LCA.. with the rear spacer, I was seeing a lot of questions about the rear spacer not fitting. I had the same issue in the video install. The spacer sat 3/8” above the top of the bump stop. I ended up taking a hack saw and cutting that rubber lip in half. Basically down to the metal inside. It still didn’t sit flush with the bump stop, but the gap went down to 1/8” which made me feel a lot better.. the video also didn’t cover the diff drop. The kit comes with two (2) long bolts, 2 larger spacers and 6 smaller bolts and spacers. The front most bolts holding the front diff to the frame get switched out with those two long bolts from the kit. Spacer sits between the frame and rubber bushing.. there was some minor creaking and squeaking on the test drive for the first couple minutes. After that, everything seemed to have settled and I can’t notice a difference in the ride from before I installed the kit
I apologize if this has been asked before, I searched for a similar question but didn’t find exactly what I needed.
I have a 2019 Off Road Premium with KDSS. Will the Pro Comp Model #65210K (amazon link below) fit? I’m wanting to make sure I like the look of a 3″ lift before going with a full-blown $1000+ suspension lift, so I want to give this kit a try as a trial run but need to make sure it’ll fit my rig before ordering.
Amazon claims that this kit *DOESN’T* fit my model, but from my understanding, there wasn’t a suspension design change from 2018 to 2019 models. I just wanted to check with you guys first since you’re the experts.
Also, while I’m sure it’s recommended, is an alignment a requirement following installation? I don’t use this rig for much off-roading as it’s my family-hauler (’96 Land Cruiser is my big-boy off-road machine).
Thanks for your help!
https://www.amazon.com/Pro-Comp-Suspension-65210K-Instructions/dp/B005OAC4ZK
Just installed this on my 2016 4r, thanks so much!! Putting some 32″ duratrecs on tomorrow and then head to Canada for 10 days to bounce around.
Thanks tons for the great install walkthrough and video.
Will this setup work for a 2013 model 4Runner?
I was going to install this on my 2014 4runner but the shop told me I would have to carv out the bump stop on this kit because it wouldn’t fit is this true ? He told me the only one that he had that fits was 600 dollars and it is Revtec brand
I saw some people suggest new adjustable Upper Control arms for proper alignment… are these actually needed? If so, at what lift height would i need to get them?
Hey Brenan, just got the Revtek 432X kit installed on my 2019 4Runner limited!! It looks awesome!! A question, do you know what size tire I can safely run with out scrubbing? Any help is greatly appreciated!
Greg
Want to install this kit or Bilstein 5100s front and rear with OME 883 springs in the front and 898 heavy weight coils in the back to get me that leveled look. With the procomp level kit do you think it will wear out the OEM struts faster? In the resort I work at there are about 18 speed bumps before I get to my parking lot. Driving this on a daily basis in and out with the procomp level kit, do you think the 5100s are a better long run investment?
Recently bought a 2018 TRD Off-Road Premium with KDSS and want to level it. The link from this article put me on to the ReadyLift 69-5060 (3″F, 2″R) kit, though the ReadyLift website does not mention KDSS it does state not compatible with X-REAS. Any firsthand knowledge using this kit on a KDSS-equipped 4Runner?
KDSS shouldn’t get in the way of installing that kit. Spacer kits are almost always compatible with KDSS. The spacer in the rear will sit on top of your spring, so nothing to get in the way there. In the front, the spacer stacks on top of your coilover, and again, nothing to get in the way there either. You should be fine but always enter on your own. Hope that helps.
Thanks for the information. I just purchased the ReadyLift kit, but I’m told by others I probably will want to replace the control arms in order to maintain the correct caster. I’m a total noob when it comes to suspensions…can you offer any advice here as to how to determine the right arm (ball type, size, caster specs, etc) to get this right? Also, is 2″ lift in the rear enough to require a differential drop? Thanks!
New to the 4runner world. Just bought a 2018 sr5 premium, it is not 4wd, but I would still like to put a small lift on it, what do you suggest? and is it worth doing if it is not a 4wd?
Thank you
I don’t think there is anything really wrong with lifting a 2wd. It would serve more for looks than function but as long as you are comfortable with spending the money then why not? I would go with a Bilstein over an Icon/King though. Ride comfort still comes into play even with 2wd. Bilstein is going to provide a pretty comfortable ride. Also, take a look at Falcon Shocks by TeraFlex. They just released a nice kit for the 5th Gen that we bought for our 2016 TEP with KDSS. Its small, only 2″.
Hi,
Purchased the kit and getting ready to install it on 2018 SR5. That said, I noticed when I hit the brakes hard, the front end nose dives. Will the kit improve the nose dive or make it worse? If the kit increases pre-load, it might make for ‘stiffer’ ride but should decrease the nose dive (unless I have that wrong lol). Alternatively, could the Bilstein 5100’s with the spacer kit address this? Second question, does the lift kit decrease the life expectancy of OEM struts?
•Rear: Bilstein 5100 33-187174
•Front Option 1 (Struts Only): 5100 24-196499
Thanks!
Hey Brennan. Love the page! Very informative. As of right now my 2016 TEP with KDSS sits stock from the factory. My procomp spacer kit front and rear are being installed today. I have 2 specific questions…..what unforeseen issues could I face with KDSS today while installing? And can’t i upgrade my shocks and front strut to Bilstein 5100 keeping them at 0? I saw that Raj already kinda mentioned this. Can’t i use these shocks just to improve ride quality and not necessarily gain more lift from them? Again great site! Look forward to hearing from you.
For the cost of a spacer kit and 5100s, you can afford to buy an upgraded adjustable coilover like the 6112. Why not just make the jump to 6112s?
Help!
I just had a ProTune 3″ front and 2″ rear suspension lift kit installed on my 2018 T4R Off-Road Premium (w/o KDSS) to help bring it almost level.
According to my research this should have closed the gap between the front and back to 1/2″, yes?
The rear is still 1.5″ higher than the front though. What am I missing?
Thanks in advance
I have no idea. Send me an email with some pictures.
This was so detailed!!! I am sure lot of people got benefited from you post..
One quick question. I have 2016 Toyota 4runner SR5 and I installed Bilstein 5100 Adjustable and lifted my front up by 2.5″ but the ride was really sturdy. I could manage but since being a new dad 🙂 , thinking of installing Pro Comp Nitro kit as per your above explanation , and going to bring back the front Bilstein to normal instead of 2.5″. Do you think this is a good idea and improve my riding both on and off road? Thanks again and cannot be happier I found your site.
Raj, thanks! I feel like adding spacers on top of Bilsteins would increase body roll, nose dive and give you more of a loose, floaty feel. Interesting question, but I am not sure I would recommend doing what you suggested. Spacers are a good option for stock suspension and if you want a lifted appearance. Spacers are not “ideal” for off-road or on-road. They are really for the appearance in my opinion. You could try adding some Ekstrom Designs Strut Shims on top of the coils, and then take the preload down a notch on the Bilsteins. That might make your ride a little less “stiff” while maintaining your appearance. You can read more on those shims here.
Wow didn’t even realize that it’s a overkill. If I were to go with lift kit with Bilstein Shocks (since it’s already installed), which would be a better option instead of Spacer? Thanks again.
Along in the same line, below is the description from the quote I received from my local shop.
Shock Absorbers In Kit – Shock Change Not Necessary; Black
Components; With Strut Assembly Extension/ Coil Spring Spacers/ Differential Skid Plate Spacers/ Hardware
Cool. Thanks for replying. The sketch of why 1.5″ spacer affords 3″ lift was meaningful. Also, my spelling is horrible, (but I really enjoyed geometry in school ;p) Pythagorean Theorem, A^2 + B^2 = C^2, but I digress.
This helps suggest the large number of spacer lifts are largely leveling kits and just for looks and bigger tires (also mostly for looks), but a spacer lift can be more functional by addressing the bump stop concern. Agreed it’s no coil over or suspension travel improvement, but when mild can maintain stock articulation but push the skids away from the earth a scosh, and at this point that’s what I’m looking for (coil overs and a rear airbag to coils swap is years away for me…but until then a little reassurance that the skid is farther from the ground is all I’m going for and a spacer can afford that, when done with consideration.
I’ve been nerding out on this for a bit and I really appreciated the video. thanks and Ciao.
Thank you for a comprehensive video install!
I have a GX470 which shares chassis with 4th gen 4R, and b/x my GX has KDSS so it also shares with some early 5th gen 4R. I understand differences between different lift options, spacer, vs. coilover, vs. longer spring and shock and diff drops and I also understand that this procomp spacer lift was mainly for levelling, lift and on-road use.
My question may or may not be answerable as this rig wasn’t intended for off-road use but you’ve indicated understanding of the geometries of both, so here goes (with some possibly unnecessary long-winded explanation as I go 😉 With a spacer lift like this (specifically for front as the rear is addressed with how the spacer is installed), have you noticed need for adjusting the front bump stop? probably not for on-road use, but for off-road use and sme real suspension articulation, would you suggest modifyng the front bump stop?
My understanding, again specifically front, is that by spacing the strut down one changes the LCA position and with full stuff/compression of the shock, the bump stop will not engage before bottoming out the shock. I’ve seen where the shock bottoms and crushes before the bump stop engages.
I like the drawing explaining how a spacer affords 2x distance in lift and thank you for that! I’ve been passively trying to understand that geometry, but a picture is worth a thousand words. 🙂
As such there’s a comparable geometric drawing that would suggest spacing the bump stop such that it becomes functional again, maybe 3″, maybe a little less (the Pythagoreum theorem will answer that 😉
Does this all make sense? My question is have you found it best to adjust the front bump stop to compensate from the lift to keep it functional w/o damaging the shock.?
Yeah, I think you answered the question. There is little to no flex on this 4Runner at all. This 4Runner is not pushing 50 through long stretches of wash-outs or crawling on anything more than the parking lot on whole foods. If one were to install a spacer kit with the intention of “really pushing it” then bump stops wouldn’t be a bad idea but yeah, you would need some good sized bump stops to do anything productive. Also, you lost me at Pythagoreum theorem. lol
What are the wheel specs? Trying to do a similar wheel/tire setup.
All those specs on the Vapor wheels and KO2s can be found here.
Question:
2018 Toyota Off Road Pro Premium with KDSS. Will the Pro Comp Model #65210K work with my setup?
I don’t see why not but check with Pro Comp first.
nice article! i noticed there is a bolt and spacer for the diff drop kit. did you have to install with the 3″ level kit? have a 2017 SR5 and debating whether to do a 2.5 to avoid the diff drop kit. thanks !!
You should install the diff drop if you go 3″. We installed the diff drop on this 4Runner a few weeks later during another install. We will be doing an overview on our other 4Runner soon.
awesome, looking forward to the overview, thanks!
I just performed this with a Daystar leveling kit on my 2016 trail premium. I had to disconnect the sway bar and upper control arm in order to get the strut out. I only did the front thus far. I started it up and i am not getting ABS, traction control , and multi-terrain disabled. I unplugged the battery for a few minutes and reconnected. That did not fix the problem. Anyone seen this? thanks
I installed the 3 inch leveling kit on a 2018 4Runner. While doing the alignment, unable to get caster within spec. Will an after market upper control arm get the caster back within spec. Also my rear end bottoms out going over speed bumps. I think I need a longer rear shock.
Jerry, yeah with the 3″ leveling kit your caster angle will start to push towards the back of the 4R. This will create a negative or neutral caster. In order to set your caster at a positive angle, you want aftermarket UCAs. Aftermarket uni-ball UCAs often have caster built in so your steering feels more stable and clear your firewall (depending on tires and wheels). Off-road and on-road performance is generally increased with aftermarket UCAs.
Popular uni-ball options for us are Total Chaos, Camburg, and Icon Vehicle Dynamics. Some Uni-ball UCAs will cause noise, and some are noise-free. The uni-ball UCAs range from $650+ with TC, and Icon being the more expensive option. Then your more affordable option would be ball-joint UCAs with a price range of around $450 like the SPC ball-joint UCAs (Part #: 25480 depending on the year). What is weird is that Amazon does not show fitment for these UCAs but I doubled checked and they will work. Please double-check and confirm with sellers, though. After you install your UCAs, you will either have the correct caster after the install or you can take them into a shop and have the entire suspension tuned if you have been playing with the caster on your current setup.
Cheers,
Bg
So going with say the readylift kit i would need new uca? My set up would be very similar to the one mentioned in the article. This is my wifes 2018 sr5 premium 2wd with mainly city driving, she just wants a more aggressive look. Anything else you would recommend?
Is this writeup applicable for KDSS? Im installing front spacers only. Thanks
Yea, this guide, and general steps will work for KDSS. For a good resource and tips on KDSS, check out the image at the bottom of this page.
Thanks for the post! Really educational!
Before buying online at Amazon it says will not fit on my 2017 SR5. What is your take on this? Can I still buy this eventhough Amazon indicates not fit?
I would say yes, but always double check with the seller.
Got it installed by local 4×4 shop. Looks awesome! Not I feel a bit of shaking on my steering when taking off, and goes away. What could be the issue here?
How critical is it that I get an alignment right after the install? Can I drive 15-20 miles until I can get it in for an alignment? What’s the worst that can happen before the alignment?
Not “critical”. You will be fine driving 20 miles to a shop. Peace of mind, if nothing else but depending on who installs it, you may or may not need it. If you install it and you are not confident with correct torque specs, then take it in. If you have a good 4×4 shop install it, you are probably fine. Either way, never a bad idea to get an alignment after a lift or spacer lift. Again, not “critical” though.
I just purchased a 2018 4runner TRD Off-road premium and trying to figure out the best and cheapest way to get the front exactly level with the rear without messing with the ride quality. It’s my daily driver and I don’t do any serious off roading (just occasional dirt roads, camping, etc..) also, once the front is level with the rear, what size tires will I be able to fit? Currently have 265 70 R17. Will 275 70 R17 fit without any rubbing? Thx!
I just recently installed a leveling kit from rough county on my 2017 sr5 and after finishing my ABS light, traction control and 4wd lights are on on the dash. Has anyone had this problem after installation? I checked the abs wire and it’s not damaged so I’ve been scratching my head trying to figure it out. Any thoughts?
It could be the ABS speed sensor wire was tweaked or something. You can order new ABS speed sensor wires or take it to a mechanic. This might be the issue, I am not sure, though. I have never had this happen to either of our 4Runners.
yes I am having the same issue right now and want to know what is the cause of it also.
I am a machinist with a machine shop I have dimensions for the front spacers but need some inner and outer dimensions of the rear coil spring spacers so I can finish making the lift for $free.99
If anyone is just buying the kit take some measurements of the rear coil spring spacers please!
1 more question for you.. I see you have the readylift kit that looks identical for the 2018 4 runner instead of the pro comp nitro kit 65210k. I do not know of any changes in suspension on the 5th gen. From my searching I havnt seen anything updated from pro comp but my question is do you think the pro comp version will have any fitment issues on a 17 or 18 runner?
Great website by The way. You have really condensed a lot of information that is really helpful and answer a lot of questions that people have and are afraid to ask on message boards because of the (use the search/read the manual coments)
Well done.
Thanks
Abe
Abe,
Yeah, nothing has changed on the suspension for the 4Runner. We just had someone mention that the Pro Comp Leveling kit did not show up as compatible with the 2017 4Runner but the Readylift leveling kit did. So, we updated the post to reflect another kit option that shows as compatible. Both kits are almost identical as well. Nothing too different about these two leveling kits.
Thank you for kind words!! It means a lot!
When doing this Procomp lift will someone with kdss run into any problems with install…or kdss lean? Thanks and great write up
Abe,
No problems with KDSS on this kit or really any other leveling kit out there. We had a very similar leveling kit on our 4Runner with KDSS and everything was fine. No problems at all.
Cheers!
After installing the PRO COMP SPACER LEVELING KIT, were you able to increase the tire size? If so, by how much (without rubbing)? Have decided to proceed with this particular upgrade and have been waiting for at least one year to replace my stock 265 Duelers, which are no longer reliable in snow. Any suggestions for tire sizes after carrying out the PRO COMP SPACER LEVELING KIT? Much thanks.
Mike,
After dropping in a 3″ leveling kit, you can increase your tire size from about 31″ tires to 33″ tires. But with 33″ tires, you might get some rubbing. So, 32″ tires are safe. If you want to be safe, drop in 32″ tires, if you want to push it, move to 33″ tires. If you want to really cut some stuff apart, opt for the 34″ tires.
I recently purchased a 2018 4Runner and cannot find anyone who has a leveling kit for it. Will the will the bilstein shocks fit since it is a 5th gen? And if so, will they have the same effect as the leveling kit?
Eric,
The best way to make sure the leveling kit is compatible with your 4Runner is to check with the manufacturer. Or, head over to the link provided in the description and enter in your vehicle. This will show you if the kit works (most of the time, if not then the manufacturer needs to update their kit to the newest models). I am not 100% sure if the kit works on a 2018 4Runner, but I would think you are ok. You probably ok to grab the kit but always double check before buying anything.
I installed the leveling kit on the front and now my uca hits my coil over. HELP!!!
Ryan,
It sounds like you may have disconnected the pitman arm that holds your wheel assembly together. Disconnecting this is not needed for the install and would cause the issue you are having. Maybe I am confused though. Send us an email directly if you have further questions and provide as many images as possible. Thanks.
Thanks Bgreene,
If someone knows how to get the driver side one installed please let me know. Left was easy.
Right……I’m stuck. Help.
Thanks
To follow up on Wyatt’s thread…I got the same kit and installed it yesterday. Trouble came when we tried to install the front differential spacers. Left (passenger side) one went in fine after loosening the two bolts on the arm. The right one we couldn’t get in because it is a different design with 3 bolts and also an “L” shape. You didn’t have these at all in the video. Are these needed? If so How do I get the driver side spacer in? 2017 4Runner. And a huge thank you for the video and step by step.
Chris
Chris,
Yeah, you do not “need” the spacers but you should put them on. This is a blub straight from the Forum that sums it up pretty well:
I know a couple guys that have damaged their CVs in just 2 months of having their lift installed b/c they did not install a diff drop kit. On the flip side, I also know of a guy with a lifted 4Runner that has yet to have an issue with his CVs. Doesn’t mean he won’t, I’ll just have to wait and see. In short, just b/c you personally have not yet had any issues with your CVs, doesn’t mean you don’t need one. You may be fine now, but without a diff drop installed, you simply increase the risk of damaging your CVs in the long run. Remember, I didn’t say you would damage your CVs w/o running a diff drop, I simply said you greatly increase your risk of damaging them w/o a diff drop. It’s like riding a bike w/o a helmet. You can do it, but you greatly increae you risk of a head injury during a wreck without wearing one.
We still need to throw them on our SR5. As soon as we throw them on, we will update this post.
Any updates on this differential drop and the problems he had? I was planning on installing this kit this week on my 2018 TRD Off-Road but I haven’t seen any sources about this particular part.
RL,
Just reached out to Chris, we will see what he says.
Hey brother I did the whole front end last night including the diff drop. I’m not sure why he would have had any issues installing them. The only thing I could figure is maybe he was trying to do them individually. If so then yeah it would be hard to flex one side and then the other. As long as you drop both sides of the differential down at once then it’s more than easy and only takes 3-5 minutes at most.
Awesome! Thanks!
This may be a dumb question, but I’m confused. I just got the Pro Comp leveling kit in the mail, PN#65210K. On the front page of the booklet it says it is for a 2006-2011 FJ…does this kit fit both rigs or what?
Wyatt,
Not a dumb question at all. The 5th Gen 4Runner sits on the same frame of the FJ and has the same suspension components. You are all set to use this leveling kit on your 4Runner. That is why you see on so many websites “Fits FJ and 4Runner”. We got the same instructions and installed the same kit. You are all good. Have fun with the install!
I called ProComp about the 65210K being comparisons with 2015 SRB he said I need to Go to Toyota dealer and purchase rear upper spring isolator from FJ Cruizer.
Hey Brenan,
I recently acquired a 2017 T4R limited. Is it possible to do the Pro Comp level kit with the Limited? It does have the Xreas on it. If not, what leveling kit would you recommend for us Limited owners?
Rod,
Hey there. You have a few options for the XREAS.
1. Rip off your XREAS and the sky is the limit. You can pretty much do whatever you want.
2. Leave your XREAS on and you are limited to spacers or upgraded adjustable coilovers in the front. Being that we do not own a limited 4Runner or have not installed any kits on the limited yet, you may want to search through the forums and read through a few limited threads on installing level kits and suspensions. If you want to leave your XREAS on, you can run spacers in the front and a spacer in the rear. I would go with one of these in the front:
1.5″ Spacer = Exactly Level (Check this kit out)
2.0″ Spacer = 1/8″ Higher in the front (Check this kit out)
For the rear, you can go with an aftermarket spring 1.5″ of lift or a spacer that sits on top of your spring.
Hope this helps!
Hi Bgreene,
I’ve got a 2018 Limited, and was wondering what options I have for the ‘upgraded adjustable coilovers’ in the front? I’m not sure I’d want to sacrifice ride quality with a spacer lift but wanted to do the proper research before I decide what direction I’d like to go. At this time my goal would be to have an exactly level 4 runner with +1.5” lift in the front. Also, do you have any shop recommendations in so cal?
Best,
Chris
Chris, you are going to have better luck in the forum on this topic. Check out this post about lifting limiteds. Not too many of us over here have limiteds.
Ok I have a dumbass question if I just wanted to bring the front end level with the without lifting the rear what kit would I need im new to Toyota
Ray,
Not a dumb question at all. So, you have a few options if you just want to level the front of the 4Runner. It will be a pretty easy install as you do not have to remove the Upper Control Arms. Only the strut.
1.5″ Spacer = Exactly Level (Check this kit out)
2.0″ Spacer = 1/8″ Higher in the front (Check this kit out)
A comment on that first one (1.5″): For those who want to level your 5th generation 4Runner (2010-2018) this is the kit for you.
Let us know what you go with! Also, we would love to hook you up for sharing your step by step install when you throw it in.
Hey Brenan,
First, I’d like to say thank you for taking the time to educate us on the possible capabilities our T4Rs. I’ve been reading all of your articles.
I was looking to purchase the Pro-Comp lift kit that you were recommending, but I just noticed that you have decided to remove the spacer kit for Bilstein coil overs and shocks.
Not sure what it would cost to go with Bilstein on all four corners yet, but I’m sure this is the better way to go versus spacers on all four corners.
When it comes to off-roading, I don’t plan to get too serious with it, but do plan to make an occasional joy ride. Besides that, I love the aggressive look of a 3/2 lifted T4R!
I recently purchased a 2017 TRD PRO in Magnetic Gray, and can’t wait to get it lifted.
Any suggestions? Thanks again.
Hey bud I’m new to the 4 runners,(2017 sr5) And i like the look of this lift. So you removed the front spacers and used adjustable shocks for the front. Did you keep the rear spacer? Or did you do something different in the back
Gil,
Thanks for connecting! Glad to hear you are enjoying the posts. Congratulations on the 2017 MGM PRO!!
We will eventually remove the front spacer and go with the 0-2.55″ Bilstein 6112 Coilovers ($607 for both). This is absolutely not necessary, but it will perform better than the spacer, on and off-road. We already purchased a set of rear shocks (Bilstein 5100 – $79 per shock) that should be going on the SR5 here in the next couple weeks. We are going leave the rear spacer on the back and eventually swap out the spring and spacer with a new 2″ coils which would make for a full suspension lift. But again, none of this is “needed”.
This is a great kit to get started, even just understanding the undercarriage of the 5th Gen a little better, and it’s very affordable. You will not regret the look. As for off-road, this kit would suffice on fire roads and your everyday weekend adventures just fine. If however, you are pounding your suspension on rougher terrain, you may want to opt for a complete suspension lift.
I think this kit was around $350, so well worth it in terms of looks. Ride quality will change a bit but it all comes down to budget. Spacer kit is about $350 Vs. $600(front coils)+$200(rear coils)+$200(rear shocks) = $1000+ for suspension lift and Bilstein’s on all corners. All depends on budget but obviously coils all the way around would be the best.
I have a 2016 TRD Pro 4runner will I have to change the shocks or do anything with the driveshaft after installing the kit?
Sam,
No. The spacers are all you will need. The spacer kit is built for that exact 4Runner so they take the rear shocks, sway bar along with the front struts into consideration. You can always add aftermarket struts/ coil-overs in the front and aftermarket shocks in the back but this kit is plenty and all other OEM parts work great with just the kit. It also depends on how much (if any) you are going to take your runner off-road. If you do plan to wheel occasionally, you will be fine. If you plan on being really aggressive, you should look into aftermarket everything (IE: A Complete Suspension Lift – struts/ shocks) as opposed to a spacer lift. Hope this helps! Let us know what kit you go with!!
On a second note here:
We are going to go with new rear shocks and possibly remove the front spacer. After we remove the front spacer, we will add new adjustable Bilstein coil overs (0-2.5″) and max them out at the 2.5″ height. By doing this, we will achieve a more rugged, durable and flexible suspension. This should put less stress on the undercarriage and perform better on and off-road. Stay tuned for a future post on the installation of the Bilstein front coil overs and rear shocks.
Hi Brenan, I had to do some digging to find my question since the site has grown so much in a few years. I ended up installing an Icon Stage 2, I never tackled a challenge like that before let alone doing most of it solo, but I wanted to reach out and say thank you for all the informative posts!