
Ironman 4X4 Foam Cell Pro 2” Suspension Kit Stage 2: Step-By-Step Install + Review For the 5th Gen 4Runner
I am a firm believer that you shouldn’t run out and get a lift first.
As the amount of gear that you put on there will affect the suspension. I always protect the rig before lifting. With all the protection and recovery equipment I’ve added, I now have as much ground clearance as an Outback. It’s definitely necessary for an upgrade to the suspension.
There are a plethora of choices when it comes to lifting your 4Runner. If you are new to lifting your 4Runner, check out this guide first or for some inspiration, check out these 10 Lifted 4Runners.
Bucking The Status Quo
For the longest time, I had my heart on the coveted Icon Suspension Stage 6.
After talking Suspension budget with my wife, I got a solid FU on their price point. After having my hopes crushed, I started to rethink what I am really going to be doing in my rig? And with any build, I would always suggest starting with the end in mind.
For my ride it is a daily driver and weekend warrior first, then second it tackles longer 2-3 week-long adventures in the backcountry. I am not going to be thrashing whoops on the Baja or crunching steel on Moab Boulders.
As my research dug deeper into actual user comments and I started to peel away marketing hype, I came to a conclusion: there are very few differences in any of the technology out there and what difference is there comes from racing technology.
Why I Chose Ironman 4×4
Even with advances like adjustable remote reservoirs, they are still stiff.
I want to find the perfect balance in plush ride and control, both on and off-road, also without breaking the bank.
This led me to Ironman 4X4, an Australian company that has been in business for over 60 years which is now breaking on to the US scene.
I had picked up a winch from them at Expo West and had a chance to talk with the US CEO, Luke Schnacke.
“It does what it says on the Tin”
Ironman 4X4 has the no-nonsense approach to their product development, and I love the phrase that Luke used “It does what it says on the Tin”.
In all the products that they had on display, I did take note of their Pro Cell Suspension since it was different from what I was used to.
While I didn’t pick up the suspension then, It stuck with me and I began to do more research. The founder, Gunter Jacob, migrated to Australia after surviving the brutality of the Concentration Camps of WWII. He survived by having the valuable skill of a Blacksmith, hence “Ironman”. He started the company building suspensions for the Australian military.
About 10 years ago, his Son transitioned the brand that’s strictly utility to include the recreational market as well. Now it is the largest family-owned Australian Offroad Brand, a brand built off of Foam Cell Suspension.
Find It Online:
- Ironman 4×4 Foam Cell Pro 2″ Suspension Kit, Stage 2: Check Price
What are Foam Cells?

Standard shocks use gas to stabilize the oil inside a shock, normally nitrogen.
This means there is a portion that is oil and a portion that is gas.
The Foam Cell doesn’t use gas. They use a piece of closed-cell foam that acts the same as the gas-filled, however, it allows the shock to be filled with oil. More oil means more heat dissipation and takes more abuse to cavitate. Cavitation is when the oil begins to create bubbles from the valving process.
Every shock, no matter the company, can have this occur with enough abuse, think miles and miles of corrugated roads. The Foam Cell Shocks limit this by, not only filling the shock with oil but also having a larger shock and thus even more volume and cooling surface.
Another benefit to not having gas is the fact that you can now rebuild your shock at home vs sending them out or taking them to a shop.
They also have a 3-year unlimited mile warranty… who has that?
Foam Cell Suspension Standard vs Pro Edition: What’s the Difference?
It’s simple and has been proven for many years across the pond. Ironman 4X4 has two types of foam cell shocks.
The difference between the Standard and the Pro is that the standard is nonadjustable and the Pro is adjustable 2”-3” with small threads for even micro-adjustments.
The Foam Cell Pro Suspension Kits come in 3 variations:
- Comfort Load for stock weights: If you don’t plan on adding winches, bumpers, skids, and racks this is the best choice.
- Performance Load: If you do plan on adding all of that, then another option is Performance Load, which takes accessory weight up to 660 pounds.
- Constant Load: If you have your rig fully kitted for overland expeditions with additional weight over 660 pounds up to the vehicles max weight.
For my 4Runner build, I went with the Performance Load.
Ironman 4×4 Suspension Step-By-Step Install
- Remove Front Sway Bar Mount
- Install Relocation Bracket
- Remove Splash Guards
- Disconnect Brake Lines From UCA + Steering Knuckle
- Disconnect UCA
- Remove Top Bolts From Shock Tower
- Remove Lower Shock Bolt
- Unseat Shock & Remove From Tower
- Install Foam Cell First
- Cover Up Spring + Remove UCA
- Reinstall in Reverse Order
- Reattach Front Suspension
- Disconnect Rear Sway Bar
- Use Floor Jack To Lift To Lower Side You’re Working On
- Install Coil Spacers Or Reuse Factory Spring Isolator
- Insert Closest Side Into Mount Towards Axle
- Secure Top Nut With Needle-Nose
- Apply Anti-Seize To Mount Bolts
Foam Cell Pro Front Suspension Install
The Foam Cell Pro 2” Suspension Kit Stage 2 comes with everything you need including forged upper control arms, sway bar relocation brackets, and all new mounting hardware.
I also had Ironman 4X4 prebuild the coilovers as I hate messing with the cheapy spring compressors.
The install is fairly standard with a few specific details that need to be observed with the placement of the shocks.
Note: If you are interested in how Ironman sets the coilovers, then check out their video here. There is also a video (above) of this install by Adventure Built, my brother’s channel.
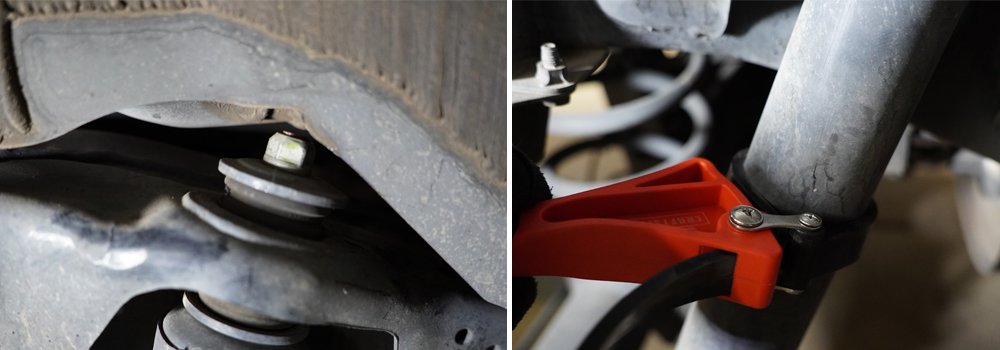
Step 1. Remove Front Sway Bar Mount

After jacking up the 4Runner and removing the tires, remove the front sway bar mounts and bunged the bar out of the way.
Step 2. Install Relocation Bracket

I installed the relocation bracket since I was there but this can be done later. This bracket will move the sway bar forward and give more room to the larger springs.
Note: You can’t mess this up, as I tried to, the holes only line up a certain direction. I added Loctite to the bolts.
Step 3. Remove Splash Guards

Remove the rubber splash guards with the trim tool.
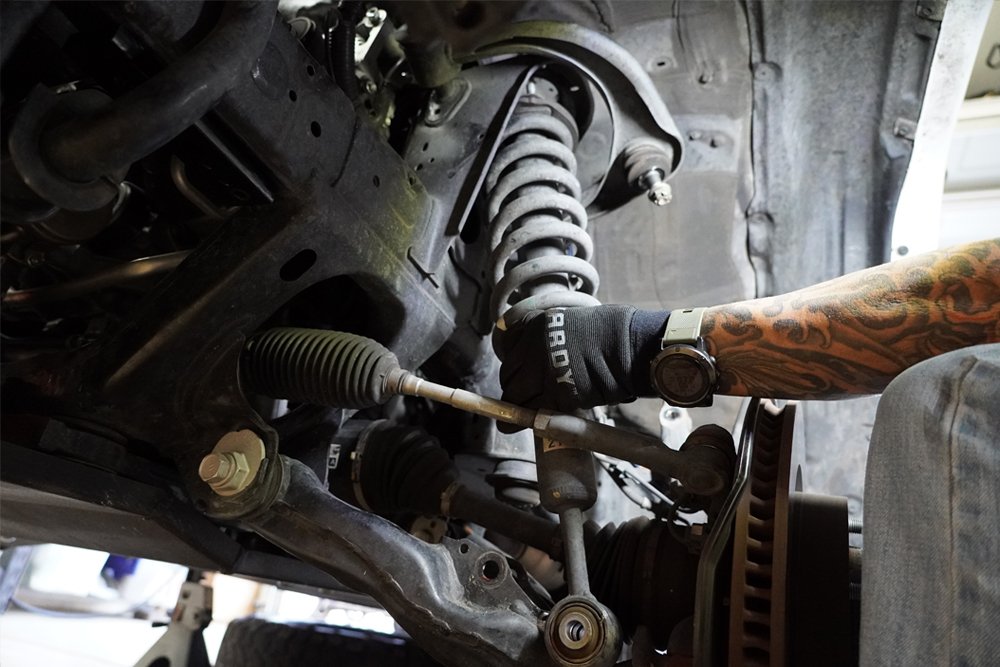
Step 4. Disconnect Brake Lines From UCA + Steering Knuckle

Disconnect the brake lines from the upper control arm and steering knuckle to create more room to work.
Step 5. Disconnect UCA

Disconnect the upper control arm.
Step 6. Remove Top Bolts From Shock Tower
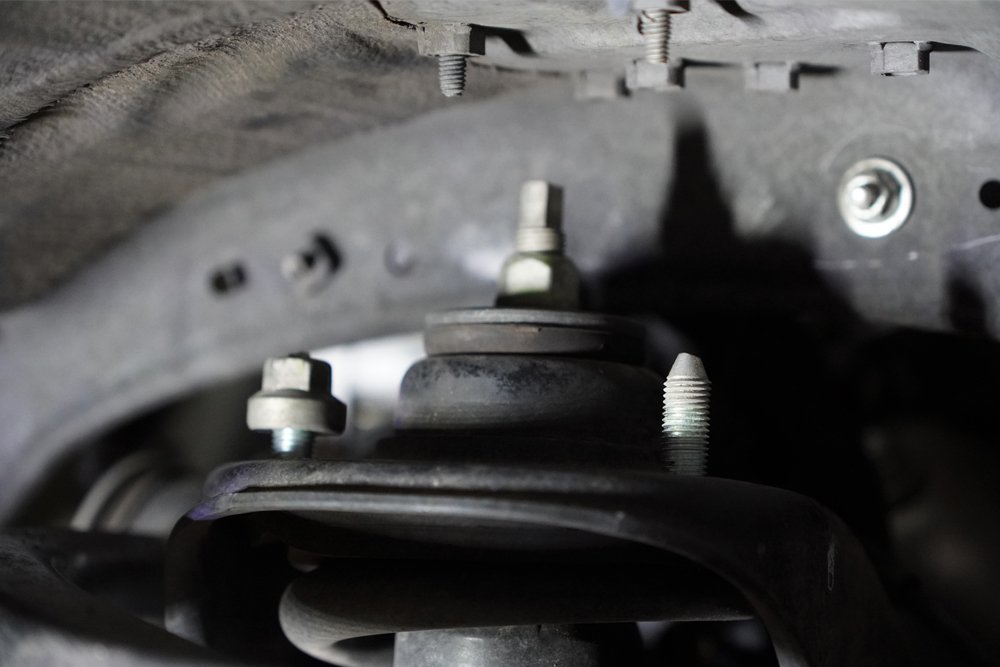
Remove Upper Bolts from shock tower.
Step 7. Remove Lower Shock Bolt

Remove Lower Shock Bolt, may have to drive it out.
Step 8. Unseat Shock & Remove From Tower
Pull from the bottom to unseat the shock then lower it out of the shock tower.
Comparison of the OEM and Foam Cell Pros

Shown above is a side-by-side comparison of the OEM and the Foam Cell Pros.
Not only are there more coils but they are a larger gauge as well. The diameter for the mount is beefy as well. The prebuilt are marker driver and passenger.
Step 9. Install Foam Cell First

Install in reverse, the foam cell goes in easier. Hand-tighten lower bolt and torque lower when on the ground as it may damage bushing.
Step 10. Cover Up Spring + Remove UCA

Cover up the spring before removing UCA, as not only cosmetic the powder coating protects from rusting and once compromised it is a pain to control on springs.
Use Two Wrenches For Add More Torque To Loosen UCAs

The UCA bolt can be accessed on both sides without removing anything from the engine. My Genesis Dual Battery made me nervous but still had plenty of room. Using two wrenches will allow more torque to loosen.
OEM vs Forged UCAs

The weight feels close, however, the Ironman 4X4 forged UCAs are thicker and more robust around the bushings. OEM bushings and ball joints are maintained in the new UCAs as they are affordable and function very well.
Step 11. Reinstall in Reverse Order

Installation is the same in reverse, however, these are an exact fit.
There is no play on either side so you must have them exactly lined up and angled properly. It took about 10-15min each side to line up.
Also, make sure that the washers are near the bushings as there is not enough room for them around the body.
Step 12. Reattach Front Suspension

Reattach all the front suspension components, when attaching the front sway bar the bolt should be on the second hole from the front.
Now, let’s get started on the rear suspension install!
Step 13. Disconnect Rear Sway Bar

Disconnect the rear sway bar. You may also disconnect the track bar to make it easier to remove springs.
Use Pipe Strap To Pull Out OEM Rear Shock
Pro Tip: Save time taking out OEM rear shock by using pipe strap instead of holding the top.
A few bangs with a hammer on the bottom of the shock will help you to easily pull it off.

From the photo above, you can notice the rust on the inside of the bushing and mount.
Step 14. Use Floor Jack To Lift To Lower Side You’re Working On

Pro Tip: Once the shocks are out, use a floor jack to lift the opposite side to drop the side you are working on. They will come right out without effort.
Step 15. Install Coil Spacers Or Reuse Factory Spring Isolator

I reused the factory spring isolator, as I didn’t want an additional lift. Ironman 4X4 does have polyurethane coil spacers than can give more height or correct for lean.
Step 16. Insert Closest Side Into Mount Towards Axle

The rear shocks are very beefy, and the base is offset as they would not sit properly on the mount.
The closest side inserts into the mount toward the axle.
Step 17. Secure Top Nut With Needle-Nose
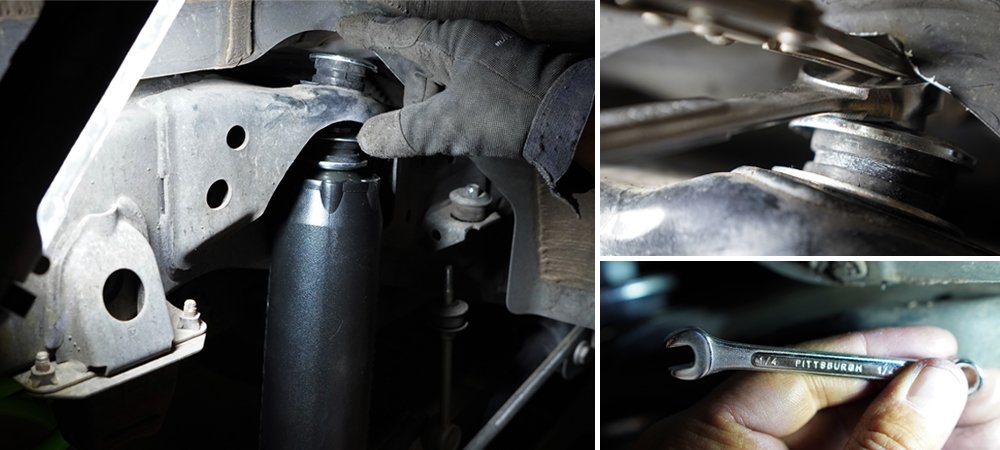
Getting the top nut on takes 3 hands. Once installed, though, you can use a needle-nose vise grip, however, I found the grips may chew up the stud, a ¼ wrench worked better.
Step 18. Apply Anti-Seize To Mount Bolts

Remember that rust? Make sure to hit the mount with some anti-seize or taking this off for rebuild will be a mess. I hit every bolt with it!
That’s it! You’re done with the installation!
Final Review

Overall, I gained 4” in the front and 3” in the rear.
But it’s a 2-3” lift… How did you get 4”?
Great question, the stated lift is from the factory height. Not only is it sitting pretty, but I also regained my ground clearance from all of my additional weight.
This is truly the best bang for your buck suspension upgrade you can do!
Most importantly… the RIDE! I am so impressed with how nice the ride is.
It is a perfect balance of firmness for control and softness for comfort. It has no issues handling bumps and dirt roads at speed, plenty of flex for getting up obstacles. Nosedive is cut dramatically steering and corning is improved and it is not STIFF! It still feels like a truck but not abusive in the slightest. The rear is a little stiff when going over large bumps but that was expected.
When speaking with Ironman 4X4’s Product Manager, Chris, we crunched the weight numbers and with the future addition of a rear drawer system, it should be just as plush as the front.
In a sentence: This is truly the best bang for your buck suspension upgrade you can do!
I installed the foam cell pro 2.5” front 2” rear lift today on my 4Runner. I forgot to measure hub to to fender before the install. Currently I am sitting at 23” on all 4 corners. Trevor what is your current lift height after everything has settled?
Very close to pulling the trigger on the stage 3 kit but I am curious if you think the UCAs will accommodate 295/70/17s? I’m prepped to do BMC. trimming and what not but don’t want to have to get another set of control arms.
Do you see any great advantage to doing the stage 3? I am doing the stage 2 soon and I am trying to figure out if I want to adding the next stage on as well.
Step 2: Install Relocation Brackets:
I just received my Stage 3 Foam Cell Pro kit and there were no front sway mar relocation brackets. I called Ironman and got someone knowledgeable on the phone in about 30 seconds, love that. She told me that for my 2015 4Runner Trail Edition it was not needed.
I took another look at the ‘U’ shaped brackets that actually hold the sway bar and they are asymmetrical/directional so they accomplish the same thing without the extra part.
I just thought I’d throw that out there for anyone else reading this in 2022 or later. 🙂
Install planned in a week and a half along with 295/70/17 tires. BMC was done last week.
Looking forward to the upgrades.
were you able to get the 295s on? I was watching someone who decided on 285 because he wasn’t sure 295s would fit due to the UCA with stock wheels so I’m not sure if I want 295 or 285.
Do you not have any lean after install? I have kdss and I don’t want to deal with a lean after installation.
Beginner question here. I have a Tacoma and was recommend by several people to look into the Ironman products. If I get the 3″ foam suspension kit, will I gain any actual clearance on my 2019 Tacoma or is it simply a lift to the body height?
You will gain clearance. However, the only way to get the rear diff up higher is to fit bigger tires.
You said you were a dealer for Ironman 4×4 products? What would stage 2 and stage 3 foam cell cost?
Were your front coil overs labeled driver and passenger or just the boxes? I removed mine not realizing this. I don’t see any actual labels on the coilovers themselves. I’m assuming the one that has the locking collar set “higher” is for the driver side? Putting them side by side they look to be the same exact size just more pre-load on the one.
It was just on the boxes. I would look at bottom offset. If not just call their customer service, they rock!
Installed the stage 3 back in January, love it. The sway bar end links are way more important than I could’ve imagined. Just added 285’s the other day, had some rubbing and did some trimming and got it aligned. Still rubbing some on left side when turning left at near full-lock. Firestone (I have lifetime alignment with them) says they have the caster pushed as far forward as they can (Don’t know if I believe them). Have you experienced this rub? If so, how did you deal with it? I’d really like to avoid the BMC, if possible. Many thanks!
I did experience rub, but I also had the spacers on. I did a body mount chop and some inside fender messaging. I take the spacers afterwards to see how they fit but it was to late to really guage fitment before the chop. Hope this helps. I added the sway bars extensions as well, it really took the tension out. I have the trade bar bit haven’t got around to the install yet.
I ordered the stg 2 performance 2.5” front coils and 2” performance rear coils because it was the only options available. I was wondering if it was going to give a huge amount of rake considering I want a level to a slight rake kind of stance of my 4runner. I don’t have any constant load or anything in the rear.
hello Trevor, great DIY instruction. with over a year of ownership, any issues yet?
No issues with the suspension at all. Love it!
I do need to replace the UCA ball joints, as they start to squeak, but that is with a year of hard use.
This is awesome. I ordered the Stage 2 kit at the end of Feb. with the 25% off sale they were having. Did you have the stock TRD Off Road wheels with 285’s when you did the original install? Trying to figure out if with my stock Trail/Off Road wheels (not running spacers) and the Ironman UCA’s if I’ll end up having to do a BMC with 285’s.
It really depends. I ran stock wheels but I had the spacers which pushed me to the body mount chop. Without spacers, it probably will not rub but I’ve seen it go either way.
Hi Trevor,
Thanks for the detailed review. I am interested in getting Foamcells installed on my FJ. I am new to AZ (near PHX) do you recommend a shop for install? I don’t want to tackle it myself.
Thanks, Chris
Hey Chris,
Welcome to the land of perpetual Sun… and heat!
Thanks for the offer to help. I’d take you up on the offer to help with the install. And if you want to give me a idea on cost for Stage 2 or 3, I wouldn’t mind throwing you the business. They have 25% off right now and free traction boards, so I don’t know if you can get close to that.
I got FCP stage 2 installed and I feel like the rear is sitting higher then I would like. Should I waiting for suspension to settle in or adjust the front coilovers higher? We set them to spec from Ironman but it’s not leveled.
The rear will settle a little bit but you will probably want to adjust the front if it still needs it. I have to raise my front end as well, my estimation on the front end weight was a little bit off.
I upgraded to the stage 3. The sway bar end links and adjustable panhard bar really helped the rear end settle. It also softened it some which was welcome… I called Ironman and they only charged me the $130 for the extra parts which when bought separately would’ve been close to $600
That’s Awesome, they have always had excellent customer service. I still haven’t got the panhard yet.
Looking at it, I feel like the extended sway bar links would effect the ride more. The sway bar just doesn’t have the stress on it that it did and the axle is free’d up. Though, I am sure the panhard helped too. Thanks for all of your advice on this.
Do you think with the 3” stage 3 kit you could fit the 285/75/R17’s?
My tire set up is 285/70R17 (32.7″) with Method Wheels 703s 17×8.5 | 6×5.5 | 0/4.75″. I also have a body mount chop and a good amount of trimming in the fender wheels.
The 285/75R17 are 33.8″ which is minimum but your Wheel offset will be the main factor of fitment.
Thank you for answering Trevor. I really enjoy y’all’s videos. If I ever make it out with my family you’ll have to show me some of those trails. I’m going to go with the 285/75R17’s.
Awesome. Hit me up anytime!
Leaning towards the stage 2 nitro gas. Any worry about a diff drop with the 3-4 inch lift that you got?
My axles are near stock angle, so I never felt the need for a diff drop. Just remember on the nitro I don’t believe the front are adjustable as the foam cell pros are. I would also look into the sway bar extensions as there was a bit of tension there, and the Ironman 4×4 ones are way beefier.
Well with congress deciding to hand out some cash I’m now going with this kit. You posted this a year ago. How are you liking the kit after that amount of time?
Love it! I have added the swaybar extensions and will be adding the track bar soon. It has taken me up the Arizona BDR, Moab and multiple other hard trips with zero issues!
You mentioned in the video that you loved the ride on road too. I have a 2k mile roadtrip planned in 6 weeks to the Rockies to go skiing. No lift needed there. Debating waiting to do the install. Thoughts? Ski gear does not weigh what camping gear does.
For me the Performance springs gave me a great ride but I already had the weight in the front end. After adding drawers, fridge and tools to the rear it didn’t noticably effect the ride at all. In my experience it depends on what you want. If you adjust the front for max lift but don’t have a bumper or winch up front it may be a bit stiff because of the lack of compression. But if you plan on adding it soon than go for it, you can also adjust it later on as well. I’m actually going to raise my front up a bit more to help with clearance. You can call the guys over at Ironman 4×4 they should be able to set you up.
Installed over the weekend. Loving it! Thinking about getting them to send me the adjustable panhard bar, which i think you mentioned you have since added. Question: Why the adjustable bar and not something like the eimkeith panhard bar correction mount?
I haven’t seen that option before and not familiar with the results. However, one of the big distractors I see is that it is a weld on solution vs replacing the actual bar with a few bolts.
did you ever get the adjustable rear pan hard bar installed? I bought the Stage 3 kit and when I go to do the adjustable pan hard I am wondering how to measure it and set it.
1/16″ inch in length for every 1″ lift of height in the rear. Measure your stock panhard (center bolt to center bolt), translate to the adjustable bark, unlock the center bolt (spin the smaller nuts to the center), adjust as needed, relock the nuts to either side.
Awesome Thanks!
Not yet, I just got the sway bar extenders. The pan hard bar is next on my list. I’m sure Ironman can give you some help.
Hey man. Fellow Trail4R contributor here. Anyway I am ordering the stage 3 kit, but I am wondering about the “Lean” (5th gen 4R). I know the front can be adjusted, but do I need the spacer in the rear? Please help ASAP. Waiting on your answer… Thanks.
Hey Andy. There is a slight lean but not visually noticeable so I didn’t even adjust for it. The spacer is 25mm, so almost an inch. Think my lean was only near a 1/2 inch. You could get the spacer later if it is noticeable as the rear end is a lot easier than the front or just get it and see what happens. Just remember that the spacer is a single so if you want to raise both sides you’ll need 2. Hope this helps.
Thanks for the answer. Can’t wait to get this kit on!
I am about to install the FCP Comfort set on my 19 TRDORP. I had already purchased JBA UCA’s. I picked up the Ironman rear sway bar extensions, as well as a transfer case drop and front extended bump stops. One thing I noticed while looking at videos on YouTube was that some kits come with spacers for the radiator bracket mounts, which was pushed out a bit due to the sway bar relocation bracket.
Did you run into this issue at all? Anything I might be missing that you would suggest?
Thanks for comments and questions! There was no need for the transfer case drop. And there is plenty of clearance for the radiator with their relocation bracket. I also didn’t use the extended bumps as I wanted to see if they were needed so far they are not, but I don’t bomb the woops.
The only thing I’m upgrading is the sway bar extensions as they have a good amount of tension on them and eventually the track bar when its back in stock.
Cheers,
Trevor
Trevor –
Waiting on the track bar as well. At this point it will be all buttoned up and good to go.
I recently purchased the stage 3 foam cell pros. I took it to a professional shop to install and after the set up was complete the mechanic noticed that the driver side was sagging by about 1.5” so he adjusted it an inch to compensate for the sag. I was wondering if anyone had ran into the same issue.
Awesome, I’m slowly upgrading to the Stage 3, have the Swaybar Links but will be getting the track bar later.
As for the lean it is a common issue with Toyota. The front can be adjusted with the Foam Cell Pros and for the rear they make a spacer. See link.
https://ironman4x4america.com/toyota-03-4runner-fj-cruiser-lexus-gx470-gx460-polyurethane-rear-coil-spacer-25mm/
Cheers,
Trevor
Hi, i was wondering what tire size are you running? It looks very proportional in the after picture. I currently have ironman shocks with oem coils. Im not shure if buying the ironman coils since it may look weird the my current tires (nitto terra grappler 265,75,16).
I’ve got the BFG KO2s in 285/70/17. The 265s will have a good amount of gap. Just a heads up the new Wranglers and Gladiators in the Rubicons have the 285 tires so you can actually pick up a set of near new tires fairly cheep on marketplace.
Cheers,
Trevor
Did you have to do a bmc to fit the 285’s? I’ve been looking at that size and was hoping to be a quick change out. Worst case scenario I do it but I’d rather know ahead of time. Thanks.
I did need one as the rubbed with the factory wheels and aftermarket spacers. Kinda wish Toyota just came factory with more room for tires.
I forgot, my truck is a 4th gen 4 runner. Do you think it might have too much gap? The tires are new hahah.
It’s all personal preference but the 4th gen may look good.
What rear springs did you go with? The performance ones or the stock rate ones? I’m debating these 2 right now. I only carry extra weight in the back when I’m camping and I don’t have a rear bumper or anything.
Since its been a few months, how are you liking this setup? Anything you would change?
I went with the Performance Springs in the rear as I had taken into account my future drawer system and keeping all my tools and recovery gear in there. It took me a few months to get the drawers ordered. The performance was a bit stiff, especially on speed bumps, but it wasn’t to bad. Once I got the drawers in it was perfect! With all that said, it really depends on how you roll a majority of the time, if that is mostly stock, than I would go that route, the Ironman Spring will be an improvement of OEM for sure.
As for changes, no and yes. No, I love the Foam Cells and still think it is the best all around suspension out there at any price. However, they didn’t have the Stage 3 when I got mine so I’m upgrading mine. So far I have the swaybar extension links on order and will get the track bar down the road.
I’ve been eye balling this suspension for a while. I currently have the TRD Pro Bilstein suspension with stock UCA’s on my 2018 ORP. Do you think the Ironman Cell Foam Pro would be an upgrade from my current setup, about the same, or a down grade? I was looking at getting the Stage 3 in performance load.
Honestly, I think the Foam Cells are not only the best suspension for the price but the best all around suspension period. However, it also depends on how you ride. With over 1K Trail Miles across Arizona, Colorado and Cali and 30K highway miles I can say I haven’t even began to push these to their full potential.
Hey Trevor,
Just took my car to the shop to have them install this kit and they said that the rear shock is hitting the axle or a part of the chassis which would cause it to rub. Did you run into this issue?
Thanks.
Meng,
Sorry to hear that happened. I can’t say for sure but the shop probably installed the rear shock going the wrong direction. Look at the image for step 16. It is off set and has to be set in a specific direction for clearance.
Hope this helps, let me know how it turns out.
Trevor
I spoke with them, said that they know about the issue with the rear strut, but it still rubs. They said that it will only rub mainly when i am offroading and flexing the rear.
Interesting, I haven’t noticed it yet. I will have to park it somewhere at full flex and inspect it closer.
Please keep me updated, I will keep a close eye on mine as well. Thank you!
Do you have KDSS on your 4runner? I emailed Ironman and was told that KDSS needs to be disabled to run this kit unless it was a total misunderstanding.
Meng,
I do not have KDSS. In my research it seemed that when stock the KDSS is great, as it gives more sway control on the road and more articulation when off. However, as soon as you lift it most of those benefits are limited, no matter what lift is put on. Some companies will say their lifts may be capable however, that just means that non of their components will make contact with the KDSS system. I would double check with Ironman as in their Lexus GX Video they show install with KDSS and it is the same lift as the 4Runner. https://youtu.be/lcA5z4YPUTk
Trevor, I just installed the Dobinson’s 3″ lift kit with their UCAs on my 2018 4runner. The ride feels really busy on the road, like the twin tube nitrogen shocks do not do very well soaking up small road imperfections. I am thinking about purchasing the Ironman foam cell shocks and installing them with the Dobinson’s springs. How is the everyday street driving with the Ironman suspension? Does the ride feel busy or smooth?
Chris,
I would say smooth but It still drives like a truck. Tucson has really bad roads and I can still feel the small potholes and seams but not rough in the slightest. Long highway stretches are comfortable. Super happy with this lift!
Trevor
Why didn’t you install the new uca before installing the new struts?
You could do it either way. I figured this way would be the best way to protect finishes.
What would be the max weight for the stock or ‘comfort’ option (vs the 0-660 listed for the perf.)? Is there a reason the stock or ‘comfort’ kit on their page does not include control arms, like the performance and constant options?
Great questions. I wasn’t sure of the answer so I jumped on their live chat on their website. Here is the brief version. So the foam cells are the same on all of the levels just the coils change. With the performance coils they will add more height over the comfort and will be a firmer ride. The UCAs are really only crucial because of the extra lift from the performance, while it is recommended to get an alignment and if your vehicle wont get into spec than get the UCAs. They really are about getting people what they need and not over selling them just because they can. Hope this helps.
Thank you Trevor.
“In a sentence: This is truly the best bang for your buck suspension upgrade you can do!”
What about your July 2018 article on the Bilstein 6112/5100 upgrade (https://trail4runner.com/2018/07/03/bilstein-6112-5100-install-5th-gen-4runner/)? That is ~$600 less than the Ironman comfort pkg detailed in this post.
Brenan did that instillation on the Bilstein, however, I have had them installed on my Xterra before. I would consider the Bilstein a step up from a spacer lift. Like Brenan said it’s a good entry level lift, but I feel their too stiff. The Foam Cell Pros are up there with a higher level lifts such as Icon. There nitro suspension, similar to the Old Man Emu, would be somewhere in the middle.
Which Bilsteins did you have on your Xterra? 5100s? Also, if you were trying to improve on and off road handling while maintaining < 1″ of lift, what brands or parts would you go with?
Thanks for the question Jack. They were the 5100s. I would not do them again as they made everything very stiff.
If I understand you want to keep the 4Runner near stock height but improve suspension performance. I’m a huge fan of Ironman 4X4 and believe the Foam Cell pros are the best suspension out there. Eyeballing it appears that they go down to the stock height, however I would call and verify.
Let me know how it works out.
I ran the standard foam cell on a 2012 Tacoma and currently run the nitro gas iron man on my 2019 4runner , I find it comparable to ome with the foam cell being better.
I also considered the nitro suspension. I’ve had the OME on a XJ. It was stiff and squeaked because of the poly bushings. The Ironman uses rubber bushings and is adjustable. I would consider the Foam Cells as vast improvement.
Awesome, thanks for letting me know. I almost did the nitro, as I did have the OME on a XJ, but the foam cell was new to me and sounded to cool to pass up. I think the ride is much better on the foam cells vs the nitro as well. Softer and the OME squeaked, poly bushings.