
Lamin-X Precut Tint Film – Step by Step Application Process on 4Runner Fog Lights
Recently, we covered the Xenon Depot H16 yellow fog light bulb. Those bulbs produced impressive/intense yellow color along with powerful light output. The only possible downside to some owners is that the XD yellow h16 will not give your truck that “yellow fog look” with the lights off.
Other than that, the Xenon Depot H16s are a kick-ass yellow fog light bulb. If you have not seen those, you should consider them.
The Lamin-X filter covers will give you that yellow look with the lights off and on, but will not produce the same impressive/intense yellow color or the powerful light output as the XD H16s.
The Lamin-X filters offer a much more affordable option to get that yellow light.
UPDATE: We added the XD H16 yellow bulbs in the factory housing with the Lamin-X filters. The outcome was impressive. While the Lamin-X filters alone are a little on the dull side, and the XD H16s are on the bright yellow side, together they create a very soft orange/amber hue. This is a really nice look in my opinion. Check out the bottom of the page with all the light comparisons and you be the judge.
Yellow Fog Lights with Factory Housing
- Lamin-X yellow filters: Check Price
- Lamin-X amber filters: Check Price
- Xenon Depot H16 Yellow: Check Price
Lamin-X Filters Overview

Lamin-X offers made-to-order, pre-cut film for the 4Runner, in a variety of colors. For some people, the color options might be a big deal, but for most yellow is the focus option.
If you are going with a color other than yellow, check your local laws to make sure the color is not illegal. Red and blue might be specific to law enforcement only in your area.
Lamin-X makes the install simple with the pre-cut 12 mil film that fits the fog light housing on the 4Runner. The Lamin-X protective film is impact-resistant similar to a clear bra material, which should increase the protection of your fog light housing.
The yellow and amber are both great choices that most owners choose. While yellow has a distinct look, amber may closely match the 4Runner parking light color depending on the type of bulb you have.
While some owners might buy the filters for the style and aesthetic aspect, others may buy them for protection, and some because it checks both boxes.
On the colors in addition to Tint, Gunsmoke, Green, Yellow and Amber, Lamin-X also has Clear, Blue, Pink – that is for the precut kit.
Individuals can also purchase the universally sized sheets (come in all colors and tint shades) if they wanted something beyond what is offered as a pre-cut fog light kit.
Quality Materials
- It’s designed to prevent lights from becoming cloudy/hazy/oxidized
- Protects against UV rays
- 12 mils thick (to the everyday person that doesn’t really resonate but compared to other similar films it’s much thicker)
- Great for protecting against rock chips and other road debris – whether the vehicle is used as a daily driver or offroad
Installing Lamin-X Yellow Filter Film
To install the Lamin-X Protective Film requires a few minutes of your time and a little patience.
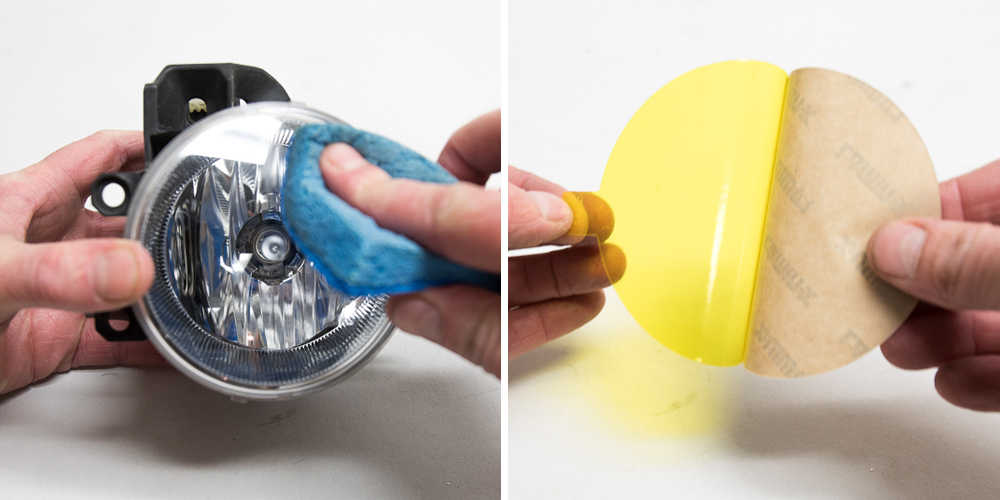
First, you will want to remove the bezels, this makes the install easier. If you don’t remove the fog housing, you are going to fight with the filters. To me, this was common sense but some people leave the housing mounted behind the grille.
The diameter of the bezel is smaller than the fog light face which will force you to stretch and pinch the film in order for them to slide it.
The manufacturer says warmer weather will lead to an easier installation. Some guys even leave their fog lights on to warm up the housing. I don’t think this is necessary. What I tried worked fine with very minimal effort. Being a few weeks into winter, the days are starting to get cold.
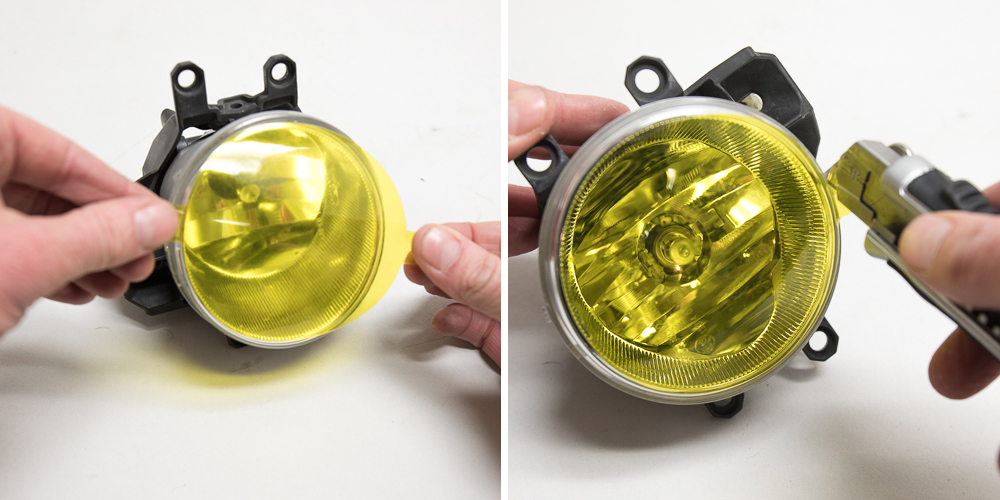
I removed the fog lights and brought the housings with me to my office, then set them on a side desk. Nowhere special, just inside and away from the cold. Towards the end of the day, 3-4 pm, I cleaned off all the dirt and dead bugs on the lens. I then peeled back the Lamin-X tint and applied the film directly. If you miss it the first time, just peel back and re-apply then push out the bubbles with your thumb. Very simple.
Application Process
- Remove fog lights
- Bring fog housing and film inside, let sit.
- Clean the lens
- Peel back Lamin-X
- Apply the film to fog light housing
- Push out air bubbles
- Re-install fog light housing
The company actually recommendations two different methods. The wet application and the dry application.
Wet application – Beginner
The wet application is very much like tinting a window. You use soapy water and spray a fine mist on the adhesive side that you will be applying to the fog light. The wet method allows you to remove and reposition or even reapply during the install if you need to. This method is great if you have less experience in applying films or tints.
Dry application – Advanced
The dry application is exactly how it sounds, dry. Lamin-X says the dry method is a little less forgiving and does not allow for re-positioning once applied but that was not the case for me. Just apply in the same manner as you would apply a static lens cover to your cell phone or tablet.
Lamin-X Film Review
Not only will the Lamin-X Protective Film keep your 4Runners fog lights protected, but it will also give your 4Runner the yellow fog light look. The best part about this upgrade is the low cost and easy install.
Compared to the Xenon Depot H16 Yellow, they are much less intense in yellow color and light output. The beam pattern keeps its factory appearance but the front-end color projection and facade do get a face-lift.
For around $15, you really can’t beat it.
- If you are looking for a yellow fog without spending over $100, the Lamin-X is a good option.
- If you want the yellow fog look this is also a great option.
- If you don’t want the yellow fog look but you want yellow fog light output, then check out the XD H16 Yellow bulb
The next options for more light output in yellow/amber color would be the KC HiLiTES Gravity G4 and the Baja Designs Squadron-R Sport in wide cornering.
Factory (H16) Fogs with Factory Low Beams (H11)

Lamin-X Fog Light Filters with Factory Low Beams (H11)

Xenon Depot H16 Yellow with Xenon Depot Low Beam HIDs (H11)

Xenon Depot H16 Yellow with Lamin-X Fog Filters

Baja Designs Squadron-R Sports with Factory H11s
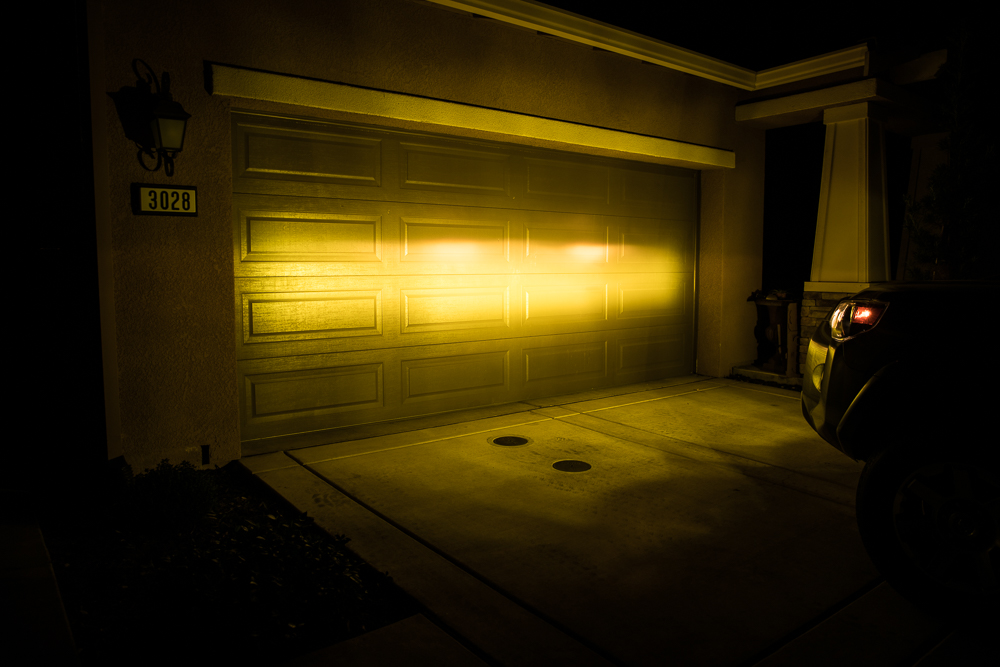
Yellow Lamin-X Fog Filters on White 4Runner

How does the Lamin-X yellow on the halogens compare to the Diode Dynamics fogs? I tried kapton tape and it was not yellow enough, the Lamin-X amber is too orange.
Do I need the round or oval shape! Their site has both options and they can’t tell me which one I need. Thanks!
You need the circle one. That is Lamin-X Part Number: T649Y
A scam company, I have no idea who is running this company. They sent me the wrong product and then tried to charge a restocking fee for their mistake. Then when I sent it back they ignored me when I kept inquiring about my refund. I will be dedicating all my time and resources and will be releasing emails with company to show how much of a scam they are. They created their own reviews to get people to buy.
RVinyl is a way better company for these types of products
Mr. Davis – good morning!
First, I apologize that your experience with us did not meet your expectations. Based on conversations we’ve had with our customer support team it sounds like every attempt was made to try and offer you a full refund provided you send us documentation in the form of a picture(s) detailing that the fitment of the product you received was incorrect.
For well over 15 years this has been a policy of ours regarding refunds as it relates to fitment issues.
Our records indicate we never received the requested documentation from you thus we could only offer you a partial refund minus the restocking fee.
Lastly, we have taken a screenshot of your comments as you twice use the word ‘scam’ to refer to our company in addition you have made a false claim that reviews on our website related to this product are not authentic. This (a screenshot of your comments) will be forwarded on to the appropriate department within our company.
Lamin-x Protective Films
Thats not true I have all emails as documentation. Refund my money As soon as Possible. All I want is my money, thats it. You sent me the wrong product and then charged me a restocking fee. Thats a scam, I will continue to report to as many outlets including the Georgia Department of Law and Consumer Protection Division I am about action not victimhood
Did the same – super easy, didn’t remove the lights from the truck, looks super cool too. I am prone to biting off more than I can chew and getting into trouble with projects, this was super easy, you’d have to really try to screw it up.
Also agree on the Laminix as far as the lenses look awesome but the lights do not cast a super strong yellow light after installation, it’s pretty faint right now. I suspect it’s going to be more evident with snow, but I’m looking for more of the yellow light as depicted in the photos above and will probably go for the yellow bulbs next.
I just installed my Lamin-X covers with the method described here and on the instructions that came with them – start in the middle and apply pressure spiralling out. Worked like a charm! Only needed to trim the tabs and didn’t remove the bezels!! Thanks for the review and the advice. Still daylight here, so once I drive it after dark, I’ll let you know what I think.
I saw a tip that made it super easy to install these without removing the bezel. You touch the middle of the film to the middle of the light, then slowly draw a spiral with your finger from the middle going out. It applied perfectly with no bubbles whatsoever and easily tucked right behind the bezel. I then trimmed the little tabs off with a razor blade. It took less than 2 minutes and turned out perfect.
I just installed the yellow ones last night. Agreed, super easy to install “dry”. Stick them down in the middle, slow circles around the light, trim the tabs, and use something to push the excess underneath the bezel (I used a relatively flexible credit card).
Helpful hint for tucking the excess in — put the filters on very slightly off-center. This gives you a good starting place (less material to tuck) for tucking the excess under the bezels. Then leave your card between the filter and the bezel, and just go around the circle in either direction.
Nice!!! I like it, sounds legit. I guess we took the long way around the barn.
Thanks for the review!! I ordered my Lamin-X covers a couple days ago, so this is very timely for me.
Awesome Eric, let us know how you like them.