
DIY High Clearance Bumper Cut Mod on 5th Gen 4Runner – SSO High Clearance Bumper Cut Mod with C4 Fabrication Lo Pro
There are many options on the market for front bumpers for the 2014+ Toyota 4Runner.
Some prefer the hybrid look, such as the C4 Fabrication Lo Pro Bumper, while others prefer to go full steel with ones from makers like CBI Off Road.
But what happens when you want the clearance of a full steel, without the full weight of a steel bumper? Southern Style Off-Road (SSO) came up with an interesting modification. You can also see this on another post about front bumpers, but Southern Style Off-Road calls design their “Stage 2 High Clearance” front bumper.
You can go with most low profile front bumper though, it does not need to be SSO. Although SSO is the originator of the mod/design so you have to give credit where credit is due.
Low Profile Bumper Options
- C4 Fabrication
- Southern Style Off Road
- Relentless Fabrication
High Clearance Bumper Cut Details:
- Provides an even more aggressive look
- Allows closer approach angles
- Requires cutting of factory bumper
- More wind noise
- Possible stronger crosswinds
- Windshield washer reservoir exposed
Tools and Materials
- Tape
- Exacto or Utility Knife
- Automotive Edge Trim (smooth finish)
- Automotive Edge Trim (textured finish)
- Heat Gun
- Zip Ties
- Option 1:
- Option 2:
Why would you want a Low Profile Bumper?

There are various versions on the market, but the two popular and better-made versions are the C4 Fabrication Lo Pro Bumper and the Southern Style Off-Road Slimline Bumper. Both allow you to run a hybrid, steel bumper which sits in the lower valance of the bumper on the 4Runner.
There are various options for these bumpers. Some owners buy them just for protection against dead center hits. Others get them for the ability to add up to a 30” LED Bar for night trail runs and or to cut through fog better on back country roads or off-road. Some owners also run the bumper for a hidden winch, which will assist in situations you may find yourself stuck or needing help up a section of trail.
While this cut was introduced by the Southern Style Off-Road company, it can be done with most other hybrid bumpers, as well as the stock bumper.
One important thing to note is Southern Style Off Road offers “wings” which bolt into the bottom section of their Slimline Bumper and provides protection to the bottom of the cuts made to the bumper, as well as some protection to where the fender liner is removed.
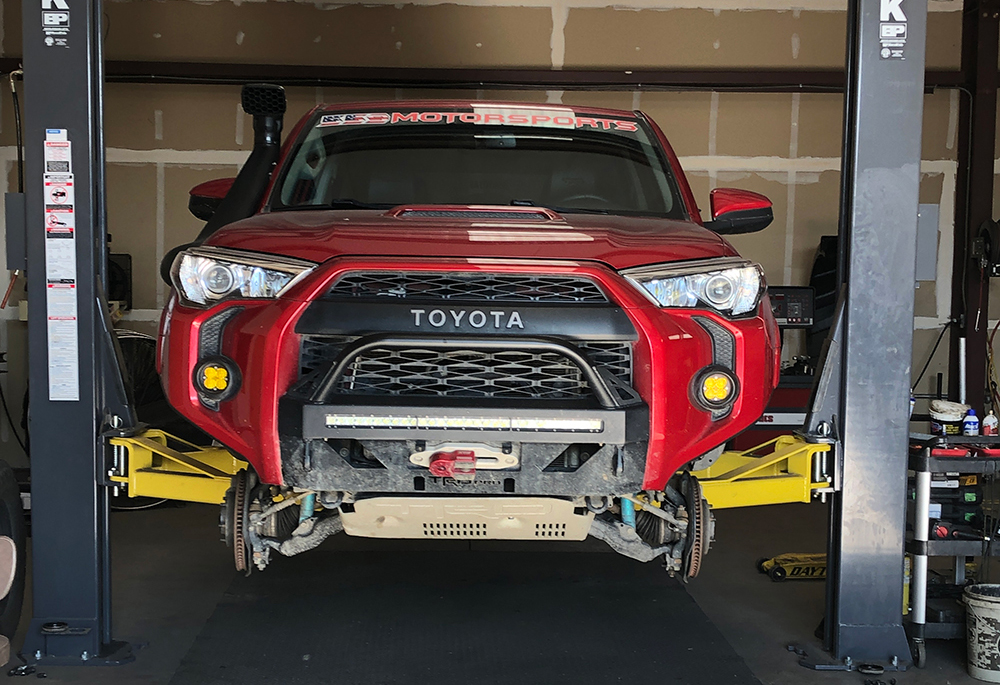
Bumper Cut Overview & Installation
The general directions from Southern Style Off Road are to measure 3” diagonally from where the bumper meets the fender, and 2-1/4” from the bottom of their bumper.
If you have the SSO bumper this part is pretty simple. However, if you do not, this is where you will need to be creative and find where you want to put your mark.
Measuring for Cuts
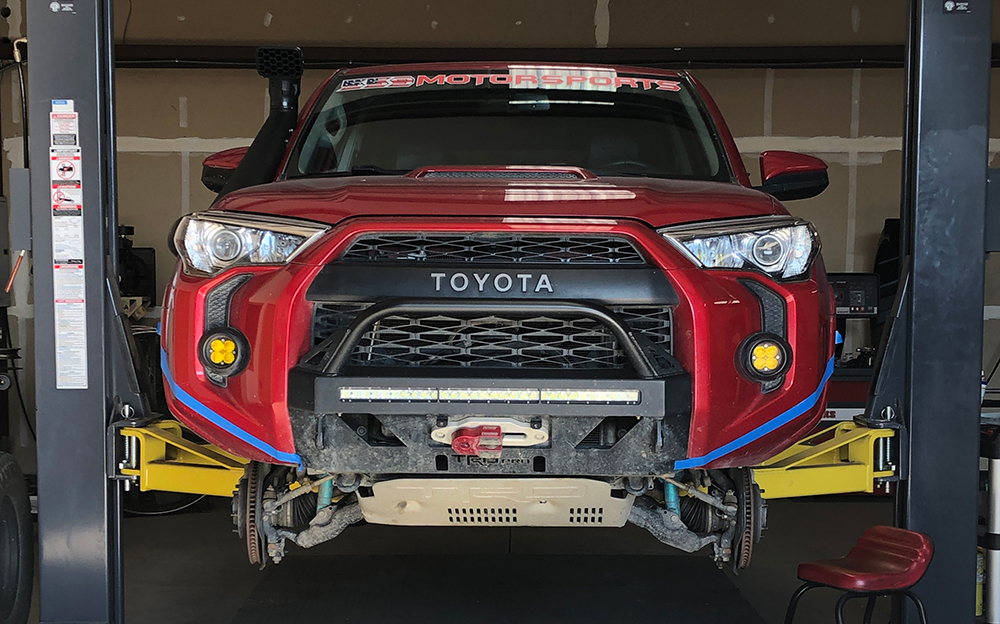
Because there are numerous bolts at the bottom for the stock bumper, as well as one that connects the C4 Fabrication Lo Pro Bumper to the stock bumper, you may want to cut differently. For the C4 Fabrication Lo Pro Bumper we chose to cut a little lower than what the SSO directions called for to allow the bumper to stay bolted at the bottom to the Lo Pro Bumper.
Once you decide where you want to mark it, run painters tape from the top mark to your bottom mark on both sides. We did this and made some small alterations to make sure it was going to look even on both sides, and be cut evenly as well.
Cutting the Bumper
Now the fun part begins. Start cutting. We used a Dremel saw, but you can technically use anything that will cut through plastic. It is important to note that some saws can cause the plastic/paint to melt/burn, so be sure to not use something too excessive.
After making sure both look the way you want, make any adjustments you may see, and then proceed to smooth out the rough edges made from the cut. We decided to curve the cut with the Lo Pro Bumper to make it blend more easily than without it.
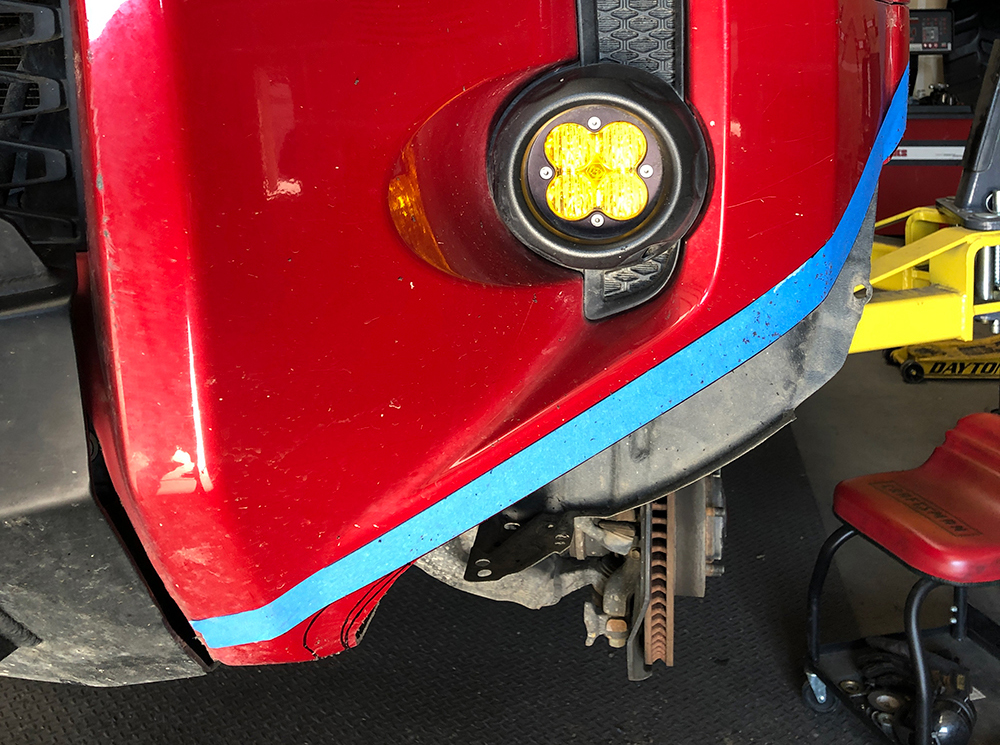
Adding Trim
![]()
Then we went ahead and added some automotive edge trim (smooth finish) to the sections that were cut to give it a clean look. While it’s up to you, we decided to go from the end of the mold in the bumper to the end of the cut, rather than including the mold, as the fender mold would look off not having its own.
What to do with the fender liner

The next decision was possibly the trickiest, though not hardest. What to do with the fender liner. With SSO their wings help protect what is in the fender well. You just trim the liner to fit with it. Unfortunately, with the C4 Fabrication bumper, that option wasn’t possible.
So what to do? Heat it up! Add some heat and reform it to the cut. Then like anything else after a modification, find a couple mounting spots, and cut holes in the fender liner and zip tie them up.
The harder part is the passenger side, as you have the windshield washer fluid reservoir to deal with. Ultimately we did the same as the driver side, but did have to cut a bit off to fit around the reservoir. It is important to note the reservoir will be exposed. The good part is, whether you have SSO or not, their washer fluid “skid” will work on your vehicle. If you don’t want to run this (it runs $50), you can easily paint it black which will help it blend in, but it will leave it exposed.
Final High Clearance + Low Profile Bumper

That’s it! You now have higher clearance to allow better approach angles while on the trail.
Though it isn’t as high as a true full steel bumper, this will without a doubt help you with those obstacles that always seem to have your front bumper scraping and breaking on.
It ultimately should allow you to run larger tires up front more easily.
What size tires are mounted
Has anyone done this mod with bushwacker fender flares?
I have been hoping to see this as well! Love my bushwhackers and big fan of the viper cut, plus going with bigger tires. Have you been able to find anything or try it yourself?
I have a shop cut it. They just cut the liner horizontally. Now there is a big exposed gap. What could I use to cover that?
Did you finally figure out how to cover this gap because I am planning to do viper cut with the Bushwacker fender flares
Quick question without the slimline bumper can someone show pictures and explain how to secure the excess wheel liner. I’m looking at doing this and I understand to heat bend and attach it so its secure but I’m unsure where/ how to do it. Thanks for your time.
For the driver side I only cut a bit of it so I could bend it forward and fit it in. Then I created a small hole on the outer edge so I could anchor it to the fender again (where the fog light is) and this way I left the lights covered. On the passenger side I cut in the shape of the tank pretty much.
Easiest thing to do, which is what I did, is cut it with a razor blade or automotive scissors, and then zip tie it to random spots.
I have a 2017 limited. Is doing a fender cut like this feasible for the limited bumper?
I know it has the parking sensors along the bottom portion of it….
But. Has anyone seen anything like it?
Did you ever get an answer to this? Exploring options for the same
What size edge trim did you use?
Has anyone tried this with the MetalTech Stronghold bumper? I called SSO and asked and they said it wouldn’t fit.
Does this increase the size of tires you can run?
Yes and no. The front bumper normally needs minor trimming and shaving to fit larger tires, but the bigger issue is typically the mud flap that needs to be removed, as well as the body mount and pinch welds. Those will all need to be modified to run bigger tires up to 34″. If going above 34″ tires you begin to either need long travel, spacers, aftermarket fenders, and more aggressive body mount chops and shaving in general.
The bumper cut looks great, however, I am interested in the spare tire mount on the rear of the vehicle. I don’t recognize it and I do not see where the mount is attached. I would be interested in this type for 2017 SR5.
The spare tire mount is the Detours Knucklebone. It will work on yours without any issue. It attaches through the hitch.
Great write-up! Do you need to keep the liner or could you trim it and leave the area open and exposed?
Up to you really. If you keep the liner you will need to heat it up to help form it so it fits, and also put a hole or two in it to zip tie it somewhere underneath. Otherwise you can remove it all, but that does leave everything underneath exposed, and keep in mind your intake on the passenger side would be susceptible to water and even more dirt.
Next mod-snorkel to eliminate water intake.
The best way to avoid the melted plastic look is to cut below your tape line with a standard grinder cutting wheel then get a 600 grit sanding/smoothing wheel to take it up to the tape line. Used this method when I cut for my CBI Off-road Bumper.
What is the brand of trim protector you used, I’ve been looking around and can’t seem to find one bendable enough to make the bottom bend look good! Thanks in advance!
We used Crowleys edge trim for it. Heated it up to help make the bend easier, and to also get the glue extra sticky. It’s held up perfectly fine in all types of weather and fast highway speeds for multiple hours straight.
Thank you! I wanted to get the SSO Hybrid bumper for my 4Runner specifically so I could do the high clearance kit down the road. I just recently scored a used C4 for 1/2 price but wasn’t sure if I could still make the SSO kit work. This answered my questions and will definitely help when the time comes.