
Bilstein is one of the most common options for digressive shock absorbers across many platforms. Developed in both North America and Germany, Bilstein is a brand you can trust to run on your 4Runner.
The install was done with 285/55R20 (32.3″). Tire Size: 20X9 with an offset: 35 and backspace: 6.350. No rubbing in forward/reverse after a few days of driving. This 4Runner is strictly a street princess so we probably won’t test much off-road flex on this set-up.
If you are looking to run 32.7″ (285/70R17) tires, you can but you will likely have some trimming. If trimming is not your thing, then you should stick with a mid-level 32.1″(275/70R17) tire or smaller.
Please check out our tire size guide if you have any questions on tire and wheel size.
The 6112 and 5100 combination is a great option for many 4Runner owners out there who are looking for a mid-range suspension lift. You can expect an extended 1-1.5″ travel of shock but won’t truly see that travel until you mount UCAs (upper control arms). Expect a substantial amount on-road stability and performance, though. With 6112s, 5100s, and Icon springs, your body roll, and nose dive will decrease and your cornering stability will increase.
Find It Online
- Bilstein 5100/5100 (no UCA): Check Price
- Bilstein 5100/5100 (add UCAs): Check Price
- Bilstein 6112/5160: Check Price
- Recommended Upper Control Arms (SPC): Check Price
- Rear Spring (ICON 52700): Check Price
Table Of Contents
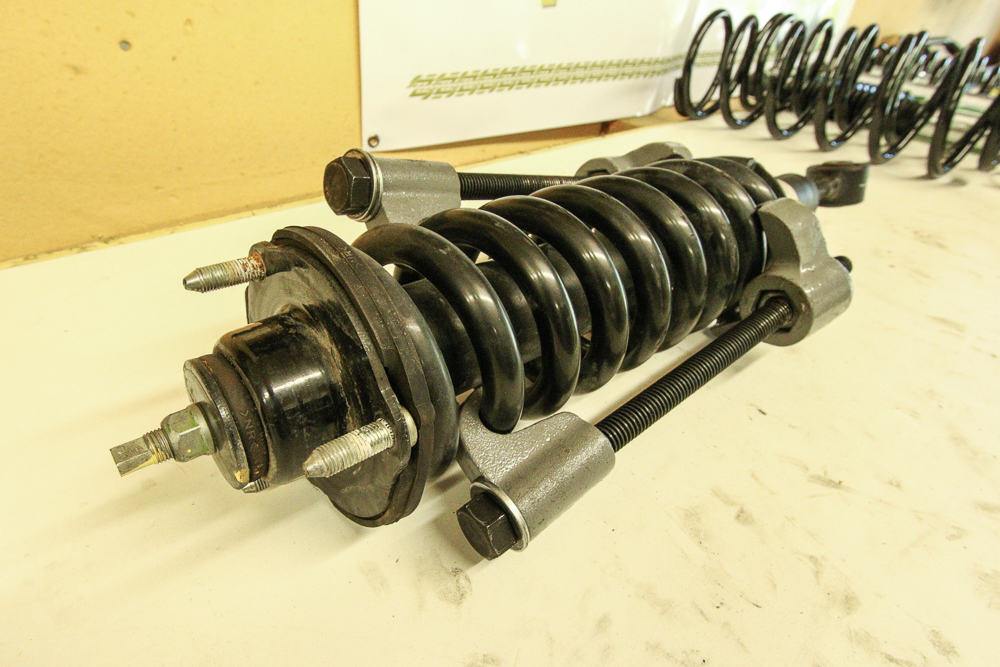
B8 6112 Coilovers (47-259768)
The 6112s offer 0-2.65″ of lift on 4WD 4Runners and 3.25″+ on RWD 4Runners with 7 snap-ring grooves and clip settings for ride height adjustment. Many websites quote 0-2.5″ and 0-2.65″ of lift, but the height really is closer to 2.65″ of lift on the highest clip setting. The Eibach-sourced 600lb spring can be adjusted to desired ride height. We can’t comment on how the actual spring rate is affected under load, as we do not have an aftermarket bumper, which, etc installed.
5100 Rear Shocks
For matching rear shocks, you can go with the Bilstein 5100 1.25-2″ lift (33-187174) or the Bilstein 5160 1.25-2″ lift (25-227611). The Bilstein 5100 is a monotube shock with digressive valving that offers increased damping both on and off-road while maintaining a comfortable yet stable ride. The 5160 is a similar shock just with an added reservoir and is closer in terms of valving to match that of the 6112. If you are looking to push your suspension a little harder, consider the 5160.
Rear Springs
Plenty of options for springs out there, but we had a set of ICONs left over from our Icon stage 2 kit so they were free. You can go with the OME 2895 2″ springs, Dobinsons C59-327 1.7″ spring, or any other spring that will fit your application best. The ICON 52700 spring is a 2″ spring that is well priced for what you get considering the name.
Ride Quality
2016 SR5 4Runner with NO KDSS
I would like to have a Good and Bad section but ride quality is pretty subjective.
The ride quality on-road has been improved. Factory ride quality is somewhat still felt, although things do start to tighten up a bit (in a good way). Noticeably less body roll and less nose dive on braking. This setup feels similar to a test drive I had in 2016 TRD Pro. The Bilstein 4Runner-tuned suspension ride quality remains closer to an OEM feel as opposed to a stiff Icon suspension. This may be a good or bad thing depending on how you want your 4Runner to perform on/off-road.
Daily driving the Bilstein 6112/5100 suspension compared to an Icon will be much more comfortable. But, comfortable is relative here. I have daily driven with the Icon stage 2 for over a year and enjoy the stiffer ride over the looser/floaty OEM feel because I mostly HATE body roll. My girl, on the other hand, barely notices it. I would rather get jerked around once with a tight suspension than wobble around 3 or 4 times with a Cadillac feeling suspension. That is how this suspension rides, more like a Cadillac. It’s pretty plush, somewhat responsive, all while decreasing roll and dive. Important to note, I have not experienced any steering wheel shake at highway speeds (before balance/alignment).
For city driving, the 6112/5100 valving seems semi-firm over gentle rollers and corners smooth as well with minimal body roll, although you can still feel the roll. The same goes for riding over potholes, uneven pavement, speed bumps, and exiting driveways at an angle. It’s more firm than stock, but not as stiff as a KDSS system with an Icon suspension maxed.
This all may be improved with the 5160 shocks as it’s the closest shock in terms of valving but hard to say with no experience. I doubt it will make much of a “noticeable” difference to many people out there.
Conclusion on ride quality
There is some give and take in finding the right suspension across all suspension events. Digressive, progressive and linear shocks all handle events differently and they all come with their ups and downs. There is no “best” solution out there. This is to be debated by only you on whether or not you want a stiffer ride or a smoother ride overall.
Overall, this is a great introductory suspension lift for the 4Runner. You will maintain most of the factory ride while reducing roll and dive. If stock roll and dive is a “10” the 6112/5100 would be a “5”. Honestly, it will cut the roll and dive in half.
The 6112 is somewhat adjustable so you can tailor the coilover to your desired ride height dependant on the rear spring you choose. If at a later time, you add a bumper or winch, you can swap in a heavier coil over your strut.
Finally, the Alignment Sheet.
Installation
This install assumes you know how to jack up your truck, safely use jack stands, and remove your tires. If you are not confident in this install, please take your truck to a local 4×4 shop and have them perform the install for you.
Tools Needed:
- Floor Jack
- Jack Stands
- Vice
- Metric Sockets
- Standard Sockets
- Open-end wrenches
- Vice Grips
- Impact wrench
- Coil Spring Compressors
- Mallet/Hammer
- Pin Punch
- Screwdriver or snap ring pliers
Step 1: Remove Lower Strut Bolt
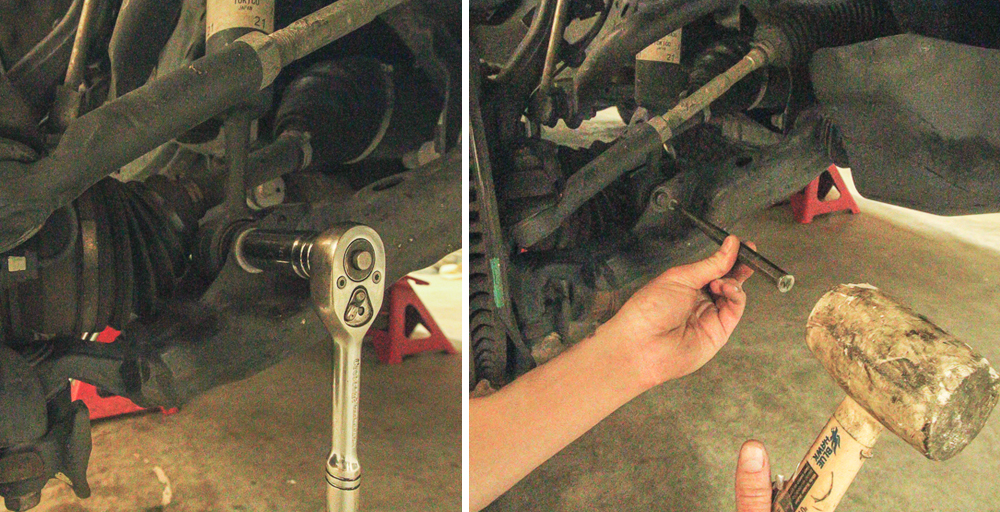
Once you have jacked up your truck and placed jack stands under your frame, start pulling apart your suspension components. The strut bolt is tight. Once you have the strut bolt nut off, you can knock the bolt out using a punch. To prevent the strut from putting too much pressure on the bolt against the lower control arm, you can jack up the hub assembly. This way when you punch out the bolt, the whole assembly won’t fall down. This also prevents bolts from stripping.
Step 2: Coilover Tower Bolts
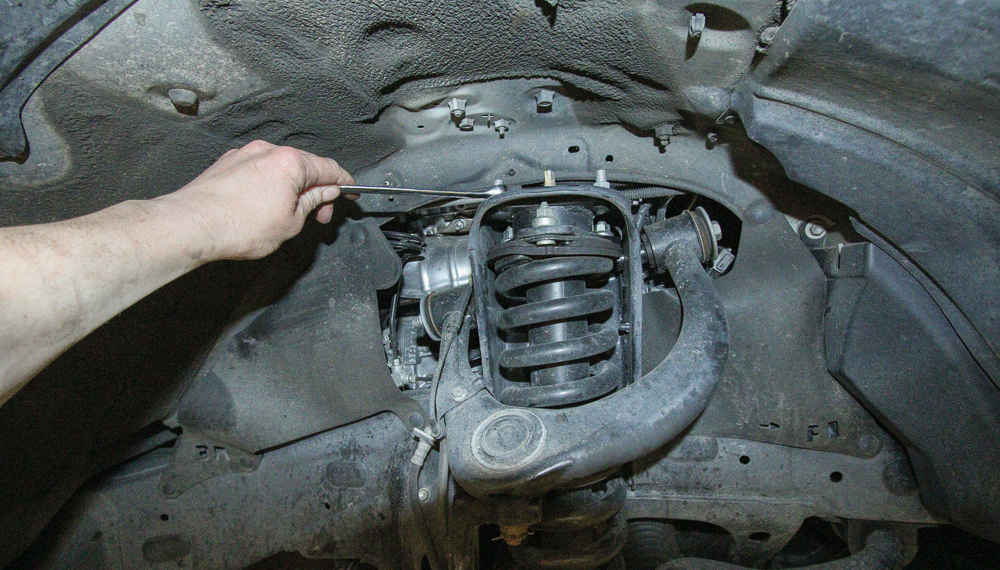
There are three bolts on top of the bucket. Using an open-end wrench, you can remove the nuts. This will free the whole strut and coil from the bucket.
Step 3: Lower knuckle mount bolts

There are two lower knuckle mount bolts you need to remove. Once these are out, the whole lower control arm will be free from the hub assembly.
Step 4: Remove factory shock
To further separate the hub assembly from the lower control arm, it helps to jack up the hub assembly at the bottom of the brake rotor. This is much easier with two people. Jack up the hub and press down on the lower control arms, and the strut should fall right out.
Step 5: Compress Factory Springs
You can buy a set of coil spring compressors for around $50 or you can rent them for around $20. It makes more sense to just buy them as you will have them forever. You need to compress the coil in order to remove the OE top mount from the strut.
Step 6: Remove Top Hat
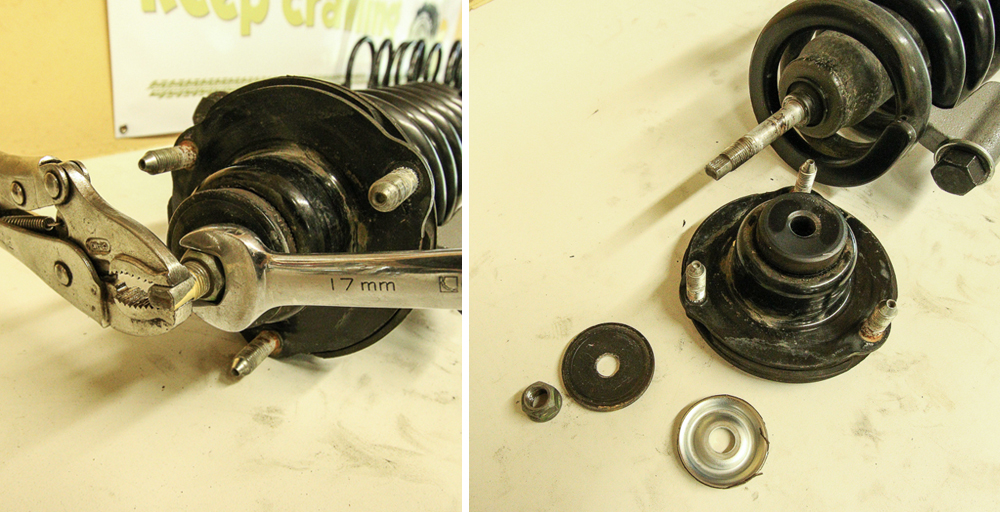
Using a set of vice grips and a 17mm open-end wrench, loosen the nut from the top of the OE top mount. Pull everything off and save the top mount. You can discard the OE washer, nut, and bushing. Bilstein provides hardware in their kit that will replace these.
NOTE: You will need to keep the bushing that is on the underside of the top mount. That should stay attached after you remove the top mount. Don’t take it off. Just leave it where it sits.
Step 7: Strut Clip For Ride Height

Using a set of snap ring pliers or a flathead screwdriver, move the adjustable clip to your desired ride height. In our case, we are moving the clip to the top ring.
Step 8: Bilstein Spring Seat

The spring seat just slides down over the shock tube into place and sits on the clip.
Step 9: Rod Adapter and Lower Washer

NOTE: The washer is upside down. Flip the washer so the flat surface is facing the top.
Step 10: Vice and Compress Springs

Although, it’s not pictured. You want the text on the spring to be right side up, not upside down. The Bilstein text on the coil should be towards the top. Coil spring compressors are not designed for impact wrenches or air guns but it will go much faster using an impact. We have used these compressors for a few different installs and on this day, we stripped a bolt (just something to think about). You will need these compressors to get the job done.
Step 11A: Top Mount

After your coil is compressed, place the top mount on top of the coil.
Step 11B: Bushing, Washer, and Nut

Add the bushing provided in the Bilstein kit along with the spacer and nut.
IMPORTANT: Make sure that one of the nuts on the top mount is inline with the bottom of the strut. You want to make sure that the bottom of your strut will fit into place, along with your top mount fitting into place in the bucket. If you fail to align these, your Bilstein 6112 will not fit. You will need to loosen everything and make adjustments.
Step 11C: Tighten Nut

Thread your nut down until everything is tight. You want to make sure the spacer and bushing underneath is not moving.
Once you thread your nut down and everything is tight, then you can remove the coil compressors.
Lastly, torque to 20ft lbs.
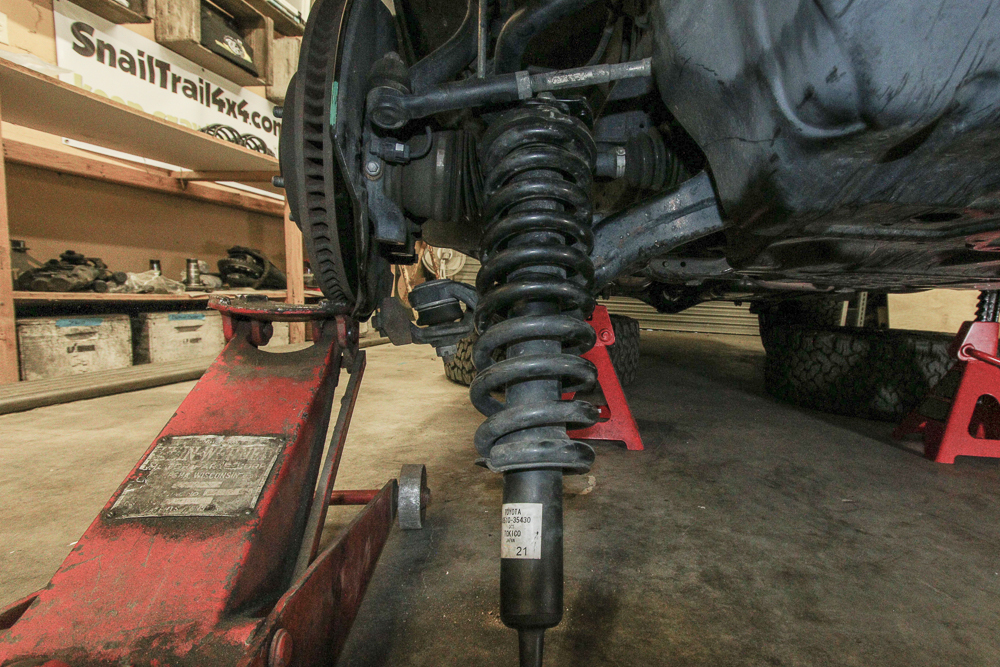
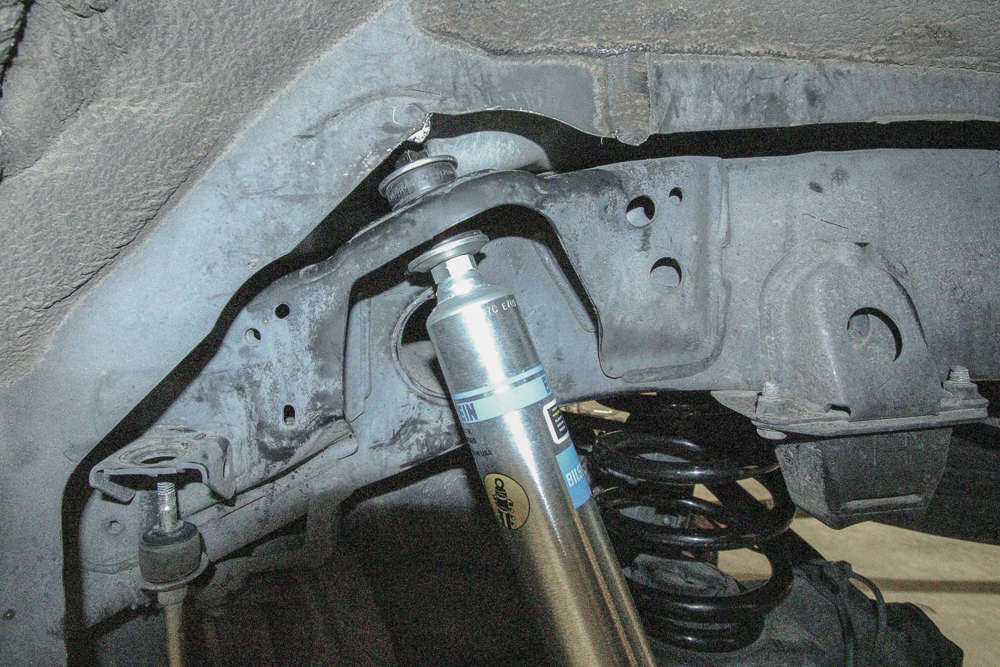
Step 12: 6112 Coilover

That’s it for the front. Throw your new Bilstein 6112 up into place. Place the bottom of your strut into position. Slide your strut bolt through and make sure your top mount fits into the coil bucket correctly. Thread down your top mount bolts and then thread in your lower knuckle mounting mounts.
5100 & Icon Spring Installation
The rear should go quicker than the front. Removing the rear shocks are always pretty simple. Removing the rear springs will be easy if they are factory and may take a little more force if you have larger springs or springs with spacers.
Step 1: Lower shock bolt

Step 2: Top shock bolt

There is very little room to work with around the top shock nut. You need an 8mm socket or small vice grips at the very top to hold the shock body still while turning the other nut to break loose. Be patient with this part of the process. Once you have the top nut off, the rear shock should fall right out.
Step 3: Sway bar mount

This is not necessary but in some cases, you may need to disconnect your sway bar from the frame in order to drop the axle low enough to remove the rear springs.
Step 4: Brake line brackets and cables

There are lines and brackets along the axle that you may need to disconnect in order for the brake lines to hang free.
Extending the axle to remove the springs will stretch out your brake lines. If you stretch your brake lines out too far, you risk damaging them.
Do your self a favor and disconnect any cable/bracket that is connected to the axle that may prevent your axle from flexing before removing the springs.
Step 5: Factory Springs

To get the rear springs out, jack up one side of the axle which will drop the opposite side. This will free up the spring and with a little wiggle, it should come right out. We had 2″ spacers on top of our coils, so it took a little more effort.
If you have factory springs, they should come out really easy.
Step 6: Bilstein 5100 Shocks

Remove the plastic sleeve on the Bilstein shocks. Place your Bilstein 5100 shock on the bottom shock mount first, and lightly thread on the shock mount nut. Then, add your washer and the bushing to the top of the shock. Place your shock up through the top shock mount and add your second bushing and washer. Thread on your top nut and then torque to spec on both the bottom and top shock mounts.
Step 7: Reconnect Sway Bar Mount

Reconnect your sway bar mount and you are all set!
ALWAYS IMPORTANT. Double check the torque specs on everything and make sure you double check your brake line brackets.
Final Result

How does it sit?
Pretty damn close to level. The front sits .5″ lower than the rear. If you wanted to level it completely, you can grab a couple shims from Ekstrom Design and throw a .25″ shim on top of the top mount.
For around $1000, this is a pretty nice suspension for the 5th Gen.
I have a 21 SR5 Premium 4WD. I had the 6112 installed in the front and the 5100 with OEM springs in the rear. With the 6112 set at the lowest setting the 4runner had a rear squat. We had to add spacers in the rear. That corrected the problem and now it has the correct rake. I am a novice and my question is will the spacers cause any damage over time to the rear shocks? Should I get bigger springs instead. The truck rides great and has been aligned. Oh we are having to put a shim in the left rear. There is a 1/2 difference in the lift. Im assuming from the full fuel tank. Any input would be welcome.
Very new to the suspension game here. I installed Bilstein 6112/5100s with aftermarket UCAs 1.5 years ago. I haven’t done any off-roading, just street driving. Nothing to truly stress the suspension or body. I’ve recently \ noticed some knocking in single increments in/around the suspension/tires whenever I move from a stopped position like pulling out of parking. Sometimes the knocking occurs in turns but usually not. Any idea what this maybe? Possibly missed something in maintenance?
I’m running this same lift with the Bilstein UCAs and the additional .25″ shim in the front that gives another 1/2″ of lift. I want to run a 265/60R20 (32-1/2 x 10.7). Will this rub?
Hey there,
Here’s how much lift each clip gives you according to Bilstein
These are labeled driver side/passenger side
Non KDSS:
Clip 3/1: .80″
Clip 4/2: 1.2″
Clip 5/3: 1.6″
Clip 6/4: 2″
Clip 7/5: 2.5
With KDSS:
Clip 1: 1″
Clip 2: 1.4″
Clip 3: 1.7″
Clip 4: 2″
Clip 5: 2.4″
Clip 6: 2.7″
Clip 7: 3″
So to answer your question it is staggered if you do not have KDSS and vise versa. So you would want to use the first option to have as little lift as possible.
Thank you, very helpful!
No problem! Just revised with updated specs from Bilstein and for KDSS vs Non-KDSS models.
Got the 6112/5100 Bilstein’s installed today. I also added the Bilstein rear springs for 1″ lift in the rear. I used setting 7 for 5th gen 4runner with kdss.
Although it is too early to provide an accurate review, I’ll say that the difference is very noticeable.
My ride is no longer soft and mushy, it’s much more compliant and precise. The suspension is smooth and seemless for road use. The added height gives the vehicle a solid look and feel. It immediately gives the driver a feeling of height and inspires confidence.
I am looking forward to taking the 4runner off road, the oem suspension was already capable off road but I can’t wait to see how she performs now. Although I am not a serious off roader, I do enjoy the odd trail here and there but in my opinion, the factory ride height of the 4runner was too low…even on beginner trails I found the stock vehicle height was bottoming out and scraping against the smallest obstacles.
Do you happen to have measurements from before the lift? As of right now the front of my 2016 SR5 4wd (non kdss) is 2” lower on the driver side and 1.5” lower on the passenger side compared to the rear. I have purchased the 6112s for the front and 5100s for the rear and would like to end up with similar results to this with the front being about .5” lower than the rear but the math doesn’t seem to add up for me with 2” springs installed in the rear. What do you recommend to achieve a similar lift to yours?
How do these compare to the dobinsons ims?
what kind of tires are these, if you dont mind me asking?
I put this on my 2015 Limited. It went great. Does this need to be aligned once installed? Sorry if I missed this somewhere.
Alignment won’t hurt. I usually always take my truck in for an alignment after installing a suspension.
I did align it…..Much better. On another note, I have a stock 2019 Limited as well. We go to a camp that we takes all dirt roads to. This suspension is incredible compared to the stock one. 20 miles an hour on the stock one VS 40-45 on this one. Just an incredible difference!
So I’m thinking about upgrading from just the procomp lift/leveling kit that lifts 2” in the back and 3” in the front. I already replaced the back shock with a Bilstein 5100. If I were to leave the spacer and shock in the back, and then went and installed the Bilstein 6112 on the highest setting (so 2.65) and then put a Ekstrom Design 0.5” spacer, would this bring it to exactly level?
I just got my 2018 SR5P all stock and looking to do 5100s all around as my first budget friendly mod to the suspension/lift. Any tips or advice?
If you are ever going to go with 34s, or lots of weight just make sure your springs can handle the extra weight or bigger tires. Make sure you are buying the right spring rate for your intended “future” setup. That’s my 2cents.
I have a 2014 Trail Premium with KDSS. Thinking about doing the 6112s in the front and 5160s in the back like you said. Do you think the ICON rear springs would be very different from the OME 2995 rear springs? Also, is there a difference between getting the OME 2995 and 2885?
Hi I’m new to your blog, I just got a 2019 4runner off road premium and I want to get it lifted and bigger tires. I’ve already started black it out, step by step from your blog. I called the dealership and they want to put a leveling kit on it , he said he suggest a leveling kit and that I will be able to fit 33s. Do you happen to know if it will be better just to put a lift? I want and least 3 to 4 inches. I went to the dealership because I was worried about the mods voiding my warranty. The dealership also said it will cost 1200, after reading this I’m worried about getting the leveling kit. I would like my 4runner to also be able to go off road and street, since it is my daily driver. Thanks!
I wouldn’t go with a leveling kit, as they typically provide poor ride quality compared to an aftermarket suspension like this Bilstein 6112 & 5100. Go with either a simple (middle of the road) suspension kit like the new Eibach stage one lift kit or this Bilstein mentioned here. If you can afford it, that is. Leveling kits won’t offer you any additional “performance” off-road other than ground clearance. And while you are thinking about ground clearance while off-roading, you might want to save your money and buy a suspension – you will be happy you did. 4″ is overrated for daily driver nor do many companies offer a 4″ kit (plug and play). Bilstein is about 2.75″ in the front which will allow you to run 33″ tires but you need to do the minimal trimming needed to clear. Either Eibach stage one or Bilstein sounds like a better option than a spacer kit in my honest opinion.
Hey it’s Jaz, I have a 2018 4Runner TRD off-road and i recently got a stage 1 bilstein lift kit, which is 5100 shocks and coil overs for the front and rear. I am noticing on my front tires that the outside is wearing more than the inside of the tire. This started happening after the install. Any idea what’s going? Thanks!
Installed this exact setup with the addition of icon upper control arms. After setting the snap rings at 6 (driver) and 4 (passenger) and I look to be nose up a touch more than I expected.
I just ordered this set up for my 19 offroad
I recently purchased a 2019 SR5, I kept my aftermarket Fuel rims and tires that are 20X9 with a -12 offset and the tires are 33X11. I plan on taking the 4runner off road in the near future but for now the most of roading I do is at the beach in North Carolina. Would you recommend this set up? I mostly want a “level” look but I’m also looking to get rid of some of the floating while driving.
Thanks in advance for your feedback.
If you went with the ekstrom design shim that you mentioned in the article, do you figure a 285/70r17 would fit better?
Yeah, you’re adding extra ride height so it will give you more clearance within the wheel well. It’s not much, but yes.
The spacer in “Step 9:” is backwards. I followed this and found that you can’t start bushing nut because not enough thread to grab (and it’s backwards). Had to realease spring tension, flip spacer and start over. The spacer is placed correctly in the video. Otherwise, good video except this key point.
We probably did the same thing you did and I must have forgotten about that detail after the fact. Thanks for pointing that out, I will update the post.
The aluminum spacer is backwards in the photo for “Step 9”. The flat receiver end goes on top of the shaft. It is correctly installed in the video. If installed backwards, you won’t be able to thread the top bushing nut onto the top of the shaft. I learned this after depressing the spring. Had to release and re- compress spring………..Otherwise good vid but key point!
Where can I find the torque specs for 5th gen?
I think the forum has a go-to guide, just search “5th Gen 4Runner Torque Specs” on Google.
Seems like those 5100 setup have a sag on the back. Might need a higher coil on the back
I very much appreciate the useful information that Trail4Runner provides. It is a treasure trove of useful info and insights.
I recently purchased a 2019 ORP w/KDSS. After researching the multitude of T4R forums and blogs and considering how I plan to use my new vehicle I have decided to go with the Bilstein 6112/5160 setup with Icon rear coil springs. This seems to be the best combination of performance and value for my needs.
I understand that T4Rs with KDSS tend to have a passenger lean and that the stock suspension is tuned to accommodate for this (https://www.toyota-4runner.org/5th-gen-t4rs/244480-yet-another-kdss-lean-thread-2.html). Not wanting to exacerbate this propensity with an aftermarket set up, I have a very specific question.
Would you recommend setting the front passenger shock a ring higher than the driver side, leave the front shocks the same, or perhaps add an Ekstrom Designs ¼” shim on the front passenger side? I don’t want to have to mess with this after the initial install and pay for additional labor costs and deal with general frustration after the fact.
Perhaps the right answer is to level the KDSS per the procedure outlined by Australian Images (https://www.youtube.com/watch?v=xtURdW66WM4) after an install that keeps the setup the same with both left and right fronts.
Thoughts, comments, and recommendations associated with this specific setup are much appreciated as I have already purchased the parts!
Bilstein updated the 6112 with KDSS. Passenger and driver side set to same clip. Only offset with non KDSS runners.
Why does some websites say the OME 2895 and/or Icon Rear Spring (ICON 52700) won’t fit a 2014 4runner trp ?
Does it matter which one I pick?
Great article. Another good read!
What setting do I need to run this at to have a level looking lift?? Clueless on this…. I am going with the 6112/5140 setup with the 2″ Icon Springs in the rear. I have a CVT 3-Person Tent on my roof rack, along with the Gobi ladder & Artic Cooler in the rear space. With the rear 2″ inch springs and the xtra weight on top and in my SUV. What setting do I need the 6112 on to achieve a level looking lift? Does it need to be the 2.55 Top Setting or the 2nd highest at 2.21 to achieve the level and lifted look?? Thank you so much for the help!!!
Currently running this setup on my 2011 SR5. I opted for the 5160s instead of the 5100s. I’m super satisfied with how it performs… WAY less body roll, more confidence off-road, and enough clearance WITH a BMC to clear the 285/70/17 KO2 tires. The only thing that I ended up changing was adding an extra 0.5” of spacers on the front because the lift wasn’t quite as level as I hoped. I got these spacers (2 x 0.25” spacers each side) from Ekstrom Designs and there was just enough room on the bolt studs to fit smaller nuts (thread: M10x1.25) with loctite. Awesome stance and very happy with my decision for the suspension.
Can anyone advise if the sway bar needs to be relocated in the front using the 6112’s?
Not needed for a basic installation on our end.
i know what it’s like to have your truck worked on by an inept so called mechanic. i took my 4runner to TIRE PROS with all the parts i ordered from toyota half shafts upper and lower ball joints front bearing dust covers they quoted me 1.295 when i went to get it there was a puddle of gear oil under the truck and most of the parts still in the car so i asked wtf so when i talked to the service manager he said that they could not do the ball joints because they are riveted i said they are not there are 4 bolts to remove the lower ball joints he said i was wrong and when they put in the left half shaft they pushed it in from the end of the shaft and destroyed it thats why there was a puddle. i saw the half shaft and told them that it is broken so i went to the parts store and got a new one and told them to do it right. now to add insult to injury they still charged me for replacing the ball joints 795$ i told the i was not going to pay for work they did not do so they said they would not give me back my car until i payed them so i did. so when i got home i contacted the state of california consumer affairs the guy came out took my statement i showed him all the parts which he took so i waited for over a year i finally got ahold of him and he had the nerve to tell me they did nothing wrong they could not produce the original work order with my signature on it by the time he finally got back to me it was too late to take them to court. so i ended up doing all the work myself that way i know it is done right . i will never take my truck to a mechanic again i had the money at the time so i thought i would save myself some hassle but i got screwed now my 4runner is completely rebuilt with all toyota parts i made the mistake and got lower ball joints from oreillys that failed in 2500 miles i won’t make that mistake again. camelback toyota part are only 15 percent more the the cheep shit a o’reilly and they will last for 250.000 miles. so that was the first time i have ever let someone work on my car and i will never do that again believe that!!!!!!, LARRY B
Hello. I had my Bilstein 6112/5160 installed yesterday. This morning, I saw that the mechanic installed the front passenger Bilstein spring upside down! I called the shop and they said they can get it corrected not until next week.
Is there any adverse effect on the shocks? I’m worried that my front passenger shocks will fail prematurely. The truck rides great though.
I’m not sure how much, but it may or may not affect your valving. I would think that they need to be installed in the proper orientation as the damping rate is not the same for your suspensions jounce/bounce and rebound.
Thanks, Brenan.
When I called Bilstein before my purchase, they mentioned that the 6112 springs are Linear rate. With my pas cars with full coilovers and linear springs, it didn’t matter if the springs were installed upside down.
Maybe it’s different with 4Runner? I took a picture of the 6112 springs out of the box and reversed one spring via Photoshop and I couldn’t tell the difference aside from the Bilstein wording upside down.
I appreciate the video. It helped me with my install! I wasn’t paying attention on the passenger side spring orientation.
Do you know how the difference in the ride quality would be if you are removing the X-REAS and installing the 6112 in front and the 5100 in the back?
Does anyone have any experience with the above question around the X-REAS? I’m looking at going with the 6112 and the 5100 as well.
I have a 2019 ORP with KDSS. I put the Bilstein 6112 in the front set at 4th setting (2”) on both passenger and driver side. Stock upper control arms since its under2.5-3.0 inches. In the rear I put the 5100’s with stock springs. No lift will be given in rear. Runner sits perfectly even after front settles for 24 hours. I run 265/70/17 General Grabber A/Tx 3 peak rated passenger tires. Kept stock size and passenger to maintain on road comfort/better gas mileage than 275+ as its a daily driver and only driven on light/medium trails and snow. Have had no alignment problems, no rubbing, sits and looks amazing. Tires don’t look too small at all and 70% decrease in nose dive and body roll with cornering. Rides “semi firm” but don’t hesitate to take on speed bumps or drain dips with pace. For those who use this as a daily driver with weekend camp vibes and light trails in mind, this set up is perfect.
Do we have to replace UACs with this lift
probably a complete new guy questions, but is there any need for a diff drop or anything like that with a kit like this?
Nope. Just to lever or lift under 3” you’re fine
No, anything under 3″ you don’t “need” a diff drop. It depends on what clip setting you have the 6112s set at but you can typically add a diff drop to any lift between 2-3″ and it won’t hurt. Just check out the before and after on your CV angels. We do not have a diff drop on this 4Runner but it would not be a bad idea as we are sitting at 2.65″.
one other thing is i found my front struts with new coil springs already installed on them so i did not have to deal with coil spring suppressors.
Brenan, you are right I have Bilstein shocks and struts on my 98 4runner, they gave me the perfect amount of lift and absolute control of my truck. Man, what a difference. My truck handles so much better than before, just what the dr called for. I have had them for 2 years now and no signs of weakening. I would recommend to anyone as an upgrade. larry b
Doing research right now for a small lift. FWIW I found an Old Man Emu kit from Rocky Road OffRoad that sells for about $970, shipped. Struts/springs in their kit are already assembled. I appreciate the write-up. I think this is something I can do at home.
way to go kenny i don’t like dealing with spring suppressors. they scare the s–t out of me personally.
Wow! The 285s fit without rubbing. That’s cool. Looks Great. What are the installed Wheel specs?
Tire Size: 20X9. Offset: 35. Wheel Backspace: 6.350
i have an 18 ORP with KDSS. been looking to do 5100s all around. i heard its perfect for the streets since i hardly ever do any offroading. im still waiting to find that perfect setup before pulling the trigger.. thoughts?
Great suspension for on-road and daily driving. From my experience with KDSS, this suspension working with KDSS would probably drive damn near perfect. That might just be the Goldilocks of suspension on the 4Runner. But, as always everyone has different taste in ride-quality. What means quality to one person could mean crap to another. It would be nice if someone could chime in with this kit installed on a KDSS 4Runner. As for this suspension installed on the SR5 without KDSS, it is a very smooth, comfortable ride. This is really a great option for a lift while maintaining most of the factory ride quality while reducing body roll, nose dive and increasing cornering stability.
I have a 2019 ORP with KDSS. I put the Bilstein 6112 in the front set at 4th setting (2”) on both passenger and driver side. Stock upper control arms since its under2.5-3.0 inches. In the rear I put the 5100’s with stock springs. No lift will be given in rear. Runner sits perfectly even after front settles for 24 hours. I run 265/70/17 General Grabber A/Tx 3 peak rated passenger tires. Kept stock size and passenger to maintain on road comfort/better gas mileage than 275+ as its a daily driver and only driven on light/medium trails and snow. Have had no alignment problems, no rubbing, sits and looks amazing. Tires don’t look too small at all and 70% decrease in nose dive and body roll with cornering. Rides “semi firm” but don’t hesitate to take on speed bumps or drain dips with pace. For those who use this as a daily driver with weekend camp vibes and light trails in mind, this set up is perfect.
Curious Zach if you could share photos. Interested in seeing how the 265/70/17s look. Your use is the same as mine.
Thanks David B
How did the alignment go without New Upper Control Arms? Any issues?
Bilstein 6112/5100 Alignment Sheet: Check it out. For anyone that wants to understand how to read an alignment sheet, check out this video. I will do another post on this soon.
Great write up! What tire size options do you have with this set up? 285/70R17 doesn’t seem like a likely compliment
Just kidding…I should read the beginning of the article instead of just hunting for install photos. Sorry Brenan
Tom, you were right. I should have clarified the current tire/wheel setup on the post instead of going straight into the most common questions on 285/75R17. The install was done with 285/55R20 (32.3″). Absolutely no rubbing in forward/reverse after a few days of driving. This 4Runner is strictly a street princess so we probably won’t test much off-road flex on this set-up.