
A differential breather kit prevents water from entering your drivetrain during water crossings. It connects the rear axle, differentials, transmission, and transfer case to a higher point on your 4Runner using 6-8mm tubing. As these components heat up, they need to vent, and when they cool down, they create a vacuum, which could draw in cold water during crossings. This water can mix with drivetrain fluids, potentially damaging components like your E-Locker. Installing a breather kit is a cheap and effective way to avoid these issues, especially if you plan on driving through water.
Find it online:
- ARB Breather: Check Price
Table Of Contents
Different Types of Breather Kits and DIY Kits

Breather kits are all similar, and many DIY parts can be found on off-road websites like 4x4parts.com. However, we chose a trusted, pre-packaged ARB kit designed for our models for convenience. This kit replaces the OE differential breather, which has a short one-way valve prone to fluid issues. Installing a breather kit helps prevent water from entering the differential, reducing potential problems. While some owners may not see the need for one, we highly recommend it if you plan on crossing creeks or rivers during your off-road adventures.
Rear Differential Breather Kit Installation

Tools for the Breather Kit Install:
- ARB Breather Install Kit (Part #170112)
- Phillips Screwdriver
- 14 mm or adjustable wrench
- Cordless Drill (if mounting with self-tapping screws included in kit)
- Pocket Knife/Utility Knife
- Wire Cutters
Install Time:
- 1 – 2 Hours
Whats In the Box?
- Anodized Aluminium Manifold
- 4 x BSP ports for breather lines
- 1 x NPT ports for air filter
- Air filter assembly
- 4 x push-in fittings
- 3 x BSP plugs for plugging unused ports
- 8m x 8mm polyethylene tubing
- 2 x self-tapping screws
- 25 x cable ties
Video Installation
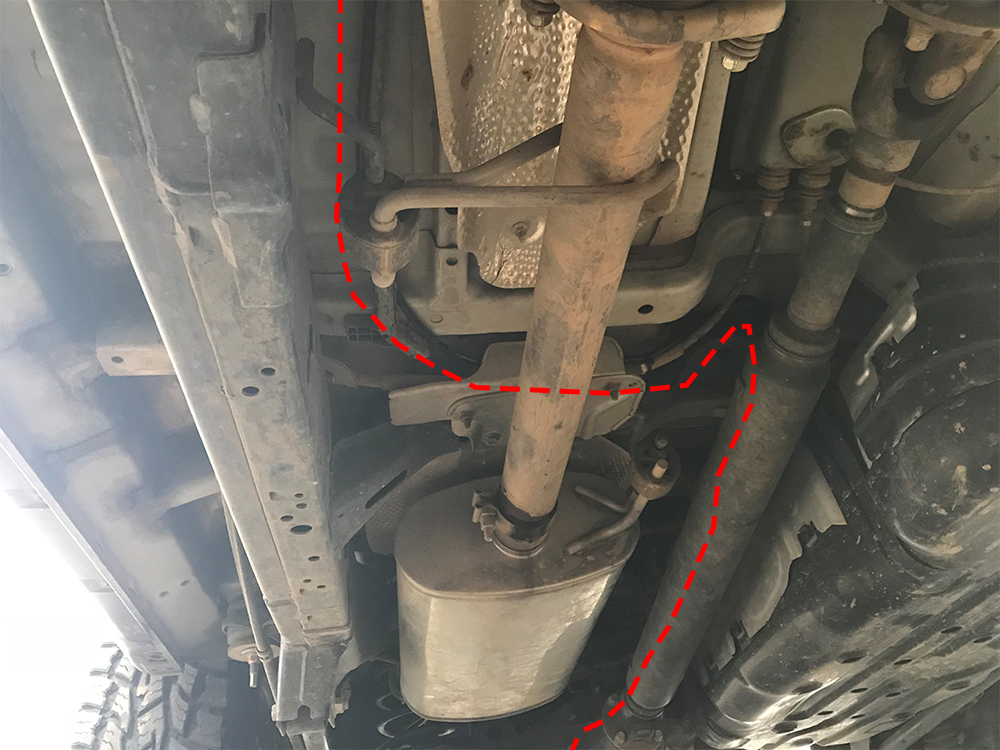
1. Locate Diff Breather and Remove

Locate the differential breather. If you have a dirty 4Runner like mine, you probably want to clean around your breather as much as you can.
If you fail to clean the dirt around your breather, you may risk getting some dirt or debris inside your differential when you are installing the new breather.
2. Install New Diff Breather (Shark Bite)

Once you have wiped down the area around your breather, you can now remove the old diff breather and install the new shark bite. The shark bite is a fitting that comes with your ARB breather kit. The shark bit is the plastic piece that fits inside the fitting that bites down on the plastic tubing.
3. Insert Breather Hose


Once you have installed the shark bite fitting, you can shove the first end of your tubing into the shark bite. Just shove the tubing straight in. This whole process is pretty simple, just make sure to shove the tubing straight in and not at an angle. One thing to keep in mind here is a little pro tip:
NOTE: Keep enough slack in your first loop connected to the differential to make room for droop in your axle. If you fail to leave enough slack in your tubing, you risk pulling the tube out of the fitting at full flex or even partial flex. Make sure you leave enough room in the tubing line to make up for your axle flexing left and right.
4. Start Running Breather Hose

After installing the shark bite fitting to the differential, you can choose where to run the tubing. Options include mounting the ARB manifold and breather on the passenger side near the intake, near the battery, or even inside the cabin by the spare tire tools. We chose to mount the ARB manifold on the firewall next to our TRD intake, as we plan to install an onboard air system there in the future. The driver side is tighter, so we left space for the SPOD setup. Be sure to seal the tubing with blue painters tape to prevent debris from entering while running the tubing.
5. Where to Run Tubing?
6. Prepare Aluminium Manifold


Once you have found your chosen route to run your ARB Breather Tubing, you want to pull all of the slack out and up through whatever side of the engine you are mounting your ARB manifold on. In our case, we chose the passenger side.
- Pic 1. As you can see in the first image above, this is the remaining slack that we had coming out of the engine.
- Pic 2. In the second image, you can see exactly how we plugged up the ARB manifold. You want to plug three holes and install one shark bite fitting in the remaining opening.
7. Mounting Aluminium Manifold

Now, you need to mount your ARB manifold. You can do this by using the self-tapping screws that come in the box.
- Start by choosing your location
- Use a long nail or screw to tap the first hole with a hammer
- Use a drill bit just under the size of the screws provided to drill a hole
- Screw down your ARB manifold in the hole you just drilled
- Level your ARB manifold and mark another hole and then rotate your manifold aside
- Use your drill bit to drill another hole in the location you have tapped
- Rotate Manifold back in place and screw down provided screw
- Hand tighten into place
That’s it! This was the hardest part of the install but as long as you know how to use a drill, you are good to go. After you hand tighten your ARB manifold, you can cut off any excess tubing and insert the tubing into the shark bite fitting. Then, screw down the Air Filter Assembly (The plastic round part) and you are set.
8. Connect The Air Filter Assembly


Once you have screwed down your Air Filter Assembly (The plastic round part), you are finished.
Curious to know if those push fittings are rated to be submerged in water or for use in water conditions? I have seen similar fittings that will allow water ingress.
I am not sure I get the purpose of this mod. Yes, it seems a bit strange that for the diff Toyota chooses to use a check valve, because the closing of it in time as the diff goes under water seems a bit far fetched. But replacing it with a breather tube adapter and bunch of tubing has its drawbacks if the tubing is damaged or dislodged. What about just ADDING tubing to the check valve? Then the check valve essentially becomes a backup in addition to being protected from mud and junk too.
What about routing the hose to the gas cap area? It seems shorter, simpler, and less likely for hoses to be exposed to underbrush, rocks and debris while still above water intrusion levels.
What happened to your e-locker? I’m pretty sure I damaged my e-locker from doing a water crossing. It engages but the dash light keeps blinking as if it’s not fully engaged
I used a shark bite T fitting for the split and then used a shark bite and screwed a reducer that fits the E locker hose.
Easy and works well
Just ordered this breather 👍🏻
I just installed my diff breather. I ran down the passenger side of the engine bay and down along the frame as well. I followed some wires along the inside of the frame until the rear wheel well. At points the tube is tucked behind the heat shield, and in places is touching it. Will that be an issue? Any risk of it melting with touching the heat shield?
I just ran mine the same way today, do you h ave any issues?
Amazon says the ARB diff breather wont fit on a 2021 4Runner. I assume the OffRoad version would still need one? Do you have any suggestions? Thank you.. and I took your advice on my tire buying this week, so Thanks again!
It should work. Nothing on the 2021 axle has changed that would prevent the install. This is a pretty universal kit.
Stock ’18 TRD OR here. Can this install be done without raising the vehicle with Jack stands, etc?
Yes you can. It’s just a little tight under the vehicle. I removed the spare tire to get more room and a clearer view of the rear diff breather. I also lifted the vehicle under the trailer hitch until the rear wheels were off the ground to get full articulation. This way I could get the correct length of tubing before I cut it.
Hi Brenan, Nice write up/video… and I know that you’ve said that maybe a future project, but could you speculate on if you would tie into the diff line the you just ran or run a line parallel up to the ARB in the engine compartment (seeing that there are several more ports), Thanks in advance…. (I am currently reading the link you posted in an earlier post, but it’s lengthy and discusses alternative products)
UPDATE:
Spoke to Ryan at ARB and they suggested running another line using ARB part number 170113 (MSRP 36.00) and connecting into the mantifold you installed previous (part number ARB 170112).
Are you talking about the e locker? If so, how did this project go? Trying to do some research as well with running a separate tube to the arb filter
Hi Brenan,
Will you eventually connect the rear diff-locker to the breather as well?
Aaron,
Indeed. We will eventually get there. Not a very complicated DIY, but we just need to find some time. If you are going to get there before us, please send in an overview on it. That would be awesome. We have quite a few installs lined up right now and always running short on time.
Is the polyethylene tubing ok since is hard and possibly break or bend or would it be better to use rubber gas line that is pliable and thicker?
Kevin,
If you are looking to do this as a DIY, you can use blue plastic high-pressure tubing (for compressed air fittings), or fuel line, or polyethylene tubing, or an array of different materials. If it were up to me and I was doing this as a DIY, I would use fuel line, some zip ties, a few worm clamps and port the line somewhere in the same location that we did in the install here. It is really a matter of preference here and there is no one “best” option out there. If you find something that you think works really well, let us know.
Isn’t there a breather on the locker as well that needs to be raised higher, separate from the actual diff?
Brad,
The transmission, transfer case, and front axle are all in your engine, mounted high-enough to not worry or stress about. The diff breathers is on the axle and the e-locker breather is located around the same height on the axle. So, yeah you can install a breather for the e-locker as well. For a good write-up on the e-locker and diff breather, check out this overview and install. We will eventually get to this mod, but that will work for you, for sure.
Need one for front and rear?
Sara,
Hey there, no you only need the one kit. The front differential has a breather that is already raised which comes up on the left side of the engine. There is also a breather on the transmission and the gearbox that is raised up behind the engine, next to the firewall. These breathers are about the same height as the air intake. So, no. You do not need one for front diff but to each their own.
Cheers!
Brenan, any pics of these breather locations? I could probably follow them if I get under the beast but if you have some pics that would be great.