
KC HiLiTES Cyclone Jeep JK Rock Light Kit converted to 5th Gen 4Runner and Wiring to Switch Pro (SP-9100).
Rock lights serve many benefits when natural light is scarce. They are great for seeing upcoming obstacles on the trail, lighting up campsites, assisting you when stepping out of your truck and providing more light in general.
I wanted to install the KC cyclone rock light kit on the 4Runner for these reasons but KC did not have a plug-n-play kit for the 5th Gen 4Runner yet. And, after seeing the Cyclones in action as under-hood lights on the 4Runner, I did not want to install any other brand or style of LED.
KC makes a rock light kit for the Jeep JK but not for a 4Runner. They also make a variety of other accessories that can be universally configured to create your own kit, be it a dome light, accessory light, reverse lights, or any other compact auxiliary LED lighting solution. The problem with the accessory kit is that it doesn’t have the length I was looking for in order to make a rock light kit for the 4Runner.
The Jeep JK rock light kit was the closest option I had in creating a Cyclone rock light kit for the 5th Gen 4Runner. So, I set out and ordered a JK kit with intentions of converting it to a 4Runner kit.
Battery Location and Wheelbase
The only major differences between both vehicles for the Cyclone Rock Light Kit is the battery location and wheelbase. Battery location on 4Runner is on the driver side, while Jeep in on the passenger side. The wheelbase on the 4Runner is longer.
Battery
- Jeep Battery: Passenger
- 4Runner Battery: Driver
The battery issue was simple, just reverse the entire set-up so that your busbar and connection points are all on the driver side.
Wheelbase
- Wheelbase on Jeep JK: 95.4″
- Wheelbase on 5th Gen 4Runner: 112″
The wheelbase, I knew was going to be interesting. At best, everything would somehow work out on the 4Runner and at worst, I would have to increase the length of the secondary harness to reach the rear passenger side of the 4Runner.
Running the Wire to Switch Panel or Battery?
If you are running the rock light kit on a vehicle without a switch panel (sPOD or a Switch Pro), this is going to be plug-n-play. KC includes a switch that you can run to your cab. You can also run this set-up to an aftermarket switch, like something from AirOnBoard.com or anywhere that provides OE switches.
If you are wiring the kit to a switch panel, like the sPOD or a Switch Pro, you will need to modify the wires. For this, you will need to have a basic understanding of wiring. This includes positive/ground wiring, currents/volts, wire strippers, crimpers, and cutters.
You will also need waterproof butt splice connectors, fork/ring terminal connectors, heat shrink, and all the tools that go along with the job.
Step by Step Rock Light Install
Cyclones Light Kit:
- Updated (universal rock light kit): Check Price
- Jeep JK Kit: Check Price
Time for Installation
- Depends on Experience: 4-7 hours
Tool & Material Install Check
- Basic shop tools
- Wrenches & Sockets
- Open-end Wrenches
- Screwdrivers
- Heat Shrink Gun/ Lighter
- Tessa Tape – high-end electrical tape
- Waterproof Butt splice & ring connectors
- Heat shrink
- Klien Tools Crimps
- IRWIN Wire Cutter
- Channellock Pliers, Needles, Bent, Linemans, Dykes, Etc.
- Surgical Scissors (great for cutting wire sleeve)
- Utility Knife – Razor Blade
- Alligator Clips (good for testing power)
- Mini Screwdriver
- Flashlight
- Gear-Aid work light
- VHB Tape
- Masking Tape
- Zip-Ties
In our step by step install, we are wiring the KC Cyclone 6-light rock light kit to a Switch Pro 9100 on a 5th Generation 4Runner.
Before following each step, please read the entire overview before cutting wires. It would be a good idea to test your lights with your preferred switch set-up first. That is what we did.
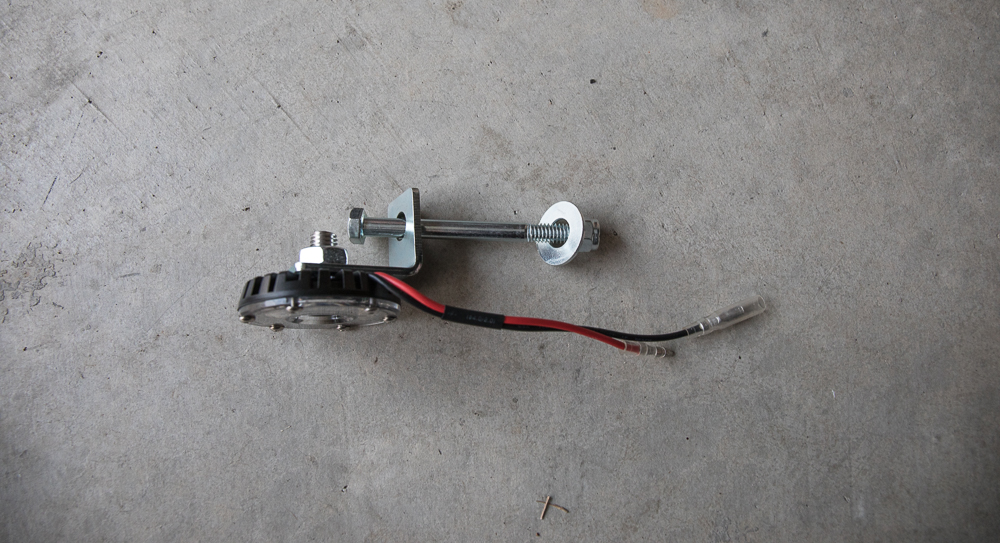
Step 1: The Rock Light Kit

Get an idea of what you have for the install.
Step 2: Map out Wiring Harness and Switch

Before we really get started, we want to map out where the wires are going to run and at the same time, figure out which wires we can eliminate.
Step 3: Route Driver Wiring Harness to Passenger Side

Because our installation is on the 4Runner and not the Jeep JK, we want to switch the set-up. Run the driver-side harness to the passenger side.
Step 4: Run the Passenger Harness to the Driver Side

Take the intended passenger side harness and run it through the wheel well on the driver side.
Step 5: Cut open White/ Green Wire sleeve

Because we are running everything to the Switch Pro, here is how we are going to accomplish that.
- Discard provided KC Switch
- Discard White wire for the provided switch
- Discard Brown ground wire for the provided switch
- Cut open white/green wire sleeve (pictured)
- Cut Green wire to length for switch pro terminal block to provided busbar
- Crimp (2) new waterproof fork/ring connectors on Green Wire
- Slide heat shrink over connectors and apply heat
- Connect one end of the Green wire to the preferred switch on Switch Pro
- Connect the other end of the Green wire to the busbar
Step 5: Connect Passenger/ Driver Harness to Busbar


- Connect the white wire from both harnesses to the busbar
- Connect the black wire from both harnesses to a ground (our case, the fuse block)
- Test your lights
Step 6: Driver front wheel well light bracket
(pictured above is an option to bolt through the frame on the passenger side if you have KDSS)
If you have an SR5, both sides are going to be the same. You can run a bolt through your frame and mount up the two provided silver brackets (no mod to bracket needed). If you have KDSS (like me), your driver side will sit further back than the passenger side. The difference is 2.75″, not much of a difference. Both lights seem to have the exact same aesthetics when viewing straight on with factory front bumper.
Step 7: Run Harness for driver front wheel well light

The harness will need to run down on top of the coil bucket in both directions. First, run the harness to the mount location and then back up and over the coil bucket. From there, you can zip tie everything all the way over to the driver side front rock slider bracket for the next cyclone rock light.
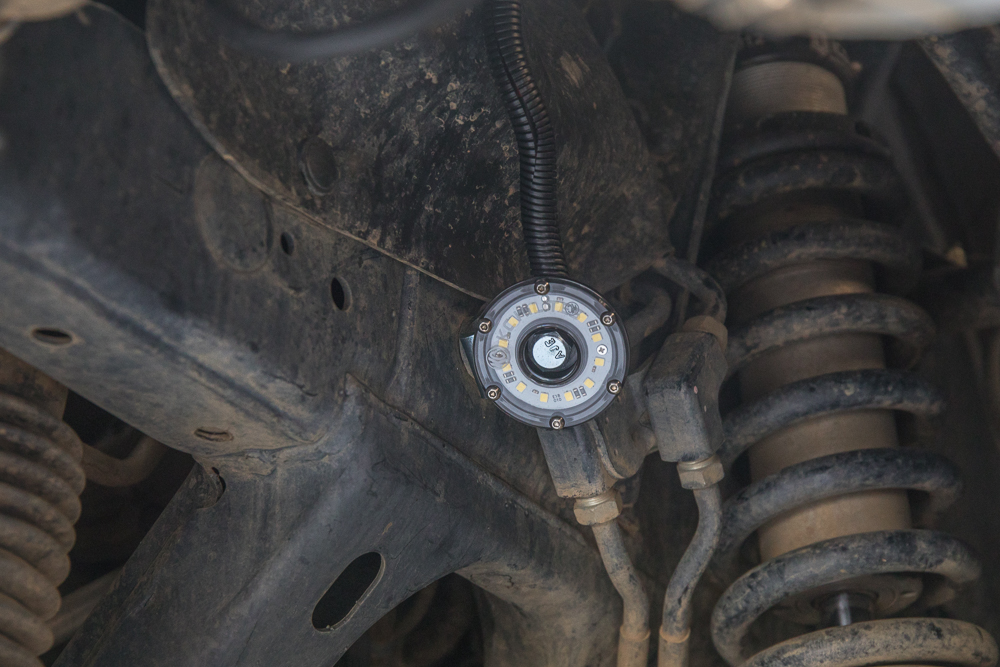
Step 8: Driver front rock slider bracket

The four black brackets that KC provides may need to be modified depending on your step or slider set-up. You might need to bend the brackets at a 90º angle in order for the brackets and cyclone lights to project the correct beam pattern. We mounted our cyclone light to the inside of the rock slider just under the rocker panels. They are in a safe location and positioned to project a great beam pattern and angle below.
Step 9: Run Harness for driver front rock slider light
Continue running the harness from the driver wheel well down to the rock slider. Mount up your light where you see fit and loosely zip tie along the way.
NOTE: Repeat the same steps on the passenger side
Extending the 3rd Wiring Harness
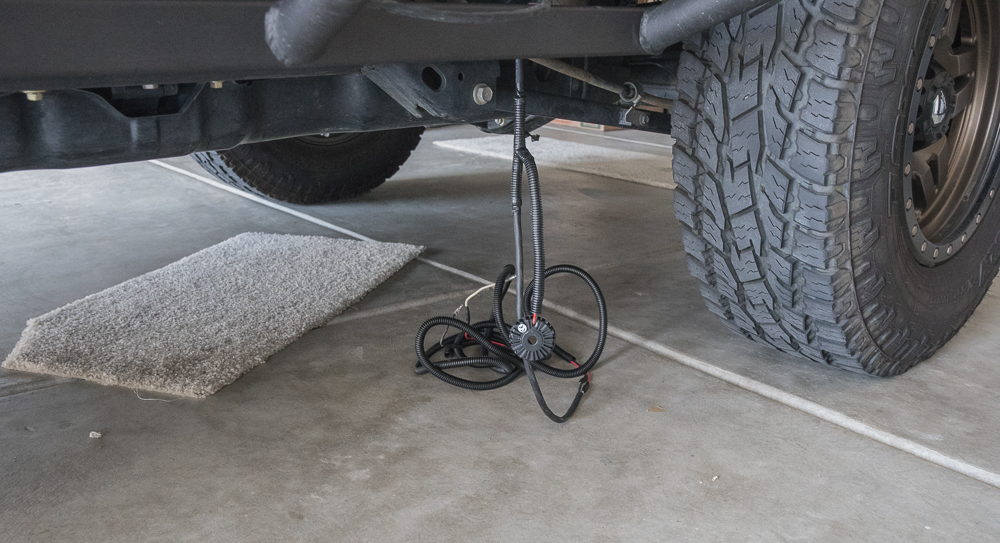
Step 10: Measuring & Extending the Harness

We started by measuring the distance of the current harness against the rear of the 4Runner. There was no way the Jeep JK 6-light rock light kit extended harness, sitting at 3′ was going to work on the 5th Gen 4Runner.
I measured out 9′ of additional wire which I knew going to be overkill but better safe than sorry. We will come back and trim this back down to exact measurements.
Step 11: Measuring for Extended Harness
I crawled underneath the 4Runner and ran a test set of wire through the frame to get an idea of the amount of wire I would need. Ideally, I was looking at 6-7′ of extended wire. The length of wire really depends on where you mount the rock lights. I wanted to be safe and go with 9′ just in case. You can always go back and cut the wire off but it would be a pain to start over.
Step 12: Cutting the Provided Harness

Start by cutting back the wire sleeve on the black and white wires in the harness. Then cut off the ends of the provided harness that connect to the last KC Cyclone LED light. Once you have the ends cut off, you can start connecting your new length of wire.
Step 13: Connecting the new wire

Connect new wire with butt-splice connectors or your preferred method. I added waterproof butt-splice connectors and crimped everything down. Then I applied heat to the connectors. Lastly, I applied heat shrink with a heat gun for a final seal.
Step 14: Testing new connections

Once you have the wires back together, test your lights and then loom everything up. It is important to loom the new wires because it makes the process of running the wires to the passenger side much easier.
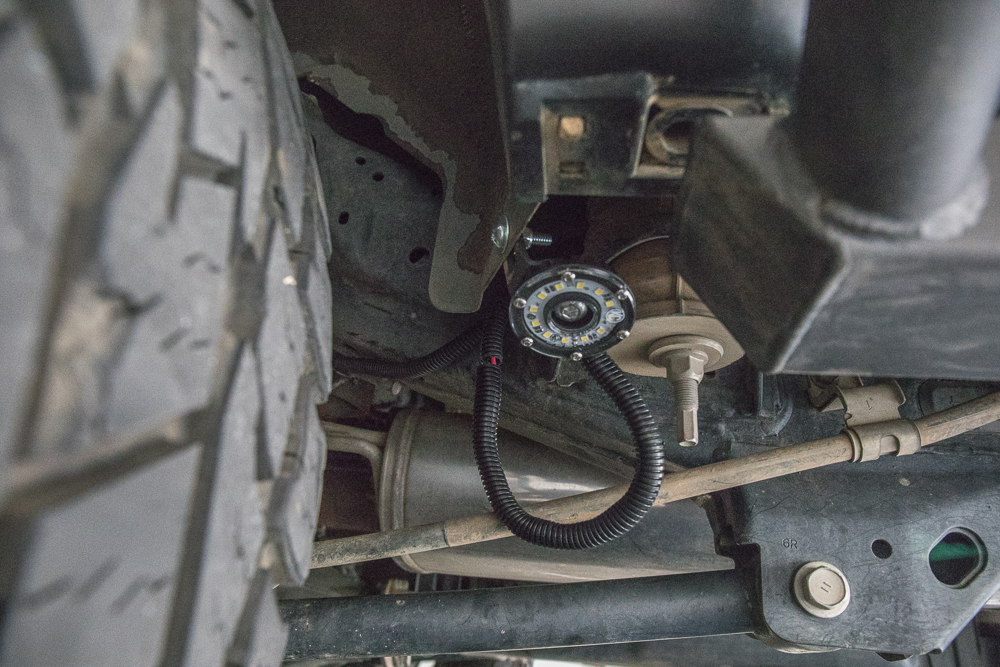
Step 15: Driver rear rock slider bracket

Once you have your new harness ready, you can mount up your driver side rear rock slider Cyclone. We mounted the cyclone bracket on the inside of the rear fender. We then mounted up the cyclone and tightened everything down.
Step 16: Running Wires from driver to passenger side
This is where the additional loom will help. If you ran your extended wires through the loom, it will make running the wiring from the driver to passenger side much easier. Focus on zip-tieing your wiring harness to the frame and avoid zip-tieing the harness to the axle.
Step 17: Passenger rear rock slider bracket

Once you run the extended wiring harness from the passenger to the driver side, you can mount up the next cyclone bracket and nut everything down.
Step 18: Cover exposed wires with loom
If you have any exposed wires, loom everything up and zip-tie everything down.
Step 19: Check all connections


Go back through your installation and check every single connection. From the engine bay to the back of the 4Runner, check every zip-tie location and rock light bracket. Check for loose brackets and loose zip-ties and correct/fix accordingly.
What type of 18g wire to extend the harness? Oxygen free copper or copper coated aluminum or does it matter.
I got some marine-grade 18G from Amazon. That way when it gets wet and covered in chemicals, it will be fine.
Hi – looking at your front mounting location – my truck (2019 TRD Pro) has a sway bar that seems like it would block the light from that spot … is the sway bar in your truck different because of the KDSS setup?