
KC HILITES Dual FLEX Array Ditch Lights Mounted on the 5th Gen 4Runner with the Low Profile Ditch Light Brackets
KC HiLiTES now offers a wide variety of plug-n-play pillar/ditch light solutions for the 5th Gen 4Runner, along with 2nd and 3rd Gen Tacomas. If you are considering a set of 4Runner ditch lights, it is likely KC has you covered with this new kit.
KC created the Toyota pillar/ditch mount LED light kit to make purchasing a set of ditch lights easier on everyone.
Instead of grabbing a set of ditch light brackets from one company and a set of lights from another, now you can buy it all in one location and packed as a single plug-n-play kit.
Whether you are looking for simple or robust lighting, KC offers a pretty impressive lineup.
KC HiLiTES Ditch Light Options

- KC C-Series C3 LED Spot or Flood Beam
- KC Gravity® LED G34 SAE/ECE Driving or Wide-40 Beam
- KC 4″ LZR Round LED
- KC FLEX™ LED Single Spot or Spread Beam
- KC FLEX™ LED Dual Spot or Spread Beam
- KC FLEX™ LED Quad Combo Beam
Head straight to their product page to order one of these kits.
Yeah, KC offers a pretty mean lineup when it comes to ditch lights. If you are looking for superior off-road ditch mount lighting, consider the KC lineup.
The Ultimate Ditch Light Options?

KC provides a full kit that comes with everything you need to install a plug-n-play set of ditch lights, including the brackets. The kits come with your wiring harness, lights, switch, hardware and brackets. The KC bolt-on/no-drill provided kit is as straightforward as it gets.
The goal in creating this ditch light kit was to provide owners with a one-stop solution for a ditch light kit.
With the KC Toyota 4Runner Pillar/Ditch Mount LED Light Kit, they really took the guesswork out of creating a 4Runner ditch light kit from multiple Yota vendors.
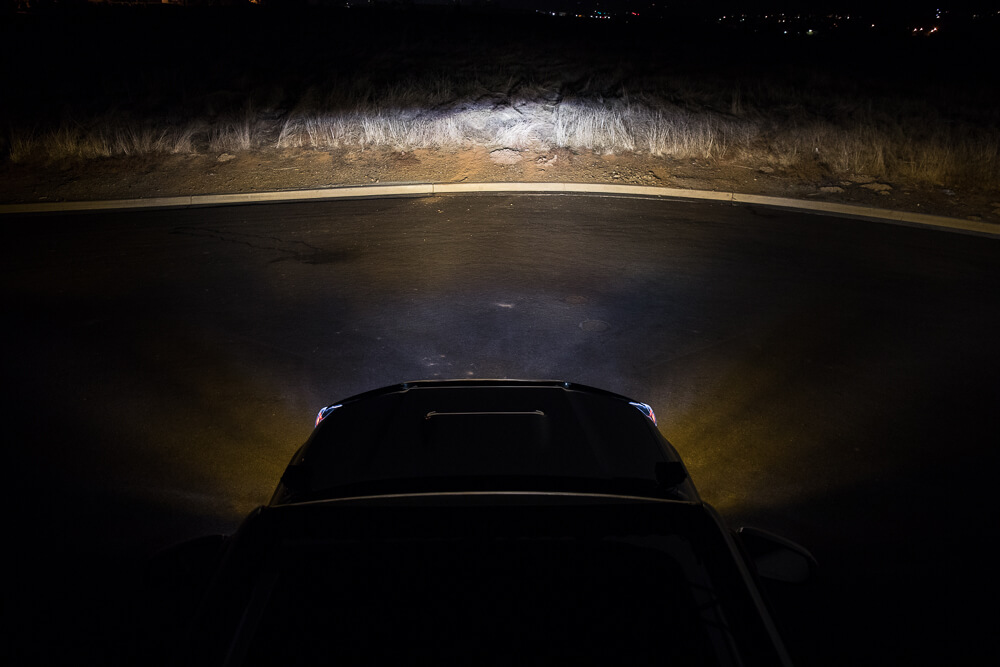
If you are looking for additional auxiliary lights or more peripheral fill in lights, KC is a great option. This ditch light kit for the 4Runner will increase your field of view allowing for better visibility at night along with oncoming obstacles.
Properly navigate through the night with your choice of many KC LED light options.
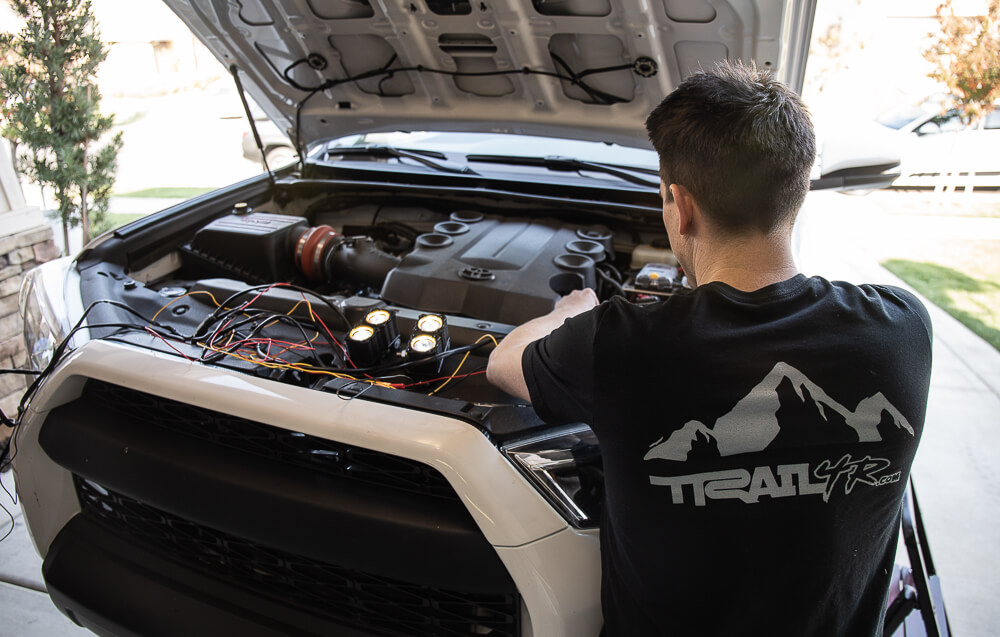
Installation

The installation was pretty simple.
KC provides everything you need and depending on your set-up will depend on how you route your wiring harness.
We are wiring our ditch lights to the switch pro Sp9100. If you have a sPOD or a Switch pro, you can follow this install, which is similar to our KC HiLiTES FLEX light bar install. If you are not running a switch panel, KC HiLiTES provides their step-by-step installation on paper with a provided switch.
Time
- 3-4 Hours
Tools & Materials
- Basic shop tools
- 10mm and 12mm sockets
- Open-end Wrenches
- Screwdrivers
- Allen keys
- Wire Strippers/Cutters
- Wire Crimpers
- Heat Shrink Gun/ Lighter
- Waterproof Butt splice & ring connectors
- Heat shrink
- 1/2″ Wire Loom
- Electrical Tape
- Extra Zip Ties
- Double Sided 3M tape
- Plastic Pry Tools
Overview of parts provided in the kit
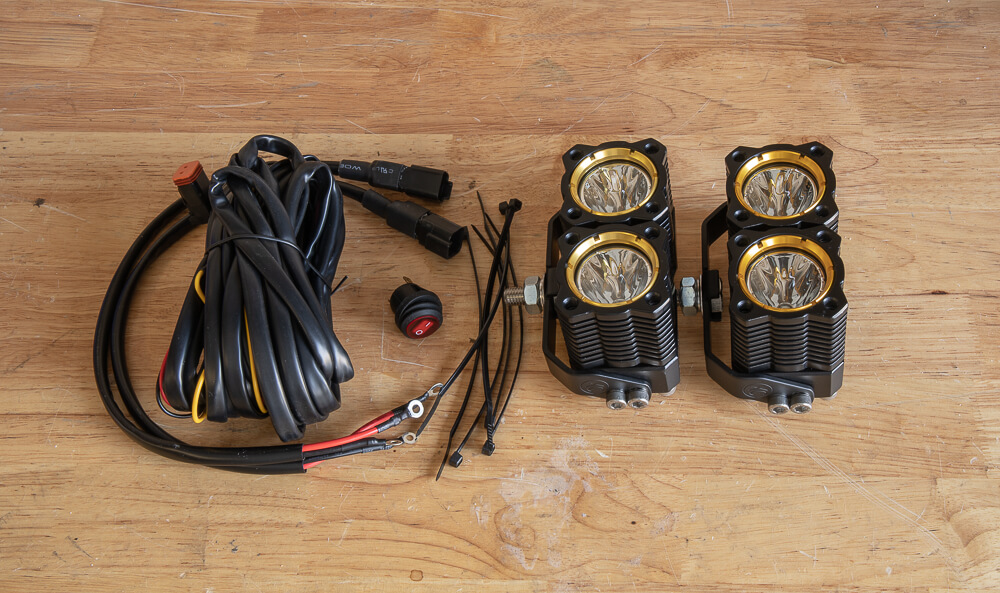
KC provides everything you will need for a plug-n-play install if using the provided switch.
Overview of provided wiring harness

Start by mapping out the harness to get an idea of the length and placement in your engine bay. If you are wiring to a switch panel you will be discarding a large portion of the harness.
Remove sleeve
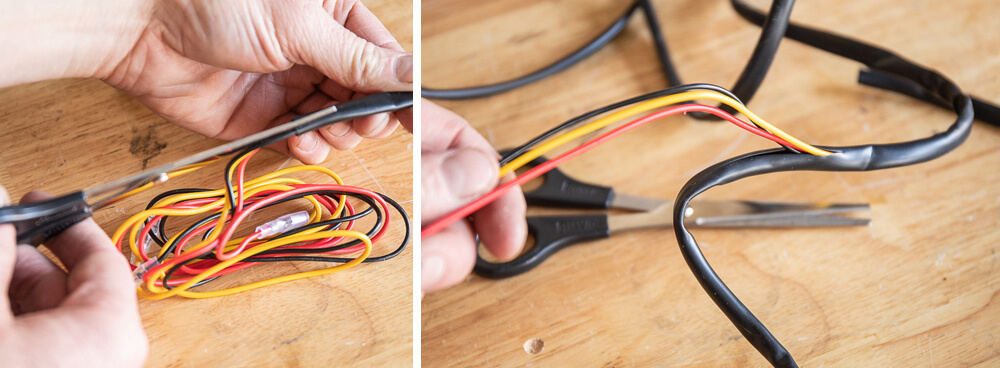
Start by removing the black sleeve around the (red, black, and yellow) harness. You can remove the entire sleeve all the way back to where the other harness starts.
Cut and remove both the red and yellow wires to provided switch
You can cut the red and yellow wires off of the harness running to the provided switch. We will not be using this portion of the harness for our switch. Do not discard the yellow wire.
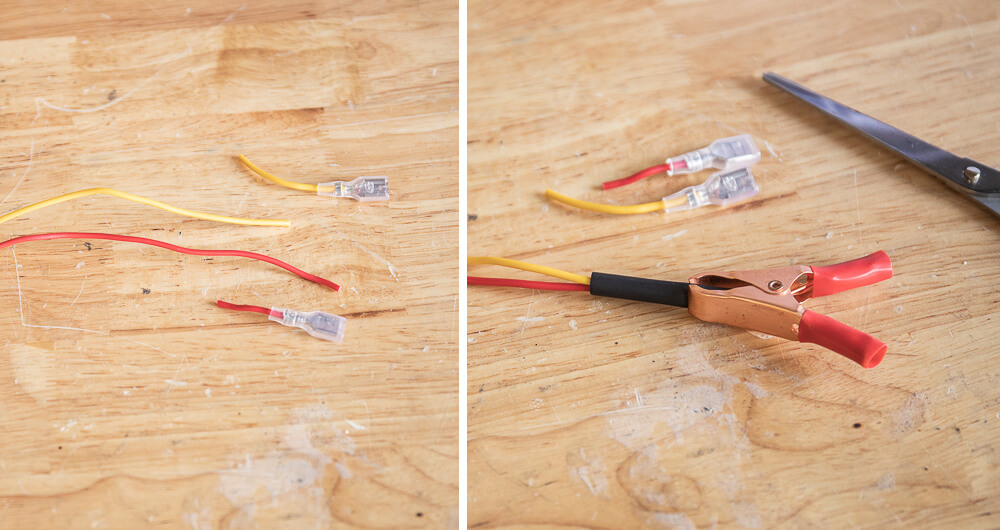
For a quick lighting test, you can temporarily twist both wires together and hold them in place with a set of alligator clips.
If you want to get straight to it, cut the yellow wire down to about 12″ from the inline fuse, or whatever length will work for your installation. See the below harness for the final layout.
Remove ground wire to provided switch
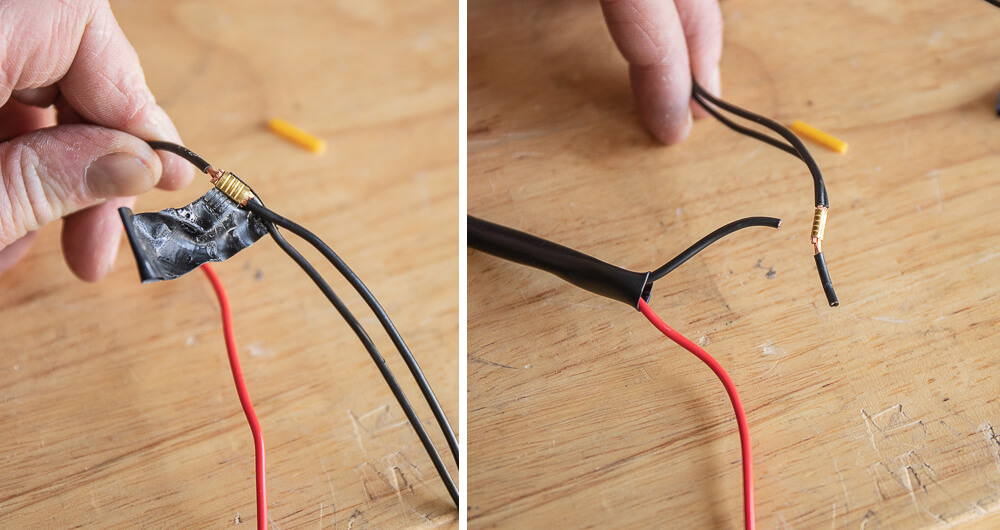
Remove the tape on both connecting grounds then proceed to discard the ground that was running to the provided switch.
Measure the final harness and then add a waterproof connector on the end of the ground wire. Again, see below for the final harness.
Power wire to yellow wire with inline fuse
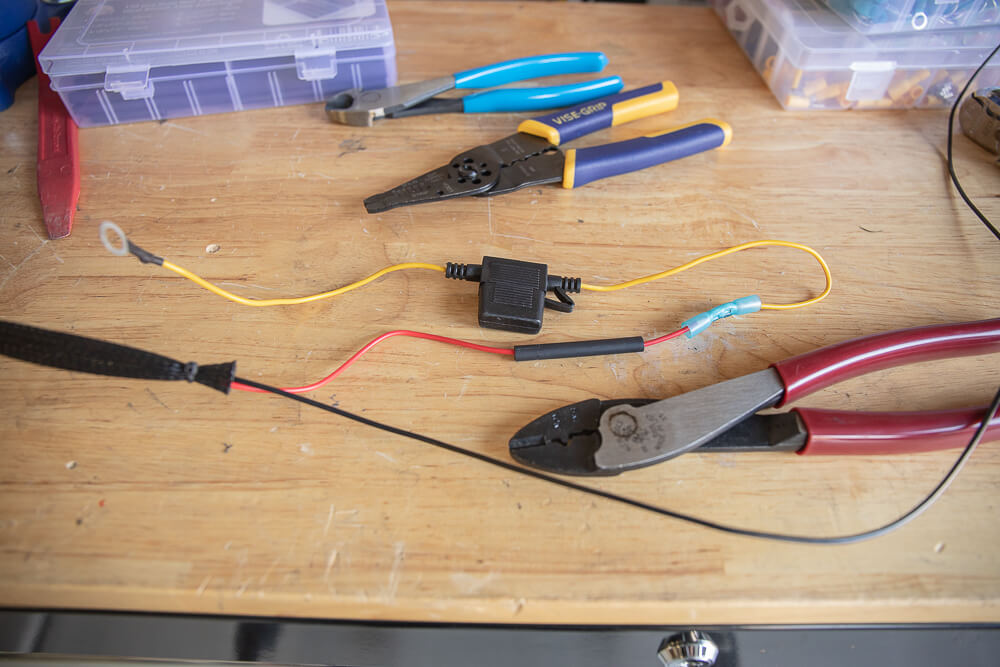
The final length of the provided yellow wire is connected to the red power wire which is supplying power to both ditch lights.
Also seen here is the final length of the ground which is the same length as the red wire + yellow wire with the inline fuse.
Test the new wire harness
You should have a pretty simple harness by now. Connect your lights to the harness, make sure everything is working and get back to work.
Final Overview of Wiring Harness

Before applying heat shrink, this is what your wiring harness should look like.
Install the Low Profile Ditch Light Brackets

With your hood open, remove the top bolt. With one bolt removed, you can slide in the bracket and screw the bolt back down. Repeat this step with the second bolt until the bracket is secure. You do not need to remove both bolts from the hood in order to install the brackets.
Repeat this process on the opposite (passenger) side of your 4Runner and you are all set.
Note: There is a small clip that attaches to the hood brackets, you need to pop this out with some needle nose pliers, install the ditch mount bracket and then reattach the clip.
Mount your Ditch Lights

The KC HiLiTES ditch lights will come with a nut and two washers attached to the bolt. Be careful not to scratch your paint.
The low-profile ditch light brackets sit very close to the hood of the 4Runner. After the nuts are threaded and the ditch light is secure, your bolt should sit about 1/4″ away from the hood.
Wire Loom the remaining harness
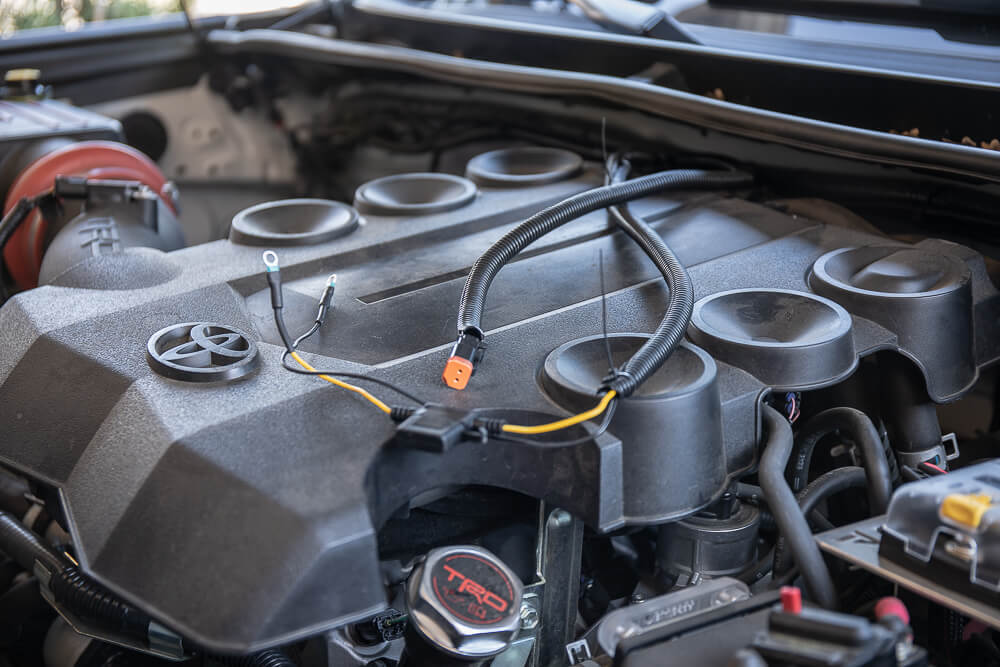
That’s it. Wire loom and route the final harness for your ditch lights and you are all set. Now go enjoy the wild!
KC HiLiTES G34 4Runner Ditch Lights

KC HiLiTES Dual Flex 4Runner Ditch Lights

Xenon Depot Headlights and Fog Lights
KC Dual FLEX Ditch Lights – Forward Facing

KC Dual FLEX Ditch Lights – Ditch Facing

KC HiLiTES FLEX 40″ Lightbar

KC HiLiTES FLEX Light Bar & FLEX Dual Ditch Lights

I bought the KC C3’s and they came with Rago mounts. I’d never heard of this company before….but they make great products! I was expecting some rinky-dink mount but the Rago’s are beefy. Won’t bend, don’t vibrate and look great. Powder coated stainless. I ordered some more stuff from them. Check out Rago fabrication!
Rago as a company has been on a downward trend. Morally and ethically, they are flawd. To start, they have dog shit customer service. Second, they try to sue everyone for using the word “MOLLE” in their marketing. Seriously, if you sell anything with the word MOLLE panel expect to get a cease and desist letter from Melissa at Rago (its laughable at how odd they are). Third, they are just cheap; I had a big problem with malfunctioning components of their Wifey Air System (started by someone else btw – not even their idea), and Rago told me they would not honor their warranty, and that it was user-error. These people are straight weasels. I stay clear of RAGO and others should too. They claim to be this vetran owned customer-service company, however Mellissa and her husband Mario are just shady people in it for the money. They are shaping up to be another Pelfrye IMO. Good luck, ask around and you will find the truth.
What kind of roof rack and light bar on the roof rack are you running? It looks really awesome.
That is the @stellarBuilt roof rack. https://trail4runner.com/2019/01/02/custom-stellar-built-roof-rack/
Hello, First I want to say that your site is amazing. Thanks for being so generous. I just got a switchpros and looking forward to install some lights. I noticed that you use an inline fuse with this install and also your 40″ lightbar. I believe you can set the over current protection in the switchpros. Would this make the inline fuse redundant? I did not plan to use an inline fuse.
You don’t need to use an inline fuse but for both the ditch lights and the 40″ lightbar, they did not work without an inline fuse. When I was testing them, they only turned on if I connected the inline fuse. I thought they would work without the inline fuse as well but they didn’t. Am I missing something?
At the moment I live in South America and my 4Runner is not always in a secure location. How easy would it be to steal the lights? Would it be as simple as removing the nut and yanking the wires out?
Devin, yeah one can steal these lights pretty easily. But, KC HiLiTES makes theft-proof nuts that you can buy. This would enhance the security of the lights for sure. We need to grab a set soon.
I saw that you had the Rago Fab/Squadron Pros installed at one point (looks like pre-switch pro). I was wondering why the swap over to this setup? Better lights? Mounts? I didn’t see a comparison but I may have missed it…so feel free to point me to that if you’ve already answered this.
Thanks!
Tyler, that post was actually submitted by someone else and was before we were adding everyone’s author bio. My fault there.
Brenan, great article as always! Love your site man!
I’ve been eyeing these lights for a while and was wondering, a) did you get them in spot or flood version; (a1, why did you go that way).
b) these lights are modular but at their website they only come in spot or flood but not combo, do you think it would be possible to get one of each and split them in order to have one spot one flood in each pod?
Pablo, thanks man!
A. Flood/Spread.
A1. I wanted the lights to disperse light in a wide, flat pattern, creating more side-to-side coverage, and less distance coverage. I personally didn’t need lots of distance coverage from the ditch lights as I have the 40″ FLEX bar which pushes impressive distance. For someone that has no light bar, then maybe the spot version would be a good option.
B. I would reach out to KC directly for that question. I remember reading somewhere that the FLEX system was available in spot, spot/flood, and dual but I see what you are saying about their website. I would just give them a call. Super cool guys over there.