
Xenon Depot 4Runner LED Headlights (Low and High Beams) Complete Step by Step Installation Guide, Review, and Overview
The Xenon Depot 4Runner LED headlights are bad ass! After writing our initial thoughts and overview on the Xenon Depot headlights, we were anxious to get them installed. After driving around for a few days in the dark with these aftermarket headlights, we were thoroughly impressed.
Other brands of headlights?
We recently installed another set of LED headlights, and they worked but the Xenon Depot low beams (H11) and high beams (9005) are on another level of quality. When you are looking to buy an aftermarket set of headlights, you should seriously consider the XD brand.
HID Headlights Vs. LED Headlights
We have not jumped on the HID bulbs yet. We will get there soon. If you want the brightest light possible on your 4Runner, though, you want to go with an HID bulb over the LED bulbs.
The only problem you will find with HID headlights is that your low beams may have oncoming traffic into thinking they are high beams, and then you will get flashed with oncoming lights. One way to solve this problem is by tilting your headlights down a bit.
LEDs are a good option for someone looking for a better light and better color. The HID headlights are for someone who wants/ needs the brightest light possible, also with a better color.
XD LED Xtreme Pro Headlights – The Best?
I really do think that these are the best option for our headlights in general. The XD low beams and high beams are better than anything you will buy on Amazon or eBay. They are a bit more pricey, but you get what you pay for. The XD LEDs are basically the Goldilocks of low beams and high beams.
These lights will kick out better light output, better color and a better beam pattern than many brands on Amazon and eBay. But, not as much power and brightness as some HID kits/ bulbs (especially the Xenon Depot brand).
While the HID headlights might be a little too bright, too bright they need to be adjusted, this leads me to point out the obvious. How are these lights not the perfect option?
The XD LEDs are right in the middle of more light output, better color, and a better beam pattern. To me, that sounds like the perfect option.
Where can you buy these headlights?
Driving with the XD (Xenon Depot) lights Vs. Amazon headlights
Yeah, big difference!
- Beam Pattern: The other low beam (H11 Bulb) headlights had an incredibly odd beam pattern. It was like they had a shotgun technique and just shotgunned light all over the road. The XD lights had more of a sniper rifle approach. The XD beam pattern was incredibly precise, targeted and very smooth. The beam pattern is exactly horizontal across whatever terrain you are on. It is actually pretty impressive coming from the other headlights.
- Color (5500K): The color of these headlights compared the other Amazon brand of headlights was much more crystal white as opposed to the blue. And, the company marketed the lights as “pure white” but the XD lights are actually “pure white”.
- Brighter/Power: Most importantly, these headlights are BRIGHTER than the other headlights. The beam pattern is better at covering a larger area in a more consistent fashion, so they feel brighter and more powerful than the Amazon brand. This is the headlight that you install, drive for a few days and then say “yeah, I am so glad I bought these”.
Step #1A: Remove Dust Cap

Step #1B: Remove Battery Optional (Driver)

Step #2: Remove Bulb

Step #3: Save your Stock Bulbs!

Step #4: Prepare Dust Cap 1″ Hole

Step #5: Drill Hole in Dust Cap

Step #6: Clean Dust Cap & Feed LED

Step #7: Fitting LED Wires

Step #8: Connect LED Driver to OEM Harness

Step #9: Connect LED Bulb to LED Driver Harness

Step #10: Test your LED Light

Step #11A: Note Position of Tabs

Step #11B: Plug in your LED Lights

Step #12A: Plug In Everything/ Screw on Dust Cap

Step #12B: Plug In Everything/ Screw on Dust Cap

Step #13: Zip-Tire Outside Wires

High Beam Step #1: Remove Bulb

High Beam Step #2: Unscrew and Pop Bulb Out

High Beam Step #3: Screw in Bulb

High Beam Step #4: Fit Fanless LED Bulb

High Beam & Low Beam – Optional: Rotate Bulb

Xenon Depot LED Headlight Dial Settings
This came from a user: I was messing around with mine, and actually found that the LEDs work best when the bulb was rotated at a 45. The post has been updated with a new image (Bulbs on right at 45, while bulbs on left are at 3/9).
High Beams should be 12/6. Low Beams will work on 12/6 or 3/9.
Low Beams is hard to tell exactly what the clocking is (orientation and direction of the bulb) because you can’t see the bulb.
Try them the way they are as they are shipped. If something doesn’t seem right, adjust the dial 45 degrees and then try again. Repeat that process until you have reached your desired light pattern. The lights should work as they are shipped directly from Xenon Depot. You shouldn’t need to adjust them but it really depends on your pattern preference.
High Beam – Stock Halogens

High Beam – Xenon Depot LED Pro Xtreme

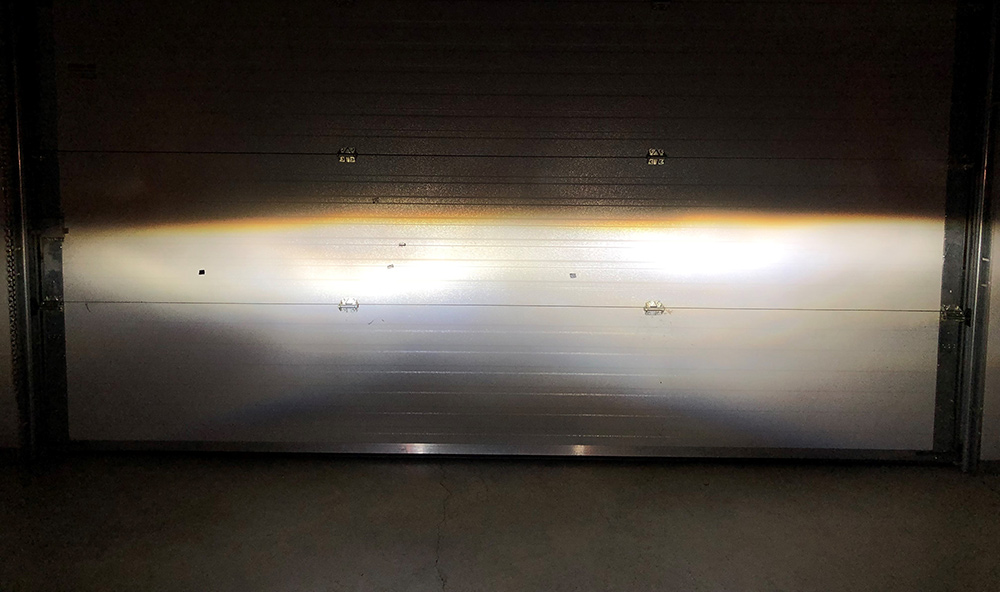
Low Beam – Stock Halogens

Low Beam – Xenon Depot LED Pro Xtreme

We have Two 4Runners – Stock Low Beams Vs. LED Pro’s Back to Back

Stock 4Runner Halogen Headlights – High Beams

Xenon Depot High Beam Headlights – High Beams

Xenon Depot Headlights Posted Under the Stars

I got the xenondepot H11s for my low beams on my 15 trail. They are def an upgrade from stock, but anyone else having issues with longevity? Mine only last ~1.5 to 2 years before one or both burn out.
I had one die out after a year as well
Yup mine just burnt out, after 4 years.
Just a heads up, these do NOT work for the 2021 4runner trail edition. Low beams are already LED and high beams arent compatible.
Michael, I have the 2021 SR5P and they are the same housings. You should not have had a problem with the install. Mine work perfectly.
Michael, bummer. Any specifics or they just don’t turn on? Did you get polarity reversed by any chance?
They don’t fit the housing or turn on. Tried polarity both ways. Even if they did turn on, there’s no way to fit them.
I recently bought the LED’s but it’s been getting near 0 degrees at night so I had my local shop install them. My only gripe is they didn’t install the dust covers back on. I do live in the Rocky Mountains in CO where it gets really dusty off-roading. Should I make a grip and have them redo it putting the dust covers back on?
You want that dust cover on! They prevent moisture build-up in your headlight housings, dust, and debris. Get those dust caps back on as soon as you can man. All you need to do is drill a 1″ hole in the dust cap and slide the harness through then position the grommet in place. If you can’t slide one of the connectors through, just de-pin the harness connector and re-connect on the other side.
So I just did this install, low beams only. Just a small note. I have a 2011 SR5. I drove down to Lowes to grab a 1″ spade drill bit to for the dust covers just to get home and realize it doesn’t have dust covers. I’m assuming this would be the case for all of the early 5th gens? Otherwise super easy!
For anyone interested– some comments here have already mentioned this, but I just spoke to a rep at Xenon Depot– they say these LEDs (Xtreme LED Pro H11s) run cooler than our factory halogens, so there should be no problems shoving all the wiring behind the dust cap and sealing it. As others have mentioned, probably wouldn’t be a bad Idea to tidy things up and put some heat protective tape on, but should be good for a no-drill option if you’re skeptical like me.
I just purchased the 9005 and H11 for my 2017 SR5. The instructions were very vague as to how to adjust the angle. Anyone able to walk an apparent idiot through how to adjust these?
I just did mine yesterday. You need to loosen the small set screw with the provided Allen wrench. The first time you try to adjust them, they’re going to put up a fight. They’re kinda stuck there. But once you break them loose, they move freely.
Remove the blue gasket from the mounting base, loosen and/or remove the set screw (don’t lose it! – although they ship extras with the bulbs). Hold the bulb body (the part with the heat sinks and cable attached to it) with one hand, and grab the mounting base with the other and give it a hearty twist. It’s going to take a bit of oomph. Once it breaks free, just set the angle to what you desire.
There are tabs on the bulb body that ride in a track on the mounting base. The unfortunate part is that slots that one would use to insert the body into the base are at 45° where the suggested alternative angle is. So you have to push down hard in the base to make sure the O-ring is sealed between the body and base before tightening down the set screw. Seems like a recipe for a leak (although the low beams are in a sealed enclosure – might not matter). I tested both ways, and I personally found the original orientation had the sharper cutoff line for my particular installation. So I set it back to default.
Hope that’s useful information for you and others!
~Chris
2019 4Runner- Do I need the PWM module for the low beam LEDS and the DRL module for the high beams?
If I understand what I read correctly, the DRL are basically a lower voltage operation of the high beams and the DRL module allows for a stable non-flicker operation of the DRL/high beam LEDs?
Also for the low beams, what does the PWM do and do I need the module? I assume it also has something to do with flickering?
Thanks!
I’m getting ready to purchase my xenon depot headlights but im not sure if I need the options- with PWM module and with DRL LED? I have a 2016 Trail 4runner. Any help is much appreciated! Im buying the same lights you linked above
Thanks!
I bought the DRL module for my 4 runner limited 2019, and it works great, you don’t need the all connector, just need the connector w he DRL module, I got this information from the Xenon Company.
Just installed these today. I drilled the 1″ hole and here’s my advice to potential buyers: Get a step drill bit. I feel 1″ is too wide a diameter for the rubber grommet. If it’s too small, go a step larger. I drilled exactly 1″. I went a step further and applied silicone hi-temp RTV sealant in the grommet channel. This provides a weatherproof seal and keeps the bad stuff out of the lamp.
Definitely brighter than the halogens.
Great install. Thanks for the help.
Hello there
I installed my H11s for the low beam today, but decided to not make the 1″ hole on the cover and instead I inserted everything (the driver with the 2 bulky connections) inside. Then i spreaded the fins from the heat sink as much as I could in the limited space remaining and closed it with the cover.
I noticed these bulbs get hot, I am little concern with all these electrical connections in this small enclosed space. Wife really doesn’t want me to make the 1″ hole in the cover…. so is there any danger by doing in the way I did it?
Hi, I just received mine and am thinking about doing the same thing. Not a big deal to drill but I’d prefer to leave the cap sealed if possible.
Any issues so far with everything jammed in there?
Hello there
I have not used my headlights that much since I did this install. I was told by a rep at 4wheelparts that the led get really hot and could melt the plastic around. I am not sure how true is this statement. I have not experienced this because I have not used the low beams that much. I run all day with my DRLs and they work and look great. There is small delay between the 9005 bulb (passenger side) vs the driver side. This occurs on both modes: DRL and High Beam . I should try to switch bulbs sides to see if the issue continues but have not had the time yet. I am still a little worried about the hot H11 bulb and all connectors stuffed inside the low beam housing… so I try to not turn on my lights unless I need to. Lately I have been considering going back to Halogens for this reason..also because I think that the yellow tone on the headlights actually looks good on my Magnetic Gray 4R.. I am considering going to Phllips Crystal Vision Ultra which are brighter than stock, have the yellow tint that I like and fit the housing with no issues. I will use the Xenon LED on my wife’s honda. If someone else has done this H11 install without making the hole on the cover, please chime in.. Thanks
Just installed the set without drilling the dust caps. Took some heat resistant tape (designed to protect wiring and electrical components in hot environments ) and I coated almost every inch of the wiring and plastic clips. Left the drivers uncovered. I stuffed it all inside and fanned out the heat sink best I could and closed it up. Tight fit but I think it’s protected enough by the heat repelled tape. Clocked left headlight to 45 and the right to 315 to try to angle them properly. Not sure if I got the beam pattern right but it’s bright enough for me. Seems like everyone has just winged the degrees
Ryan, about a year in now have you had any issues with putting everything behind the dust cover with the heat resistant tape? A rep at XenonDepot said there should be no problems, but would love to hear from someone with real world experience.
Hi Tanner,
So I actually wanted a little more driving light. So a few months later I switched to the Xenon Depot HID kit H11. So much happier with the results. I did have to angle the beams down slightly because I was getting flashed. I used a step drill bit on the dust covers and used some silcone and some water tight tape on the back and inside of dust cover where the grommet goes.
Moved the LED H11s to my fogs (you can do this safely per Steve at Xenon Depot) and put the Lamin X amber film over my fogs. Now I have great low beams and nice LED amber fogs.
Thanks for the quick reply– Were the H11 Xtreme LEDs not that much better than stock? Or you just needed a little extra? Were you otherwise happy with them for the time you had them? Also, with the step drill bit and tape, have you had success keeping moisture out of your headlight housing?
I was a little disappointed with them after a few nights driving. The HIDs are honestly so much better if you are looking for a full beam pattern. You will need to clock your headlights down slightly but I feel so much safer driving at night.
I used a lot of silicone sealant glue on the holes and grommet and then I used that special leak fix tape on the grommets to really seal it well. I live in AZ so it is very dry here and even through months of the monsoon rains I have never had moisture in the housing. I don’t think you’d have to worry about it if you really seal up the grommet with glue and tape it on both sides of the dust cover with the water tight tape.
Thanks for the info man! Not sure which way I’ll go yet, but I currently do a lot of city driving so I worry I would get flashed nonstop even with turning the headlights down if I went HID.
Brenan, I just installed my H11 and 9005 XD Xtreme LED pro; install wise it wasn’t too bad, BUT I noticed after the H11s my DRL wouldn’t work (without touching the stock OEM 9005). I continued on thinking it’d work itself out, after install the 9005 LED w/ DRL upgraded driver, still nothing. Not sure if they changed it where it was on/off instead of DRL. Any ideas as far as troubleshooting?!
UPDATE: driving to work this AM they started working… Not sure what made it start working, but I’m assuming it warmed up or computer recognized it? Regardless It’s all good. Thank you, just figuring out alignment of the beam pattern now. Is it 3 o’clock and 9 o’clock universal for H11, 9005, and Fog; I misunderstood upon installment and set all to 45 on all lights… oops, gonna be a pain un-fanning the heat sinks. Thanks for the reviews and information!
I thought putting all of them (low beam and high beam) to a 45 was the suggested install pattern? My understanding is the picture on the wall has the two options 3/9 vs. 45…not that some go to a 45 while others go to 3/9. I hope I am not being confusing. I guess the bottom line question we’re both wondering are all lights (low and high) to be set to 45? Thanks.
I trouble shot mine, and can’t rwmwmwbr the exact set, but feel like they were different for almost all to be set horizontally (3/9). I just trial and error till I got it. You can either mark them with sharpie and adjust, or eye ball it…. another good way is marking the OEM stock halogen bulbs when full turn, then just duplicating that via LED bulbs, worked like a charm. Hope that helps?
I ended up just doing the same thing (trial and error). Last night I got them to a spot they look great in. Honestly, they are such a huge improvement I got to the point where it felt like splitting hairs a little bit.
Thanks for the detailed installation directions. A huge help. I recently purchased both LED Pro bulbs for my High Beams and Headlights for my 2018 4Runner. Did you have a difficult time fanning the heat sinks in the Headlight housing? I worry the aluminum alloy leaf heat sinks may get too hot and melt nearby wiring. The High Beams, however, were not a problem fanning out. Appreciate the help.
No worries. There was no issue with the heatsink in the headlight housing, not with fanning them out and not with the actual heat. When you are fanning the heatsink out in the housing, just fan tight and compact. There is not a ton of room to work with, but they fit. We have had these LEDs in for a while now, and they push out really nice, bright, white light. Great product all around, and a great company.
You’re photos made this install such a breeze. I did try rotating the bulbs but the output was worse than leaving it at the factory 0. I might double back and silicone in place the rubber grommet but then again, I might not. Thanks for the post!
I just received both the Low and High beam LEDs. They also sent to boxes of 9006 which has something called “anti flicker module” I am confused what to do with that. Your instructions do not illustrate it. The instructions that came with both the H11 and the 9005 LED bulbs have this module. If I am supposed to use it in conjunction with the bulbs then UI need two more, right? I am confused. Also, you did not mention what numbers to alight the bulb to. Do the bulbs need to be top and bottom or left and right?
Shaf,
Your lights should be at 9 and 3oclock (left and right). Both lights come pretty close to 9 and 3 after you plug them in. For the high beam (9005), plug them in and see where they are sitting inside. If they are not sitting at 9 and 3, rotate the dial until you reach 9 and 3. I am not sure about the exact degree on the dial. For the low beam (H11), you want to play around with them and adjust according to your beam pattern on the wall. If you are not happy with the beam pattern on a wall (testing from about 10+ feet out), then adjust the dial accordingly. I will see if I can get the exact dial setting information for you. You do not need the anti flicker module. The instructions have this in there, but you do not need the flicker module for completing this install.
Did you ever find what the low beams were dialed to for best light out put?
This came from a user: I was messing around with mine, and actually found that the LEDs work best when the bulb was rotated at a 45. The post has been updated with a new image (Bulbs on right at 45, while bulbs on left are at 3/9).
Hi, Brenan great post. Im just struggling with the diod alignment for the low beam, since the 4runner has some kind of lens or housing you cant actually see the diods. do you know the setting ?
Im having some kind of yellowish light on the edges of the hot spot, do you have this too ?.
As I get older, I find it more difficult to see at night while driving my 4Runner with its original headlight setup. Compared to my wife’s BMW, the white output makes driving more comfortable as I’m not straining to see the next bend in the road.
Question: Are the Xenon Depot LED truly the way to go? Do you feel the light output (distance) is the same or better? I don’t think I want to go the route of HID headlights because the output might be too much for oncoming cars. Any other options would be appreciated. Thanks GS
Gregory,
These lights are a great option for sure. Are they truly the way to go? I think so. The distance and the light output is much better than the stock halogens. You will have a much better time on the road with visibility. Also, we just installed 4Runner LED fog lights in my girls 4Runner a few days ago. These new LED fog lights help SO MUCH when running the low beams and fog lights together (basically, normal lighting). She has the stock halogen light bulbs with the new LED fog lights and it was an outstanding difference. We were driving on a two-lane road, pitch black in the middle of nowhere last night to visit family. We were both seriously impressed. The LED fog lights almost wash out the yellow/orange hue from the stock halogen bulbs. I was really impressed. For Headlights, the Xenon Depots are probably the highest quality you will find. I would say grab a set of the Xenon Depot LED low beams/ high beams and the LED fog light bulb as well. This will make for the perfect front-end lighting solution.
Cheers!
A bit confused.
Should I be installing a canbus for the high beams? I contacted Xenon directly and their reply is quoted below.
“You’ll want to get the canbus for the high beams to ensure your DRL work without flickering. Now this will cause the DRL to be on at full brightness since the LED bulbs can’t dim.”
Did you run into this issue and did you install a canbus?
Thanks!
Greg,
You don’t “NEED” the canbus. If you do not want your DRLs to flicker, then get the Canbus. The 4Runner uses a pulsing signal in DRL (Daytime Running Lights) which ends up providing a lower average voltage to the 9005 high beam bulb; this is how the stock halogen 9005 bulb dims in DRL mode. LEDs have instant-on/off functionality so when installing an LED bulb with a pulsing signal it will end up flickering extremely fast (literally milliseconds). The Canbus module takes the pulsing signal coming from the car in DRL mode and modulates it so that the LED driver sees a stable 12V all the time. In short, without the canbus module the leds will flicker in DRL mode. With it, they won’t, but the light will be on at full intensity (it won’t dim like halogen).
Hope this helps!
Slapped these guys on today and it was an easy install but I don’t like the rats nest of wires left over. You go from one clean wire to the bulb to 4 or 5 long wires and accoutrement! For now I have them zipptied and as much out of the way as I could think of but I’m worried about the life of the wires hanging and rubbing on crap. I guess I could just cover them in tones of electrical tape?
Jay,
Yeah, you can always grab some wiring loom or wiring wrap to clean things up. I was thinking the same thing after the install. I bought some of this wiring wrap to clean the wires up. I have not seen any wiring loom that would be large enough to cover all of the wires.