
C4 Fabrication Lo Pro Front Bumper With KC HiLiTES 30″ Flex Lightbar & Smittybilt X20 10K pound Winch
We finally installed a bumper, a bumper that’s tried and true.
Many of you know about the C4 Fabrication Lo Pro front bumper and if you don’t, you should.
As the name suggests it’s a low profile front bumper for the 5th Generation 4Runner. It fits into the lower valance portion of the 5th Gen bumper grille and cutting the factory valance off is required to fit this bumper.
This bumper among many of its low profile counterparts are great options to consider if you are looking to mount a winch, lightbar and to offer a little extra front-facing protection in the event of an accident or off-road encounter with a rock.
If you are looking to install a winch or lightbar alone, there are other options out there. You can look at hidden winch mounts for the 5th gen and behind the grille lightbar mounts as well. You don’t need a full low profile bumper to accomplish these mods.
This front bumper provides more protection up front and makes for mounting a winch and lightbar pretty simple. You can also combine this Lo Pro bumper with the common high clearance bumper cut modification to increase your approach for off-road use.
Now let’s look at specs, price, and compatibility.
LoPro (Low Profile) Winch Bumper:
- LoPro: Check Price
- High Clearance Additions: Check Price
- Winch (Smittybilt X2O): Check Price
Weight
- C4 Lo-Pro Bumper: 75lbs
- Winch (Smittybilt X2O): 67lbs (Read winch assembly)
- KC FLEX: 13lbs
- Total Weight: 155lbs
Additional Features
- Fits 2014 4Runner+ (non-limited) with cutting
- CNC cut and press brake bent from 3/16″ P&O steel.
- Can be ordered with Extreme Led, Baja Designs, or Rigid
- No powder coating offered
- Fits non-integrated solenoid winches from 8k-10k (some integrated models may fit)
- Works with TRD Pro Skid Plate
- 8 weeks production time
Other Bumpers From C4:
- Hybrid Series (Tube Bumper): Check Price
- Overland Series (Pate Bumper): Check Price
This is not a full review, but more or less an installation overview. And even though there are a few others out there, you knew we had to put an install together.
Installation
The installation can be found on the forum by Caleb, the man who built the bumper, and Jason/SwellRunner did a video on it as well. We still wanted to throw one together as there were some things that both overviews missed. With that being said, there are also some things that Jason and Caleb covered that we did not. With all three overviews, you should be set when installing the bumper.
Our install includes a KC HiLiTES FLEX lightbar and while we don’t cover the exact brackets, the lightbar does fit with the Smittybilt X2O 10K winch.
Preferred Tools
- Dremel (the one I use) – check price
- Power Drill
- 10mm-19mm wrench/sockets
- 9/16″ wrench/socket
- 1/2″ wrench/socket
- Small/large flathead screwdriver
- Sockets and Extensions
- Zip-Ties
- Painters Tape
- Sharpie
- Transmission Jack
Step 1: C4 Fabrication Lo Pro Package Contents

Start unpacking your Lo Pro and layout your contents. If you ordered a lightbar directly from C4 they should provide brackets to mount the bar.
We used a KC HiLiTES 30″ FLEX and made our own bracket. For those of you out there wondering if it fits, it does but you need to customize your own bracket or figure out how to mount it.
The KC FLEX is also much larger in-depth than a Baja or Extreme LED but it does fit with the Smittybilt X2O.
Step 2: Pop Push-Clips on Plastic Cover

Push down on the center portion of the clips, then you can pull/pop them out.
Step 3: Remaining Push Clips and Center 10mm Bolt

Pull out the remaining push tabs. Removing this whole section is very similar to removing the grille for the TSO Grille. Refer to that section for an in-depth overview.
Step 4: Pull Back Fender Liners & Unclip Fog Lights

- Remove 10mm bolts
- Use Screwdriver or plastic pry tools to pop clips off
- Push fender liners back behind the tire
- Unclip fog lights but leave housing in place
If you need a full reference on removing fogs, check out this recent post on installing KC Fog Lights.
Step 5: Remove Remaining Bottom Bumper Bolts

There are a few more bolts holding the bottom portion of the bumper in place. Remove these last bolts and you are ready to pull the bumper off.
Step 6: Pull Bumper Down, Out and Under this Bolt Hole
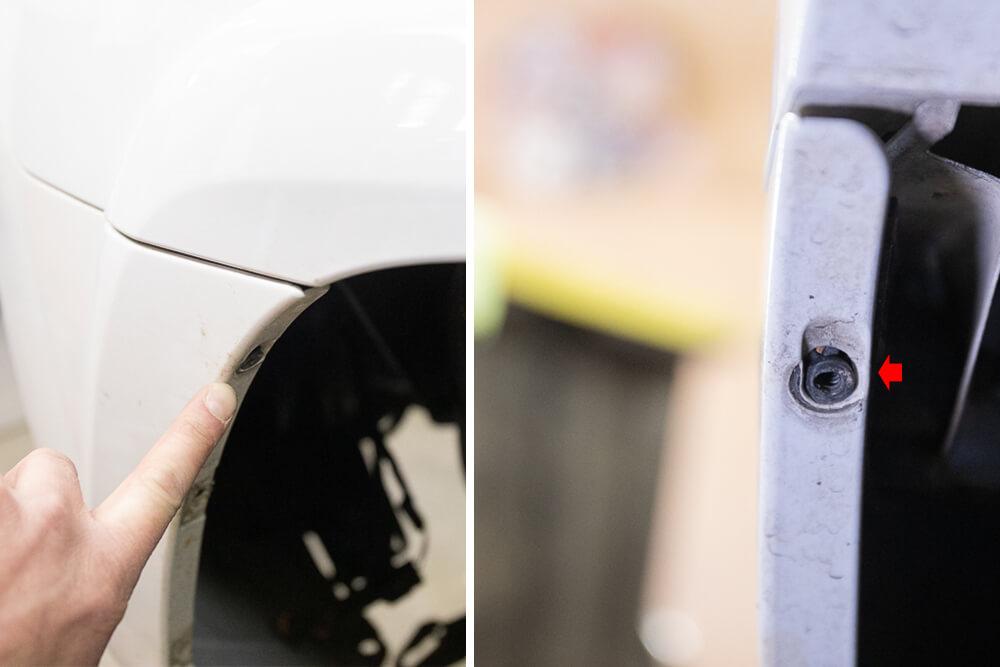
There is one bolt hole at the top of the fender liner. It sticks out a little past the bumper. Pull down and out on the bumper, over this bolt hole. The whole top portion of the front bumper will pop right off.
Step 7: Remove the Front Bumper

Pull off the front bumper and set to the side. If you have any additional accessories, now would be a good time to disconnect those as well. I had a forward facing camera that needed to be disconnected.
Step 8: Remove the Foam Insert and Frame Rail Support (Crash Rail)

The aluminum crash bar can now be removed from the frame of the 4Runner. Use a 14mm socket to remove the nuts holding the crash bar on, then remove the crash bar mounting brackets from the frame as well.
Step 9: Remove Crash Bar Mounting (Spacer) Brackets

Take off these three bolts and save the OE hardware, you will re-use to install the Lo Pro bumper.
Step 10: Remove Rear Clips on Bumper Valance (Trail/ TRD Off-Road)

Behind the bumper, you have plastic clips holding the Trail or TRD Off-Road Valance in place. You can remove these clips with a screwdriver or pliers.
More importantly, comes the cutting of the front bumper.
Step 11: Tape Top Portion of Bumper for Cutting

REFER TO BOTTOM OF POST FOR AFTER SHOTS.
I cut about 1.25″ or exactly on the blue painters’ tape line, but if I were to do it again, I would have cut at 1.5″ out all the way across. You can see for images below that this cut lip will tuck under the C4 Lo Pro so even cutting 2″+ wouldn’t matter. It would have been nice to know this going into it but now you know. If you cut short, just know you will have a gap between the Lo Pro bumper and the OE bumper. Cut at 2″ or over and the Lo Pro will sit over the cuts.
Step 12: Tape Sides of Bumper for Cutting/Trimming

Continue along taping off the sides of the bumper. If I could do it again, I would have made cuts further towards the center of the bumper, not the outside. We made our line straight down the center but I would go as far in as possible. Please refer to the images below and see the gap in the bumper/cuts.
Step 13: Cutting/Trimming on Center Tape Line

Here is a better shot of cutting down the center line on the bumper.
Step 14: Cutting/Trimming Inside of Bumper

There is a portion of the bumper that is hard to reach with a smaller diameter blade from the front. If you are using a Dremel, you may need to flip the bumper over and make cuts from the back side where the area may be hard to reach from the front.
Step 15: Lower Valance removed

Now that your lower valance is removed you can remove the tape guides for your cuts.
Step 16: Prepare C4 Fabrication Lo Pro Bumper

Depending heavily on your shop setup, this will look different for you. Getting creative in hoisting your bumper into place is incredibly important in the proper placement of your bumper and less strain on your body.
Step 17: Bumper Positioning on Transmission Jack

If you don’t have a transmission jack, you can always rent one from Home Depot. Or figure something else out. But, this did make the installation go very smooth.
You can see in the photos above, Jimmet Jet got pretty creative in how we positioned the Lo Pro into place. If you don’t have anything else in your garage or shop, the transmission jack made life very simple. It will be worth a drive to Home Depot if you don’t have one.
Step 18: Cutting Plastic Air Dam

For the C4 Lo Pro to fit into place, you will need to cut off this portion of the air dam on the driver side. You can leave the passenger side as is. It will rest on the inside of the bumper.
You may need to repeat test-fits in order to ensure final placement.
Step 19: Position Bumper & slightly bend the A/C condenser line

In order for the winch to fit correctly, you may need to slightly bend the A/C condenser line to make room for the body of the winch. We are running the Smittybilt X2O and only needed to pull the line out less than 1″.
Make sure to check clearance between the bumper, winch, power steering line, and A/C line before the final install!
If the A/C line is rubbing on the winch or the bumper somewhere, it can puncture the line and allow the freon to leak out.
Step 20: Power Steering Line Clearance Overview

We took an extra precaution and added a piece of rubber bike tube hose around the power steering line, taped it and then zipped it to the metal grille support bracket.
Also, some winches may interfere with the small metal grille support bracket right in the center area in front of the condenser. this bracket can be slightly bent back with a mallet or crescent wrench to create the necessary clearance.
Step 21: Power Steering Line Bracket (Driver)

In order for the power steering line to clear with less strain and resistance on a zip-tie, I bent the driver side bracket back on towards the driver side.
You can see the exact direction and orientation of the bend above. The more you bend/twist the bracket, the higher up the line will set. But if you go too far, the passenger side bracket won’t line up. Twist and test fit in stages to confirm perfect fit.
Step 22: Passenger and Driver Bumper Brackets to Frame Rail

Continue mounting the Lo Pro bumper to the frame using the provided support brackets.
Step 23: Winch, and Lightbar Wiring

Once the Lo Pro is fully mounted, you can run your winch wiring along with your lightbar wiring. Some of the excess wires can be tucked and zipped into this empty spot on the bumper.
Step 24: Recheck Final Placement before Putting on Factory Bumper

Double check all your lines, wires and bolts. Now might also be a good time to re-spool your winch with some resistance. Please follow the instructions on re-spooling your Smittybilt winch, on our winch overview page, towards the bottom.
After everything is tucked and tight, you can reinstall your front bumper, and connect your fog lights.
Step 25: Connect Body Brackets from C4 Lo Pro to OE Bumper

Finally, install the last brackets that connect the Lo Pro Bumper to the OE bumper.
OE Bumper and Lo Pro Bumper Gaps

If I were to do it again, I would have cut on the inside edge down the bumper instead of the outside edge. And for the top, I would have cut further out like the images above suggested (1.5″ instead of 1.25″). Regardless, the bumper still looks badass and I am pretty stoked with the bumper, lightbar and winch combination, right now anyway.
We will follow up with a review eventually.
If you are looking at low-profile bumpers, C4 Fabrication should be at the top of your list for sure. They really did a great job with this bumper and will more than likely go down as a classic, for the 5th Gen.
So this doesn’t work with a 2014 limited ?
Can anyone help me with the Diode Dynamics SS30 brackets and how they work with this bumper? I’ve tried and can’t figure this out for the life of me. I’ve seen on Trail4R that that light bar works with this bumper. Help!!! 50$ amazon gift card to your email if you’ll help me please.
There are two options I came across. Either bend the provided bracket with a vice grip and hammer or buy the extreme led x6s 30″ lightbar bracket c4 fabrication offers. I went with bending.
Bending requires holding the long upper body of the bracket in the vice grip and hammering the 3mm side of the small bolt-on base portion, to create a bend in the same direction as the bend of the arm. Then hammer the small bolt-on portion close to the long body to flatten in out. It will come out looking like its kneeling. Don’t hammer it too far out away from the body or it’ll round the bottom piece.
(I realize I’m responding to an old comment but I had the same question at first so this is for those that come later)
STEP 22: BUMPER BRACKETS TO FRAME RAILI lost the bolts for the side holes on the frame, to attach the brackets, those in the front part are M10-1.25 but I can remember the size and pitch for the lateral ones, any help will be apreciated.
Late to the game here, but I just received my C4 bumper for my 2021 TRD Pro. One small concern about the power steering line. That line doubles as a cooler for the fluid (i think). Since you guys wrapped it for protection, have you noticed any issued with power steering or the fluid getting too hot? Living in AZ, we have to take ALL cooling system seriously, especially when wheeling at slow speeds. Great install guide also. Plan to use it soon. Thanks.
Not at all, we ran this setup for about 4 years with zero problems.
Has anyone installed the Badlands winch on the Low Pro Bumper?
Probably a stupid question but I have not installed any parts yet. Question is, Do I install the aftermarket skid plate prior to or after installing the Lo Pro bumper or does it even matter. I have a 2017 4Runner it going on. Thanks.
It doesn’t matter. You can install skid plates before or after.
Love the walk through, but I will admit I am installing a SSO lo pro and did a google search regarding winch and power steering clearance. I am running into clearance issues and tried bending the brackets but not enough clearance. I’ll be adding some bike tire and zip ties and should be good to go now! Thanks!
Did you special order the bumper to get “trail” cut in it?
That was one of the original options on the C4 Lo Pro. They don’t offer that cutout anymore.
Hi there, the 4Runner looks great. Quick question, did you replace the plastic cover that would cover the void where the winch goes? If you did replace it, how do you get to the lever to release the winch so it will freewheel, and then lock it up again. Hoping to get one of these right after the new year on my 2020 TRD Pro.
There is an access hole in the front of the bumper. There is a large cutout on both sides of the bumper and the right side is to access the drum lock handle. The front mesh valance does not get in the way of accessing the drum.
Brenan-
I just ordered my C4 and I should be here 8/20. In the meantime, I keep focusing on the steering hose rubbing either on the winch control box or radiator support. If you had to do it again, would (could) you move the box to the passenger side of the winch? Or would it then interfere with the ac line?
Trail Safe
JB
You can modify where the winch sits on the bumper in order to re-position. You would have to cut new holes on the mounting floor of the bumper, which would then cause access issues to the drum unless you cut more holes in the front of the bumper. I don’t think re-positioning the winch or the winch control box would be a great idea for this specific bumper as the power/ground/control cables on the box are designed to sit exactly where they are in relation to the drum. You can do anything you want and make it work obviously but man it would take some serious extra work to get around what has already been designed to work with this setup.
Man totally forgot about posting this question! Since then I went with a straightforward (recommended) install. I was able to manipulate the line/hose with minimal effort. All good!
Thanks for the reply!
Trail Safe
-JB
I just purchased my C4 winch bumper for my 5th gen from a guy that no longer wanted it. The bumper looks amazing however he did not provide me with any of the mounting brackets. Are the brackets absolutely necessary? And if so, how do I get a replacement brackets?
I am having a difficult time trying to contact C4 fab to see if they would sell me replacements.
Can anyone help me?
After the install, any issue with your front facing camera? I’m considering the low height bar option to prevent the front camera from being blocked.
You’ll actually need the full height bar to avoid interfering with the TSS in front.
Any torque information? Will be installing next week.
How hard would it be to install or replace a winch after the bumper is installed?
Hi guys. Back to the weight thing. 155lbs added to the nose but how much was taken off to fit it? I’ve heard 45 to 50 making it around a100lbs added. Am I correct?
Ok, just got a reply from C4 Fabrication on this. The factory crash bar is 25lbs. The crash bar brackets are around 5lbs each. The plastics weigh less than 5lbs but we can say 5lbs. It sounds closer to 40lbs to me.
Thanks for looking into that. I’m gonna go that route. I’m going to sacrifice a spare battery in favor of the C4. Still gonna go with an air compressor but it’seems too easy to start loading up the weight.
I know, i’m obsessed with weight. I should get over it and go for all the bells and whistles.
Hammer, great question, we should have weighed the crash bar during the install. It’s not light. I would assume you are correct in the ballpark of 50lbs. Let me get an exact number on that and reformat the post. Standby.