
Metal Tech BMC Kit – Step by Step overview on Cutting Body Mounts for the 5th Gen 4Runner
When you make the move to larger tires, you are likely going to need a body mount chop (BMC). There are other areas you need to trim as well, but your body mounts are one of the most important.
Making the jump to 33″ – 34″ tires, or even larger, will mean rubbing throughout your wheel well. After you have trimmed fender liners (also push back), rocker panel caps (valance caps), splash guards, and your actual body, you will need to take your 4Runner in for a body mount chop or do it yourself.
You have a few options for chopping your body mounts. You can do it yourself or take it a shop. You can also use a model-specific kit or use scrap metal to connect your mounts after you chop the ends off. I would recommend using a kit that is specific to your 4Runner, unless you can cut and design your own plate.
The body mounts are awkward to cut so having the right tools for the job will make a big difference. Using a 5″ angle grinder will work, but be prepared to make quite a few cuts before you get a decent amount of the body mount cut off. A plasma cutter might be a better option as you have a little more flexibility in the angle of cut.
Not everyone has a plasma torch sitting around so just know, a grinder will work. I used a 5″ cutting wheel with a battery-powered Milwaukee grinder and was able to cut the mount off just fine.
What Are Body Mounts?

Body mounts are exactly as they sound; they mount the body to the frame. You often hear the term “body on frame” construction. Our 4Runner has a body and a frame.
The body sits on top of the frame and is mounted in place using these “body mounts”. Inside the body mount is a rubber bushing that helps dampen vibrations which makes the ride for you and your passengers more comfortable.
Body mounts protrude into the wheel well often causing problems for larger tires. Cutting off the tip of the body mount and welding on a new plate is not going to comprise the strength of your frame.
Where to Purchase:
- Metal Tech 2010-2013 Kit: Check Price
- Metal Tech 4×4 2014+ Kit: Check Price
Parts in the Kit
- 1 Left Body Mount chop plate
- 1 Right Body Mount chop plate
Recommended Tools:
- Plasma Cutter
- Grinder with 5″ cutting disk
- Grinder with flap disk for blending and sanding
- Welder
- Bucket of water and towels
- Light-colored paint pen or red sharpie
- Basic hand tools
DIY Body Mount Chop Vs. 4×4 Shop

If you do not weld, use a plasma cutter, or have general experience with a grinder, I would strongly recommend taking your 4Runner to a shop. We have cut off our body mounts, and it’s not difficult. Like everything, it just takes time. Just make sure you are taking the necessary safety precautions; glasses, gloves, facemask, ear protection, etc. After we cut off our mounts, we usually head straight into our local shop and have them weld on new plates. If you cut off your mounts, weld on a new plate as soon as possible. The front body mounts handle the most weight of the 4Runner so you want to make sure you restrengthen the body mounts by welding on a new plate.
Only perform the steps below if you are an experienced fabricator/welder or have enough experience with the tools to accomplish this task. At your local off-road shop or fabrication shop, they will have all the tools you need to get this job done right. The cost for a shop to do a BMC is relatively inexpensive ($100-$250).
Sacramento, CA
Stellar Built is a very reputable 4×4 fabrication shop in Greater Sacramento. If you are looking for a good off-road shop, give Stellar Built a call. They are much more of a Toyota shop as opposed to a Jeep shop. Stellar Built has now become our go-to fabrication shop in Sacramento. You can find them on Yelp and Instagram.
Lakewood, CO
If you are located in central Colorado or anywhere near Colorado in general, and you need a reputable 4×4 shop, look at RSG Offroad. RSG Offroad specializes in a wide variety armor installs, suspension work, custom fabrication, along with body mount chops and body mount relocations. RSG also manufactures their own line of rock sliders and skid plates for the 5th gen 4Runner. RSG is the place to be in Colorado for sure. You can find them on Yelp and Instagram.
Step 1: Jack up Truck & Locate Body Mounts

Initial Steps Recommended by Metal Tech 4×4:
- Remove battery ground cable from the battery
- Remove the front wheels
- Remove any installed sliders or aftermarket parts that may be in your way. Allow yourself as much room as possible to work with.
Start by cleaning off your body mounts and then let dry. Lay your body mount chop pieces out and notice the radius corners on the plates. These plates are specific to the driver and passenger side. The side with the radius corner is the top. The flat edge of the plate is the bottom.
Step 2: Remove Rubber Bushing from Mount Housing


Remove your body mount nut, washer, and bushing. This is to prevent the bushing from catching on fire when you are cutting or welding your body mounts.
Step 3: Mark Cut Lines on Body Mount
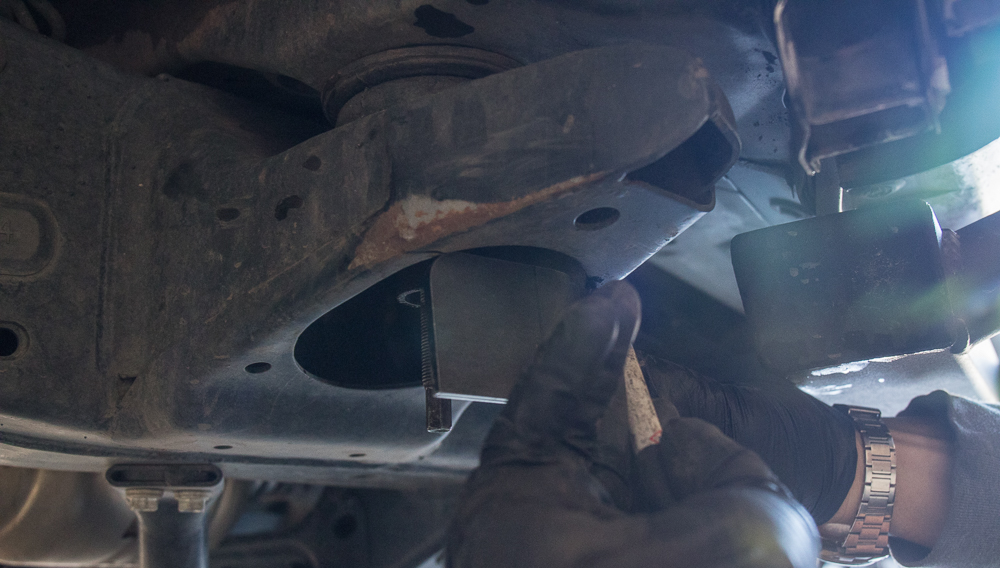

Using a light paint pen or sharpie, hold up your BMC kit plates and mark your cut lines.
Step 4: Using Plasma Cutter, make initial Cuts


Using your plasma cutter or tool of choice, make your initial cuts on the body mount.
Step 5: Using Angle Grinder, Grind Ends on Body Mounts

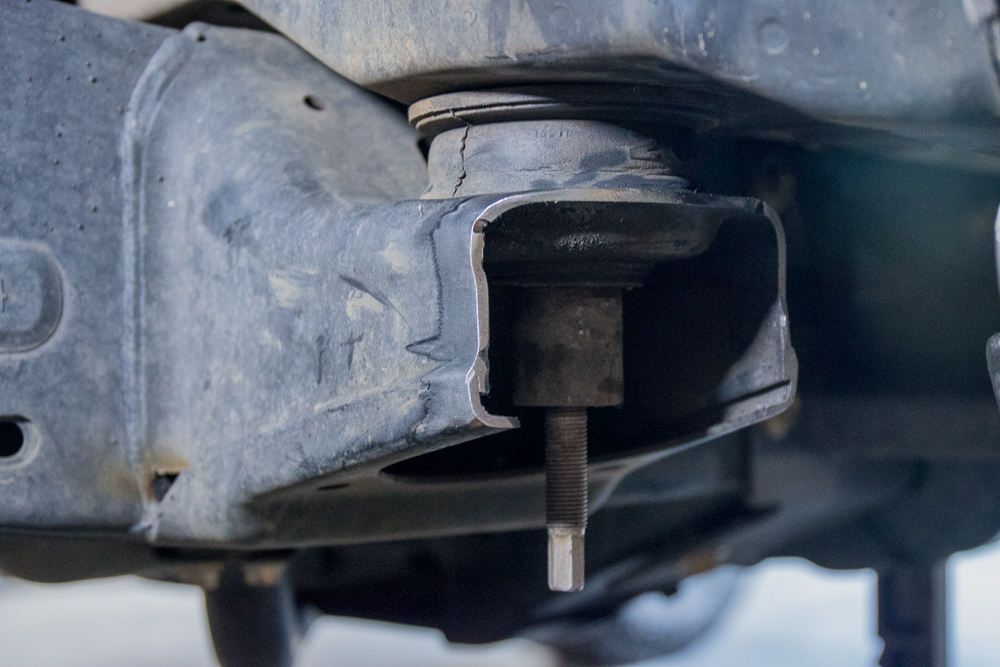
Using your paint pen or sharpie again, mark your locations to grind down to. Using your angle grinder or tool of choice, grind down your body mounts so you have a flat edge.
Step 6: Weld Plates to 4Runner Mounts

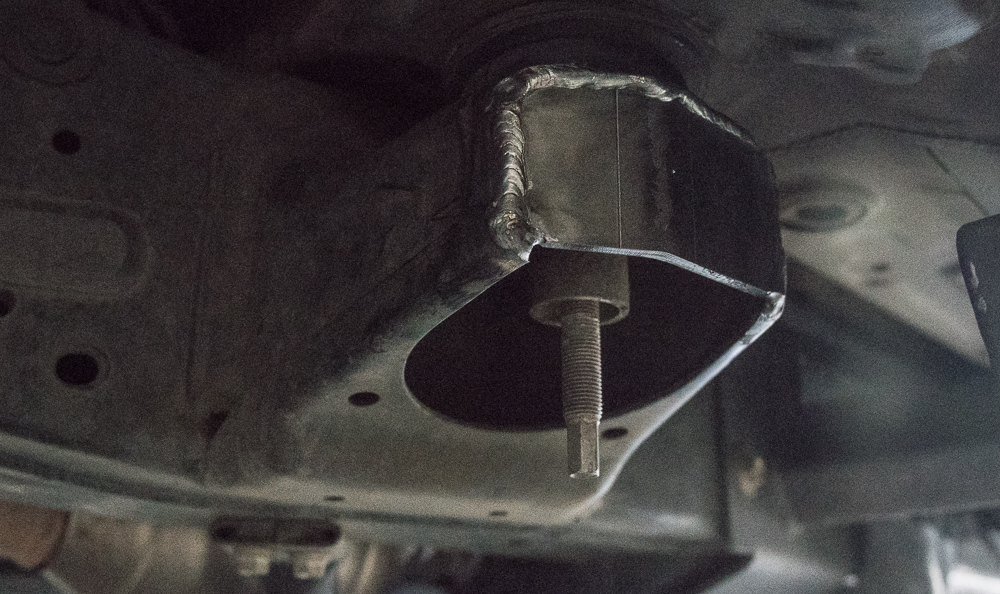
Weld the driver/ passenger-specific plates to your body mounts. Make sure your radius corners are facing up and the flat edge is facing towards the ground.
Step 7: Flat Black Spray your Body Mounts

You can use flat black spray paint to paint your body mounts. This will give the end result a cleaner, more factory appearance.
Body Mount – Driver

Body Mount – Passenger

If you are looking for more clearance around your tires, this a great kit that is specifically made for our 4Runner. To sum up the install, it is fairly straight-forward. Metal Tech 4×4 provides a detailed step by step installation sheet that you can refer to if you have any questions.
Your options here are simple, do it yourself or grab a kit and have someone else do it. It may sound crazy to pay someone else to cut metal off your truck, but if you don’t know what you’re doing, you can make mistakes.
After owning three 5th gens, I have cut the body mounts off and paid to have it done as well. Sometimes I think its easier to just pay someone to do it but it depends on your skill level, time and budget.
I personally recommend having a professional get it done but to each their own.
I have a 23 pro 4 runner I love it but I’m trying to max out my tire size… I have a Westcott designs leveling kit installed and am currently running 285/70/17 I’m hoping to step up to 285/75/17 I am going to have some rubbing on the body mount. I see I can easily cut it back. In my research I found a thread where another 4Runner owner posted an educational video in regards to how important that mount bracket is. I just want to make sure anyone that is performing this modification understands that the purpose of that mount is to keep the wheel from driving into your legs during a head on collision!
Do your safety research and know why that bracket is there in the first place. It’s one thing to take the risk for your self but keep in mind you are risking potentially deadly injury to your passengers or possible future owners of the vehicle. That factory bracket is designed to save life and limb.
with that being said I’ll be cutting mine…
I went with the Limited 5th gen, 2020 to be exact. Will this same BMC work on it as well? I do plan to remove the XREAS for my 6112/5160.
—@Kirby, voiding a warranty in full to my knowledge is unlikely in most scenarios. Whatever your warranty covers, it should cover everything it does not effect. For instance, removing my XREAS only voids the warranty for the XREAS & anything that it is connected to. & I am still researching what it could be touching (if anyone has any experience with that).
think it’s pretty weird that you’re posting guides to do something you didn’t actually do yourself and dont have the skills to do. Kind of the tone on this whole site, I’ve noticed. “here’s how to do something. I didn’t actually do it and have no experience with it, but here’s a step by step guide I wrote anyway!” “Here’s some tires I think you should buy. I’ve never actually driven offroad on them, but they’re great offroad, I swear!”
Colin, thanks for your comment. Maybe you missed it but if you read through the article, you would have noticed that its a collection of many people, not singular nor one-sided at all. Here is a reference to that point: “In each section of this buyers’ guide, you will find a review and overview from a person that has actually tested and driven those tires. This article is a collection of what 20 unique people had to say about their brand of tire.” … Cheers man, hope you have a good day.
Will this kit allow to fit 35s? I have a 3 inch suspension + 1 inch body lift. Thank y’all.
Will this void my warranty?
I searched for the kit that was linked in the readings and opted to go with this one from the same company.
https://www.metaltech4x4.com/metal-tech-2014-4runner-body-mount-chop-kit/
Check it out. It leaves the body mount looking as close to stock as can be but also removes the the rubbing for the bigger tires.
Just trace it on paper. Take the paper cut out and and trace it onto the body mount then with a grinder cut along the trace. Put the mod component and check fitment. Make any more modifications and then tack weld. I read that a lot of people prefer the staple weld as it will look more factory, not entirely sure on this. Ensure the bushing doesn’t catch fire. Once completed use spray primer let dry and then spray matte black. Each side should take roughly 35 minutes to complete if welder or tech knows what they are doing. As Brenan stated, $100-$200. Check with your chosen 4×4 if they weld and what the cost is per hour. Average cost here in Houston was $105/hr.
Oh and with 2.5” Bilstein 5100 lift with Wheelers T1/T13 springs front and back and JBA ucas, on 285/70/17 Falken Wildpeaks and SCS Ray 10 wheels, 17×8.5 -10 mm offset I’m rubbing the bmc on full reverse lock out. Looking at just doing the kit instead of chasing around castor and alignment.
I just checked again, there is a kit for 2014-current available so make sure you order the correct kit. I didn’t know the body mount changed on the Gen 5 after 2014?
Ty, thanks for pointing that out. We used those plates for our BMC (2010-2013), I guess it doesn’t really matter that much but here is the “correct” link to the 2014+ BMC kit.
I’d like to elaborate on this a bit. I recently ordered the “correct” kit for 2014+ and it’s awful. The plates are super tiny (no dimensions or items for scale in the online photos). I don’t run an excessively oversized setup by any stretch of the imagination (285/70/17 on stock trail wheels with spidertrax) and the plates are not large enough to trim the area on which I’m rubbing. I ordered the total chaos kit because they have an excellent YouTube video tutorial and their plates are 2x the size of metal tech, allowing you to trim much more of the front of the body mount.
not sure what metal tech has this style recommended for 2014+ but don’t waste your money. If you want to go metal tech go with the kit shown in this video to remove the entire end, not their angular kit.
other kits like SSO, Relentless Fab, etc. seem to be on par with the Total Chaos size.
I ordered the wrong ones as well and have my chop scheduled for tomorrow….do they work? I have a 19. I can get rid of th ones I ordered and reschedule if not
The metal tech kit says it fits 2010-13 4Runners, but I’m assuming this same kit will fit newer models as well? Your link to the kit is the 10-13 model.
Ty, yeah 2014+ 4Runners are compatible as well.
General red letter grabbers the old school ones. On 17 inch methods. Still rub a little at full lock. I didn’t know I could cut that longer part back. Great advice.
Great idea. I cut mine but still need to trim more. I will follow your guide to trim the remainder off. I was still able to stuff 35s under there
Nice! What 35s did you go with?
Thank you Brenan! I live near you so that will be no problem. I’m in Cameron Park.
Hi Brenan,
Who did the cut and weld for your kit? I got my kit but need it installed.
Thanks,
Dan
@stellarBuilt in Sacramento, CA. They do great work.