Falcon Shocks Tow/Haul Suspension 4Runner Installation on 5th Gen 4Runner
Just like any other suspension, you need a core set of shop tools for the job. If you are not confident or unsure about installing a suspension, take it to a professional shop.
If you get stuck on a portion of the install because you had the wrong tools, it can leave you stuck for a week or more with no ride. Trust me, I’ve been there and it’s not fun.
This is a fairly simple install but you need to compress springs. If you have not compressed springs before, there are a few tools can get the job done.
The first tool is a cheapo set of coil spring compressors used here, the second is a basic floor mounted compressor used on this install, and the third is a commercial strut spring compressor.
The cheapest compressors are around $30, the next step up about $100, and commercial spring compressors are about $800+.
We have already blown through two sets of the cheap coil spring compressors, so we ordered a basic floor mounted jack for this install. It actually exceeded our expectations and performed quite well given the price point. Even though at first glance it appeared to be a POS straight from China.
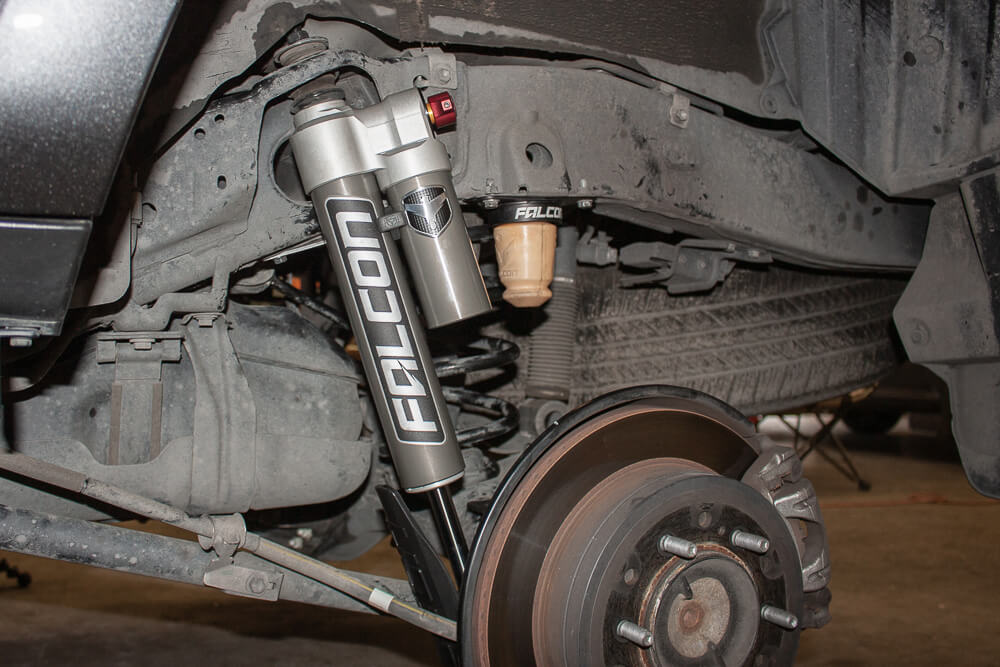
Straight from Falcon Shocks:
Every aspect of vehicle dynamics must be considered in developing a properly engineered suspension system to ensure predictable handling and a smooth ride. This includes correct suspension geometry as well as properly matching the shock’s compression and rebound to the spring rate. Falcon Shocks went back to the drawing board to engineer brand-new shock absorber systems that are properly matched to the factory spring rate resulting in a sportier ride with better control and handling without sacrificing ride quality. Our in-house engineering experts have invested hundreds of hours in dyno verified – as well as real world on and off-road driving – shock tuning to deliver optimal results. Results that can be felt in a “seat-of-the-pants” drive. All Falcon Shocks are designed, engineered, and built with state-of-theart methods including CAD designs, finite element analysis (FEA), in-house lab simulation, and real-world street and trail testing.
Time and Tools Suggested
Time: 5-8 hours depending on help
- Basic shop tools
- Pliers
- Snap ring pliers: Check Price
- Metric Sockets
- Metric Open-end wrenches
- Vice grips
- Vice
- Floor Jack
- Jack Stands
- Impact wrench
- Coil Spring Compressor: Check Price
- Floor Coil Spring Compressor: Check Price
- Mallet/Hammer
- Pin Punch
2″/1″ Lift Kit – Tow/Haul Options:
- Falcon Sport Tow/ Haul Lift Kit: Check Price
Front Suspension Install
This install assumes you know how to properly use jack stands and a floor jack. If you do not understand the basics, please have a professional work on your truck.
Removing the front strut assembly does not require any previous experience but it does help. You can refer to the factory service manual or check out this other post for more information on a suspension removal and install.
Removing a suspension with KDSS vs. Non-KDSS suspension is going to differ.
KDSS is going to be more challenging than Non-KDSS, even if you adjust the KDSS accumulator assembly to loosen the pressure in the lines.
Lower Strut Bolt and Top Shock Mount
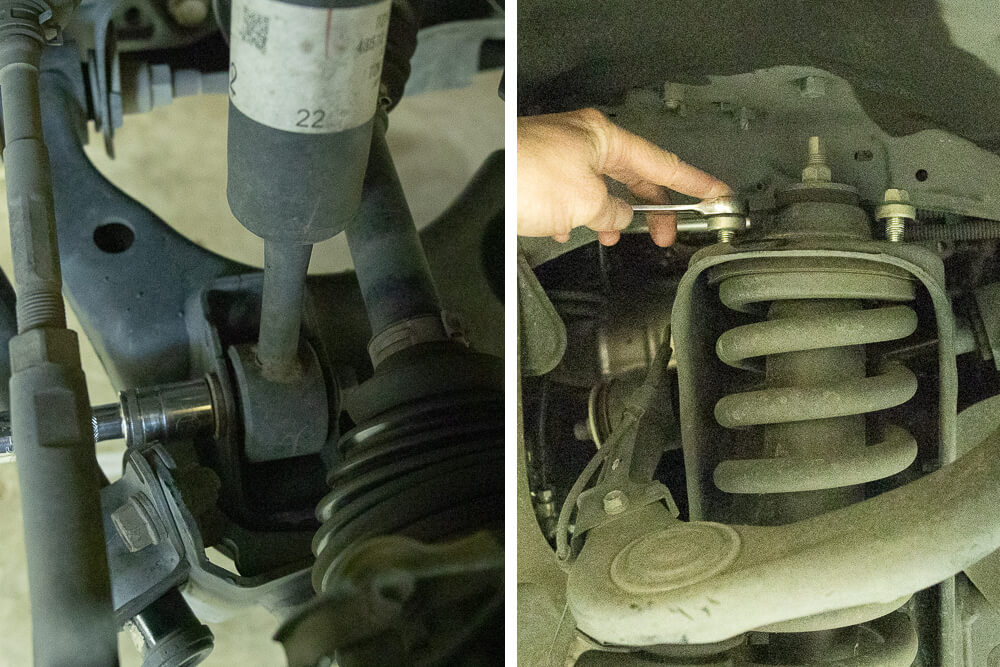
Start by jacking up your truck and disassembling your IFS components. Start with the lower strut bolt and the top shock mount bolts.
ABS Bracket & Spindle
Start with the brake line bracket then the pin on your spindle.
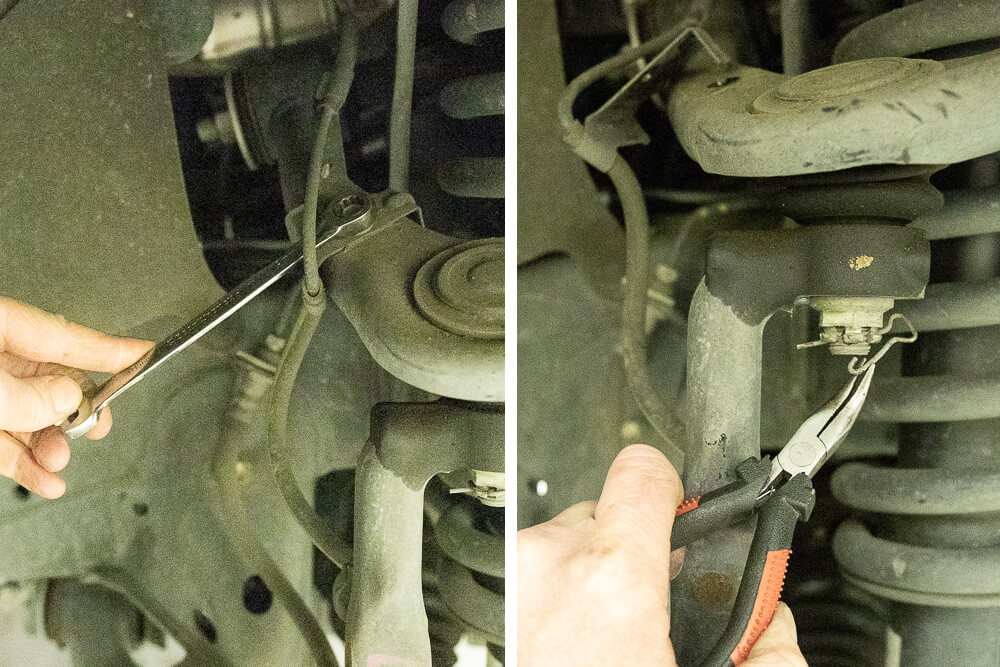
Unbolt Spindle and Knock Loose
Once you have the spindle nut removed, knock it loose with a hammer. You may need to come down on it a few times, its tight.
Securing Spindle
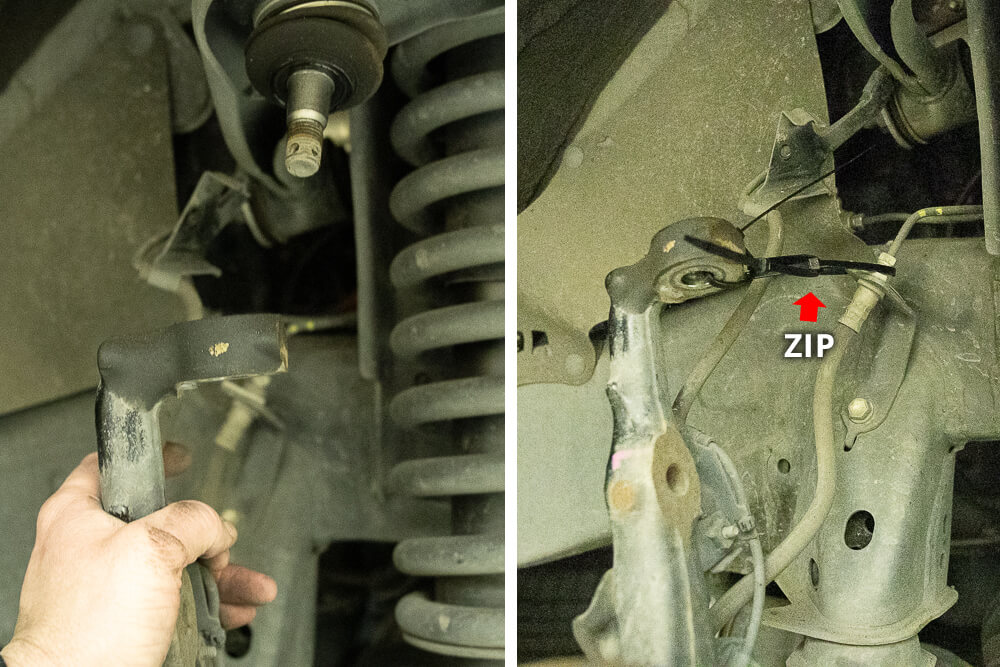
Once you knock the spindle loose, you can ziptie to secure in place.
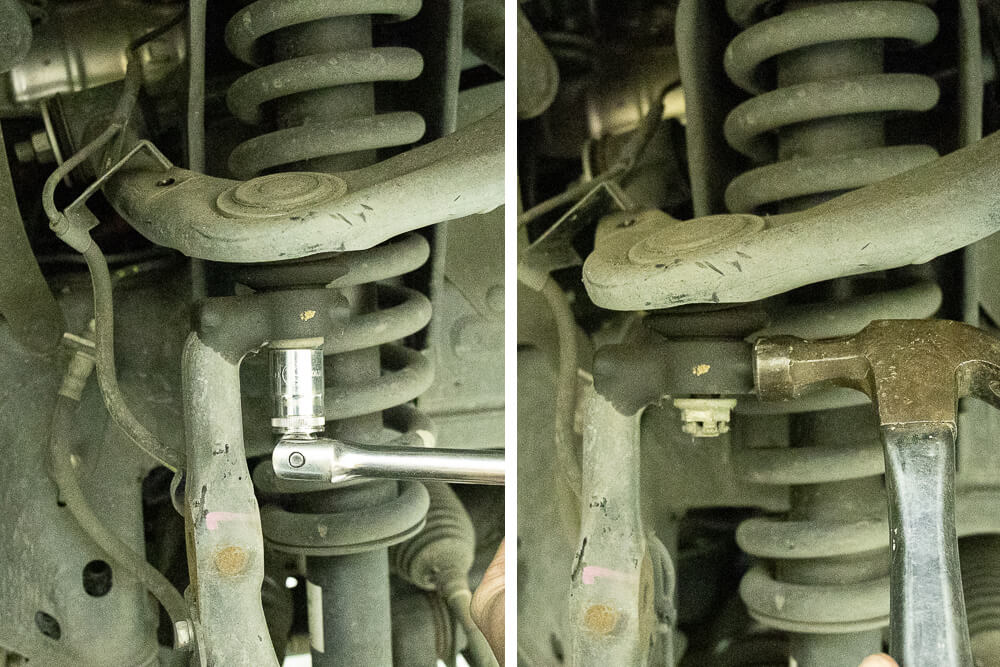
Lower Strut Bolt and Remove Coilover
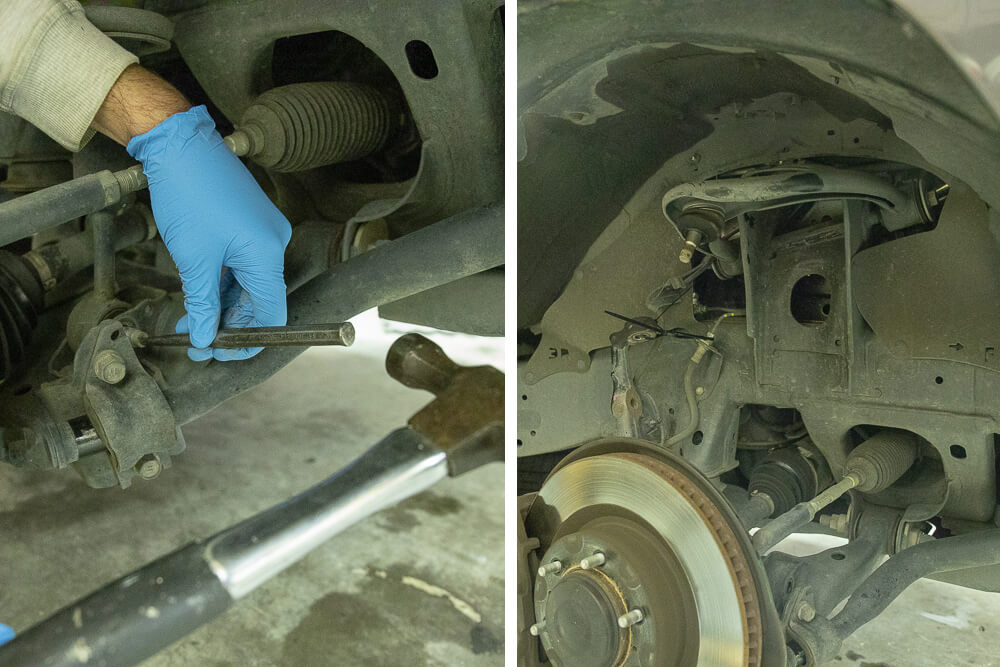
In order to pull the coilover out, pull the bottom of the coilover out first and then press down on the lower control arm. You will need two people to achieve this. While one person presses down on the lower control arm with their foot, the other person can wiggle the coilover out. Doing this on a non-KDSS 4Runner will be easier.
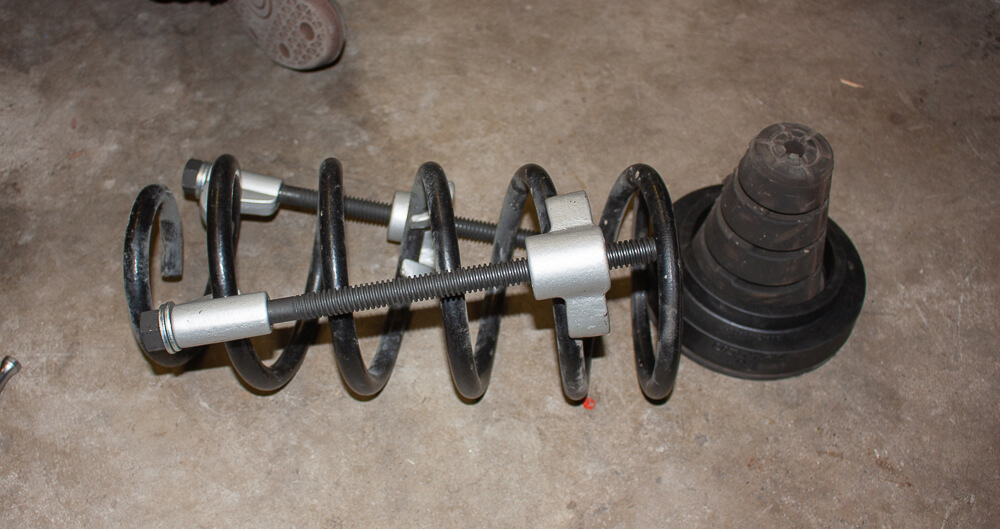
Coil Spring Compressor

Remove front strut assemblies. You can refer to factory service manual or check out this other post for more information on a suspension removal and install.
Have a qualified mechanic separate coil spring from factory strut and reinstall on Falcon shocks if you do not have the right tools.
You can use a $30 spring compressor from Amazon but they can be unsafe. We have used them a few times on coilovers, but its always an uneasy feeling… like a spring is going to pop off and break someone’s neck.
The floor mounted spring compressor we used was incredibly stable and secure compared to the $30 spring compressors. If you are only going to install one suspension and or plan on only compressing a couple springs, a floor mounted compressor may be overkill. You may be able to rent one as well. Call around and see if you are able to rent for the day. If not, the $30 spring comrpessors from Amazon do work, just work at your own risk.
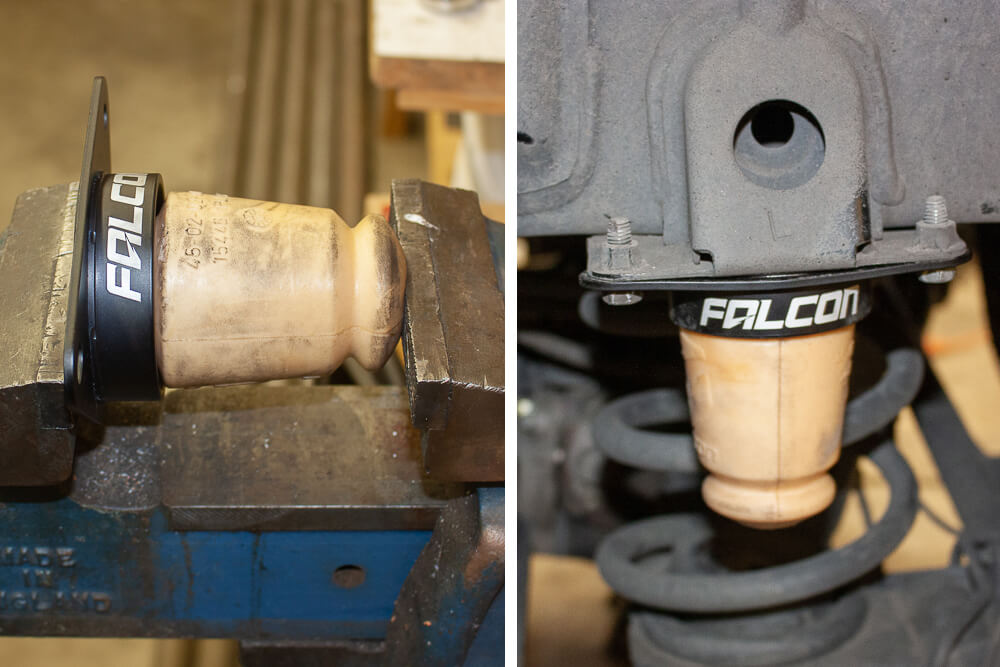
Install Snap ring and spring retainer
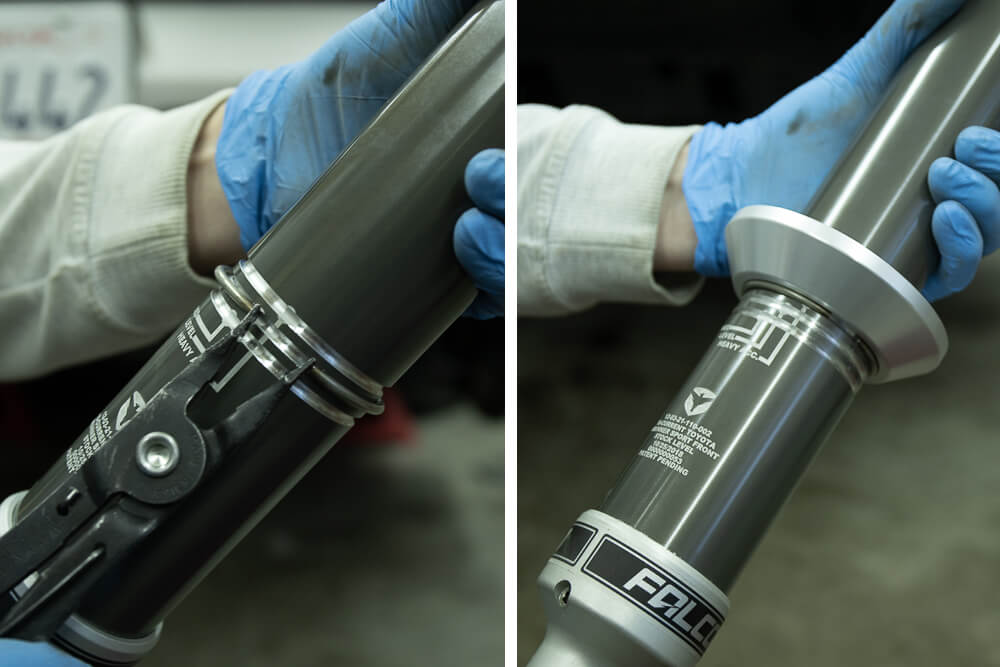
Move the snap ring (pre-installed on “Level” setting) to desired ride height, then install the coil carrier. We maxed ours to the top. Their “level” setting is actually lower than level, and even lower than a raked look. The top setting will still give your truck a rake. About 1″ to be exact.
Install spring retainer and bump stop
Install the spring retainer onto front shocks. Then Orient and install bump stop on shock shaft as shown in the image above.
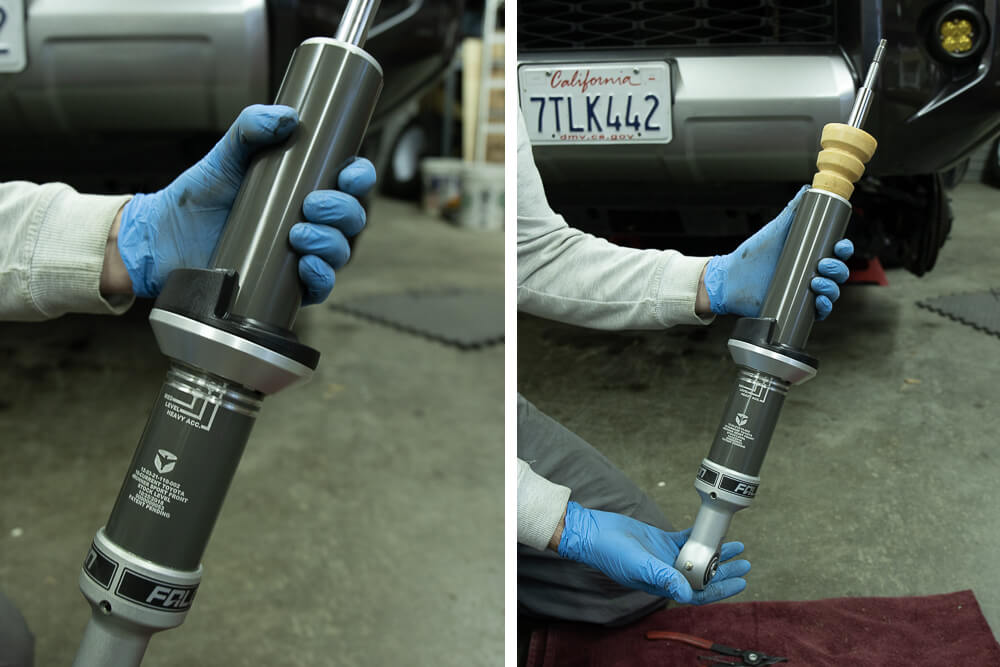
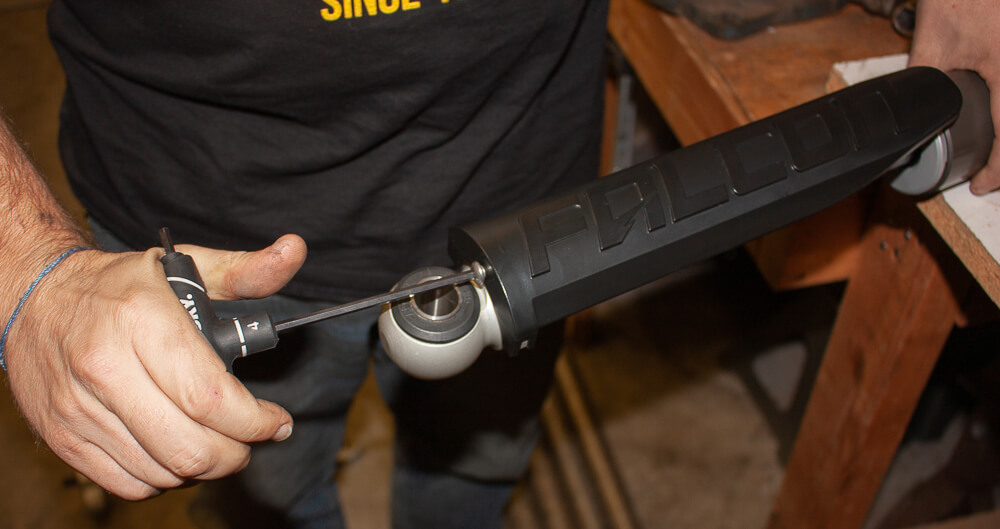
Factory Spring Over Strut Install

ATTENTION INSTALLER: Note strut top cap orientation in relation to lower eyelet and grease zerk.
Install nut onto the shaft until it bottoms; then torque to 40 ft-lb. You should have about 1″ of threads showing.
Install Falcon strut assemblies using original shock bolts and nuts. Torque to 61 ft-lb
Reassemble IFS components including the spindle, ABS bracket on upper control arms, etc. Then torque all hardware to factory torque specs.
Rear Suspension Install
The first portion of the installation is pretty simple. Start by removing rear shocks. To remove the rear shocks, you will need a set of vice grips or small channel locks that can grip the top center shaft of the shock.
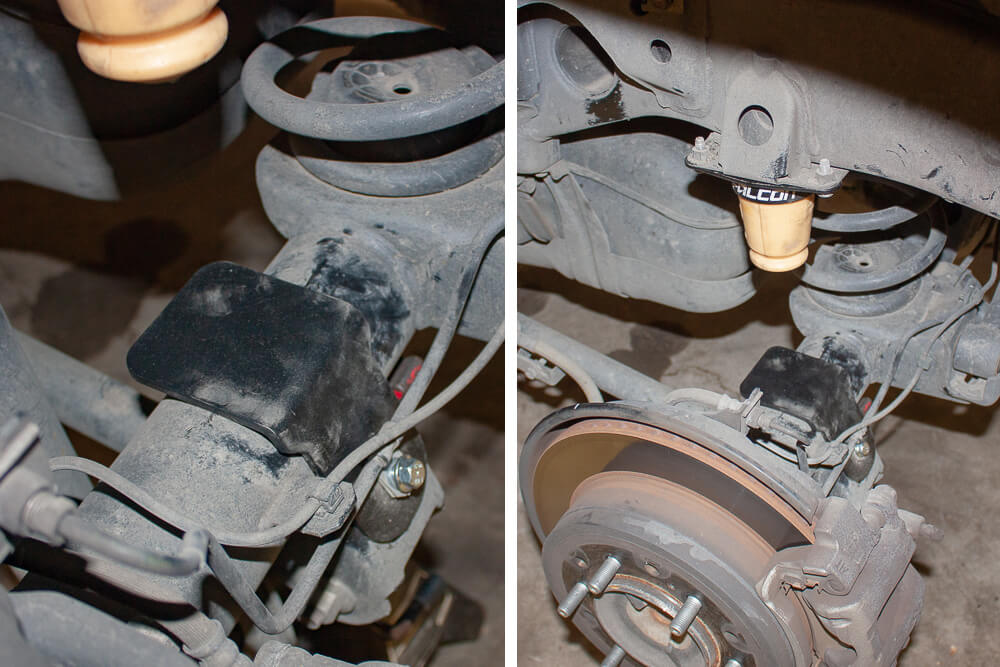
This will hold in place while you loosen the nut on the top of the shock. You can see this step here. Then disconnect upper sway bar links, brake line bracket, and ABS line bracket.
Remove the axle end track bar bolt, and any lines and brackets that prevent your axle from drooping.
The bump Stops
Remove factory bump stops and assemble the new bump stops into the mounting bracket. You can use your two paws and press the bump stop into the bracket or use a vice. I used a vice. Once you have the bump in the bracket, install the bracket back into place.
Install the bump stop pad
Remove the brake line bracket, then install the bump stop pad and then reinstall the brake line bracket.
Driver and Passenger Brake Line Anchors
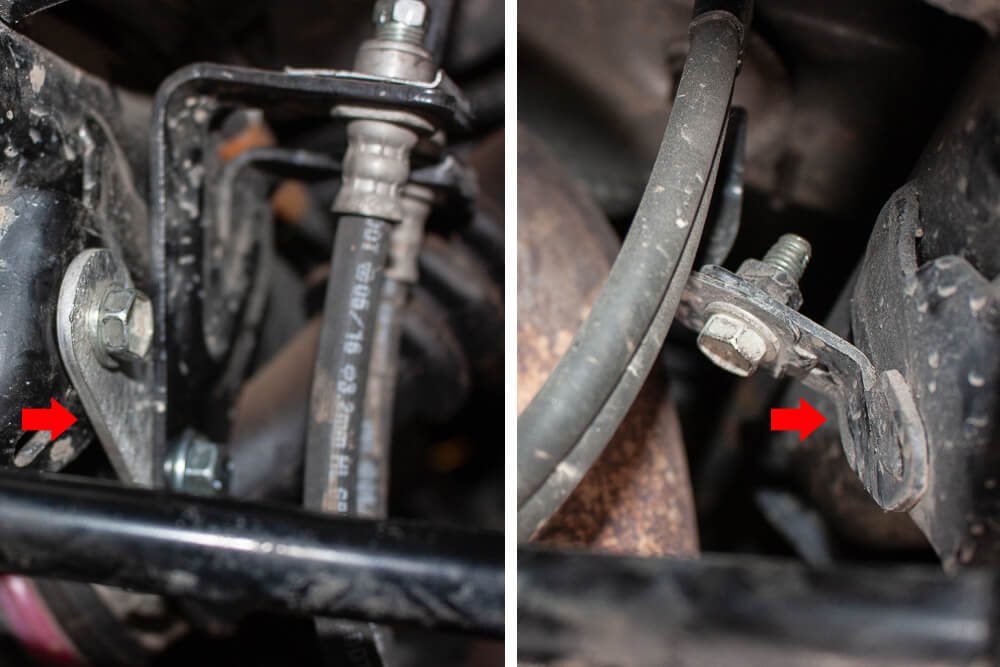
Remove the passenger side brake line anchor bolt, then install the brake line anchor extension. Remove the rear sway bar from the frame and note to make sure you remember the correct angle. Pull the brake line away from the exhaust and then reinstall the 12mm bolt. Torque factory hardware 25 ft-lbs.
Rear coil spring spacer
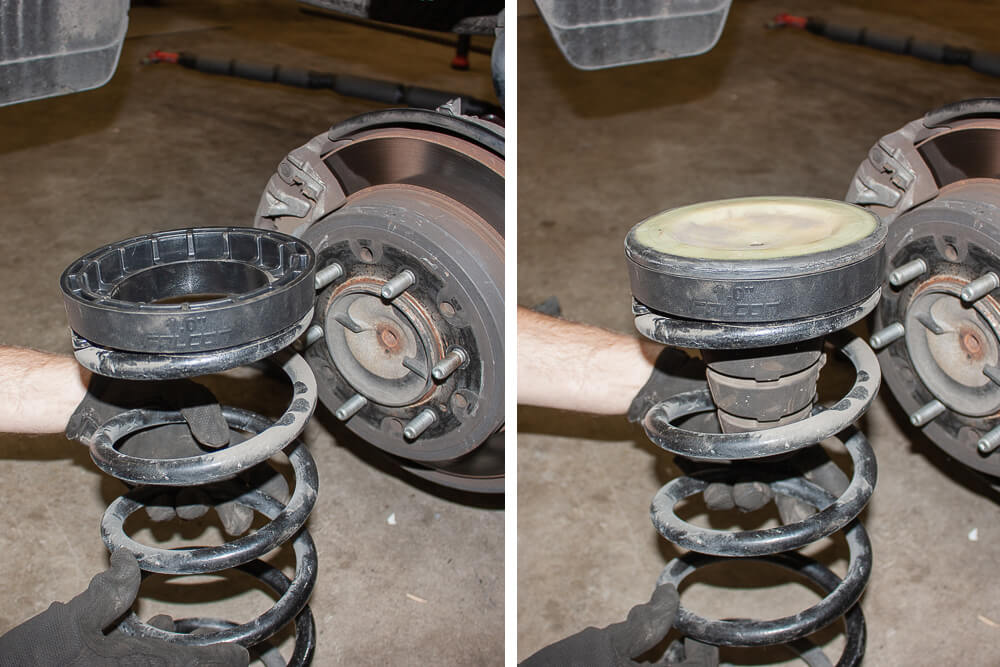
Remove rear coil springs and Install 1’ spacer with the isolator between the spacer and spring. Then, install the assembly onto the spring. Allow the rear axle to fully extend to reinstall the coil spring assembly.
Even though they can be sketchy at times, we used a set of coil spring compressors to compress the springs enough to fit them back in. Without KDSS, you may have enough room to stuff them back in by flexing axle on opposite ends. With KDSS, you can also adjust the KDSS accumulator assembly and get more droop. Honestly, coil spring compressors are just quicker.
Install rear shocks guards
Install rear shocks
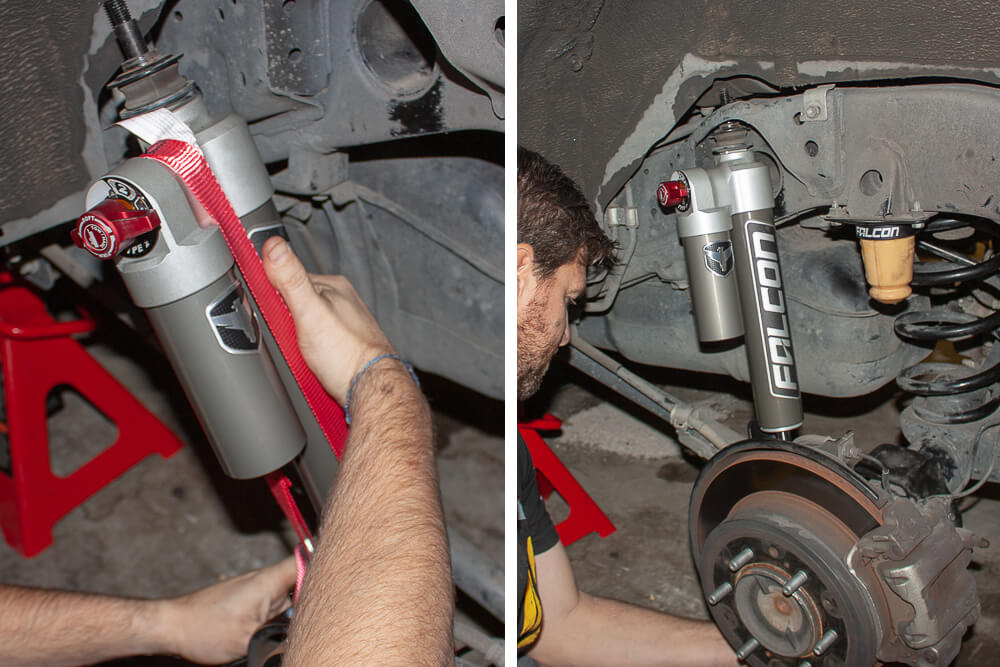
Install shock lower eyelet onto axle mounting post. Falcon suggest inserting the shock into the upper post mount by pulling down. The shocks are tight.
We grabbed some ratchet straps and compressed the shock down in order for us to fit underneath the rear shock mount. Once you have everything in place, release the ratchet straps and torque to factory specifications.
Install the alignment tab
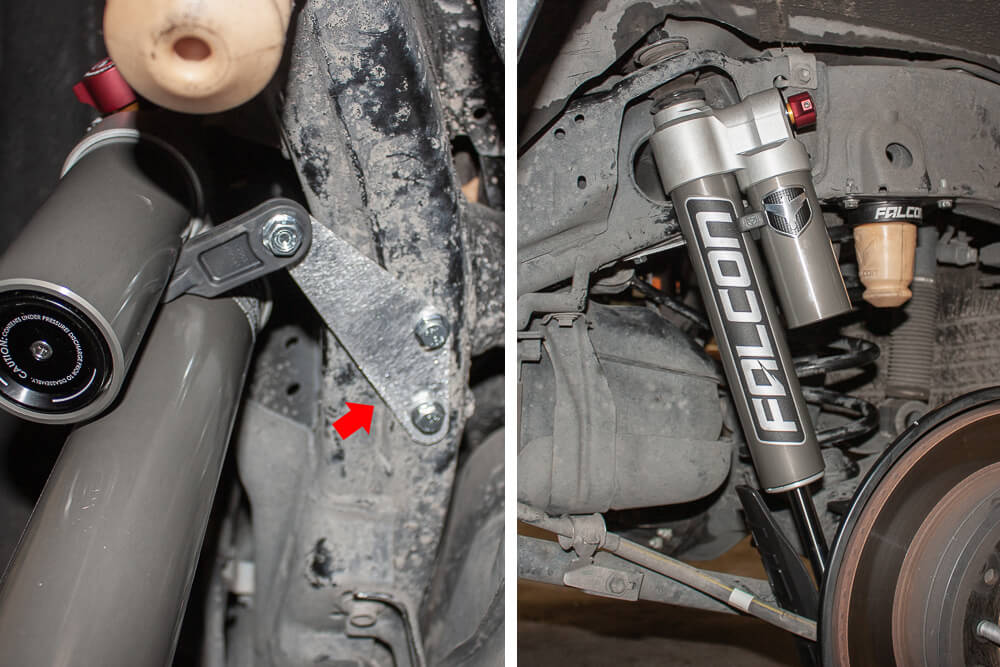
Install the alignment tab between the main shock body and reservoir. Bolt to the frame with the provided hardware. Install sway bar extension and reinstall sway bar links. Reinstall brake line and ABS line extension brackets and you should be all set.
Double check all nuts and retorque to factory specifications.
Before – Factory Suspension

After – Falcons Shocks Tow/Haul Suspension

After – Falcons Shocks Tow/Haul Suspension

Will this kit work with KDSS then as Anthony @ Falcon said that it won’t. Now I’m confused since you mentioned KDSS in the article.
Yes, this kit works with KDSS. They have KDSS versions and non-KDSS versions. I installed this kit on a KDSS-equipped 4Runner.
So after this install its basically at the 2″ lift/ride height of the TRD Pro?
Pretty much. Yeah.
Do you have to use the 1 inch spacer in the rear? I wonder if you could use the “level” setting on the front shocks without the spacer in the rear?
James, you don’t have to use that spacer, no. You can install the front coilovers only, and then the rear shocks. That should set you pretty close to level as the 4Runner sits about 1″ lower in the front. Your ride quality won’t be compromised either. That’s probably a good idea if you aren’t going for height but rather a ride quality improvement.