
Pictured: RRW (Relations Race Wheels) RR8-H Forged Beadlocks, 35X12.5 Toyo M/Ts with ARB OME BP-51 3.5″ Lift
How To Trim Fenders and Fender Flares to Fit 35″ Tires on a 5th Gen 4Runner – Complete Guide
Fitting 35″ tires on the 5th Gen 4Runner is not what I would call a plug-and-play mod. It’s not as simple as throwing a set of big tires and calling it a day. To run bigger tires, it’s usually a good idea to do it right the first time so you don’t have to come back and keep hacking away at your fenders. Take your time and research all the possible options for what it takes to clear bigger tires.
The main options for clearing 35″ tires on the 5th Gen is running fiberglass fenders, trimming your fenders/flares, and/or rolling your fenders’ sheet metal. We already showed you guys what it takes you to trim for 35″ tires using fiberglass, and we’re not going to roll our sheet metal just yet so let’s jump into trimming and see what it’s all about.
Where to start:
Let’s back up for a bit. Where are you at?
- 33″ Tires: Fender Liner Push-Back for the 285/70R17s
- 34″ Tires: Body, fender liner, firewall, and pinch weld trimming for the 285/75R17
- 35″ Tires with Fiberglass: Relocating Pinch weld and running fiberglass
Instead of using fiberglass, today we are going to trim the factory fenders/flares in order to clear 35″ tires.
As a disclaimer, I am not saying this is the best option nor is this going to allow you the ability to fully stuff your tires off-road and reverse full-lock when seeing full articulation on the trail. I can tell you that this has allowed us to run 35-inch tires on the road and mild off-road trails without any rubbing on the fenders or firewall.
If you want to fully stuff your tires, you should check out the Coastal Off-Road overview of re-locating or “tubbing” the firewall, also known as building a firewall tub. This “firewall tub” is basically another way of saying cut open your firewall and weld a new one in place… that looks like a tub.
Fiberglass Vs. Trimming Fenders

Pictured: My White 2014 TEP 4Runner with ADV Fiberglass Fenders
The goal of trimming for 35″ tires is to push your fender, fender flares, and fender well plastics beyond the firewall. This is going to give you the most clearance. If you can get your plastics behind the firewall then the only thing left for the tire to hit in regards to the caster is the firewall itself (pinch weld, and pinch seam); this is assuming you already chopped your body mounts.
I ran fiberglass for about 2 years on my 2014 white 4Runner and they worked well for clearing tires – although the install was a PITA. I was able to push them behind the firewall and that stopped the 35″ EVO M/Ts rubbing completely.
Trimming Factory Fenders?

Pictured: Factory fenders after cutting
They’re actually much easier to trim than I thought, and honestly, I think it looks better than fiberglass because you retain that OE-look, and directly from the back, you don’t get that awkward-looking bulge. Don’t get me wrong, glass looks insanely badass directly from the front but from the back…not so much.
After running fiberglass for well over 2 years, I was familiar with what it took to clear 35″ tires. I knew I had to push the fenders behind the firewall, so I started cutting. In order to move the fender behind the firewall, you need to relocate the pinch weld bracket, and with that comes a couple of options.
You can either cut off the pinch weld bracket and weld it back behind the firewall or drop the pinch weld bracket and make your own. I simply made my own using a couple of brackets I had laying around the garage. This mod is pretty simple. You can do this job with a grinder, a multi-tool, some door edge trim, and some hardware likely laying around your garage. If you don’t have the brackets at home, a trip to Home Depot would suffice.
We might eventually have custom brackets made, but for now, the ones we are using have held up quite well.
Without further ado, let me show you what we did.
Fitting 35s on a 5th Gen 4Runner
Trimming Fenders & Fender Flares: Step-by-Step

Parts & Material List:
- Rocker Molding (caps) with Yellow Clip: Toyota Part: 75858-35010
- Rocker Molding Yellow Clips Only: Toyota 75395-04010
- Fender Flare: Toyota Part: 53848-35906
- Toyota 4Runner Fender Flare Seal: Toyota Part: 7569135070 or .5″ 3m VHB Tape
- Toyota Fender Flare Clips (Blue & Orange Clips)
- Door Edge Trim
Tools:
- Grinder with cutoff disc and sanding disc
- Muli-tool with a plastic bit
- Dremel with plastic and metal bits
- Sanding paper (80-100 Grit)
- Utility Knife/ Exacto Knife
- Cordless Dremel kit
- Protective Eyewear
- Automotive masking tape
- Red Sharpie
- Plastic Pry Tools
- Metric Sockets: 10mm
- Ratcheting Drive 1/4″, 3/8″, or 1/2″
- Drill driver
- Drill bits: 1/4″ bit
- Bent needle nose pliers
- Needle pliers
- Loctite
- Zip-ties
Step 1. Where are you starting?

This install is assuming you’re already at this point. That means you have already chopped your body mounts, removed most of your inner fender liner, and have beaten back your pinch weld seam with a big hammer. If you have checked those tasks off your list, your setup should look something like this. Your body’s pinch weld should be hanging down and connected to a bracket that is also connected to your fender. And your fender is connected to your fender flare using a series of clips.
Now that you know how everything is put together, let’s get started.
Step 2. Remove Rocker Cap

Start by popping off your fender flares. If you don’t want to break the clips on the backside, grab a set of needle-nose pliers, or even better, bent needle nose pliers, and pop the clips off from the backside of the fender. This will require first removing the fender liner in order to access the clips. If you pull the fender flare off of the fender without first removing the clips, you will break clips and retainer fasteners on the fender flare.
Step 3. Remove Fender Flares

I started by pulling the fender flare off of the fender and ended up breaking almost every clip on the backside of the fender flare. The correct way to remove the fender flare is to first remove the clips by depressing the tabs from the inside of the fender well – which requires removing your fender liner first. You either destroy your fender liners or fender flare clips – or both. No real way to get around pulling off your fender flares – something has to break.
Step 4. Mark Lowest Point

Now onto the marking and measuring for cutting. I think it’s a good idea to get started with cutting a line before you make your permanent lines.
Step 5. Cut Lowest Point

Start getting a feel for how the grinder cuts against the sheet metal before you make your final cuts towards your final destination.
Step 6. Cut Off Pinch Weld Bracket

Cut off the bracket that connects the pinch weld to the fender sheet metal.
Step 7. Make an “S” Bracket

Make an S bracket that connects the pinch weld to the fender sheet metal. I used a straight bracket and then bent both ends to create an S bracket. Having a plasma table would be nice if you can make your own brackets but bending small metal pieces like this with a vice also gets the job done.
Step 8. Mark & Drill Fender

Mark a hole in the fender from the back to the front side in order to drill a hole through the front side. Also during this step, you should have already bolted a hole through the pinch weld and connected your S bracket to that point.
Step 9. Pinch Weld & Fender Bracket
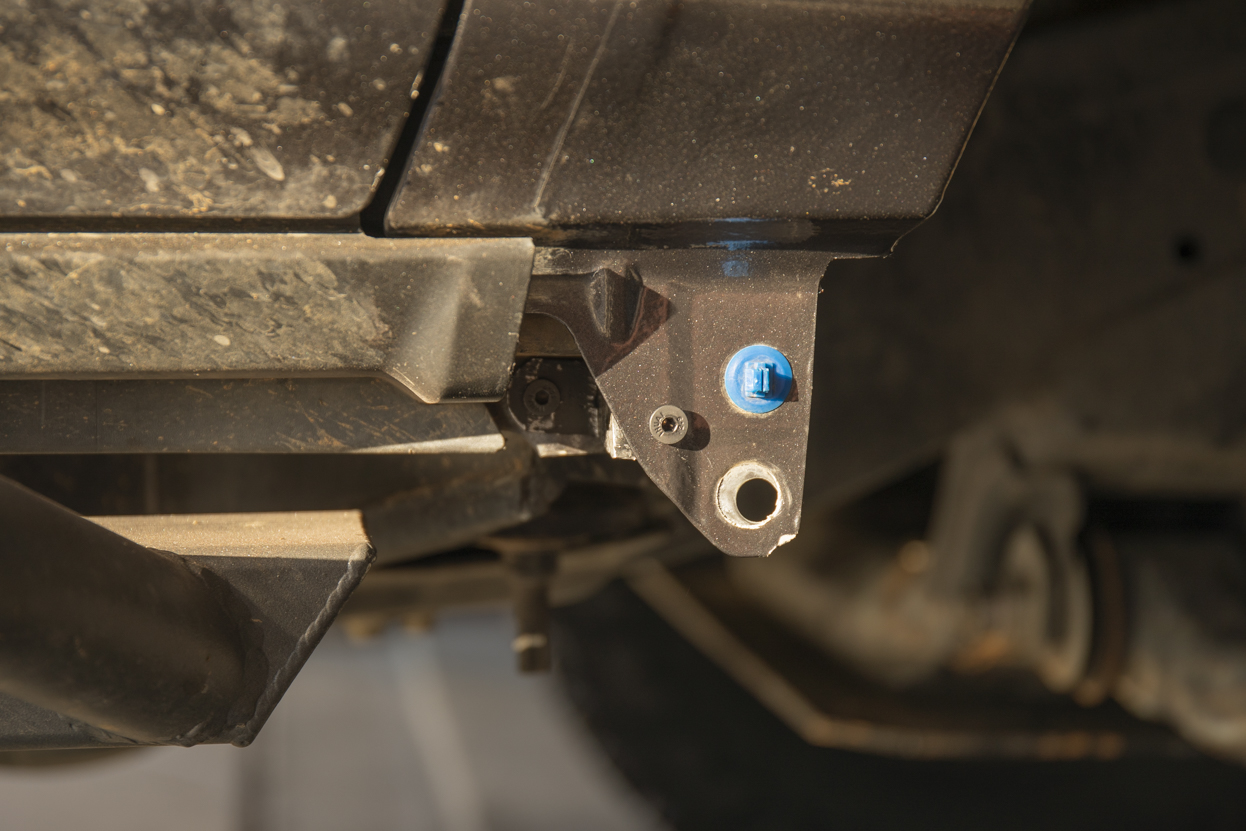
Now go ahead and connect the other point on the S bracket to the fender.
Step 10. Cut Off Excess Fender

Depending on how far back you want to go, you can now cut off any excess material on the actual fender.
Step 11. Finalize Fender Mount Point

Here is a final look at the lowest point on the fender. You can even come back and round off any sharp corners you think may hit your tire.
Step 12. Mask Off Fenders

We started masking off our fender flares from the corner that meets the front bumper allowing us to follow that factory line.
Step 13. First Cut on Flares

Using a multi-tool, start making your initial cuts in the fender flare.
Step 14. Cut Fender Flares

In order to get cleaner cuts on the fender flare, it may be a good idea to cut it in sections. This will help to create short milestones along with allowing the blade to make a tighter turn on the radius corner.
Step 15. Rough Cutting
Finalize the cut on the entire fender flare.
Step 16. Temporarily Fit Fenders

Go ahead and temporarily place the fender flare back on the fender clips for temporary placement to ensure correct fitment. Make sure you are happy with the amount of material that has been taken off. If you feel like more material can come out, repeat the steps above.
Step 17. Trim Material

Once you have the final fender flare cut, you can proceed to fine-tune any imperfections with a Dremel plastic cutting wheel and Dremel sanding disc.
Step 18. Sand with 80-100 Grit

After all of your imperfections have been taken out, hand-sand the fender flare using rough grit sandpaper. The rougher the sandpaper, the more imperfections will come out. We used an 80-grit sanding disc from our grinder but you can use any old sanding paper.
Step 19. Rocker Panel Caps

Time to trim the rocker panel molding caps. Start by temporarily snapping the rocker cat back onto the yellow clip on the fender flare and follow the same tape line down the rocker caps you use to cut the fender flares. This will ensure the cut on your fender flare matches up with a cut on your rocker molding caps. Take the rocker molding caps off, tape them, and then cut them with a multi-tool.
Step 20. Rocker Panel Cap Fitment

Place the rocker molding caps back on the fender flare and make sure both lines match up.
Clearance Before

Check the clearance before the cuts.
Clearance After

After making the cuts might be a good time to temporarily drive around and make sure your tires aren’t touching the rocker panel caps. Time for the infamous curb drop test. Back out of your driveway full lock reverse left and right that’s a good indicator of where you might be rubbing. If you’re still rubbing, repeat the steps above.
Step 21. Tape & Mark Sheet Metal

Now it’s time to start cutting the actual fender’s sheet metal. Tape off the fender the same way you taped off the flare. Using a pencil, mark a line using the fender flare as a guide just behind where the flare sits. You can push this as far back as you want however you can’t get too far as there are clips on the sheet metal that hold the fender flare into place. We went about 1/2″ behind where the flare sits and about 1″ away from the clips.
Step 22. Cut Fender Sheet Metal

Here you can see how close we are to the fender clips and exactly where our line is. We used our Milwaukee grinder with a 5-inch cutting disc in order to cut the sheet metal on the fenders. Take your time and follow your line as precisely as possible. When it comes to the radius corner, you may want to lightly score the outside of the sheet metal until your blade has found enough of a groove to start chewing through. Once you have a good groove around the radius turn, you can start to dig in a little deeper with the grinder to get a smooth turn.
Step 23. Flapdisc 80-100 Grit
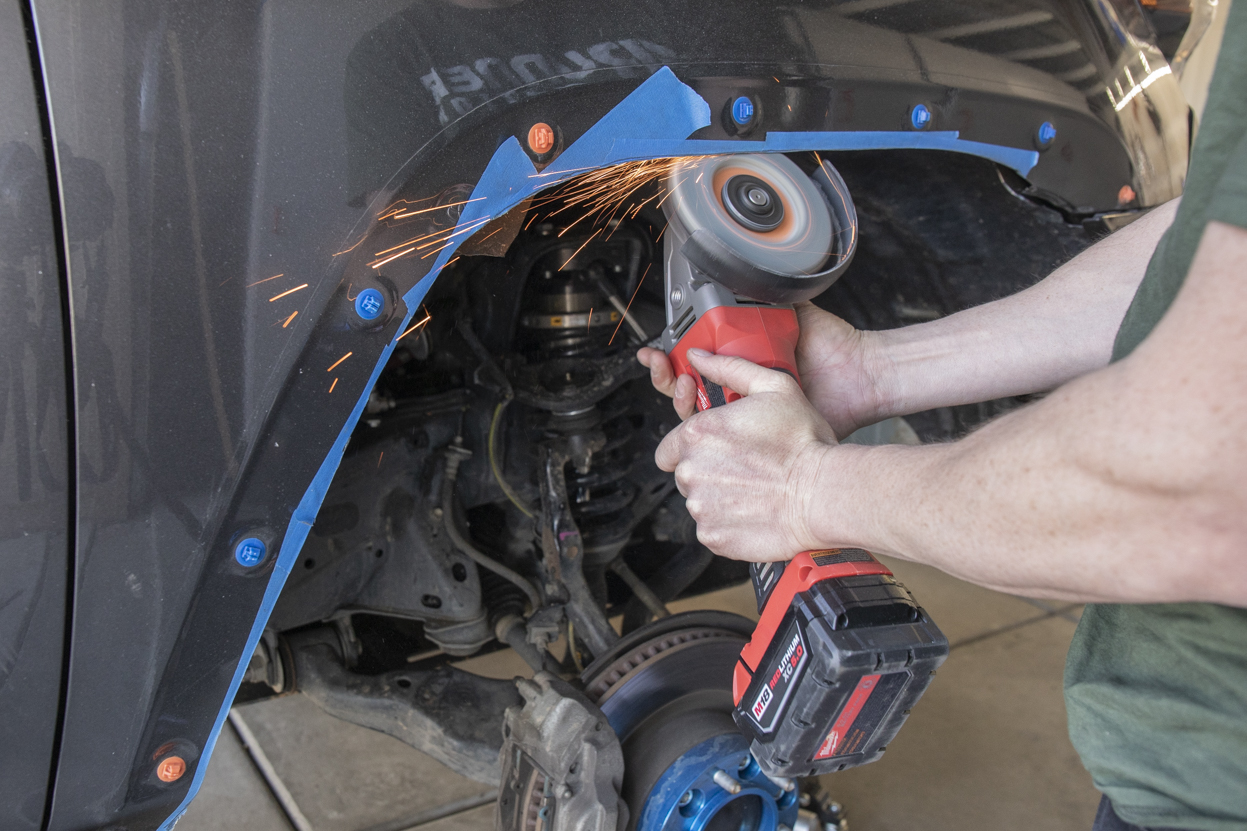
In order to sand down the sheet metal, you want to use a flap disc or sanding disc with at least 100-grit sandpaper. If you have any loose pieces of sheet metal hanging off, it’s really important to clean up all this excess material and to have a nice smooth finished line in order for the door edge trim guard to rest on. If you have shards of sheet metal hanging off, your door edge trim guard will not rest flush against the sheet metal.
Step 24. Door Edge Trim

Adding door edge trim guard on both the fenders and the fender flares will clean everything up and add that factory look. The trim definitely looks good on the metal grey metallic color paint, however, if you have white, cement, or another light color paint on your 4Runner, you may want to reconsider adding black as there may be too much contrast and it might not look good.
Step 25. Remove Fender Liners

Remove your entire fender liner. An easy way to do this is to take a razor blade and cut out all of the fender plastics and leave all of the clip fasteners in place. The clip fasteners can be a bit of a pain to remove so having less fender liner in your way when removing those makes it a little easier.
The best way to remove these clips is with a set of bent needle nose pliers and/or a Gearwrench clip fastener tool.
Step 26. Remove Adhesive
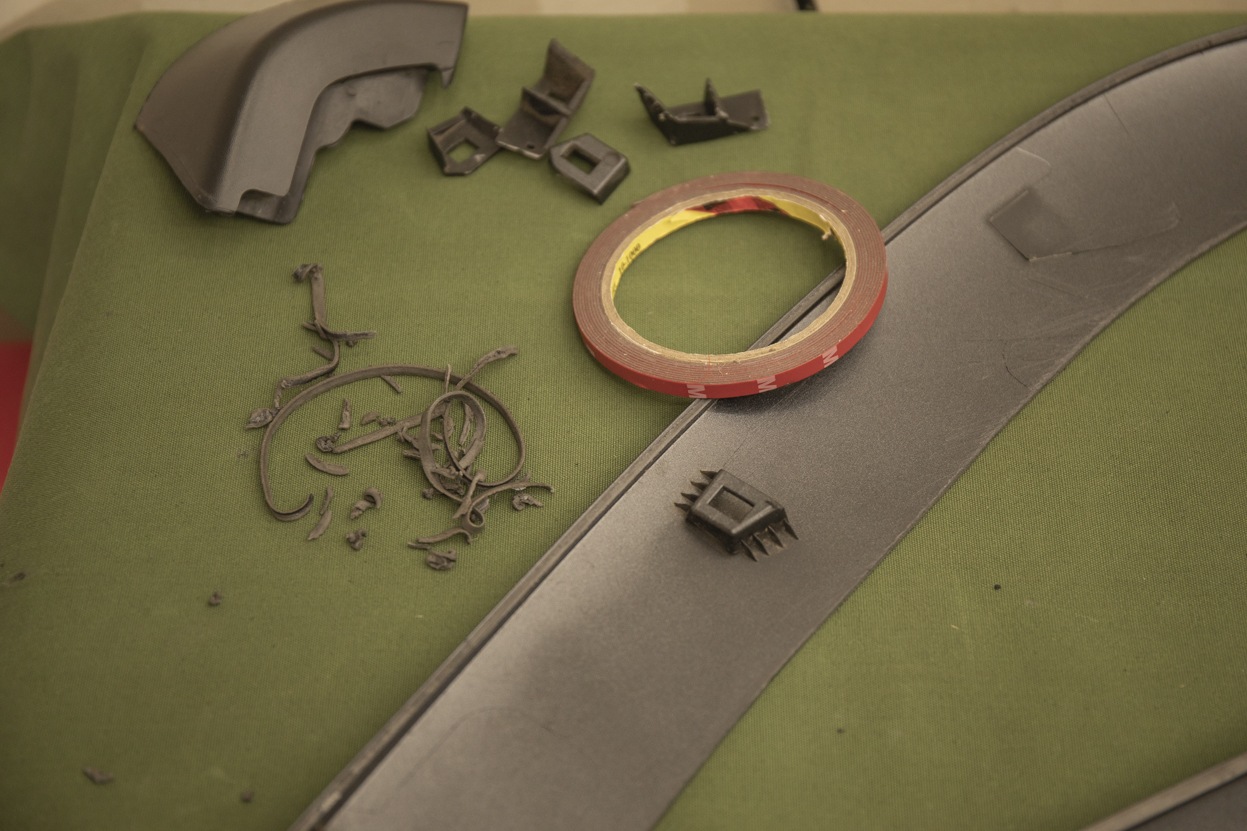
Remove all of the adhesives on the backside of the fender flares. You can manually scrape all this off with your blade of choice, however, heating it up with a heat gun and slowly rolling your thumb over the adhesive will allow you to pull off big strips one at a time. If you attempt this method, you may want to use gloves since the adhesive can get hot. I tried cutting it off and using the heat gun method; the heat gun worked best.
Step 27. Apply New 3M Tape

Take a quarter-inch roll of VHB tape and apply the new VHB tape in place of the old adhesive backing. Before you lay down the VHB tape be sure to clean off any residue left behind from the adhesive.
Step 28. Remove all Factory Clips

Head back over to your fender and remove all the factory clips that were broken when you pulled your fender flares off. Then clean your fenders with your favorite automotive cleaner and a lint-free towel.
Step 29. Install New Clips

Install your new fender clips. Be sure to notate the color of the clips and their placement on the fenders.
Step 30. Rocker Moulding Clips

Place your new rocker molding clips on the bottom of your flares.
Step 31. Add L Bracket & Clip
Attach a simple L bracket to the bottom of your fender using a small bolt. Then take a plunger-style fastener and pop the fastener through the fender flare and into the L bracket.
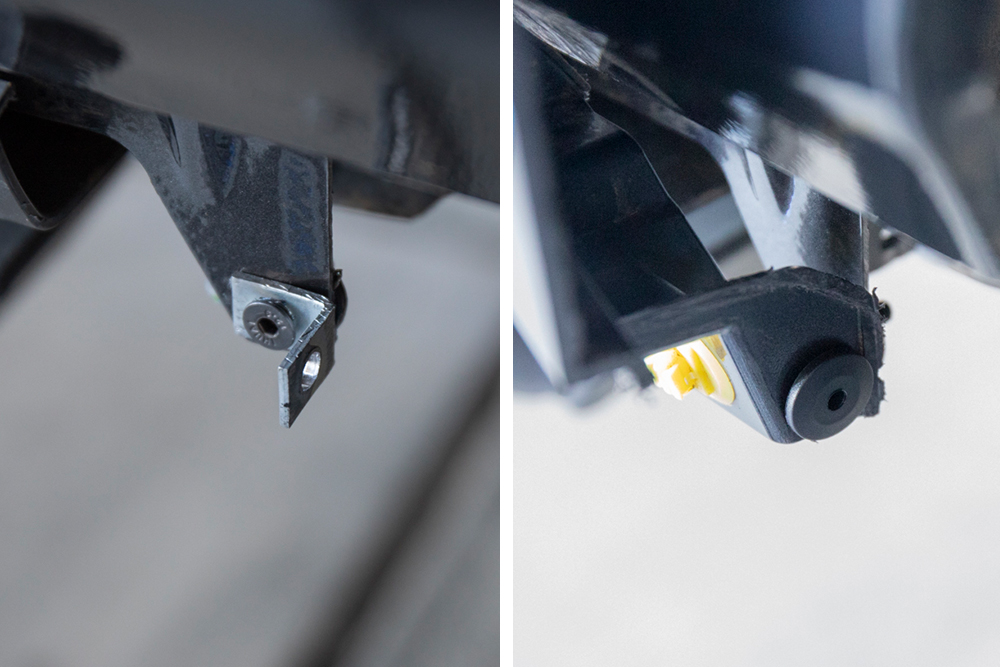
Bottom Looking Up At Brackets

Here is a look at how the fender flare is fastened to the fender and how the fender is fastened to the pinch weld. We are using an L bracket to connect the fender flare to the fender and an S bracket to connect the fender to the pinch weld. Both brackets are being secured in place by #8 metric bolts with allen heads. This is all basic stuff that can be sourced from Home Depot.
Step 32. Clip Flare to Fender

Before fully clipping your fender flares to your fenders, slightly remove both ends of the VHB tape backing so you can peel back the tape while slowly snapping the fenders into place. Continue pressing the tape into the fenders to get a tight connection.
Step 33. Reinstall Rocker Caps

Finally, snap your rocker molding caps onto your new yellow clips.
Rocker Caps Side View

Rocker Caps Inside View

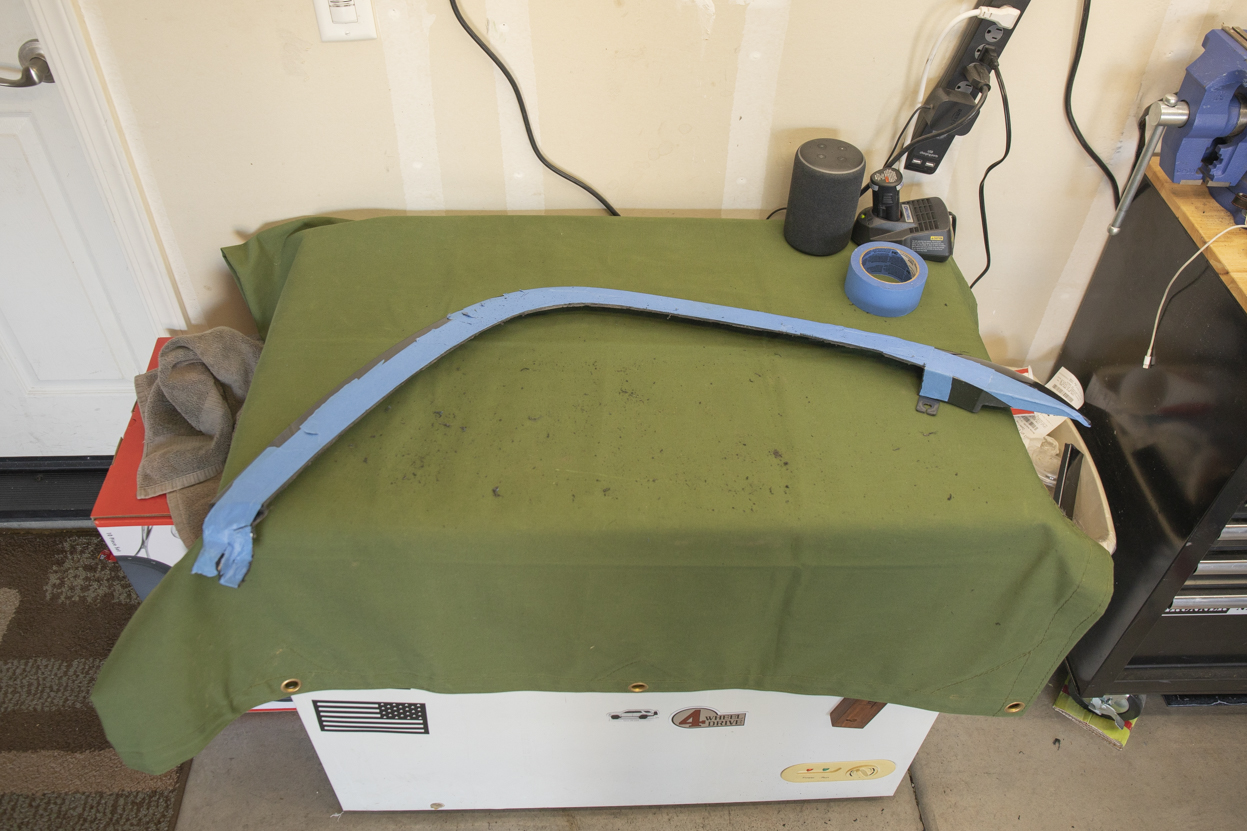
Before Trimming

After Trimming

Final Thoughts
The only thing challenging about this install was waiting on a few specialty clips to come. That and freehand cutting both the fenders and fender flares can prove to challenge your mental focus as well. But as long as you tape off accurate lines and follow them accordingly, you should be fine.
We’re definitely stoked with how it turned out. I like this option a lot more when running a mid-travel suspension as opposed to fiberglass.
After we ran the fiberglass on our white 4Runner, we found that, from some angles, it looked too bulgy without a purpose. I would run fiberglass again if I was running a long-travel suspension but with a mid-travel suspension, I think trimming the factory fenders is a cleaner look. Also, the installation process with fiberglass is kind of a pain in the ass for what you get with the final result. It really comes down to personal preference though; whatever you feel is going to look best for your build is totally up to you.

Next for Jade is going to be fully stuffing the tires and seeing how much further we need to cut into the fender well. I may be getting to a firewall tub next. I’ll keep you guys posted.
Man, thank you for this step by step i really appreciate it. I just installed 35” and i got ready all before it. This post guide me and i followed to the letter i got ready with hundreds of clips ahead haha. I manage to keep my entire fender liner back as I removed it completely before doing any cuts. After lots of heat gunning i have this cut with fender liners on :). Thank you for the amazing content.
thanks so much for this. I was just about to go back to a wrangler where life was a hassle maintenance wise but simple in send it life.
I’m not promising im NOT going to be the jackass who just puts a 6″ FabTech Lift on just yet. but im getting closer to a confident build roadmap for properly running and gunning from your hard work!
Did you end up having to tub the fender? How’s the articulation off road, any other areas you needed to address?
where are u located i need mine done do u do work on the side
Great info! Worked for me!
So the one thing about removing the fender liners is now your air intake lives completely exposed in your wheel well without a fender liner to keep the elements at bay. I have seen others solve this issue by running a snorkel, but what did you do to solve this issue? This is assuming on the step where you remove the liners that you didn’t add them back later.
I’ve been running the open fender liners since this post and have zero problems. I’ve also crossed pretty deep rivers without concern but mostly because I walk the river first and spot the deep spots to make sure the 4Runner will pull through it. If the water crossing is too deep, I won’t cross it, simple as that. There is little to no problem that occurs with open liners other than super deep river crossings. Dust and debris are stopped by the air filter (not all particulates but the majority are caught) in the air box and I am not worried about everyday driving or even dusty conditions because the air filter does a good job at protecting large, and mico particulates. Again, the problem is with river crossings and even with fender liners (custom or factory), you run the risk of hydro-locking or a multitude of other electrical problems if you’re that deep. Before you cross a 3-foot-deep river, and if you’re not running fender liners, use your best judgment. If we’re talking airflow, yes, overtime particulate build-up is a thing and can prevent proper airflow through the inlet tube and through the throttle body ultimately resulting in a reduction or performance and longevity (cough insert 4Runner reliability line), however with regular maintenance after dusty trails, you’re fine. After making my own fender liners out of 1/8th neoprene rubber a few years ago on another 4Runner, I would absolutely do it again I just haven’t found the time to punch another set. When I am ready, I’ll make another mold and have them punched. Never a bad idea to have another layer of protection to keep the elements away.
You can add a snorkel or you can block off the hole to the fender inside the intake box and cut a different hole in the bottom or backside to get away from sucking air from the fender area.
Im going to do this and make it into a video AND give your the credit, as I should .
JailBreak Overlander on YT IG
Dude thank you so much!! I see quite a few YouTube videos that copy the step by steps and give no credit. So seriously man, THANK YOU!
Did you make the video
I follow you on both IG and YT. Any chance you can do a tutorial vid on this soon?
Great Job!
looks sweet and the write up was easy to follow and actually encouraging.
I love modifying rigs and off roading but I think it’ll be a few years before I’m allowed to cut up the new car. LOL
A guy can dream lol.
Awesome, thanks man!!
I was able to repurpose the bracket! Carefully cut it and with some adjustments it works perfect and is already threaded for using the original bolt
Dude well done!
I really need to pull the trigger on this, I live in the pnw and want to find a way to re-use my fender liner. I have an idea to possibly create tabs in the fender and flare. Thanks for the write up!
Yeah, there are some threads over on TacomaWorld.com of a guy doing this. Not a bad idea.
Hey Brenan, what did you use to repair the broken brackets on your fender flares? I didn’t read enough clearly haha and I broke mine as well. I order some J-B Weld and I am hoping that will do the trick. Just curious how you corrected the mistake. Thanks.
Just Gorilla glue and/or Superglue is fine.
I used some gorilla glue epoxy material, it’s been holding great 12 months later
Really like what you did, excellent how to tutorial. You didn’t show photos and it appears you did not cut the rear @ all, the fenders appear to be stock looking in the photo. Correct?
You are correct. We didn’t cut the rear. Not much you can do in the rear other than gain more travel from your suspension. In order to trim, you would need to trim the door and the rear fenders which is easier said than done.
This looks like my next mod for full clearance even though I have minimal rubbing at full stuff now with 35s. I’m running OME BP51s, stock lower CA, Nitro UCAs, Geolander MTs 35×12.5 on zero offset wheels. I barely rub the fender liner at full stuff and so far have only bent over the pinch welds, cut back the lower trim mount, BCM of course and run CBI front bumper which I’ve also had to trim a little bit off. If I wanted to go back to a more aggressive look and add wheel spacers I would definitely need the extra space, thanks for a great write-up. Bookmarked!
You still have your fender liners with 35″ tires? Yeah, spacers can cause so much more rubbing.
I do and when I do rub a little it’s those, so getting rid of them along with the fender trim I should be able to add back my wheel spacers, hopefully 😉
Thinking 285/75r17s is my sweet spot for a 5th gen 4Runner. I have them in BFG KM3s that they did great rock crawling in Moab with a 3″ LT MRA suspension from Dobinsons. I don’t feel all this extra cutting is worth it for an extra 1/2″ of tire height. But that is just my opinion. The 285/75r17s are doable with stock gears, but obviously a re-gear is very helpful (especially if you live or travel often in a mountainous area).
I ran 285/75R17s and they required a re-gear for sure. I would absolutely re-gear moving up to that size. I re-geared to 4.88s but 4.56s might be adequate depending on travel style. I would not rely on the factory 3.73s for 285/75s. You’re correct on the perfect size for the 4Runner. It’s a great size tire for the 5th gen that doesn’t require this level of trimming but you still get to run the “biggest tire possible” that so many guys ask about.
A jig saw with a new metal blade works way better on the fender and fender flare, plus way less heat.
Yeah, a jig saw does cut through the metal faster but because the blade is wedged in-between the sheet metal, it can cause both sides to wobble extremely hard. As long as you keep the base of the jig saw firm on the sheet metal (heavily tape both sides so you don’t scratch your paint) and you have a fresh blade, you will be fine. You definitely can get some serious sheet metal wobble though. For the radius cut on the corner, the jig saw does work much more efficiently than the grinder in getting a perfect arch.
I won’t be cutting on mine but it’s obvious how much better it is off road. Never like exposing bare metal but would do it if I spent more time on the trail. Love a good question and answer but this guy’s a moron. I’d probably really consider a huffer at that point. Problem solved.
Thanks, random guy on the internet with a snide comment. What’s a huffer?
Thanks for putting this together! Have you considered just adding a body lift? It appears that about 1″-1.5″ of body lift coupled with 3″ of suspension lift may require a lot less cutting to fit 35″ tires.
I’m going to go 3” suspension and 2” body lift, after seeing this I might do less suspension to keep the travel.
I want to keep it stock looking as much as possible (have to according to the wife! Lol) for the price of long travel and regearing I’d do a SAS in my garage (did one on a 1990 Daihatsu Rocky).
body lifts are fine, I used to drive forklift and center of balance on a vehicle isn’t an issue for the regular driver.
your friend driving it on the highway is a bad idea LOL. Oh and great write up
A body lift wouldn’t be my first choice for running bigger tires, although I am not opposed to it. As you said, even with a body lift though, you still need to trim your wheel well, body mounts, and other plastics to clear the 35s – especially if you want to wheel. And, not sure I would go above 1″ but again I don’t have any experience with body lifts yet. A 1.5″ body lift to me just feels like overkill but to each their own. I would like to eventually install a body lift just to gain more experience – at the least. I have read the pros and cons of a body lift but would still throw one on a rig.
The main concern for body lift, for me, is if you have or want aftermarket bumpers. They will need to be modified as well or you will have big gaps. Otherwise I would have done a body lift already!
I’ve been looking and the bumpers go up too their for show on the outside.
I’ve read others saying it’s a piece of cake. Most of the time with some ingenuity a bracket can be made.
I really hate when people don’t finish the job, sounds like you would and at a fraction of the price.
Thanks, Brenan. Yeah, i’m curious about this as an option too. I have a friend who has wheeled military G-wagons for decades now and he’s been a fan of body lifts on his trucks. There’s a youtube of a completely useless 2wd 4runner fitting 35″ tires with a body lift, but i just don’t know how a proper 4R can will perform offroad with one (https://www.youtube.com/watch?v=che8okZHY58).
Putting 35s on a 4Runner will really screw up performance and gas mileage, unless you change the gearing. Looks like heaven, drives like hell.
I don’t think it drives like hell at all. My tires are balanced, aligned, and do quite well on road. This 4Runner is now running 4.88 Nitro Gears and performs great on-road and off-road. It’s definitely slower off the line with the loss in low-end torque but that doesn’t mean it drives like hell, it’s just slower and heavier. To me personally, running the ARB OME BP-51s, 35″ tires, and 4.88 gears is a better driving experience over the stock suspension on 31″ tires. But to each their own… it’s all personal preference.
SAS on 36” tires on a Daihatsu Rocky spool in the back locker up front and it drives 1000% better daily drove it for 2 years. Also waited for re gearing and the 22re got her up to 90 mph no problem.
don’t ever let gas mileage hold you back from motor sport fun.
You did the gears. That is the difference. Most people won’t do that.
I run 32s (Toyo MTs) on stock 17″ rims. No cutting needed, and the gearing is suitable as is. I have 12″ inches of clearance as it is, and while it doesn’t look cool, it will go anywhere, and put far less strain on the drivetrain.
Looking cool is far less important than getting back. But that’s just me.
Yeah, I hear you. If this was my daily driver, I don’t think I would put 35″ tires on it. 32″ tires or even 33″ won’t put that much more stress on the driveshaft, tie-rods, or CVs but you just don’t see guys wheeling super technical trails on 32″ tires. I think 34″ tires (295/70 or 285/75) are a comfortable size for a daily without too much trimming but that still warrants the need for the 4.88s or 4.56s depending on your driving style. The most common size for the 4Runner is obviously the 285/70R17 which provides a great middle-ground for off-roading and daily driving. A little too small for me personally but perfect for the majority of owners out there. That really is a great size for the 4Runner. Minimal cutting and trimming, however, it does great off-road when you need it.
I can go anywhere short of pure rock crawling, which I leave to the yoot, and do. The San Juans are our playground. Another 1.5 inches of clearance is pretty marginal. Lockers mean more.
Bigger tires without changing the gearing have made people hate their vehicle. My 2006 isn’t flashy, until we get to the rough stuff. Then it surprises some people. Especially Jeepers.