
How to Fit 35″ Tires on a 5th Gen 4Runner with Fiberglass Fenders and Relocating the Pinch Weld
Running bigger tires on the 4Runner often creates some new challenges.
I have run many different tire sizes over the last 5 years. Everything from 31″ Nitto Terra Grapperlers and 33″ BFGs KO2s, to 34″ Toyo Open Country AT2s among others.
The jump to 33″ tires provided to be quite simple, but moving to 34″ tires gave me a whole new challenge in the trimming department.
- 33″ Tires: If you want to see cutting and trimming to fit 33″ tires, check out this trimming overview on the Guard Dog MT (285/70R17).
- 34″ Tires: For running 34″ tires, you can see even more body, fender liner, firewall, and pinch weld trimming we did for the 285/75R17.
- 35″ Tires: Here is an updated post on how to fit 35″ tires with factory fenders.
After installing the fiberglass fenders, trimming the front bumper, and hammering back the pinch welds, the 34″ tires completely stopped rubbing on-road but would still slightly rub when stuffed in the fender well while off-road. After throwing the 35″ tires on, it was back to the drawing board.
If you have not read the two articles linked above, please read those first. That will get you up to speed on moving straight to 34″ tires – literally step by step.
Just in case you don’t want to read those, I will catch you up.
What we did so far to get here:
- Cut the bumper plastics
- Removed the fender liner and wheel well plastics
- Installed fiberglass fenders
- Body mount chop
Tools and Materials:
- Cooper Evolution M/T Tires
- Fiberglass Fenders
- 10mm socket wrench
- 10mm open-end wrench
- Masking Tape
- Floor jack
- Jack stands
- Dremel
- #4 Hammer
- Vice Grips
- Lineman’s Pliers
- Razor Blade or Utility Knife
- Rubberized Rust Encapsulator
- Powder Coating, Spray Paint or Bed Liner
- Grinder/plasma cutter for BMC
- Welder for BMC
Running 35″ Tires Causes Rubbing

Bigger tires = More Rubbing.
Finally, we made the jump to 35″ tires (35X12.50R17) Cooper Evolution M/T. We decided on 35X12.50R17 Cooper MTs based on many Cooper reviews here on the blog. Cooper was not on my radar until Max Sheehan, a fellow author and experienced driver, wrote a few reviews of their other models.
Larger tires cause the most rubbing on the pinch weld fender mount point, pinch seams on the firewall, and body mounts. The focus point of adjustments are near the rocker panel end caps. The larger the tire gets, the more of that area you need to trim back. Removing our factory fenders, the rocker panel caps, and even the fender mounting point bracket will really open that corner up.
Larger tires can also cause rubbing on your front bumper – but that’s an easy fix – just trim your bumper. For this section, you can go with a full-width bumper, run a high-clearance bumper cut, or trim off the factory lines which keeps your factory bumper intact as pictured here.
Running Fiberglass or Rolling Fenders?
Going with the 35X12.50R17 Coopers are going to cause more than simple fender well trimming. Running the fiberglass fenders and trimming for the 34″ tires will prepare you for 35s but you’re far finished.
You don’t need fiberglass fenders to run 35s but it may help with stuffing the tires.
There are guys running 35s without fiberglass fenders. Some guys roll their factory fenders, others cut a few inches of the sheet metal off all the way around, and others leave them as is (not recommended). Without wider fenders, you simply risk forcing the fenders to push out when a tire is stuffed in the well and then turned driver or passenger. If you leave them as is, your fenders are going to chew up your tires once they are stuffed and spinning. Any rough or exposed sharp edge of the sheet metal will rip corners of your tires right off. It’s really important to gain as much space as possible for the life of your tire along with general off-road performance.
We fit our 35″ tires with fiberglass, but you have other options.
The main focus point here is fixing or correcting the area by your pinch welds and pinch seam. We cut our mounting point off and relocated it beyond the firewall.
Relocating, Cutting, or Hammering The Pinch Welds?

You have a few different pinch welds in the fender well. The ones to focus on are by the body mount; the pinch seam (running up the firewall) and then the pinch weld fender mounting point (pictured above with red arrow).
- Pinch seam: Runs along the firewall in a vertical direction up the fender well. To fix this, you can fold the entire seam over with a large 4lb hammer.
- The pinch weld fender mount point: This is where your factory fenders connect via a 10mm bolt. The pinch weld mount bracket has two arms that come off the body and meet at a central tac welded nut location for that 10mm bolt.
The pinch seam up the firewall is simple, just bend/fold the seam over with a big hammer.
Relocating the Pinch Weld Fender Mount Bracket

You have a couple of options for this pinch weld fender mount bracket.
You can cut one arm off and push it back or you cut both arms off and relocate the whole bracket. Relocating the whole bracket is a little more work and will require welding but will offer a stronger point and extra clearance.
Cutting one arm off and pushing the bracket back 1″ doesn’t buy you as much “tire stuff” unless you are looking to clear on-road tire rubbing only.
By cutting the bracket off completely and relocating it back inside the fender well and against the side firewall, you are buying as much room as you the fender will allow.. as now, your mounting point will sit behind the firewall. With this method, you can trim your fenders as far back as you need.
The more your tires stuff in the tire well, the only items in your way now will be your fenders and firewall.
Prepare the Fender Mount Bracket

Start by preparing your pinch-weld bracket. If you are going to reuse the same 1omm bracket, then loosen a corner of the pinch weld with a pry-bar in order to get a good bite with a grinder.
Cut Off the Fender Mount Bracket

Cutting Off the pinch weld fender mount bracket. We cut one leg off the pinch weld first and then moved to the inside of the fender well in order to cut off the other point. Try not to damage the bracket if you are going to be reusing this.
Cutting Excess Fiberglass Material

Cut out any material in the fender if you feel it’s in your way or you don’t need it. We won’t need this bottom portion of the fiberglass, so we chopped a small section off. We will end up cutting more glass material off later.
Remove and Shape new Fender Mount Point
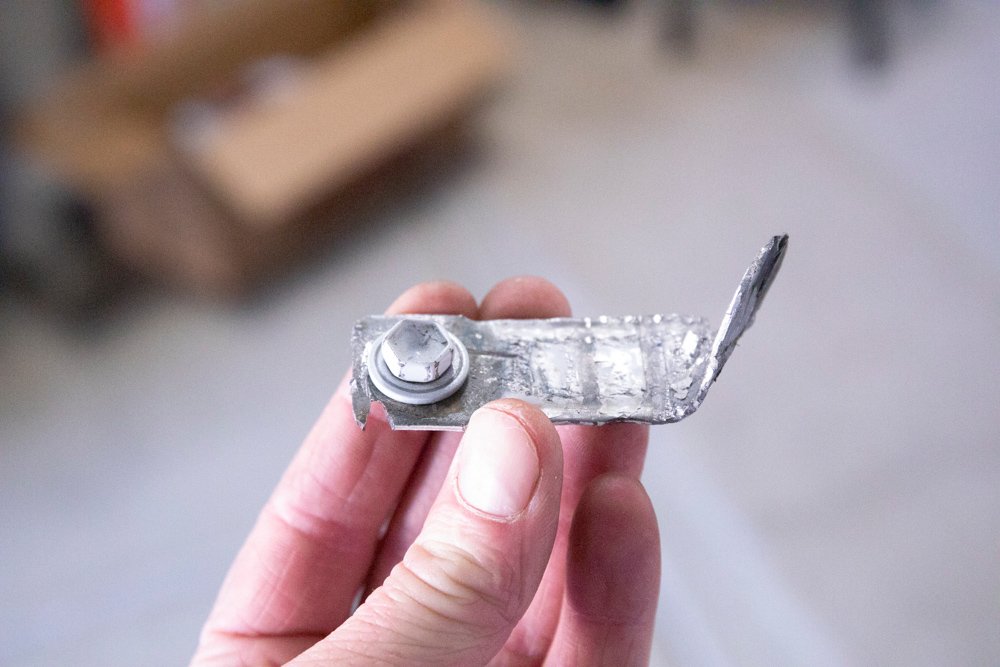
Bend and shape your new bracket if reusing for the fiberglass fenders. If possible, get some new material and shape a new bracket similar to this, then tac weld on a new 10mm threaded nut. The factory bracket is lightweight and thin. It wasn’t very easy to work with but we made it work and it has help up wheeling for a couple of months now. I think a simple 1/8″ shaped steel bracket would be ideal.
Relocate the Pinch Weld Mount Bracket

I went to my dad’s house and got a lesson on welding. This was my first ever weld… and this was the good side. I have decided that I am going to buy a welder to start melting metal together because I clearly need the experience. At some point in the near future, I am going to have new brackets made. So this is only temporary.
- Does it hold? Yes.
- Did it hold after a 35″ tire was pushing against the fenders? Yes.
- Will it last forever? It depends on how hard I wheel.
Regardless, if you’re lacking welding skills (like me), I suggest hiring this one out.
A simple process never sounded easier:
- Bend and shape the bracket
- Sand/grind down a smooth point on the bracket
- Sand/grind down a smooth point on the firewall
- Weld the bracket to the firewall
Getting the bracket shaped right and the fender lined up with the bolt hole we drilled was a process but like every install, it came together.
Cutting Off Remaining Sheet Metal
There is a large section of sheet metal hanging off of the firewall. Cut this off. Make a cut just on the outside of the spot weld then fold it over.
Now its time to hammer and fold the main pinch seam over.
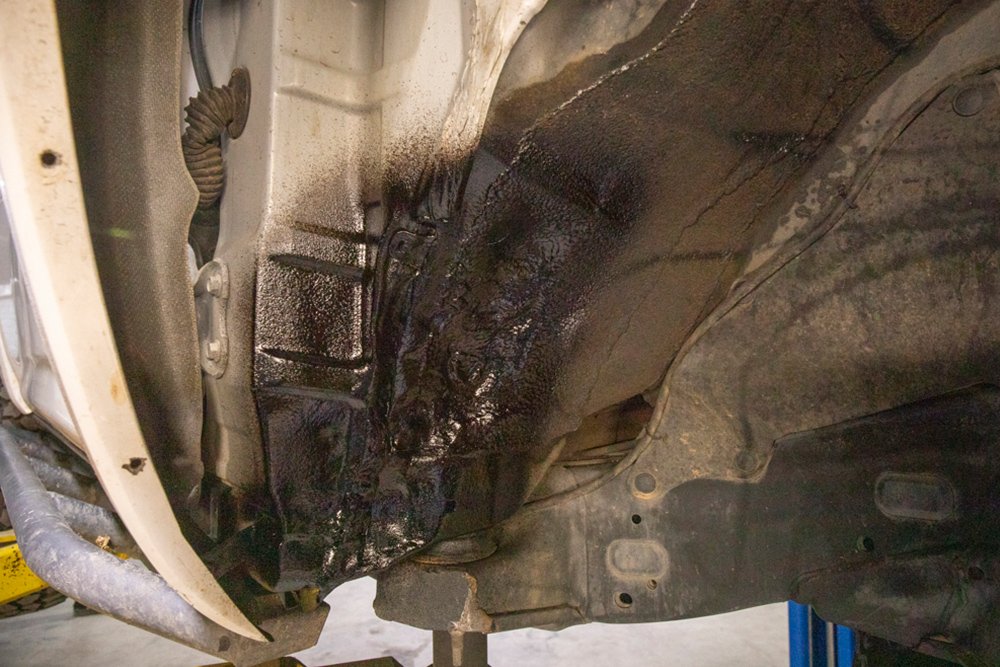
Sanding/Grinding Firewall and Pinch Seams

Sometimes prep is almost more important than the actual task at hand.
This is a really important step in the process because this undercoating/lining is sprayed up against the pinch seam. It almost strengthens the seam.
If you hammer the seam with the factory undercoating in place, it will take longer and you will have a harder time. Sand this undercoating all down and remove enough area around the seam to fold the seams over.
This will help you get a really good seam fold.
Hammering the Pinch Seam up the Firewall

Once the bottom portion of the pinch weld is cut off, and the liner is sanded off, you can fold the pinch weld over with a large hammer. Usually, the larger the hammer, the easier time you are going to have while slamming the pinch weld back.
Hammering the pinch seams requires good prep, strength, and a massive (BFH) hammer. For those that don’t know, BFH stands for Big F**king Hammer. Typically a 4lb or larger size hammer will get the job done.
A 10lb sledgehammer might be overkill, though and may dent the firewall – which actually might not be a bad thing. A good option would be a compact 4lb hammer. The pinch seams can be smashed with a 16oz hammer but is not recommend. Your wrists would be feeling it for months. Do yourself a favor and buy at least a 4lb hammer if you don’t have one.
Once you have this area hammered back, you want to clean the surface and then hit it with 3M rubberized undercoating.
Firewall Meets Floor Board
You have the outside and the inside/center of the fender well.
The outside is where the firewall is reinforced by the pinch seam.
The inside/center portion is where the floorboard meets the firewall. It’s much softer material here as nothing is reinforcing this area. Behind this section, you have electrical components such as connectors and wiring harnesses.
Giving the inside/center firewall a few hits with a 4lb hammer may help cave the sheet metal in, which may give you a small amount of clearance (if any at all). Just be careful not to smash too much of your firewall in. You can split the sheet metal and start minor cracks that can overtime become weak exsposing wires and connectors to the outside elements. If you insist on giving your firewall a few blows, just take it easy, it does dent easily.
If you need to push back your firewall beyond what your sheet metal can structurally withstand, you can. We refer to that later as the “firewall tub”.
Cutting or Not Cutting the Pinch Seam?

There is a debate here, do you cut or not cut your seams?
Some will argue that if you cut your pinch seams then you compromise the strength of the welds. And this is true to some degree. If you make a cut all the way through (pass the pinch welds) on the seams then yes, you are going to compromise the strength.
But, if you make one cut only 50% through and towards the top of the seam – just above the first fender liner tab bracket, you should be fine. But, I bet some would still argue this point, even myself, but it does making hammering a little easier.
This small cut will make it easier to separate the rear of the firewall seam and the top of the firewall seam. We are not taking it all the down here, just enough to get a fold going.
Spray 3m coating on the firewall
Finish by spraying the fender liners with some 3M Undercoating.
This is an effective coating for undercarriages, wheel wells, frame rails, and fenders that helps prevent corrosion and abrasion. Before you lay down a coating of the 3M undercoating, clean any rust, grease or leftover factory undercoating that was left behind with a sanding disk on a grinder or Dremel.
Cutting/ Relocating the Firewall “The Firewall Tub”
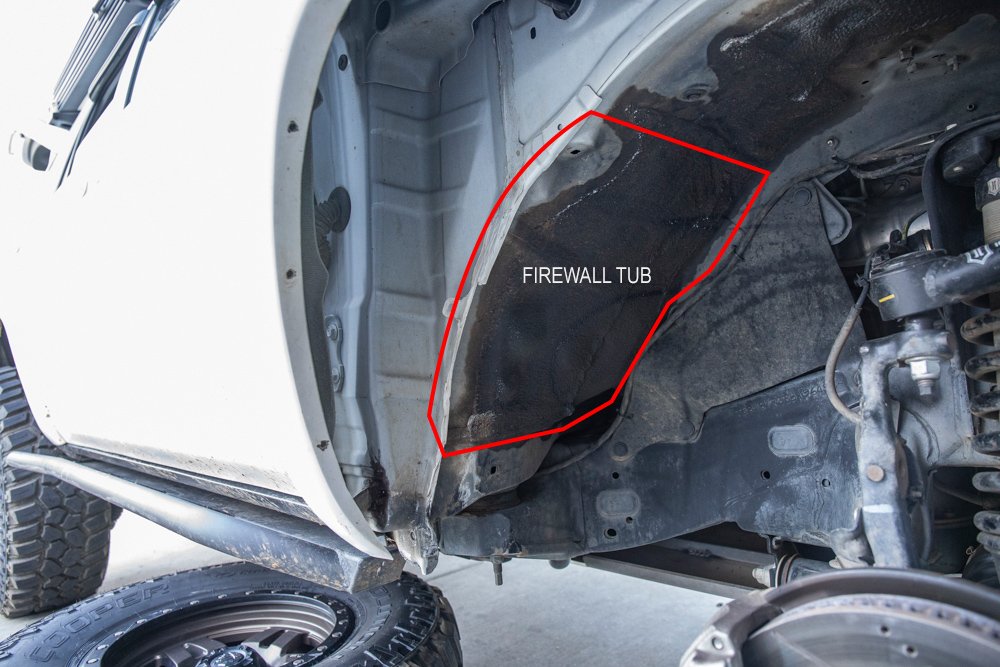
This is not a picture of a finished tub. Only an image indicating where one “might” go. This is not exact. Please do not cut a hole on these lines, use your best judgment.
Going a step further will require some real customization. Coastal Off-Road wrote a pretty good overview of re-locating the firewall, also known as building a firewall tub. This “firewall tub” is basically another way of saying cut open your firewall and weld a new one in place… that looks like a tub.
This process requires stuffing your tires at full lock in both directions without your shocks or sway bars connected. You start by removing your sway bars, and coilovers – then reinstall your tires.
Finally, jack up your hub assembly until you find the points where your tires are rubbing on the firewall – creating a full stuff / up-travel scenario. You need to repeat this process at multiple tire positions until you find all points of rubbing on the firewall – both on a surface width level and in terms of depth level.
Once all points are found, mark your selection and cut open the firewall.
After you have a gaping hole in your firewall, you can weld a “tub” or “recessed area” in place. Once you have your new tub welded in place, apply a polyurethane sealant and any type of rubberized undercoating for road debris, like the 3M Undercoating mentioned above. This should maximize your up-travel which should allow fully stuffed tires while off-road.
We have not done this and may come back for an update here or a new post.
Trimming Fiberglass Fenders

Final (pictured above)
You either have the factory or fiberglass fenders.
For the factory fenders, you can also refer to that Coastal Off-Road article if you want to cut your fenders. If you don’t want to cut your fenders, you can also roll them.
For the fiberglass fenders, you can trim any area where your tires are rubbing. We cut the portion of fiberglass that was hanging below the mounting point. It was just extra material that didn’t need to be there.
The next step is to free up some space near the lower fender bolt that is hanging off into the wheel well. In order to do this, you need to decide what type of cut you want on the fiberglass. Do you cut a 45 degrees angle off the bottom of cut a nice smooth line all the way up the fenders?
Marking Fiberglass Fenders

Cut lines marked before cutting (pictured)
Everyones cut will be slightly different but this was the route that I chose. After you mark your lines with masking tape, come back with a Dremel and make your cuts.
I don’t think it’s perfect yet and its really going to take getting out there on some rough terrain to really see how far the tires will stuff. I didn’t pull my coilovers out to test a “full stuff” scenario so only time will tell.
I think this is a great place for the 35s to call home but as always in this game, it’s always changing. We will see what the future brings.
Or you can go with trimming the factory fenders. Always a couple ways to skin a cat. Just a couple shots of Jade flexing the 35s just fine with the factory fenders.
Wondering if a slight body lift would negate some of the cutting and the use of fiberglass fenders?
nice write up man. Sweet deal.
Thank you so much for this… I have 2012 and made a jump on cooper evo’s 35’s did some trimming best i could and no rub on the streets. but as soon as I get on the trail its RUB central. Again Thank you!!!