
DIY Rubber Fender Liners Punched for ADV Fiberglass Fenders on the 5th Gen 4Runner
Fender Liners Punched by RadRubberDesign.com
When you make the jump to fiberglass fenders, you are changing more than aesthetics. You are changing the functionality of how your truck was designed to work.
On the passenger side of the 5th Gen 4Runner, our intake has an inlet tube that opens up into the wheel well which it draws air from. After installing ADV fiberglass fenders, we removed the factory fender liners which exposes the air intake inlet tube into the airbox.
After one trip off-road without fender liners, it was easy to see that with a completely open wheel well, things got messy pretty quick. The entire wheel well, including the inside of the front door jambs along with the inside of the intake airbox started to fill up with dirt.
With an open inlet tube and airbox, you are risking unwanted debris passing through your throttle body and into your engine, thus causing your engine to fail prematurely. Although we have air filters in our intake air boxes, they don’t stop everything. To each their own, but I don’t want unwanted debris entering my airbox at all.
Fiberglass fenders don’t typically come with a set of matching fender liners, so you have a couple of options here.
Common Options
- Run a snorkel
- Design and create your own fender liners
If you did the install of the fiberglass fenders yourself, you know how challenging it was. Well now, you need to get even more involved with custom fender liners or a snorkel.
Run a snorkel
If you want to run a snorkel, you need to find a compatible unit and drill holes into your glass. From there, install the new snorkel and you should be all set.
Snorkels are connected to the fiberglass fenders, and then an inlet tube connects into or onto the airbox which keeps the intake airbox sealed. But, with a snorkel only, you still leave your entire wheel well open to mud and dirt, including the door jambs. The biggest problem here is that your tire will throw dirt up into your door jambs eventually causing interior car elements to be exposed to the outside elements.
With this option, you can still make a custom fender liner.
Design and create your own fender liners
If you don’t want to run a snorkel, your other option is a new fender liner. For creating a fender liner, you have a couple of material options. To me, the choices came down to plastic or rubber.
Plastic Fender Liners?
As the factory fender liners are plastic, this is what I considered first. With plastic, you would need to cut, form and heat plastic to fit your exact mold.
I considered those Polly Plastics heat-moldable plastic sheets but it’s hard to find a 6′ X 3′ piece of plastic let alone the unpredictability of heating and molding plastic. And, I didn’t want to piece together multiple sheets of plastic for a fender liner leaving cracks here and there exposed to the elements. I wanted one piece that was solid from the front of the wheel well to the rear and I felt like plastic wasn’t going to get me there.
These skeptical thoughts on cutting and molding my own plastic fender liner left me thinking.
Rubber Fender Liners?
I had a conversation with Graeme from Go Fast Campers and we started talking about the lack of fender liner options for fiberglass fenders. I remembered a previous post that we wrote about the Rad Rubber Design engine splash guards and thought that would be a perfect fit for a custom fiberglass fender liner.
Rad Rubber Design cuts custom shapes of 1/8″ to 1/4″ nitrile rubber engine splash guards. These are aftermarket solutions for our factory engine splash guards. If you don’t have them yet, you should consider grabbing a set.
I reached out to Eddie at Rad Rubber Design with the idea for fender liners and he was totally up for it. All he needed was a pre-cut mold and we were good to go.
Cutting a Mold
To cut our mold, we used poster board and painters tape. The process was not difficult, it was just time-consuming. You need to start with a massive piece of poster board and then measure, trim, fastener, and repeat. That’s it.
Step 1: Connecting poster board
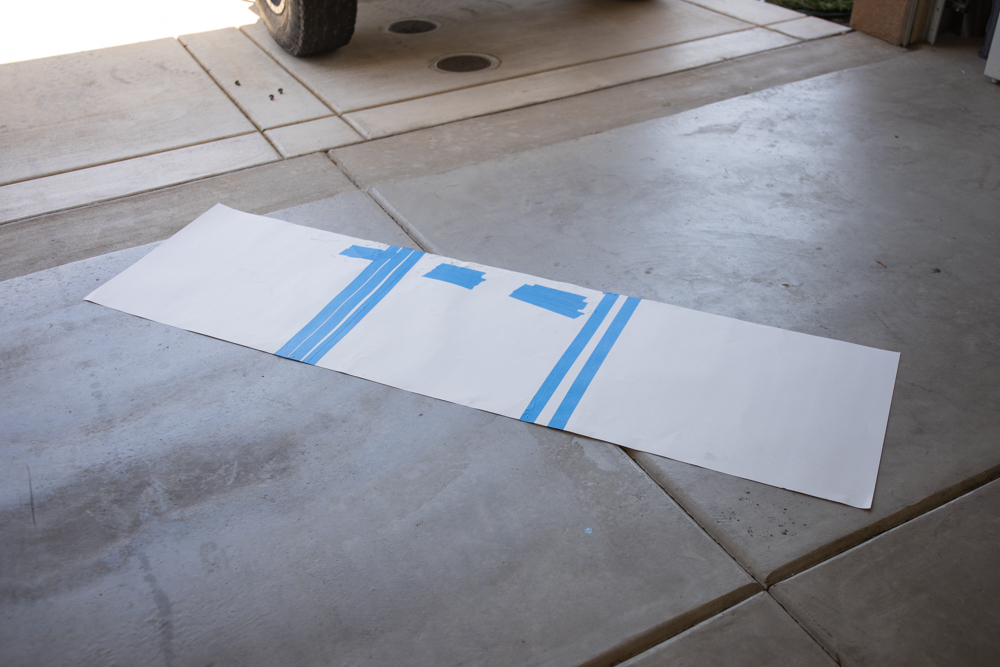
Start with three pieces of poster board and tape them together.
Step 2: Cutting away material

Start trimming away any material that you know is not going to be part of your final mold. This includes any part of the poster board on the inside and outside of the wheel well.
Step 3: Marking Fastener Holes

To start punching holes for our fasteners, I placed sections of tape where I knew the holes were going to go. Then I would guide a sharpie into place until it fell into the hole. I would gently rub the sharpie against that hole to create an outline of the hole.
I punched the first hole, took it back to the wheel well, fastened it into place, then marked the second hole. I repeated this process.
That means that for each new hole I punched, I also fastened all the previous holes down with fasteners. It was a long process but it ensured every hole was in the exact location it needed to be for the mold and final product.
As I continued to fasten down each hole, it started to tear away at the mold so I would consistently strengthen the holes with more tape.
Step 4: Finalize Mold and Layout

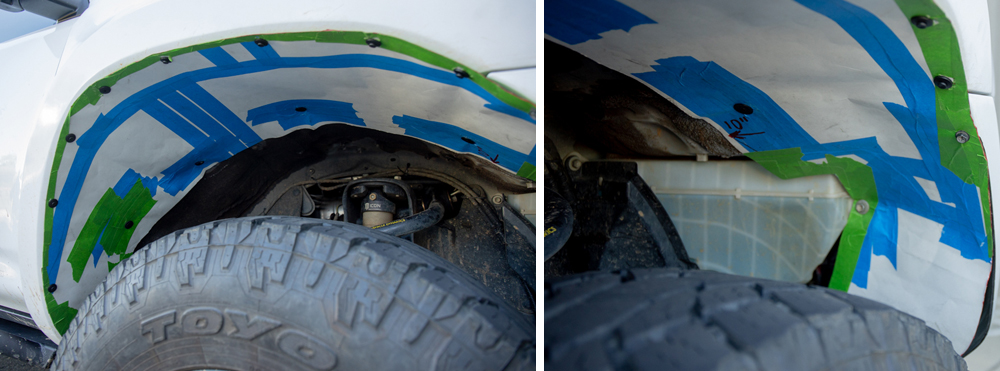
After connecting each hole with fasteners and punching a new hole when needed, I got close.
If the mold started to shift on me or holes were not lining up, I would add more material where I needed to punch a new hole. Adding more material was as easy as laying down a new piece of poster board, taping it down and then punching a new hole in that spot or a new spot.
You can see where I covered a hole and then added a new one. On the left side of the mold where there is a lot of green and blue tape (I ran out of blue painters tape – green frog tape had to join in).
If you screw up, it’s OK. All you need to do is cover the old hole with tape, add more material if needed, and punch a new hole.
Step 5: Rubber Fiberglass Fender Liner

Once you are 100% certain you have a perfect fender liner, hit up Rad Rubber Design, send them your mold and they will make you a fender liner.
It’s not going to be cheap but it’s worth it. This mold was about 5X the size of their engine splash guards and those go for about $60 a set. So expect to pay at least $200-$300 for a set of fender liners, maybe more.
I would recommend going with a professional here, and not doing this part on your own.
You can visit Rad Rubber Design at RadRubberDesign.com.
Step 6: Fiberglass Fender Liner Fasteners
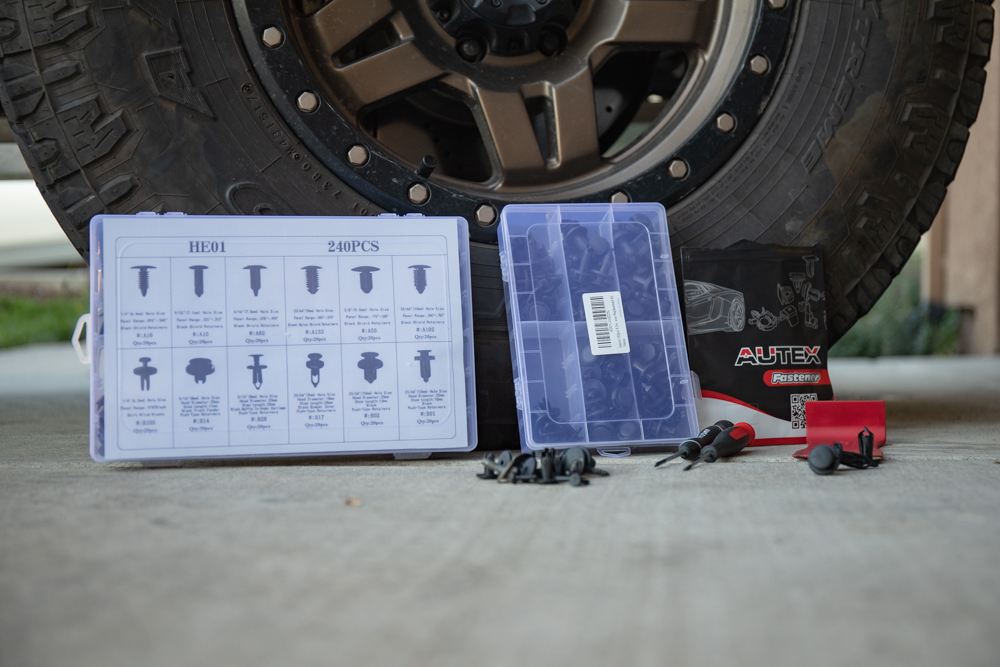
You will need some fasteners for your install. There are multiple options on Amazon.
Fasteners:
- Large multi-pack (240 pcs): Check Price
- Small multi-pack (102 pcs): Check Price
- High-end square clips (AUTEX – close to OE quality): Check Price
These are the kits that I bought and have seemed to work out quite well given the purpose of the install. The AUTEX square fasteners are pretty much mandatory even though they were the most expensive.
They were the only square style fastener I could find online for a good price and they seem to be just as good as the factory square fasteners, if not better.
Fasten the Fender Liners into place

Once you have your fender lines you can start punching them into place.
I considered going from the inside of the fender liner down but there is very little room to work with and fasteners I got, even the smallest ones, were a little too big.
Fiberglass Fender Liners (What Type of Rubber is best?)

After running the fender liners for a week or so, we had a problem. The 1/8″ thickness was a little too heavy for the fasteners from Amazon.
Originally, we went with 1/8″ rubber thickness and cut 5/8″ holes where our largest/widest fasteners were on the inside of the fender liner. This was a learning experience because the 1/8″ thickness was too heavy and the 5/8″ holes were too large. With the heavy material and holes that were a little too wide for the fasteners, the fender liners dropped off while we were on the road and burned up a small section of the fender liners.
I started to smell something and could hear it as well. I pulled over, jumped out of the truck and noticed the fender liner on the tire with a large gash in the liner.
After this, I called Rad Rubber Design back and am currently having Eddie work with us on a 1/16″ thickness version with 1/4″ holes all the way around. With these new specs, we should have less sag and a tighter fit all the way around.
Final Thoughts?
After going through the process of creating the mold, sending it off to Rad Rubber Design, and finally seeing the end product, I was pretty stoked. It was well worth the cost and the time it took to make the fender liners. The end product was almost exactly what we were looking for. It wasn’t perfect but that was on me when I was making the mold.
I cut a portion of my front bumper off so my tires had more clearance. This removed a couple of fastener points on the side of the bumper which caused some fender liner droop.
We also had some challenges because the material was too think and a couple of the holes too large, it did fall off on the road. In any case, we have a new and improved updated version shipping soon.
I will keep this post updated when the new fender liners come in.
Great write up Brennan Im going to use rubber to button the gap from my metaltech fortress to inner wheel wells. using this strategy.
Is this an available product for sale?
do they plan on keeping the design on hand?
Interested to hear how the thinner liner worked out for you. Just got my fenders installed and was noticing all the unprotected areas you mentioned. Also can they just resell the mold you made?
NM. I see on your Instagram that you no longer run them lol
I still run them. I just run them on one side right now until I get them 100% perfect. The 1/16″ Nitrile rubber is working for sure. I just recently stuffed my 34s over the weekend though and burned off one of the push tabs. The liners are still in place, but I may need to remove one push clip in order to avoid this. All in all the concept is working out great, though.