
LFD Off-Road: The Must-Have 5th Gen 4Runner Skid Plate Every Off-Roader & Overlander Needs
There’s nothing that can replace protecting your vehicle, especially the underbody when you are on all those rocky trails that can beat things to death. The last thing you want is a factory skid plate meeting a large rock. You can take out an oil pan, transfer case, gas tank, or more. If you lose these, you might not be getting off the trail, and depending on where you are, that can mean a long long walk before finding someone, let alone cell service.
Who Is LFD Off-Road?
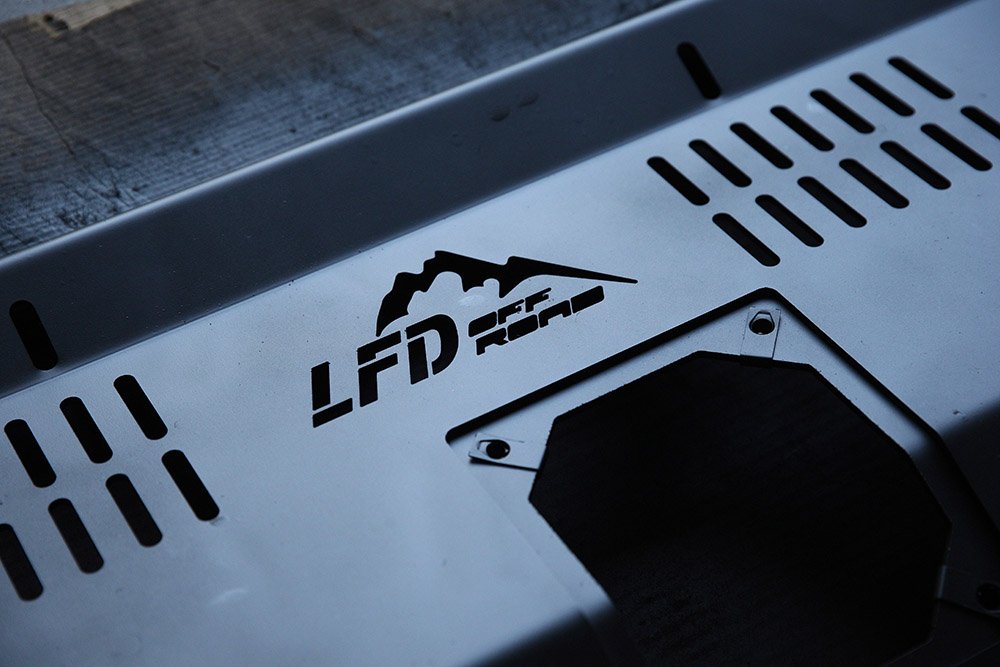
LFD Off-Road is a small business based in Denver and North Carolina. They specialize in off-road Toyota products. They were one of the first to introduce crossbars for your stock rails on the 5th Gen 4Runner, and they make everything from bumpers, to skids, to roof racks and sliders.
Find It Online
- LFD Off-Road Skid Plates For 5th Gen 4Runner: Check Price
Do You Need Skid Plates?

The short answer is always yes.
Whether you have an off-road vehicle or not, there are important pieces to keep protected on a vehicle. Most of those include the oil pan and powertrain. While it’s unlikely something will hit these on the pavement, there’s always a chance that somethings in the road that you can’t see, and not being able to react in time will cause you to hit it.
Of course, when it comes to off-roading things are a lot different. You have rocks, trees, off-camber sections that can get you high centered, among different types of terrain that hold their own unique characteristics, such as hard-packed snow.
On the 5th Gen 4Runner, the lower hanging sections that can cause the most issues are the Oil pan, transfer case, and gas tank skid. That doesn’t mean there aren’t other areas to protect, but if you are buying a kit, such as the one LFD Off-Road sells, then odds are the other things, such as the oil filter, transmission, etc, will be covered too.
You can reference the skid plate buyers’ guide to see all the skid plate options for the 5th Gen 4R.
Steel or Aluminum?
This is forever becoming a debate in the off-road community. Do you need steel or do you need aluminum? Aluminum is not stronger than steel, despite what is circulated on the internet. However, you shouldn’t think aluminum is flat out weaker either. Depending on where you wheel, aluminum might be the better option for you, and for most 5th Gen 4Runner owners, it probably is.
Aluminum Skids
Aluminum is great for those of you who aren’t into the harder trails where you find yourself smacking down on rocks. Maybe you like the easy trails that just lead to a nice view to set up camp, but where occasionally there may be a rocky spot to where you need protection. This is where having the aluminum can come in handy. It normally weighs in at least half of what steel does, meaning you’re saving on gas mileage and have less strain on your transmission, while still getting much better protection than the OEM skids that are paper-thin.
Steel Skids
Steel is great for those of you who go out a lot, but are on more of those harder rocky trails. When your tire isn’t placed correctly, or the trail is just flat out rutted and rocky giving you no lines, odds are you are going to be smacking down over and over to get through. Sure, these 5th Gen 4Runners aren’t rock crawlers, except for maybe the few SAS’d ones that are out there, but that doesn’t stop us from having fun and probably getting in over our heads at times. The advantage to steel is, if you do knock some dents, you can smack them right back out, whereas aluminum that’s going to continue to weaken the structure.
So which option is right for you?
To summarize:
- If you find yourself on mostly dirt roads with few sections where you think you’ll hit and or occasionally do, go aluminum.
- If you are on the rocky trails where you constantly find yourself hitting or rubbing, go steel.
You can of course always do a mixture if you want. For instance steel on the areas you hit all the time, and aluminum in the areas you rarely hit.
Why LFD Off-Road?

As a small business owner, I like to support small businesses in the off-road community.
I went with LFD Off-Road awhile ago for their roof rack and was in love with it. The build quality, the look of their products, and their customer service are always top-notch. When I realized I was bending and shredding my OEM skids, I needed to upgrade, and LFD Off Road’s proven products are why I chose them.
LFD Off-Road Skid Plates Installation Guide
Tools Needed for Install
- Ratchet
- 12mm, 13mm, 14mm Sockets
- Socket Extension
- Floor Jack or Extra Hands
- Rustoleum Self Etching Primer: Check Price
- Rustoleum Truck Bed Liner Spray: Check Price
- Acetone, Alcohol, Quick Evaporating Cleaner: Check Price
- Microfiber Cloths: Check Price
- Scotch Pad: Check Price
- Wire Brush (Optional): Check Price
- Personal Protective Equipment/Gear:
- Eyeglasses/Safety Glasses
- Latex Gloves: Check Price
- Chemical Odor Valved Respirator/Breathing Mask: Check Price
- Cover for Clothes
Powder Coat or Spray Paint

Unless you ordered aluminum skids, which don’t need to be painted unless you want to, it’s important to paint or powder coat your raw skids to protect them from rust and ultimate failure. Depending on what you want to do is up to you.
Some people prefer powder-coat, some prefer spray paint. The important thing to note is if you decide to spray paint your skids you want to prep them first, otherwise, the paint won’t hold up at all.
You can do this with strong grit sandpaper.
I chose to spray paint mine as I tent to hit my skids quite often, making the extra money for powder coating not worth it when I was going to constantly be touching them up.
Uninstall Skid Plates
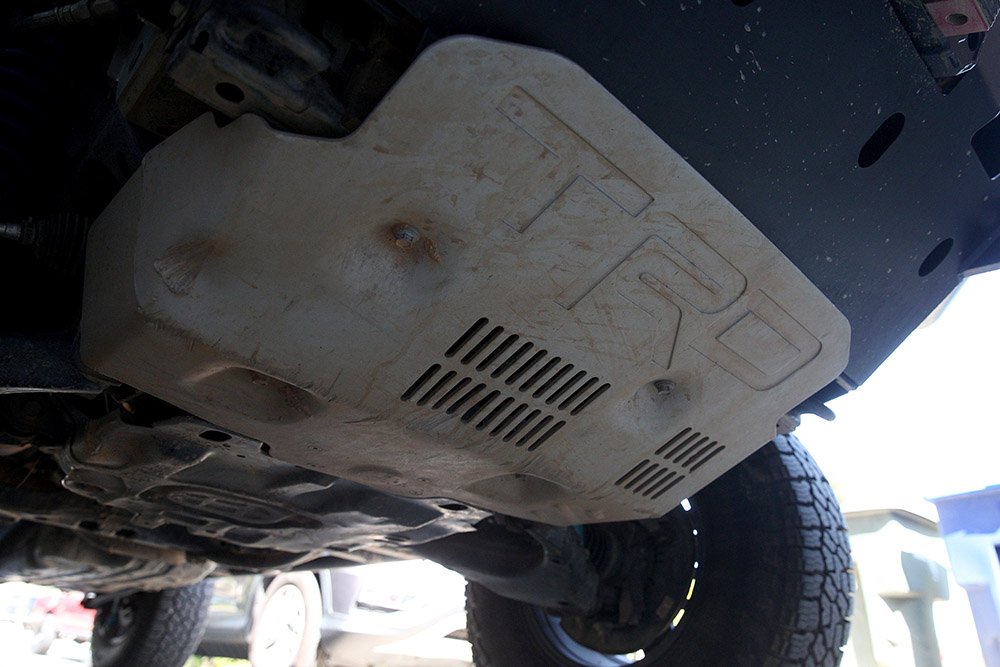
Whether you have OEM skid plates or the TRD Skid you want to remove them now. Depending on your setup, this can either require the use of 12mm sockets (OEM skids), or 14mm sockets (TRD Skid). Because I have a TRD Pro my uninstall was a little easier as I needed to simply remove the four bolts to the TRD Skid. Keep in mind when doing this, that the 14mm is required unlike the 12 for OEM.
Note: The OEM skid is bolted into different holes than the TRD Skid is, but it is easy to remove. Once the bolts are removed, it’s important to note that the OEM skid happens to rest on other sections of the vehicle towards the oil pan, requiring you to lift at an angle to get it undone. This isn’t necessary with the TRD Skid, but if you feel something isn’t unbolting with the OEM skid, even though you’ve removed the bolts, odds are this is what’s keeping it “locked” in place.
Remove Remaining Skid (+ Gas Tank Skid If You Have One)
After removing the front skid, you now have one skid left, unless you are doing the gas tank skid which I have not done. Removing the middle skid is easy if not easier than the front skid. It’s four 12mm bolts, no matter what version of the 4Runner you have, and comes off easy. There’s no need to remove the two bolts that expose the drain plug as those are built into the skid itself. You will, however, need an extension when removing the skid closest to the front of the vehicle as the bolts are a bit higher up in the body.
One these two skids are removed, you are finished uninstalling the old hardware and can proceed to install the new ones. If you have purchased a gas tank skid, you will want to begin the process for that as well.
Installing Front Skid

Unlike the old skid plate, the front skid runs from the oil pan to the front of the vehicle as one entire piece. This means this skid is the heaviest and most difficult to install, though it honestly isn’t “that” difficult, it will just be the hardest one out of them all to do.
Unless you have an extra set of hands, you will want to use a floor jack to help make the install a ton easier. I’m sure we’re all strong and can lift it into place, but why would you risk having a big heavy skid, whether steel or aluminum come smacking you in the face and likely breaking some bones? Work smarter not harder.
Install Rear Section of Front Skid First
I found that installing the rear section of the front skid was easier than installing the front first. Make sure to install the nylon spacer while doing this step as it is required when adding the middle skid. You also do not want to tighten the bolt in completely, but rather just the first few threads to hold it in place. The front of the skid, however, can be tightened completely if you want.
The front is a little trickier depending on what skid setup you go with. I chose the wide version of the skid to give a little more protection. This in return requires the weld nut on the support bracket to be used. Because the TRD skid uses the larger hole, I had to reuse those bolts to lock the bracket into the support rail under the radiator. Unfortunately, they are a bit too long, which doesn’t allow for a flush fitment, so you simply just need to go to your local hardware store to find a matching/shorter bolt.
Note: Keep in mind not all have had this issue, so this may not be a problem you run into, I just happened to be one of the lucky few who got different styled bolts from Toyota.
Once the front skid front bolts are tightened into place, you can move on to the middle skid plate install.
Installing Transmission Skid

Like most skids on the market, the transmission skid is incorporated with the front skid. Remember those nylon spacers you installed earlier? The front of the transmission skid slides in between the nylon spacers and the front skid plate. It basically locks in on that section via “pinching” when the bolts are tightened.
With this process, I again slide the front of the transmission skid into place, but loosely tightened in the rear bolts to have them in place. Once they were in place, I went ahead and tightened the front skid bolts down to keep it in place.
Remove & Replace Support Bracket Bolts
It’s important to note the support bracket bolts must be removed, and replaced with the new bolts from LFD Off-Road. The bracket will not move, however, the lengthier ones are required to fit everything in place.
You may run into a hiccup during this install, as this area tends to get rock rash a bit, and I completely shredded the head on my bolt, making it nearly impossible to remove. This is where vice grips come in handy, or some way to cut them to where you can get better grips with adjustable wrenches.
Once you have replaced the bolts, continue to do what you did with the front skid and only tighten the bolts down just enough to keep everything in place. The transfer case skid will slide in between the support bracket and the transmission skid, much as the transmission skid did with the front skid.
Transfer Case Skid

Like earlier with the transmission skid, you want to slide the transfer case skid in between the bracket and transmission skid to put in place.
While it may look like the upper section of the skid goes on the outside of the frame, it actually sits on the inside. On the driver’s side, you will have a bolt you need to undo to fit the skid onto the side. You will then use the new LFD Off-Road bolt to lock it into place. The same will be done on the opposite side, except there is no bolt already in place there. However, you run into the issue of the exhaust pipe sitting there, which can make tightening it down hard.
Pro tip: I recommend tightening down the upper side first before the lower side, as that tends to keep them locked in place more without any movement. Once done tighten down the lower section to lock the transmission skid into place as well as to “pinch’ the front of the transfer case skid.
Final Thoughts

Installing the skid plates takes nearly no time at all. Maybe roughly 4 hours total from painting to uninstalling and installing new hardware.
They are a clean set of skids that fit flush with the frame and without a doubt will protect you from anything you throw at it. While they are steel and heavy, I haven’t noticed too much power loss, but I already have a ton of added weight.
One thing I really enjoy about the skid is that it sits 100% flush with my new bumper, whereas the old TRD skid plate hung down a lot lower. I also enjoy that LFD Off-Road made sure to put a piece in the transfer skid to prevent any rattling that occurs with a lot of other makers on the market.
Overall I don’t worry about hitting or banging rocks anymore as I did with my previous TRD skid that started to have chunks taken out of it via rock hits. If there’s a rock garden that may have made me nervous before, I have all the confidence that I can make it through with no damage, and that LFD Off-Road has me covered.
Over time I have purchased the LFD OffRoad full length roof rack, the dual swing rear bumper, sliders, and the Powertrain full skids.I have nothing but praise for the design and quality of their products.Customer service is as good or better with LFD as any off road business in the industry. Highly recommended!
Great write up! How does the truck bed liner work with heat? I’m thinking of rattle canning mine when I get it.