
Prinsu finally joins the rear hatch ladder game for the 5th Gen 4Runner (2014-2022, sorry pre-facelift owners)!
This lightweight, modular ladder brings new flexibility to the market without compromising the rugged look of your 4Runner. Having recently switched from a full Gobi roof rack and ladder to a full-length Prinsu rack, I was sorely missing a rear hatch ladder for easy roof access.
I’m one for continuity when it comes to additions to my 4Runner. I was excited to hear about Prinsu releasing its own ladder for the 4Runner. Having just finished my write-up on the highly recommended Prinsu Quick Release Awning Brackets, I really wanted to write another on their ladder.
So here we are, and I’m happy to introduce the new Prinsu rear hatch ladder for the 2014+ 5th Gen 4Runner.
Find It Online:
- Prinsu 4Runner Roof Racks: Check Price
- 4Runner Ladder: Check Price
Other Prinsu Accessories
- Awning Quick Release Bracket: Check Price
- Prinsu Ridgeline Handles: Check Price
- Prinsu Summit Handles: Check Price
- RotoPax Dual Mount: Check Price
- Shop all Prinsu Accessories: Check Price
Use code – TRAILCO – to save an extra 5% off! Usually stacks with any sale going on.
Table Of Contents
Unique Design

How does Prinsu differentiate itself from the market of ever-growing 4Runner ladder options? They changed the game and made their ladder modular. You can add, remove, and adjust the ladder rungs (steps) to any position. This makes it easy to accommodate your needs on a trip-by-trip basis:
- Short weekend getaway? Set up the rungs to easily get to the roof based on your natural stepping location.
- Overlanding for a week or two? Position the rungs to accommodate mounting Rotopax, propane tanks, Trash-a-Roos, and more.
- Don’t like seeing the rungs in your rearview mirror? You can move the rungs to be clear of the rear hatch window.
Prinsu also focused on minimizing weight, and this ladder is light. The welded square tubing and C-channel style rungs create a lightweight yet sturdy ladder that weighs a mere 17 pounds. This lightweight design eliminates the need for heavy-duty hatch struts, which are typically required when adding a ladder.
Precise Clearance

The ladder has precise clearance on all parts of the hatch. The top mounting plate is slightly angled to create a very smooth and clean connection to the top plate of the ladder. This leads to it only sticking up from the rear hatch by about 1 inch.
There is plenty of clearance between your Prinsu rack and likely many other roof rack brands when opening the rear hatch.

The bottom of the ladder vanishes below the hatch, which is awesome. No additional hardware, pinch plates, or double-sided tape is visible, resulting in a very clean and low-profile appearance.

The ladder itself can get a little close to the rear lift gate handle, like most others on the market. There is no concern about contact, but it does mean your foot has limited clearance when using the ladder.
I’ve kicked the paint quite a few times with the Gobi installed, so I assume just the same for this ladder. When mounting the gear, make sure the hardware is clear of the hatch itself.
Package Contents

The shipment arrived very nicely packed, with the metal parts wrapped in thick foam and shrink wrap. Even UPS couldn’t damage this package (for once).
Review all components and work with Prinsu or the store from which you purchased it to make any warranty claims before installation.
Hardware

The provided hardware was everything that I needed; however, it differed slightly from the photos in the installation guide and video. As Prinsu continues to refine and improve its products, its parts and hardware may change.
To help, I’ve labeled where each of the pieces went, so you’ll have a general idea if they change things up again.
- (2) Hex cap bolts and silver washers mount the ladder to the underside of your hatch.
- (4) Hex button head bolts, silver washers, and 1/2 inch nylon nuts for the top and bottom plate to mount to your side rails of the ladder.
- (10) Black carriage bolts, black washers, and 7/16-inch black nylon nuts to hold your ladder rungs together in place.
- (2) Silver carriage bolts, silver washers, and 9/16-inch black nylon nuts to mount your ladder to the top plate.
Installation

Prinsu did a great job with their instructions for the ladder, which can be found below in both written and video form.
This write-up addresses questions that I had during the installation process. Hopefully, it will make your installation experience a little easier or answer any questions you may have before purchasing.
As a new product, the installation guides may also be subject to change. If what you’re reading below no longer applies, please drop a comment and I’ll update accordingly!
- Text: Prinsu Ladder Installation Guide by Prinsu
- Video: Prinsu 4Runner Ladder Installation by Prinsu
Tools Needed
- 7/16 ratchet wrench
- 1/2 ratchet wrench
- 9/16 ratchet wrench
- 3/8 drill bit + drill
- SAE hex key set
- Tape measure
- Box cutter or scissors
Supplies Needed
- Paint pen, I recommend it matches your 4Runner’s paint color
- Cleaning supplies
- Goo Gone
- Rubber grommets
- Painter’s tape
- Blanket or something to protect your hatch and rear window during installation
Step 1. Clean Your Roof

Make your parents proud, and clean up your roof a bit before you get started. You want to ensure that the adhesive strips form a strong bond with your paint.
As you can see in the photo above, not only is my roof dirty, but the remnants of my Gobi ladder adhesive strips are still there. Out of sight, out of mind, I guess.
If you’re switching ladders or have particularly nasty bits on your roof, like sap, a bottle of goo-gone and some elbow grease will remove everything nicely.

In my case, once everything was cleaned, I used soapy water to ensure the goo-gone was completely removed. I followed up with a wet towel to remove the soap and finally, a dry towel.
Step 2. Measuring For Top Plate

Now that you’ve got a clean roof, the first thing you’ll notice is that the point of measurement (4 inches noted in the install guide) will vary depending on where you place the tape measure relative to where the plastic and metal roof join.
I placed my tape measure as close as possible to what the installation guide showed and used painter’s tape to mark the side of the mount and secure it in place to prevent it from flying off when opening the hatch.
I haven’t removed the plastic from the adhesive strips yet, as I am fairly uncomfortable with drilling/cutting into OEM parts.
Step 3. Ladder Rungs

The ladder rungs have a right and wrong way to be installed, and if you’re not familiar with carriage bolts, this may help out. The square holes on each side of the rungs face out, away from the rear hatch. The circular holes are positioned to face the hatch.
For a cleaner end look, Prinsu went with a carriage bolt to secure the rungs. This also means that the rung itself provides the support needed to tighten and loosen bolts. That makes moving them around easier and a lot less time-consuming. I think that’s a great idea and allows for a much cleaner finished product!

Lastly, don’t over-tighten the bolts; they need to be snug. The nylon nut will keep things in place.
I overwrenched one and snapped the carriage bolt right in two. Fortunately, there were extras in the hardware kit.
Step 4. Loosely Assembly The Ladder

I wanted to get things roughly aligned before making any final decisions. I bolted the top and bottom plates to the ladder frame and got it sitting on the rear hatch.
Do not fully tighten the bolts on the top and bottom plates, as the play between them is needed to ensure a perfect fit when making things permanent.
This is probably where having a blanket on the hatch and over the window would be advisable. Ultimately, this step wasn’t necessary as things lined up nicely.
Step 5. Rubber Adhesive Strips

Three one-sided rubber adhesive strips come with your ladder. These will ensure your paint isn’t damaged during use, as there are a few locations where your ladder can come into contact.
At the top of the ladder, I recommend sliding them inward rather than centering them on the ladder, so that you achieve a cleaner look when everything is assembled.

The bottom required that I trim about 3/4 inch off the long edge so that the rubber wouldn’t overshoot the ladder’s bottom mounting plate area. It’s the small things that keep the eyes focused on the ladder rather than your installation.
Step 6. Top Mounting Plate Adhesive Strips

Just follow the instructions and wait an hour for the adhesive strips to adhere to your mounting plate and roof. It’s a real pain to have to reset these things if they slide or unstick, and it can be extremely difficult to move once adhered.
If you’re playing around before that hour, the adhesive may slip out of place, which could damage the top plate or your paint, making it difficult to get it back into place.
Make sure the two carriage bolts are in place as you do this. It’s not easy to slide them in afterward without bending or messing up your still-settling adhesive strips.
Step 7. Alignment

With the top plate now firmly adhered to your rear hatch, set the ladder in place and loosely bolt everything back together. I used the side of my Prinsu rack to give me a relative level (as I was parked on a slight angle) and then squared up the ladder.
Once that was done, I firmly held the bottom in place and marked out my drill locations.
Step 8. Drilling
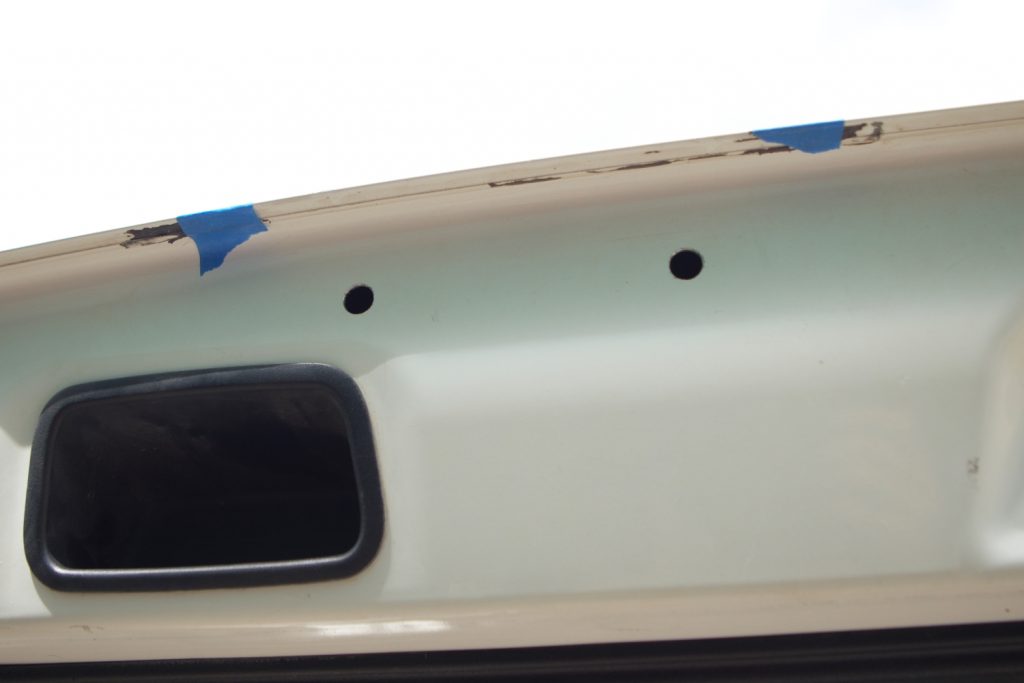
For some, drilling is a deal-breaker. However, when you pop out the grab handle on the underside of your hatch, you’ll realize it’s hollow inside with nothing to hit. There are also some weep holes right next to it, so you’re not ruining a water-tight area.
In the event you ever decide to get rid of the ladder, you can buy some 3/8-inch rubber fill caps and push them into place. I think very few people would ever know that you drilled these holes.
Once it’s drilled, use your paint pen to keep it from rusting. As mentioned above, there are weep holes not too far away from where you’re drilling. Toyota expects water and dirt to enter this part of your rear hatch. So even in relatively dry states, you’ll still likely see rust if you’re not careful here.
I recommend getting a paint pen to match your 4Runner, so you can take advantage of it and clear up any chips or deep scratches that may occur during the installation and elsewhere over the years. I just went to Amazon and searched for my paint’s name and bought the OEM pen that Toyota offers. Again, clean those areas before painting.
Final Thoughts

What a ladder! I’m so impressed that Prinsu still found room to innovate in such a saturated market. Being lightweight and modular lends to a clean look that doesn’t require you to make other adjustments to your setup.
Although the assembly isn’t difficult, it still requires some time. Be patient, and you’ll end up with a great-looking ladder to make the most of your roof rack. The finished product looks great and complements my roof rack’s aesthetic perfectly.
More importantly, the Prinsu ladder aligns with the company’s ethos of being modular/adjustable to meet the needs of many. The ability to adjust the rungs to more easily accommodate gear, and then revert to a normal ladder when needed, is a huge benefit for a weekend warrior.
I look forward to seeing what products or ideas Prinsu has in store for us. This ladder is another homerun!
What is the difference in the rear gate between the 10-13 models and the 14-current models? From what I can gather, this is the first (and only?) ladder that has this distinction. Weird. Looks awesome but I have a 2012 :/
That’s a good question. I’m not sure what the differences are. I know CBI/Prinsu’s 3D scans the vehicle to make sure things fit well. I assume they worked off a post facelift 5th gen, and haven’t tested/confirmed with a pre facelift.
Prinsu does respond to messages on instagram. I’m sure you could ping them to see.
Do you know what the weight limit is on the ladder once installed?
Hi Nelly, speaking with CBI/Prinsu, they have told me it’s several hundred pounds. However they did not place a precise number on this.
While visiting their shop in Idaho, and seeing the one installed on their TRD Pro, they made no hesitation to throw themselves on the ladder and really climb up it.
So thorough and specific…. thanks for the details. Really helps clarify the product, how to use it, how to attach it, etc. Time to go camping!