
Oil and air filter maintenance seemed to go hand in hand with the stock cold air intake on my SR5 4Runner. You know the drill; the technician would finish the oil change, come in with the dirty air filter that even had pieces of leaves on it, and say that it needs replacing. Although it may be an attempt to increase their workload and therefore my bill, I’d agree to the charge. That vicious cycle ends now with the aFe Power Momentum GT CAI.
Table Of Contents
Why I Chose The aFe Power Momentum GT CAI

I landed on the aFe Power Momentum GT CAI with a Pro 5R Filter Media. Though there are many comparisons regarding what CAI is best for you, I chose aFe for a few reasons:
- Specs – The website states a +46% airflow Increase, +24 HP, and +24 lb/ft torque.
- Long Lifespan – Washable oil and dry filter options with aFe cleaning agents available.
- Easy installation.
- Continuity – I paired it with the aFe MACH Force Cat-Back Exhaust System.
Cleaning Timeframe

aFe states that under normal driving conditions (e.g., predominantly street driving in environments with little to no dust), cleaning is necessary every 25-30k miles.
For perspective, the average person in the US drives roughly half of this mileage range each year, making the always polished, pavement-only, no off-roading/overlanding 4Runner with an upgraded aFe CAI needing a filter cleaning nearly once every two years.
Personally, I plow through that mile range every year – sucking in air from the city, highway, dusty, and muddy environments. This drives me to clean the filter every 10-15k miles, which I can complete in roughly an hour. Most of that time is allotted to the filter drying after rinsing.
Disassembly and Cleaning Process

Materials and Tools needed:
- 12mm socket and driver
- aFe POWER CLEANER
- aFe Oiling Agent
Step 1. Loosen Clamps and Disconnect Mass Airflow Sensor

The filter housing and main plastic tube end overlap each other and are secured in place by two T-bolt clamps. Loosen the bolts with the 12mm socket and driver.
While loosening one of the left clamps (the larger clamp) aids in this process, the clamp on the right (the smaller clamp) will need to be loosened enough so that it can be repositioned and left hanging on the plastic tube for easy reinstallation.
In addition to these clamps, the MAF Sensor should be disconnected. If more mobility is needed to make room for the removal of the air filter, disconnect the hose from the brass fitting directly to the right of the sensor.
Step 2. Remove Air Filter

Pull the entire plastic tube aside and remove the air filter for inspection.
Step 3. Cleaning the Filter

Remove any larger pieces of debris, such as leaves, and spray the Power Cleaner agent on the outside of the filter to thoroughly saturate it, but not drench it. After allowing the cleaner to sit for roughly 10 minutes, it will have broken down dirt and other particles without damaging the filter media itself.
The instructions then state to use a steady flow of water (e.g., soaker mode instead of jet mode on your hose) and rinse out the cleaner from the inside out, so as not to damage the media by pushing the now smaller particles from the outside in. Run water through it until it runs clear.

aFe recommends letting the filter sit and air dry (in sunlight is acceptable) instead of using other heating methods to speed up the drying process. This time takes around 45 minutes, depending on the ambient temperature.
Step 4. Oil Application
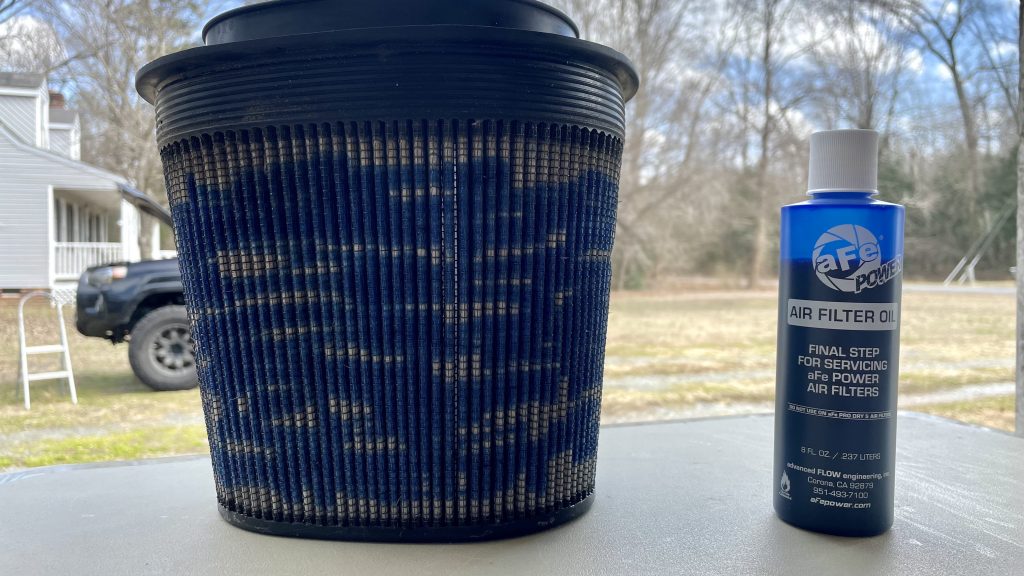
After drying out naturally, apply the blue oil agent all around the outside of the filter. You’ll notice that after giving it a few moments, it’ll spread across the filter element.
Wait for this spread to occur before applying more, as excess oil can reduce airflow through the media when in use. Dab the leftover spots with oil until they are covered in blue.
Step 5. Reassembly

With the main tube still pulled away, insert the filter back into the main housing. Move the main tube back into position and reposition the clamps to be tightened.

Once both T-bolt clamps are tightened, reconnect the MAF sensor and the hose to the brass fitting.
Final Thoughts

The filter can undergo multiple cleanings before the media begins to deteriorate naturally. I’ve not seen a visible change after only one cleaning. However, like an old shirt that always looks faded, even though it smells clean, the filter itself will eventually need to be replaced. Entire replacement filters can be bought directly from aFe when you start to see segments of media falling apart. Or, where oil doesn’t spread through properly, allowing for unfiltered air and debris to enter the intake.
At the stage of replacing the whole filter (since your mileage may vary), you’ll have a few options:
- Pro 5R filter (5 oiled layers of cotton mesh between a 100% polyurethane top and base)
- Pro DRY S filter (3 dry layers of cotton mesh between a 100% polyurethane top and base)
- Pro-GUARD 7 (5 oiled layers of cotton mesh plus two layers of synthetic media between a 100% polyurethane top and base)
I’m looking to keep my 4Runner running for plenty of years to come. There will be plenty of things that my service center will get to work on and attempt to fix that are beyond my abilities. The intake, however, after some research, is a feasible maintenance item for this DIYer.
Here’s a add on.
Great writeup, I’ve been meaning to do mine but haven’t gotten around to it. Seeing the pictures definitely helps show how easy the process is