
Prinsu Quick-Release Awning Mounts have been around for a number of years. They recently received a slight refresh with upgraded hardware to provide improved operation and usability of the butterfly clips.
Compared to the other awning mounts Prinsu offers, detailed a bit in the Prinsu Roof Rack Overview post, the quick-release mounts have a few standout benefits:
- Allows you to easily remove your awning on your 4Runner on days you won’t use it and put it back when you do.
- Provides access to portions of your roof rack that would be otherwise inaccessible with an awning installed full-time (say, when you have a rooftop tent installed).
- Provides clearance to mount your tent without having to keep it off-center, due to the low-profile nature of the mount.
This write-up goes over the assembly required, installation process, and trail review with my Eezi Awn Swift awning + GFC SuperLite rooftop tent.
Find It Online:
- 4Runner Roof Racks: Check Price
- Ridgeline Handles: Check Price
- Summit Handles: Check Price
Other Prinsu Accessories
- Awning Quick Release Bracket: Check Price
- Quick Release Awning Wall Mount (for easy storage): Check Price
- RotoPax Dual Mount: Check Price
- 4Runner Ladder: Check Price
- Shop all Prinsu Accessories: Check Price
Use code – TRAILCO – to save an extra 5% off! Usually stacks with any sale going on.
Table Of Contents
Overview

Source: Prinsu.com
The quick-release mounts come in two versions: Standard and Low Profile, with the Low Profile being one inch shorter overall on the awning mounting plate. The mounts are two connected halves, held together via bolts in a groove and butterfly clips. For added security, there is a location for a padlock or security/anti-theft nuts and bolts, making it more difficult to make a quick getaway with your awning.
According to Prinsu, as long as your awning’s bolting locations match up with either the standard or low profile, the mounts are compatible with your awning. They’re incredibly sturdy, made with 1/8-inch black powder-coated steel.

Source: 4wdcrew.com
I’ve found that my Eezi Awn Swift has an atypical bolt separation of about 3-1/4 inches. This made finding dimensions online necessary; 4WDCrew.com had this very helpful diagram above.
What’s Included

Mounting and Assembly Hardware:
- 8x Carriage Bolts (18-8 1/4″-20 x 3/4″)
- 8x Nylon Nuts 18-8 (1/4″-20 Course)
- 8x Fender Washer (1/4″ x 1″; black)
- 4x Rivet Nut (5/16″-18)
- 4x Hex Cap Bolt GR8 (5/16″-18 x 1.5″)
- 1x Tube of thread locker
Rivet Nut Assembly Tool Hardware:
- 1x Hex Bolt GR8 (5/16″-18)
- 1x Hex Coupler
- 4x Steel Washers (silver)
Compressing the Rivet Nuts Tools Needed:
- Two 1/2-inch ratchet wrenches
Step 1. Set Up the Rivet Nut Compression Tool

Ahead of putting everything on your roof rack, you’ll need to set and compress the four included rivet nuts. One rivet nut goes on each of the separate pieces of the mounts. Look over everything before you start, to make sure there is nothing damaged during shipping. Once that is done, you’ll need to assemble the tool used in the following order on the silver hex bolt:
- 2x silver washers
- Hex Coupler
- 2x silver washers
Including the washers helps ensure the rivet nut is properly compressed: They help to apply level pressure over the rivet nut and to create separation between the Hex Coupler and the bolt head for easier use when wrenching.
Step 2. Compressing the Rivet Nut

With the compression tool assembled, place your rivet nut into the individual parts so that the butt-end is facing away from where the two halves of the mount join. By hand, thread the tool until tight, and then use your two wrenches to begin compressing the nut. The wrench holding the hex coupler should be held still and in place compared to the mount itself, while the wrench on the bolt should be the one turned.
It’s critical to set the rivet nut properly and keep it completely flush throughout this entire process. The process can be awkward and might take a few tries to find the right angle of your wrenches that allows you to keep everything aligned without moving.
Rivet Nuts. Lessons Learned

On my first go, the rivet nut became unseated as I was fumbling with the tools, which I hadn’t noticed until it was being compressed outside of the mount, ruining it. Make sure, as things start to tighten, that everything is in place and the rivet nut has not moved.
I found that McMaster-Carr has the correct rivet nuts for sale and will ship a bag of 10 in about a day’s time. Websites like Amazon have 5/16 rivets for sale, but they’re narrower, have a smaller flange, and often do not provide the measurements needed to confirm ahead of ordering. Below is the part number you’ll need to order your replacement rivet nuts from McMaster-Carr. I recommend it in the event one ever becomes loose or you ruin one during assembly. As far as I can tell, this is identical to what comes with your order:
- 95105A151 – Zinc-Plated Steel Heavy-Duty Rivet Nut, Open End, 5/16″-18 Interior Thread,.027″-.150″ Material Thickness
Step 3. Setting the Hex Cap Bolt

The hex bolts help provide the support the awning needs between the two halves. They also help keep everything aligned when taking the awning on and off. To set the bolts, apply a thread locker to the upper portion of the threads and hand-tighten them into the rivet nut. Double-check fitment between the two halves, and adjust as necessary with both halves together and the butterfly clips closed correctly.
There should be enough of a gap that when putting the two halves of the mounts together, they fall into place. If you find yourself needing to use excessive force to get the parts together, loosen the bolt a bit; the thread locker will hold the bolt in place once set.
Thoughts on the Assembly Process

The assembly process can be a bit nerve-racking as there are no extra rivet nuts in your hardware kit. However, if you take your time, follow the instructions, and use the correct tools (no sockets!), then you should be fine. A bench vise, or something to hold the parts in place while you compress the rivet nut, goes a long way in ensuring things are done correctly.
I reached out to Prinsu to understand why they don’t install the rivet nuts before shipping. They wrote back stating it’s done to keep the brackets more cost-effective and may consider the option of assembly in the future. For those who are wishing for an out-the-door set of mounts, that would make mounts that much easier of a decision to buy.
Installation Guide
Tools Needed:
- 1/4-inch ratchet wrench
- Ratchet wrench to match your awning bolts
- T30 Torx bit (for the roof rack) and driver.
Due to the delay in getting my rivet nut replaced, I had to wait to get the install done while out on a trip (as you may have noticed the change in scenery). This also meant temporarily moving my rooftop tent to mount the brackets. You shouldn’t normally have to do this; however, if you’re adding an awning to your rack after having a tent, you’ll have to do something similar.
With assembly complete, it’s time to install the mounts to your roof rack. Review the mounting requirements of your awning, and look to select the crossbars that best meet those needs. For my Eezi Awn Swift, their installation guide states the mounts should be no further than 300 mm (~12 inches) from the edges of the awning.
Step 1. Insert the Carriage Bolts

The carriage bolts slide into the side of the crossbars to secure the mount to the rack. There are no relief cuts on the sides of the crossbars, only the top. With a T30 bit, unscrew the two bolts holding the crossbar to the frame. Make sure to hold on to the crossbar as the final bolt comes out so it doesn’t ding your paint as it falls.
Slide two carriage bolts into each side and screw the two T30 bolts back into the frame. Apply a small amount of the thread locker from your kit to keep them in place once screwed back in.
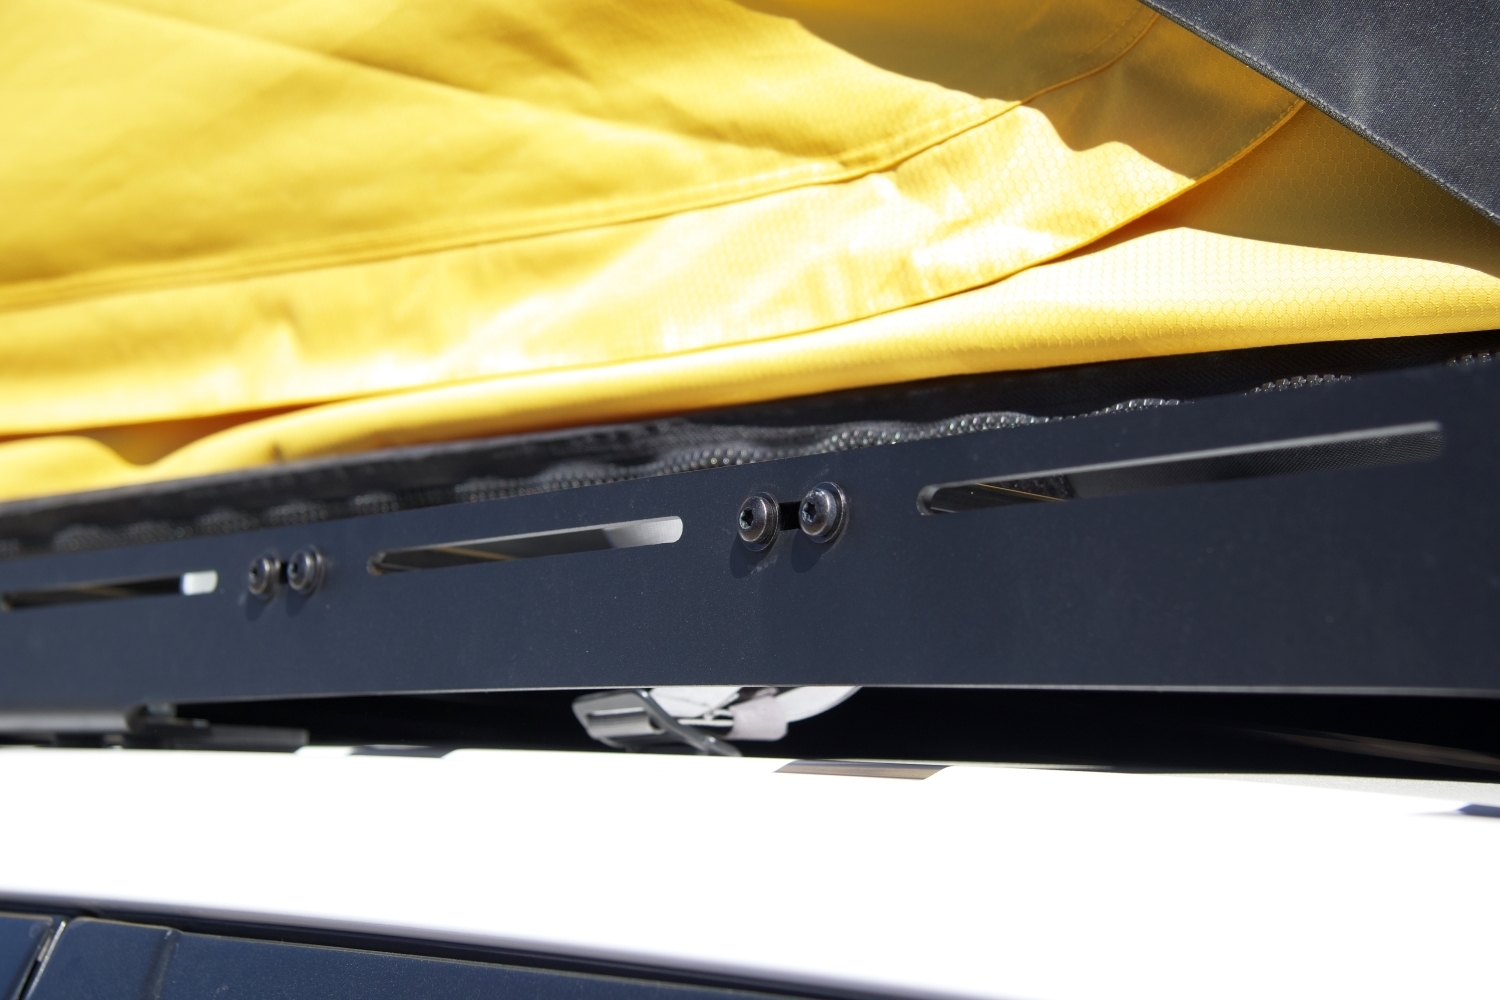
Step 2. Mount the Brackets to your Prinsu Roof Rack

With the tent moved aside, adjust the carriage bolts so that the mount can slip into place. Bring the bolts into the slots cut into the mounts, and place one 1/4-inch washer and 1/4-inch nylon nut onto each carriage bolt. I noticed there was a considerable gap between the sides of the mount and the crossbar, of about 1/4-inch. This didn’t seem like an issue at the time of installation.
When tightening the nylon nuts, make sure the gap is completely closed between the crossbar and mount. Make sure they don’t slip out from the grooves of the mount as you tighten.
Step 3. Attaching the Quick Release Mount to Your Awning

My Eezi Awn Swift only came with four nuts and bolts total. You’ll notice that the quick-release mounts have four locations to bolt to the awning on each mount. I may add additional bolts to the frame of my awning. In the meantime, I loosely attached two bolts diagonally to the quick-release portion of the mounts. Don’t tighten them all the wa,y as you’ll want to be able to make adjustments to the final location when first connecting the two halves.
Step 4. Mount Your Awning

With a friend helping out (if needed), connect the two halves of the mounts together. Make sure the bolts fit and sit in their proper resting place. At this point, the awning should support itself. Align the awning on the roof rack to where you’d like it to sit.
Step 5. Tighten Everything Up

With everything in place, go back and tighten down the bolts that hold your awning to the quick-release portion of the mounts. Apply a bit of thread locker if desired. If you’re only using two bolts as I did, double-check and make sure the alignment between the two halves of your mount is as close as possible. They should not have rotated before tightening the bolts.
Lastly, tighten the butterfly clips. There are two on each mount, one on each side. For me, three closed with ease, even within the confined space between the roof rack, rooftop tent, and awning. The fourth was very difficult to close.
Thoughts on the Installation Process

The installation process was a breeze and took little effort. I found it odd that the mounts themselves had such a large tolerance between them and the crossbar, and also that the butterfly clips varied in their ease of closing. After spending some additional time looking everything over and running through the installation process again, I found a couple of issues:
- The portions of the mount that connect to the crossbar flexed a bit when tightening down the 1/4-inch nut. The sides and face of the mount all flex slightly as it conforms to the 2″ width of the crossbar. Looking at the photo above, a slight bend of the face can be seen.
- The gap between the two face plates created by the flanges of the rivet nut did not allow for a completely flush mounting condition, which may have also affected my chances of closing the butterfly clips easily.
To test this, I unscrewed the 1/4-inch nylon nuts just enough that the mounts were free to expand back to the 1/4-inch gap I mentioned earlier. The butterfly clip closed without issue. Tightening the nylon nuts back down fully, opening the butterfly clip, and trying to close it had the same initial result of being very difficult to close.
Trail Review

Already being in the mountains for the weekend, I was able to immediately see how everything worked out. Having installed my GFC Superlite and the brand’s respective quick-release mounts ahead of placing the awning, I realized that many awning brackets would require me to completely remove the awning to get to two of the four release points. This was a huge benefit and ultimately the reason I bought these awning mounts.
The mounts are strong and have no issue supporting my 35-lb Eezi Awn when open. I still like to utilize the legs of the awning as it was a bit windy, but I noticed no bending or sagging after a few hours of having the awning open, supporting itself. With everything secured in place, removing and reattaching the awning was an easy one-person job. The hex bolts make for generous targets when wrangling the awning in and out of place.
Heading home, there were 6 miles and 2,000 feet of elevation to cover before hitting the pavement. I could hear a loud noise as I crossed over ruts, washouts, and large boulders. The only thing that had changed from the way up the mountain the day prior was the installation of the awning. I narrowed the noise down to the Prinsu Quick Release Awning Mounts.
Once home, I inspected everything and noticed that three of the four butterfly clips had also come undone, leaving one still secure. I didn’t feel that I sent it down the mountain, but I think the weight of the awning may have stressed out the butterfly clips to the point of opening. Once again, we shut all of the clamps and tried again with the fourth clamp (to no success), and we headed out for some chores. The loud rattling noise heard on the trail is thankfully not as noticeable during road driving, only heard when pulling out of mall driveways or hitting speed bumps.
Working with the vendor I purchased the mounts from, Prinsu, sent out a full replacement of the mounts; great warranty and customer service! On the second pass of the entire process above, I found that the mounts came together more easily. The butterfly clips all closed with relative ease, although the same 1/4-inch gap was noticed between the crossbar and mount. I fixed this by using some spare washers between the crossbar and the mount. I’m hoping this will also fix the noises I’ve heard while on the trail with a full replacement. I’ll follow up with a quick edit from my next time out.
Final Thoughts

The Prinsu Quick Release Awning Mounts are a great idea and fit my needs perfectly. They allow me to run both my rooftop tent and awning without compromise, leading to a very clean-looking roof setup. The assembly and installation process is straightforward, and with a small amount of improvisation, comes together easily within about 30 minutes.
Being able to keep my awning (and tent) off my 4Runner as my daily driver helps with gas, peace of mind knowing they won’t be stolen or damaged, and that it’s only a few minutes before I’m weekend-ready once again.
The two areas I hope to get another look at are the rivet nuts and the gap between the mount and crossbar being reduced. I think that would result in a better overall assembly experience. I did reach out to others who have this setup, but with a lighter/smaller awning. Ultimately, your mileage will vary depending on the precision of assembly, the weight of your awning, and your style of driving. Working with both the vendor and Prinsu, the warranty process was effortless and something I can’t speak highly enough about.
Thanks for reading! Do you have the same awning mount? Did you face any of the same issues I did? Let me know if there are things that I can do or try with the buttery clips or rivet nuts.
Thank you for the detailed and useful review. I have a Prinsu Universal Rack on a Tundra with shell, and a Overland Vehicle Systems HD 270 awning. I think my awning is ~ 70 lbs and likely too heavy for these Prinsu Removable mounts, unfortunately. Any thoughts on that, sounds like the weight of your awning was at the limit of the removable mounts?
Those awnings are a bit more serious. The awning I have is just about 26 lbs, so 3x that would put a lot of stress on everything. I’d probably feel comfortable if I ran 4 instead of just 2 mounts for something that heavy.
The awning is definitely awkward to take off and put on, so I always do it with a second person after having lost my grip on it once.
I am sure there are probably some beefier options out there, but I know finding the right mount for your setup can be a process.
I’m curious if you used the standard or low mount for your set up. I’m struggling to decide what is needed for a similar setup on my car.
Hi Lucas! I needed go with the standard version as my awning required mounting locations that was taller than low pro option. It depends on your awning and the separation between the top and bottom bolt locations.
Thank you sir. Wish I’d found this before totaling my rivet nuts 😂
Happy to help 😛
Nice to have a few on spare if they get magnled while out and about.
Would love this, but I’ve been waiting since February for it with no ETA from my vendor as of last week (was initially told six weeks).
I’ve also attempted to reach out to Prinsu a couple of times so see what’s up. They never got back to me. I almost regret buying their rack now based on their lack of CS.
That’s no good. I bought through 4Runner Lifestyles in April and got it with in a few weeks, plus no tax/shipping.
Back in February they were sold out/not available as Prinsu was making the design changes that I spoke about at the top of my article.
Love your mini-bio! Also love how thoroughly you detailed the process, the equipment, and the various experiences you had with all of it. I feel like we couldn’t get a better report.
Thanks Maureen! I Appreciate it.