
Budget Overlanding – What To Consider If You’re Living in Your 5th Gen 4Runner for Months
When you browse through Instagram, Trail4Runner.com, or any other social media, you are constantly bombarded with 4Runners that have all the latest equipment.
While I would love to have some of the things I see other people with, money doesn’t grow on trees, so in this article, I am going to discuss some more budget-friendly overlanding options and compare the costs of some inexpensive and expensive options.
It’s important to think about what you are going to use the vehicle for. For my personal use case, I wanted to take a snowboarding trip for two months and equip my car to be lived in for days at a time but wanted the car to still be able to be used as a daily driver. I hope some of these options make it easier for you to get out there and explore, whether it’s for a weekend, a week, or a year.
Budget Overlanding: What To Consider
Keeping Food Cold: Cheap Cooler vs Roto-Molded Cooler vs Electric Fridge

The first option is to only pack food that doesn’t need to be cold, but assuming you want something besides backpacking meals and trail mix, read on.
If you only plan to go out for the weekend or maybe three days then you can probably get away with either a cooler that you already have, or buying a cheap popular brand at your local Walmart or any other store. These can run anywhere from $30-$100.
For example, if you find yourself going out for longer or you are going out in very hot weather and your ice you can go with the next most expensive option, a roto-molded cooler. I decided this was the option for me as I wanted to keep food for a week.
Popular brands here would be Yeti, RTIC, and numerous other very similar brands. I personally went with YETI after having an issue with the RTIC cooler I ordered. It was $299.99 for a YETI Tundra 45, with 10% back buying it at REI, compared to $199.99 for RTIC. I found the YETI sufficient to keep food cold for a week. The downside was having to deal with melting water, which if you drain out causes the ice to melt faster. This can be solved by using a bag to put ice in, or keeping all your food water-sealed.
The next option would be an electric fridge from a brand such as Dometic. One of their popular versions, the CFX line can run from around $700-$1500, with additional equipment such as fridge slides, and some way to keep the fridge powered – like the popular, yet expensive Dometic PLB40. If you find yourself going on very long trips, and have a way to power the fridge already then this might be the option to consider for you.
Quick Summary:
Eat Dry Food: $0; Cheap Cooler: $30-$100
- Example: Coleman Cooler
Roto Molded Cooler: $200-$350 + ice bag(depending on brand/size)
- Example: Yeti Tundra 45
Electric Fridge: $700-$1500 + slide + power
- Example: Dometic CFX3 45
Sleeping & Storage: Sleeping Inside vs Rooftop Tent vs Drawers/Bed Setup Inside

The cheapest option here is to get any type of camping pad, lay it down over the collapsed rear seats, and store all your things next to you as best as you can organize them. Unfortunately, the 5th Gen 4Runner isn’t completely flat, and having my things all next to me in a disorganized mess didn’t sound good to me.
I personally love the look of a well-built 4Runner with a rooftop tent but I had to ask myself the question, am I going to really use it? For me, ultimately, the answer was no for a few reasons. I was planning on sleeping in winter conditions, and being inside in more protected from the wind. Also, you can run the car if needed for heat, without any additional heating source. Another reason is I wanted to have drawers in the back for storage as well. I came across the Goose Gear Drawers and Sleeping Platform, but at $419 and no ability to fold the platform back to get the seat there, I wasn’t satisfied.
I decided to build my own, came across some plans from SolidWoodWorx on Trail4R, and ended up buying his plans for $40.
There are many other options for other low-profile DIY drawer systems and DIY full-size sleeping platforms for the 4Runner but at the end of the day, the SolidWoodWorks design fits my needs best.
The plans required:
- 2 sheets of pine plywood for $100
- 150-lb 36” drawer slides from SolidWoodWorx for $170
I used screws and some additional wood I had from other projects and borrowed tools to complete the project. I added a folding piece of plywood that folds back so that I could use the seats and removed just the bottom of one seat for extra headroom.

I am 6’0 and fit with a few inches of space. Although I am not a good woodworker and could improve the design slightly, I now have drawers and a bed inside that folds back for a total cost of about $320.
Of course, if you plan on only sleeping in warmer climates or have a good solution for heating a rooftop tent, then that might be a good option. They can range in price from about $1200-$4000, and some may require a roof rack or other mounting hardware. This might free up enough space inside that no additional storage options are required.
Quick Summary:
Sleep with the seats down: $0; Build drawers and sleeping platform: $320 + time + tools if needed
- Dual Drawer System – Check Price
- Dual Drawer System w/ Sleeping Platform – Check Price
- Turnbuckles
- Drawer System Carpet
- Carpet Spray Glue
- Wood Sealant
- Bed Liner
- Folding T Handle Latches
- Drawer Organizers
Rooftop Tent: $1200-$3750 + Mounting Equipment
- Thule Tepui Explorer Kukenam 3 Tent: Check Price
Lighting: What is really necessary?

Exterior Lighting
For exterior lighting, I opted to not upgrade any of the lights of my 4Runner. I found this to be a mistake. The stock headlights on the 4Runner are notoriously bad which made visibility on trails at dusk and nighttime very hard, and visibility in the snow at night not optimal. There are many options for lights that have been written about but I think a headlight upgrade is definitely worth the investment and at the bare minimum an LED bulb upgrade. I personally went with the cheapest and easiest option of upgrading my halogen bulbs for around $30, after the conclusion of my trip.
A step up from that would be LED or HID bulbs for $100-$200; something like the VLEDs or a Xenon Depot bulb. If you plan on doing a lot of wheeling at night, then you might need to look into more off-road focused lighting, but for me, this could wait.
Interior Lighting
For interior lighting, I chose to use lanterns and a headlamp that I already had for camping and backpacking purposes. There are many cheap electric lanterns that you can use to light up the inside of your 4Runner. I personally found that I didn’t really need too much light at night inside of the vehicle. You could also upgrade the interior lights to LED, but I wanted to avoid this so that I did not have any chance of draining the battery. Ultimately LED interior light bulbs are probably worth it considering their relatively low cost.
Quick Summary:
Exterior
Upgraded halogen bulbs: ~$30
- Philips Automotive Lighting H11 X-tremeVision: Check Price
LED: $100-$200
- VLEDS Micro Limited H11 LED Fog Light Bulbs: Check Price
- Lamin-X Yellow: Check Price
- Lamin-X Amber: Check Price
- Lamin-X Clear: Check Price
Interior Light Kit
- Full Interior LED Kit: Check Price
- DE3175 (x3) – Check Price
- 168/194 (x6) – Check Price
- 194 (x2) – Check Price
- Don’t forget the pry tools: Check Price
Power Options: Power Bank vs Solar Power vs Second Battery

Power can be important on a long-term trip, whether it’s to charge your phone, your laptop, camera, or other batteries. It’s important to assess your personal power needs.
For me, it was to just charge my phone, with occasional laptop use. If you are working on the road and need a laptop often, or have camera equipment, then you might need a more elaborate power solution. A small note, for my Pixel 5, the 4Runner’s built-in USB port does not seem to charge as well as a wall outlet, and neither does a cigarette lighter charging adapter.
The first option is to use a small power bank from Amazon that ranges from $20-$100; you may have one lying around the house.
The next most expensive option is something like a Jackery Power Station, Goal Zero Yeti 0r the Dometic PLB40, these will have much more battery storage and more output, depending on the model you need. I decided on a Jackery 240 Power Station because it has plenty of battery for just my phone and probably enough for a phone and occasional laptop use. It also is equipped to be able to use solar panels to charge it if I decide to go this route in the future. It was $200 and did everything I needed it to, including keeping the battery at very low temperatures.
The most expensive step would be a second battery or solar power. If you are truly going to need a lot of power, are planning on longer stays, or are running an electric fridge these options could be good for you. A second battery kit can run about $500-$700 and a battery can run $200-$300. A solar panel setup can vary greatly but panels, solar charge controller, inverter, wiring, and other equipment may be necessary, as well as a battery to charge. All of this can run you from $500-$1000 easily, plus the cost of the battery.
Quick Summary:
Small Power Bank: $20-$100
- Anker Portable Charger: Check Price
Power Station: $150-$500
- Jackery Portable Power Station Explorer 240: Check Price
Second Battery: $700-$1000 total
- Toyota 4Runner Dual Battery Kit: Check Price
- Odyssey 25-PC (X2): Check Price
- Optima Yellow Top Deep Cycle Battery: Check Price
- Toyota 4Runner Auxiliary Battery Tray: Check Price
Solar Setup: $700-$1300+
- Renogy 200W 12V Monocrystalline Solar Premium Kit: Check Price
Water Storage
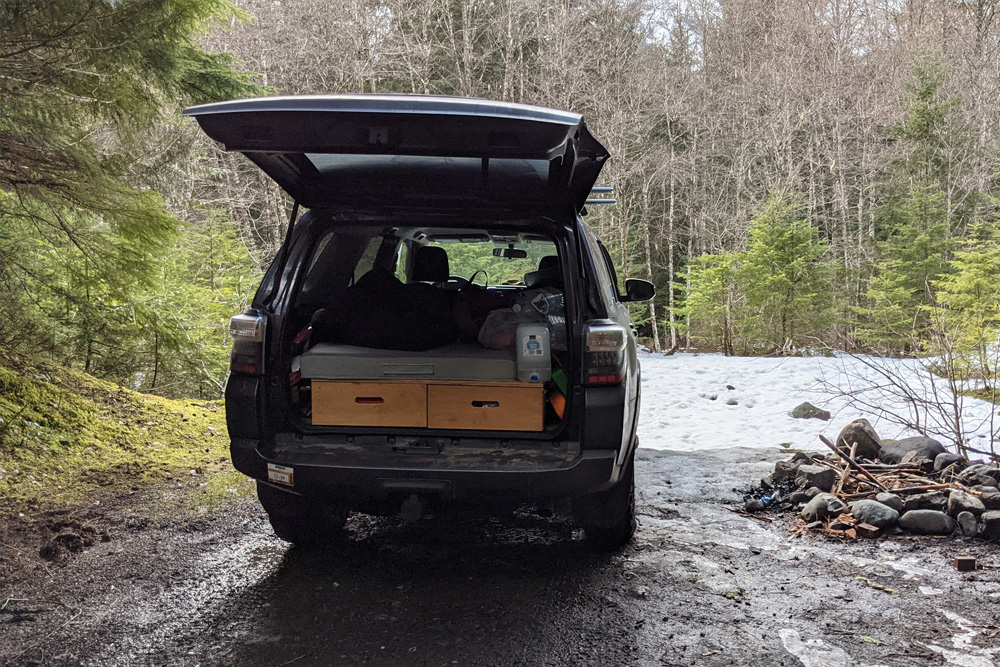
Notice the 3-gallon water container to the right of my bed.
There are a lot of options for water storage ranging from buying 1-3 gallon containers and putting them anywhere, buying a five-gallon container, or a water jerry can attach outside or stored inside somewhere. They all work for storing water with varying prices, storage capacities, and convenience.
I personally was traveling during the winter, with below or near-freezing temperatures almost every night. This led me to have to refill water at a ski resort or buy water when I stopped for groceries because storing large quantities of water was difficult.
The next option would be a large container. These can be found relatively cheap for $10-$40. If you know a good place to fill it up or are only heading out for weekends, then this option could work great for you.
If you are pressed for space, or already have a place to mount a water jerry can, then this would be the option for you. They can run about $55, and you also may need mounting hardware to secure it to the vehicle.
Quick Summary:
Buying Water: $1-$2 a gallon
- Great Value Spring Water, 1 Gallon
Large container: $10-$40
- 4.9 Gallon Portable Water Container: Check Price
Water Jerry can: $55 + mounting hardware
- ROTOPAX 1.75 Gallon Water Pax: Check Price
Final Thoughts

I hope this article has made you think about some of the options available to you, and how much you want to spend in certain areas. I kept the subjects in this article focused on equipment needed for living out of the car, and not upgrades made directly to the vehicle. Note that these may be required or useful for some purposes. There are many good articles to browse in that regard.
Also, note that the examples listed are just examples to give a general range of some of the options. If you know of any good alternatives or a cheaper-priced option, don’t hesitate to let me and others know!
Lastly, I hope this convinces some people that they can afford to get out there without all the latest and best gear, depending on their needs.
Thank you Max. I’d just like to point out something about your comment on interior lighting. LEDs use less power than regular bulbs and generally put out more light.