
DIY Full-Sized Sleeping Platform Build For the 5th Gen 4Runner
Ground tents are great and rooftop tents are also great.
But ground tent season is shockingly short here in Upstate New York, and my apartment doesn’t have a garage, so I have nowhere to store a rooftop tent when it can’t be on the roof of our 4Runner. So, shortly after getting our 4Runner, it was decided that sleeping inside would be the best course of action.
Unfortunately, the 4Runner does not come with a flat load floor. There is about a 2″ step from the rear cargo area up to the back of the seats when folded forward. Not enough to be a deal-breaker in an emergency, but more than you could make up for with even a thick sleeping pad.
This means some sort of platform is necessary, a way to give you a flat sleeping surface. At first, I was going to build something simple like Miguel’s DIY Sleeping Platform, just big enough to make up the 2″ step and provide storage for small items like a jump box, gloves, and maybe some shackles.
But the more I thought about it, the more I realized I wanted something a little different, similar to Ethan’s DIY sleeping and storage platform; however still a little different. While low-style platforms like Miguel’s offer an adequately sized space for one person to sleep, the narrow section between the rear wheel wells and the length lost to the folded-forward seat bottoms make for cramped quarters when you’re trying to fit two in the back. Not particularly a problem when I’m camping with my wife, but perhaps a bit too intimate a space to share with others.
So something different was necessary, but what?
Must-Have Features For My 4Runner Sleeping Platform
 Storage under the complete 4Runner Sleeping Platform
Objectives
Before settling on a design for my 4Runner sleeping platform, I scoured the web to see what other people have done to get an idea of what works and what was possible. I saw everything from custom-fabricated drawer systems built to maximize storage versatility to extremely budget-friendly options that looked a bit more spartan than I wanted.
Eventually, I identified some key features I wanted in my 4Runner sleeping platform:
#1. Convertible Design
Because it is also my primary vehicle, I wanted to make sure the 4Runner sleeping platform didn’t interfere with the “regular” use of the vehicle. That means when not in “camping mode”, I needed full use of the rear seats, as well as access to the cargo area in the back. The design I settled on does leave a platform in the back of the vehicle at all times, but in practice that simply provides more private storage underneath (where I store my recovery gear, camp chairs, and a few other essentials that live in the 4Runner full-time) and easy access storage options up top.
#2. Ease of Conversion
Removing the seats wasn’t an ideal solution, but doing so allows for a lot more headroom, and it’s fairly easy even if you’re converting on your own. In order to get used regularly, this 4Runner sleeping platform needs to be easy to use. So it is possible for one person to convert the 4Runner into camping mode, though of course, it’s easier with two people.
#3. Construction
I’m comfortable with power tools, but I simply don’t own many. So I wanted something that I could build using what I already had: a cordless drill, a circular saw and standard household hand tools.
#4. Comfort
If this didn’t wind up being a nicer place to sleep than a tent, the whole project would be pointless. So I wanted space, stability, and warmth.
#5. Price
If money were no object on a project like this, I would have bought a house already. And that house would have a garage, where I could keep my rooftop tent when I’m not using it, making the whole project pointless. So keeping things wallet-friendly was important.
Keeping all of those in mind, I settled on a design that puts a semi-permanent section of the platform in the back, designed to bear most of the weight while sleeping and to stay in the vehicle full-time. Then to convert to camping mode and install the full-length 4Runner sleeping platform, a second platform would be brought in, supported by its own legs in the front by a lip on the semi-permanent section at the back.
Tools and Materials
- Lumber
- Platform Plywood
- 2x4s
- 2x6s
- Woodscrews
- Exped MegaMat Duo 10 sleeping pad: Check Price
- Waddell Ash Classic End Table Leg (1.625-in x 17-in): Check Price
- Waddell Ash Square End Table Leg (0.625-in x 15.25-in): Check Price
- National Hardware 1/4 x 7-1/2 Aluminum/Steel Hook And Hook Turnbuckle: Check Price
- Stainless Steel Screw Eyes: Check Price
- Sugatsune Stainless Steel Entry Door Night Latch: Check Price
- T50 Heavy-Duty staples & Gun: Check Price
- Water repellent upholstery canvas: Check Price
- Circular saw
- Cordless drill
- Basic shop tools
Material Selection

View of the fully assembled platform before installation in the 4Runner.
Lumber
With a design in my head, the next consideration was materials.
The most important part of a 4Runner sleeping platform is of course the actual platform. Something like an MDF subfloor would obviously provide stability at a low price. But it’s disappointingly heavy; not ideal for the semi-permanent part of my platform, and a real problem for the convertible section. On thinner laminated pieces would of course weigh less, but they lack the stiffness necessary for a stable and durable platform. So I split the difference, going with a plywood sheathing, which provides the structure I need without much unnecessary weight.
To reinforce the platform, and to provide the structural support where the front section meets the back, I needed more wood. Three sides of the front and rear platforms are framed by 2x4s. Then I used a 2×6 to reinforce the fourth side of the rear platform as well as to support the back section of the front platform.
Lastly, I could have used more 2×4 as the legs and really saved money. But in the interest of simplicity, and easy installation and removal, I went with pre-made screw-in legs. Four of THESE cut down to 9″ for the rear, and then two of THESE for the front section.
Hardware
The most used hardware in this build is woodscrews. I used ones from the box I bought five years ago that somehow still hasn’t run out yet.

The back section of the full-length 4Runner Sleeping Platform is held in place using turnbuckles on either side.
But the most important hardware might be the two turnbuckles near the rear liftgate. Attaching the rear of the platform to the 4Runner’s cargo tie-down D-rings does two things. Most importantly it keeps the platform from lifting up when the front section puts pressure on the lip supporting its back end. But they also stabilize the rear platform while driving, reducing rattling and bouncing, which is good for the platform, the 4Runner, and my sanity while driving.
 Installing the latches
After the first test-run sleeping on the platform, I also added two spring-loaded latches (like THIS) to join the front and rear platforms together more securely. They provide just enough tension to keep everything in place while climbing in or out of the 4Runner.
After that, some standard Arrow T50 Heavy Duty staples to attach the upholstery.
Speaking of which, here is a look at the fabric.
Textiles
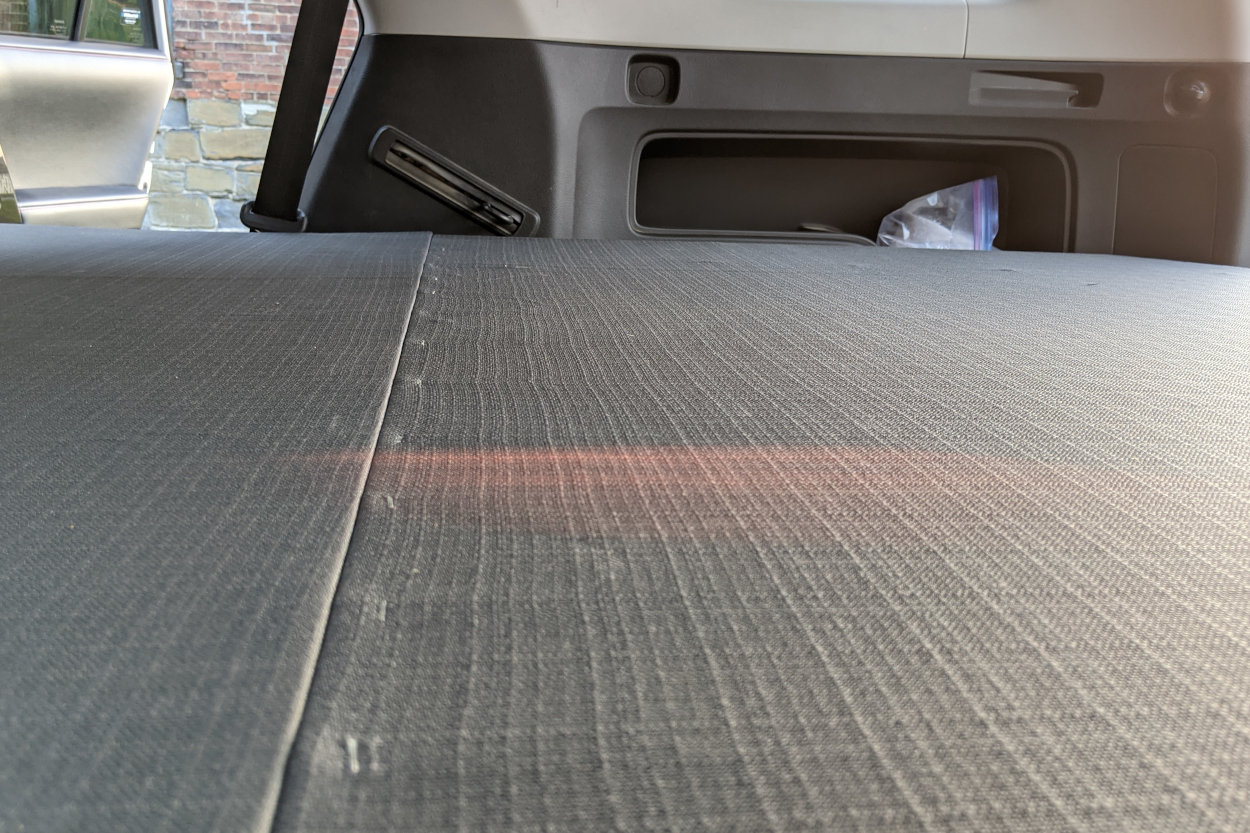 Close-up of the seam between the front (left) and rear (right) platforms, highlighting the upholstery canvas used to cover the platforms
A lot of 4Runner sleeping platform builds use acoustic felt, the kind of stuff used to wraps speaker boxes in. And it is a great option, being cheap, light, and moderately durable. Plus the look blends in easily with most black interiors. But speaking from personal experience, it gets dirty easily and is very difficult to clean. So my original plan was to take a page out of Miguel’s book and use outdoor carpeting. A bit more weight; but super durable and vacuum-friendly.
But before I bought anything I found some water repellent upholstery canvas on sale at Jo-Ann Fabric. Originally designed for patio furniture it should handle durability and cleaning with ease while weighing much less and easier to work with than carpet.
Tools
As mentioned above, I planned the design of this 4Runner sleeping platform to only require tools that I already owned. Specifically, a circular saw, a cordless drill, and ordinary hand tools.
I did cheat slightly though. I could not fit the full-sized 4×8 sheathing in the back of my 4Runner, so I had them cut down to the width I needed after purchasing. My Lowe’s provides that as a free service (their panel saw made quick work of it), so that was a simple decision.
Construction Process
Dimensions

By building my platform above the rear wheel wells, removing the seat-bottoms for the rear seats, and pushing the front seats forward a bit, I gave myself a working area that was 52″ wide and 80″ long. Almost the exact size of a standard full-sized bed (and my Exped MegaMat Duo 10 sleeping pad, but that’s a different column.)
I made the back sections of the 4Runner Sleeping Platform 39″ long, as that left enough room (with the lip) for the rear seats to still function properly when the front section wasn’t installed. I did have to give up the recline feature in the rear seats, but that’s a sacrifice I was willing to make.
That leaves 41″ for the front section, which is more than I would have liked when I was designing this platform. But in practice, the length isn’t’ an issue, and the lip attached to the back section provides plenty of stability once I added the latches.
For the reinforcement on the underside, I stuck with a 40″ width as that is the amount of space between the wheel wells. I put my platform just above the wheel wells, so by keeping the framing inside that space I avoid any contact and rubbing between the platform and the vehicle that could potentially damage either one.
Important Note
My 4Runner is a 2017 TRD Off-Road and I don’t have the sliding rear cargo tray, so I can only say with certainty that these dimensions will work for you if you too have a 2017 TRD Off-Road and don’t have a sliding rear cargo tray. But to my knowledge and experience, these measurements should be universal for any 5th gen 4Runner. Except of course the legs if you have the tray.
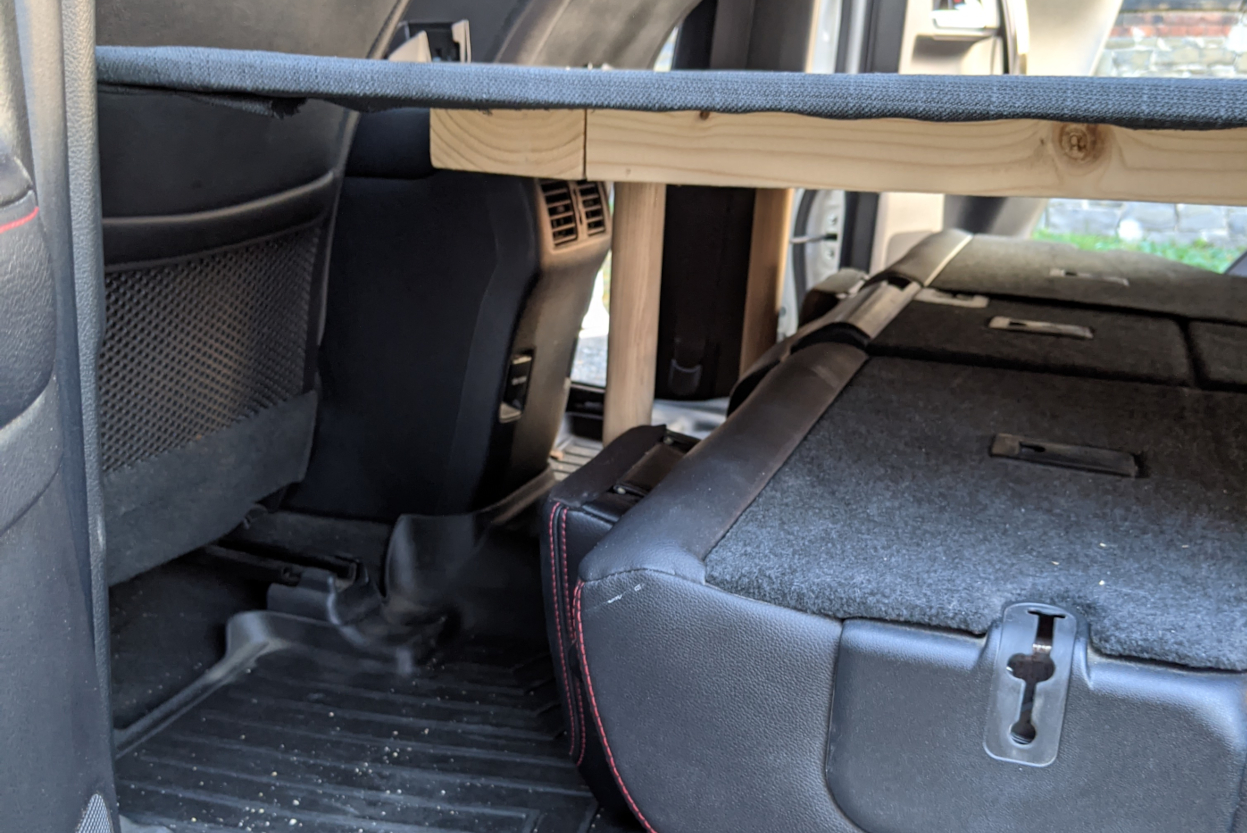
Assembly
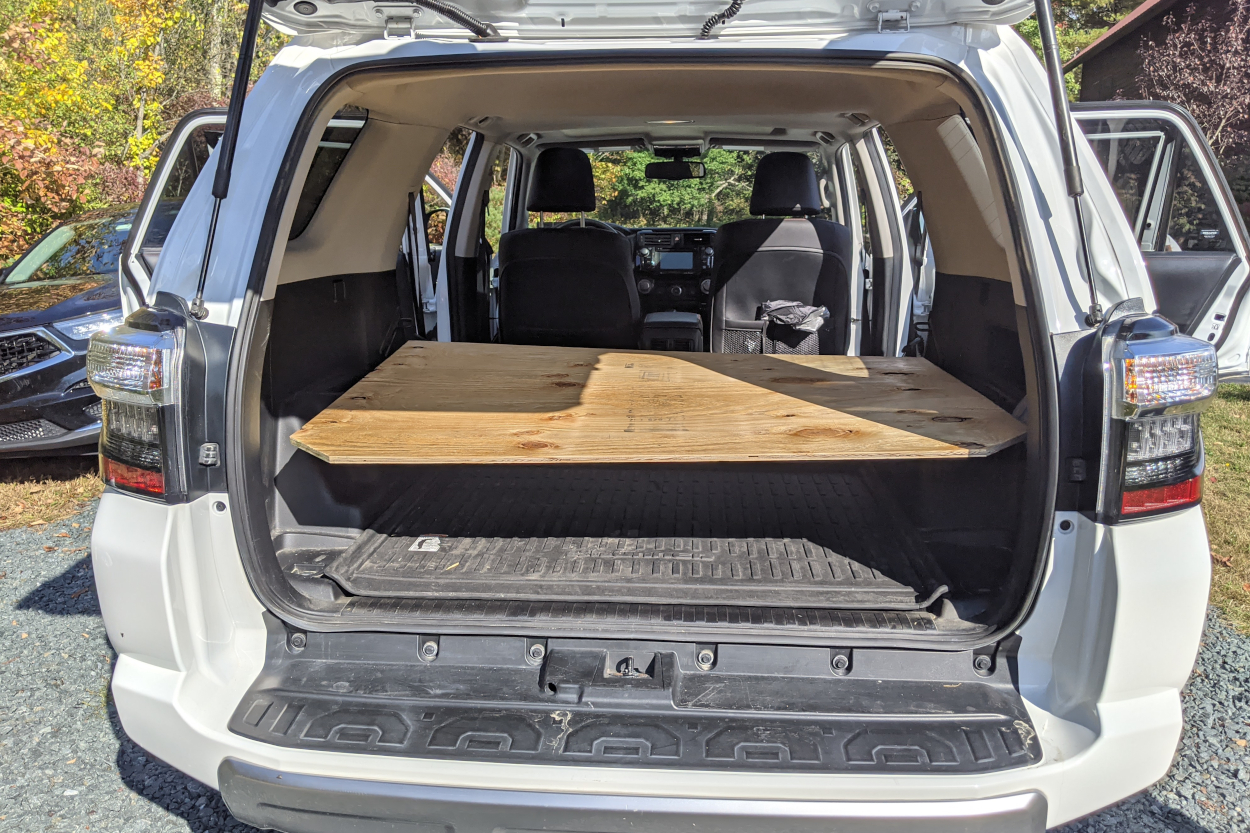 Test fitting the rear section before framing the support.
As discussed, I cut the sheathing to size before I ever left Lowe’s. But there was still some trimming left to do, specifically the rear-most corners of the back section. By cutting approximately 3″ of the corners off at a 45-degree angle, the platform was able to sit closer to the rear hatch. (Look back at the picture of the turnbuckle above to see what I mean.)
After that, I attached the 2x4s and 2×6 to the sheathing using wood screws. I screwed down from the top to ensure there wouldn’t be any tips poking through the top to deflate my mattress. I used some simple bar clamps to hold the wood in place, and countersunk pilot holes before screwing everything together.
Upholstery
 Mounting the 2×6 before installing the canvas
Once that was done, I gave the surface of the 4Runner Sleeping Platform a quick sanding with medium-grit sandpaper. Nothing serious, just enough to remove any splinters or high points. This made it easier to spread the canvas over top. Held in place with bar clamps once again, I flipped the platform over and stapled the material on all sides, a few inches from the edge.
The only exception to that method was the forward edge of the rear platform, where the 2×6 lip supports the front platform. I could have upholstered the platform before attaching the 2×6, but that would have left the screw heads exposed and made it difficult to reupholster the platform in the future if necessary. So, instead, I decided to staple that edge on the top of the platform. This does leave the staples exposed, but after covering them with an additional layer of fabric and duct taping it in place this hasn’t caused any problems.
Next having the whole platform outside of the 4Runner made it easy to mount the spring-loaded latches. A precision fit wasn’t necessary, I just lined the platform panels up, upside down on the ground. I then mounted the body of the latch and then placed the hook on the other panel, ensuring a secure hold even if the latch wasn’t squarely installed. Likewise, the eye hooks for the turnbuckles were pilot-holed then screwed in near the rear corners.
Support
 Preparing to frame the rear platform
Lastly, the legs. By using pre-manufactured legs and cutting them to size, installing the legs for the platform was as simple as mounting the plates (four screws each) and screwing in the legs. Currently, the front two legs are inside the rear seat’s headrest. I did that to leave easy access to the storage in the back seat footwell, though it does contribute to some instability on the front corners. Eventually, that may bother me enough to move the legs to the outside of the headrests, or compromise and simply take the headrests out when I remove the seat bottoms. But for now, the spring-loaded latches work just fine.
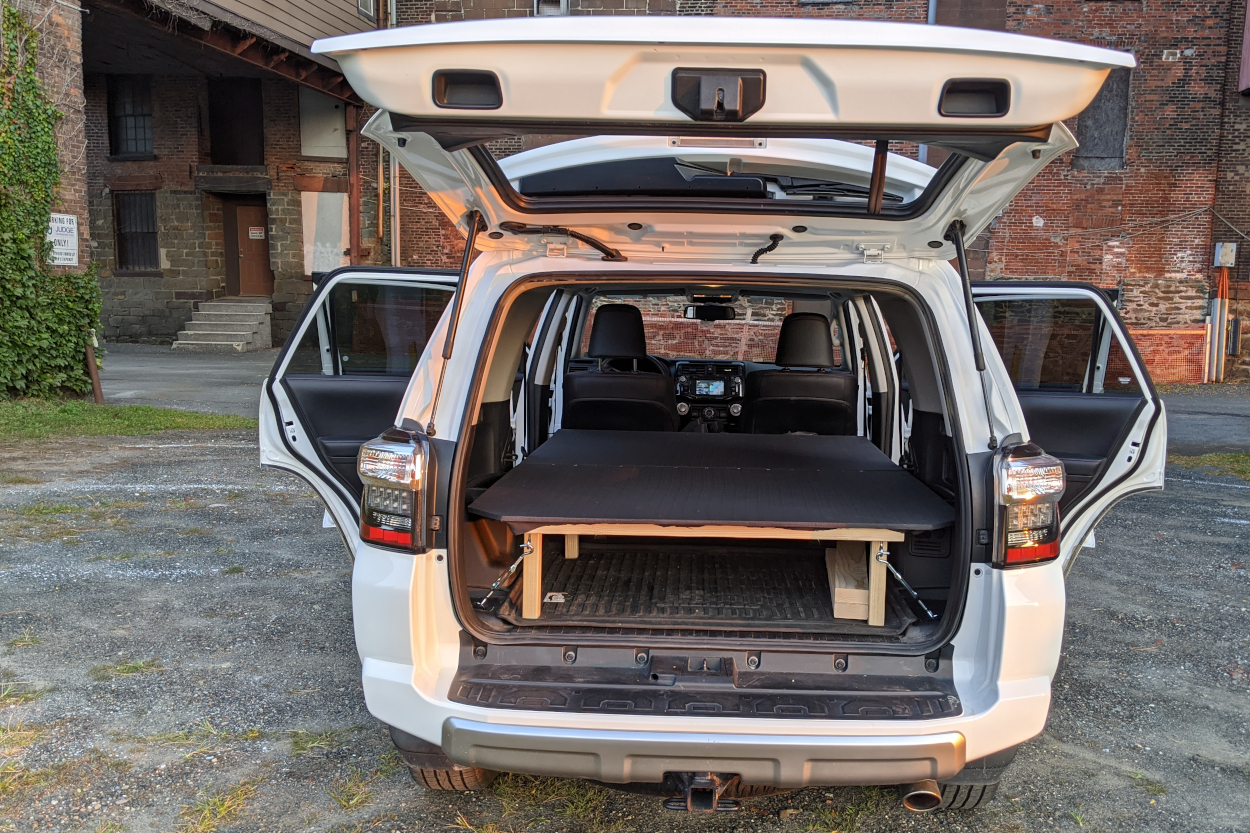 Assembled 4Runner Sleeping Platform installed in the vehicle
Putting the platform itself in the 4Runner is fairly simple. The trick is you install the whole thing through the rear doors, not the hatch. After removing the rear seat bottoms (just two 14mm bolts on each side) simply slip it upright through one door, then lie it flat resting on the wheel wells while screwing in the legs. Then repeat the process for the front panel.
4Runner Sleeping Platform Results

After all the planning and a little bit of work, it feels extremely good to say this 4Runner sleeping platform turned out as good as I had hoped.
It’s (near as makes no difference) the same size as a full-sized bed, allowing two to sleep comfortably with more room than you’d normally get from a two-person tent. There isn’t quite enough room to sit upright, but even with the mattress there’s plenty of room to move around and it never feels cramped. The “convertible” design works exactly as intended, allowing one person to quickly and easily convert the vehicle into a camper.
Final Thoughts
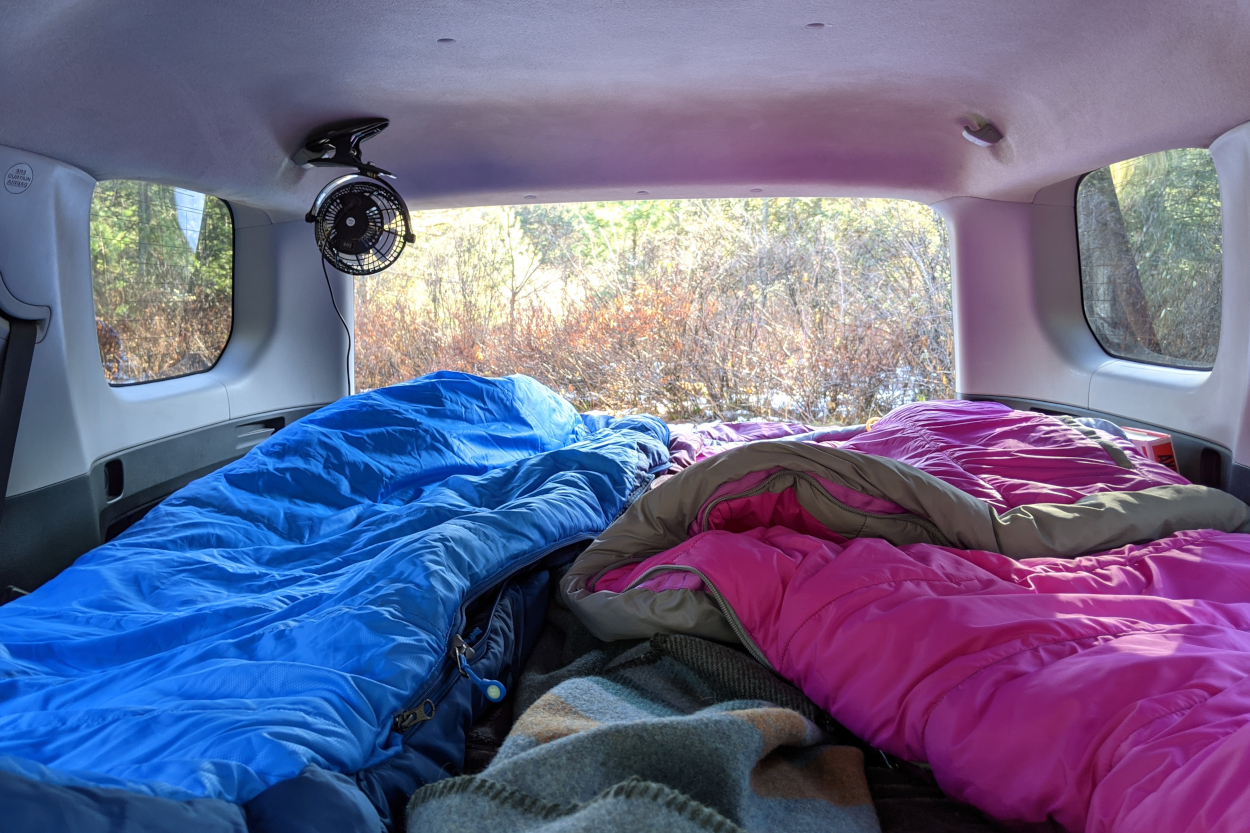 View from inside
It’s worth pointing out that it isn’t perfect though.
In order to get the full length I wanted, the front seats need to be moved pretty far forward when installing the front panel. While the 4Runner is drivable with the seats that far forward, it’s not exactly comfortable. Which means disassembling the bed every morning, and putting it back together when you next make camp. In these situations I just remove the legs and slide the front panel on top of the rear, securing it with a ratchet strap if I’ll be driving any distance.
While not as simple as waking up and driving, it is a quick and simple conversion that is still quicker and easier than packing up a ground tent, or even folding and covering some rooftop tents.
The current setup allows for easy access to under-platform storage, though I may move the legs outwards if stability becomes an issue.
At some point in the future, I may build drawers under the rear panel, though right now it’s simple enough to just pack what I can underneath. Plus the privacy lends peace of mind when storing items like recovery gear or other valuables in the vehicle.
Awesome write up, thank you for the helpful info! Now I feel prepared enough to tackle this project myself.
Great build! I am working on doing something similar.
My plan is similar except that I plan to split the second 41″ piece into 2 with a hinge mechanism joining the 3 pieces. The plan is for this piece to sit in the cargo area with the front section folded up. And unfold when the row is folded down.
With 2 people however there is little place for the Fridge. We are having to move the Dometic 35 and a Roam storage box from the rear tailgate to the driver and passenger seat respectively every night!
Did you remove the seat bottoms? That does make for extra storage space there but it is a pain to remove it every Friday and fit it back on Monday morning! 😔
Need the middle row for regular week day use.
If there was a way to free that space we could probably fit the box and fridge there.
How difficult to take out whole platform if you just wanted it every now and then
Thank you for sharing this! I’m looking for help with a build out and was wondering what part of NYS you are in? I’m in Rochester and planning to go west for the winter.
Thanks for sharing this! Gave me a great jumping off point for my own! Cheers!
This is an excellent way to easily convert your 4Runner into an overland or camping vehicle. It’s built specifically for the 4Runner and takes about 15 minutes to set up or take down. It stores well when not in use. This comes with all the IKEA pieces required for both the bed system and drawers. The drawers were plenty large enough for all our camp kitchen equipment and more. Here is the product. https://foxwoodmerchants.com/products/toyota-4runner-bed-platform-5th-gen
I have been trying to order one of these for weeks. The site gives an error message when I try to make the purchase. I even tried Collins and emailing through the contacts. How long have you owned this? Any issues with your buying experience?
There’s been a lot of issues with this YOHO business from what I’ve read on the forums. Buyer beware
I made this! Great design, it works super well. I did have a couple comments and edits – the first being that I was quite precise with the dimensions but I can’t get my seats to fold back with the rear portion in and my rear hatch closed. Not a big deal, I just open the hatch and it can rock back the inch or so it needs for me to raise the seats.
I haven’t really seen the need for the turnbuckles, it stays plenty put even on bumpy terrain, but I do have the front section on top of it so maybe that helps.
I made my legs from the little 2×6 hangars that have inside flanges you can get at Lowes/HD for a couple bucks each and they work great with 2×4’s for legs. Not nearly as pretty, but it’s what I had around.
I couldn’t get the night latch you specified, or any night latch for that matter, but I used strong velcro and that worked fantastic.
I’ll end up re-making this, and when I do I’ll probably cut a couple inches off the back to make sure I can lock the seats back when it’s in.
Thanks for the design and the article!
Hello. Thanks a lot!! Exactly what I was looking for. One question: how much height do you have between the platform and the ceiling? I’d like to know if I can sit on the platform. Thank you very much!
I made one, and with it you might have room to hunch over if you’re a shorter person (I’m 5’9″). I’ve got more than enough room to maneuver, though, and I’m using a super thick inflatable cot (Big Agnes Goosenest).
Hey! Thank you for posting this! Super helpful during all our plans during a pan-america road trip. We have been looking for a 5th gen platform model and this is pretty spot on- creating more space (above the wheel well) and for people with no wood shop available.
Question for you though. If you didn’t add the latch for stability would you be able to fold the pieces on top of each other to allow for more day time storage?
Thank you for your time!
MJ Harniss
If by folding you mean literally flipping the front section so it’s canvas-to-canvas on the back section, no. But that has nothing to do with the latches; the front section is simply too long and there wouldn’t be clearance inside the 4Runner to do that.
What is the thickness of the plywood?
I went with 1/2″, which has stood up pretty well to a year and change of regular camping. Obviously going thicker or thinner has pros and cons, it’s just a question of what compromises you’re willing to make.
I’m late to the SUV-camping game, but have been doing research into designs that hit various things I want. Yours is the closest so far, but one thing I can’t quite tell if your setup achieves that I’m looking to (attempt) to do: Allow full use of the rear seats while carrying the platform. It sounds like you leave the rear platform in your vehicle, but remove the front platform?
My goal is to be able to haul 4 people up into the mountains and let 2 people use a tent that they bring, while 2 of us use my 4runner. Are you able to place the front platform on top of the rear platform and gain full use of the rear seat? I know I’m going to lose storage by leaving the rear seat bottoms in the vehicle, but I think I’ll gain more by being able to bring folks up to camp with me.
Absolutely could be done, it would just require you to make different compromises than the ones I made.
Probably the best way do do it would be to simply shorten the length of the front platform section. Make your own measurements of course, but you’d take the current 41″ length down to about 36″ to make it fit with the seat bottoms still installed. And then it would be no problem at all to just pop off the legs and slide the front section onto the rear sections to get into drive mode. And this has the added benefit of allowing you to simply build a longer front section once your friends get their own 4Runner.
Alternatively you could build the platform tall enough that it goes OVER the seat bottoms. But I’m slightly claustrophobic and would not be able to sleep that close to the ceiling.
The most annoying way to do it would be to build the platform as described and then just uninstall the seat bottoms while making camp every night, then reinstall them when you break camp. It would be obnoxious, but it’s just four bolts and if you’re only occasionally using all four seats it could be an option. Just don’t leave your 14mm at home.
I’ve seen some other plans that go with the taller approach to get over top of the seat bottoms. I have no issues with small spaces, so that would work for me, most likely… But if it sleeps 2, not sure I can speak for the other person there. Plenty to think about here. Thanks!
Another thing I just considered about going taller is the geometry of getting in and out. It’s already lightly acrobatic at my height, I imagine there would be a lot more slithering required if it were closer to the ceiling. And getting out to use the facilities in the middle of the night could be quite dramatic.
Either way though, let me know what you go with. With everyone else going rooftop or pre-fab platforms we need to stick together.
I had entertained a rooftop tent, but those quickly seemed impractical when I realized that none of them are low-profile enough to allow me to use my garage with them installed. Not to mention the cost…
I’ve been reading up on folks’ challenges with getting in and out with the higher platform height. It does seem to be one of the main downsides to building up. Thankfully the supplies arent terribly expensive if I change my design after my first attempt. I’ll try to document what I come up with and report back.
It looks like if you split your plywood just between the 2×4 and the fabric at the head of your platform and replace it with a piano hinge (do it under the fabric), you would just be able to fold the few inches up and slide your driver seat back. Save you from having to completely reorganize the platform.
(you could even split it left/right to have the driver side fold up independent from passenger too, but more work, and loose some rigidity).
That could absolutely work. The added weight and complexity would be a consideration, but that may not be a deal breaker for some people.
One thing I kept in mind while designing this was making sure it was easy for anyone to customize to suit their needs. A lot of platform builds are hyper-custom, great for that person but not a useful idea for anyone else. Mine is more of a starting point anyone can get to, and then tweak to make it perfect for them.
So future readers, add Michael’s hinge! Or don’t! Whatever works for you.
Nice setup! I went with the low profile 2 inch platform. Quick question, how did you mount that fan in the rear ceiling? Been looking to do something similar. Thanks.
Thank you!
Unfortunately the fan is nothing interesting. Just a cheapo USB-powered fan off Amazon, it has a spring-clamp base that I just clip onto the coat hook in the back.
look cool, but after you get in the trunk and shut the back hatch door , how do you open it from inside to get out , for me i can’t get out or in from the side door !
I made an interior hatch button, check out my write up:
https://www.toyota-4runner.org/5th-gen-t4rs/263146-how-interior-tailgate-switch.html?highlight=hatch
We go through the side doors. Not the most graceful, but no worse than most ground tents we’ve used.
Nice man! Looks hella cozy!