
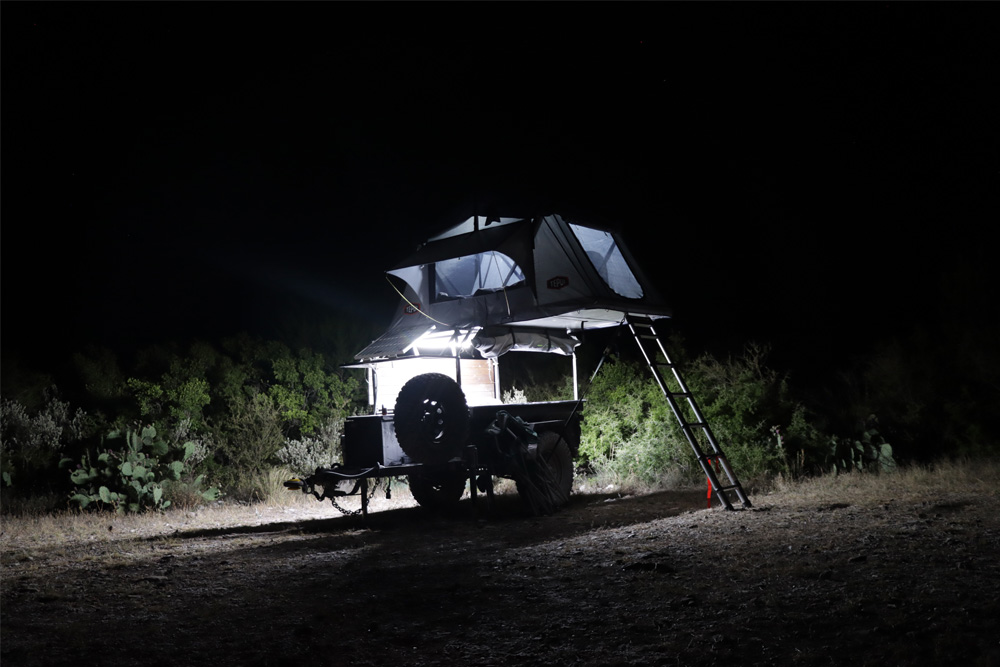
DIY Overland and Off-Road Camping Trailer Build For the 5th Gen 4Runner (Part 2)
DIY Overland Trailer Build (Part 2): How To Build An Off-The-Grid Solar System On A DIY Overland Trailer. This Will Cover Everything You’ll Need to Know About Solar-Powered Electrical Systems.
If you missed the other posts, here they are:
- DIY Overland Trailer (Part 1) – Why Trailers & Types of Trailers
- DIY Overland Trailer (Part 2) – Mods to Consider and Getting Started
- DIY Overland Trailer (Part 3) – Detailed Look at Add-Ons and Accessories
In article 1 of building a DIY overland trailer, I discussed the basics – what type of trailer, where to find a trailer, what to do to the trailer, and essentially how to get your trailer ready for gear. While this initial step was the hardest, in my opinion, installing the electrical system was a close second.
Electrical systems can be intimidating, a little scary, and ultimately very messy and confusing. For these reasons, I believe an article on my DIY overland trailer electrical system was necessary.
In this article, I will be covering how to install an off-the-grid solar system on a DIY overland trailer. There is a lot to learn and discuss, and I ultimately hope this article helps you understand electrical systems (specifically solar-powered electrical systems) better than you did before reading this article… so let’s dive in!
Why Do You Need An Electrical System?

This might be an elementary question, but why do you need an electrical system on an overland trailer? The answer might surprise you because quite frankly you don’t!
To better understand this, let’s look at what an electrical system could power, but I want to take it one notch further and also show the alternative for each item just to show you why an electrical system isn’t absolutely necessary.
Accessories/Gear You Can Power:
- Overland Fridge / Freezer (Cooler)
- Scene / Camp Lighting (Headlamps, Lanterns, and Flashlights)
- Stereo (Portable Stereo)
- Water Pump for Showering and Rinsing (Hand Pump or 1 Gallon Water Jugs)
These are just a few items you might power off your overland trailer, but very common items. As you can see, it is quite easy to use a cooler instead of an overland fridge/freezer. Headlamps, lanterns, and flashlights do a great job of helping you see at night too…so do you even need these things?
The quick answer is no, but man, they sure do make things a lot easier! What do I mean?
Well, to start off with, a cooler will work just fine, but there are a lot of downsides to a cooler. The first is that a cooler requires ice, and ice takes up space. Some fridge/freezer options such as the ARB Elements doesn’t require ice, so you have much more usable space per a given volume. Next, ice is frozen water, and water is wet…so you better make sure you pack your food properly in a cooler or you will get the inevitable soggy sandwich.

Another key point to mention is ice doesn’t last forever. Yes, there are some great coolers on the market, and I do have a really good cooler, but eventually, you are going to run out of ice.
With a properly powered fridge/freezer, you can theoretically have operation indefinitely. Last, a fridge/freezer allows you to set a very specific temperature and maintain it…including freezing temperatures. You cannot do this with a cooler.

As for lights, it is just so much easier to flip a switch and have strategically placed camp lighting than having to set up lanterns, wear headlamps, and so on. No doubt you should have headlamps, lanterns, and flashlights too, but properly set up camp lighting is yet another great reason for an electrical system.
I’ve really only covered the tip of the iceberg with fridge/freezers and camp lighting, but I hope this gives you a good idea of why an electrical system is a huge benefit and can make camping a little more enjoyable and efficient.
What Types of Electrical Systems Can You Get?
There are quite a few options to choose from when it comes to electrical systems for a DIY overland trailer, but you will ultimately be looking at a 12-volt DC system. In addition, you will need a battery of some sort. Now, this is where you can start going in many different directions.
Batteries hold a charge, but only so much and eventually they will need to be charged. Where and how you charge your battery is the big question you have to ask yourself.
Here are a few options:
- Solar Powered System
- On-Board Battery Charger
- At Home Battery Charger
- Vehicle Charging System
So, which is best? This really depends on what you are wanting, but I will give a quick overview of each system and choose what I think is best.
Solar Powered System

Quite easily the coolest option of the four is solar power. How neat is it that you can essentially take power from the sun to charge batteries!? I think it is pretty neat. Essentially, a solar system will consist of a solar panel, charge controller, and a battery to store power/charge. The solar panel soaks up the energy from the sun and sends current to the charge controller which monitors and processes the current from the solar panel in order to charge a battery safely.
Solar systems offer a huge benefit in the sense that you can charge your batteries anywhere you are. At the same time, solar systems have a drawback, and it is that you have to have sunlight to charge.
On-Board Battery Charger

An on-board battery charger is a charger that you would mount on your DIY overland trailer and attach it to your battery to charge it. In order to charge, you will need to have 110-volt power available. The great benefit of on-board chargers is that they take up very little space, can charge a battery quickly, and allow you to charge any time of day or night.
On-board battery chargers give you the benefit of charging quickly, charging whenever you want, and not taking up very much space. If you plan on visiting parks with electrical power available, on-board chargers are a great idea to have. However, they do have a big drawback, and this is simply that you can only charge when you have 110-volt power available. This essentially means you would be relying on having enough battery capacity to power your accessories for however many days you anticipate going out. While this can be done, you often have to have a large battery or multiple batteries, and this adds a lot of weight to a small trailer.
At-Home Battery Charger
These types of battery chargers are essentially identical to on-board battery chargers…with the exception that you don’t mount them on your actual trailer. Instead, you keep them at home (perhaps in your garage). At-home chargers have all the same benefits and drawbacks of on-board chargers, but in my opinion, they have one additional drawback – you don’t bring the charger with you (typically). This means that after you leave your house you are relying on your battery system entirely. Once again, this can be done, but I wouldn’t say it is the best option.
Charging Off Your Vehicle
The last option is charging off of your vehicle. You can run cables from your battery all the way to your battery on your overland trailer so that it is charged when your vehicle is on and driving. This is great for when you are on the road driving, as you are charging your batteries, but once you get to your camping spot the charging typically will stop because your car is off, and you aren’t driving anymore.
This is an option, but I believe it should only be used in addition to any of the other three options above. It just isn’t feasible to rely on charging your batteries strictly from your vehicle.
Which Charging System is Best?

Ultimately, neither system is best, but one system undoubtedly gives you the best reliability, options, and capability to remain off-grid as long as you want – solar system. Installing a solar system allows you to have charging capabilities anywhere you go, and as long as there is sunlight you are going to be charging your battery. A properly sized solar system can allow you to remain off-grid for days, weeks, months, even years if you really wanted to.
While a solar system entirely on its own is more than capably to keep your battery charged, I like to be prepared, so I think a solar system in combination with an on-board battery charger is the best route to go. The on-board battery charger allows you to ensure your battery is fully charged before leaving your house, and it gives you the option to charge at night if you happen to be at a camping location with an electrical hookup. All other scenarios your solar system will charge your battery and keep it ready to go.
Solar Systems 101

At this point in time, you might be thinking one of two things.
- A solar system sounds awesome! Let’s get started.
- A solar system sounds expensive and confusing. I might go with another option.
I completely understand the intimidating factor of a solar system or an electrical system in general. I also understand that price is an important factor in any decision. Luckily, you can get a pre-designed solar system at a low cost!
How to Size a Solar System?
While I wish it were as easy as choosing a panel and installing it, there is quite a bit more research required to properly size a solar system for your DIY overland trailer.
The first and absolutely necessary step you have to take is to determine what electrical accessories you will have, how much power they use, and how long you intend on using each accessory per day.
In a sense, you can look at this as you would your vehicle, it’s the engine, gas mileage, etc. For example, let’s just say that a 4Runner can get 18 mpg and has a 23-gallon fuel tank. This means a 4Runner has a range of 414 miles (18 mpg x 23 gallons = 414 miles). Now, let’s apply this same principle to electrical accessories.
Instead of mpg, electrical accessories typically are rated by amps (or sometimes Watts). Instead of gallons, a battery is rated by amp-hours (Ah). So, let’s take my ARB elements fridge/freezer. It draws approximately .89 amps per hour, but for this example, we will round up to 1 amp per hour. I have an 81 Ah battery. So, I theoretically could run my fridge/freezer for 81 hours ( 81 Ah / 1 amp = 81 hours of runtime).
Now, I do need to make a few key disclaimers. The first is that you never want to discharge your battery to 0% capacity. A standard car battery can safely be discharged to 50% capacity, and a deep cycle battery can be discharged to 20% capacity. Discharging either of these batteries past the recommend discharge state can result in premature failure and lack of charge.
Some Electrical Accessories Do Not Draw a Constant Current

The next disclaimer is that some electrical accessories do not draw a constant current.
For example, when my fridge first starts up it draws more current than when it is at operating temperature. Outside temperatures also affect how often my fridge turns on and off, so this plays a role. Pumps (such as water pumps or air compressors) also vary in amp draw. The more head (in its simplest form, the head is simply resistance) a pump has to overcome the more amps it will draw. For example, an air compressor typically pulls more amps the higher the pressure in your tire gets because it has to “work” harder. Water pumps will draw more amps the longer your hose is, the smaller the diameter your hose is, and the higher you have to pump your water too because the pump has to work harder.
Really, lights are one of the few electrical accessories that draw a relatively stable current, because the light is typically just on or off…it isn’t dynamic.
Discharging Your Battery to Max Discharge Level
All this said you need to make sure you add a little bit of margin for each electrical accessory and also account for discharging your battery to the maximum discharge level… not it’s actual rated capacity.
So, how do we pull all of this information together to figure out how much current you will be using every day? It is actually quite easy.
Each electrical accessory should have a sticker or datasheet which lists the electrical information…with one of these being the current draw in amps. For each electrical accessory, you will take the number of amps it draws and then multiply that by the number of hours you estimate you will use it. Do this for each accessory, then add up your total current draw.
Here is an example of what my setup looks like:
| Accessory | Amp Draw | Hours Operating per Day | Total Amp Draw Per Day |
|---|---|---|---|
| ARB Elements Fridge / Freezer | 0.89 | 24 | 21.36 |
| Diode Dynamics 40” Strip LEDs (x2) | 3.4 (1.7 x 2) | 1.5 | 5.1 |
| NorthStar Diaphragm Water Pump | 8.0 | 0.33 | 2.64 |
| Cooling Fan for Electronics | 0.10 | 2.4 | 2.4 |
| Total Amps Used Per Day | 31.5 |
As you can see, I’ve estimated that I will use 31.5 amps per day. I’ve put slightly longer runtimes on some of the electrical accessories, but this makes my calculation a little more conservative. Now we can move into what size battery you will need.
Sizing Your Battery

You can size your battery in a variety of different ways. I chose to size my battery so that it could run all of my accessories for two days without any charging whatsoever. How do you do this?
Well, for the sake of this article, let’s assume we are using a deep cycle battery (which is what I used and recommend). A deep cycle battery can be discharged to 20% capacity. So, we simply need to do a quick calculation:
So, I would need a 78.75 Ah battery (minimal) to run my accessories for two days without any charging whatsoever.
What Type of Battery?
There is a multitude of battery options out there – different group sizes, Ah ratings, lithium, deep cycle, starting, etc. Which is best though?
Well, I don’t want this article to focus on the ins and outs of batteries, because that is an article in itself…but, I do want to quickly discuss what battery I chose and why.
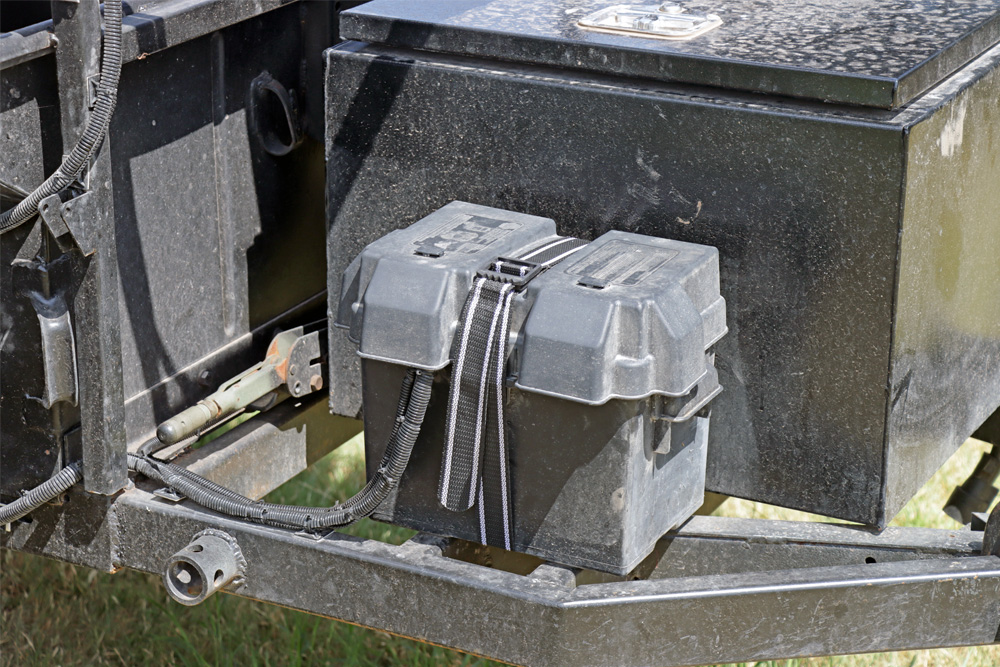
I ultimately went with a standard marine deep cycle battery. As previously mentioned, it is important to get a deep cycle battery, as starting batteries aren’t designed to be discharged over 50% whereas deep cycle batteries can discharge to 20%.
I researched various batteries for quite some time, but many were very expensive, heavy, and not something I could find locally if needed. I wanted an affordable, reliable, and easily accessible battery. This is why I went with an Interstate SRM-24.
The SRM-24 isn’t cheap, but at $120 (at time and location of purchase) it was definitely on the lower end of the spectrum. It just so happened that this battery fit my needs very well. This battery is a group 24, so it is about the size of a standard car battery, has 81 Ah, and is about 46 lbs. At 81 Ah, the SRM-24 fit my requirements for having at least 78.75 Ah to run all of my electrical equipment for 48 hours without any charging. Simply put, for my needs the SRM-24 from Interstate was an excellent option…but one of many good options.
This battery suits my needs great, but you may be running more or less electrical equipment. All this said, use the premises I’ve outlined above for calculating how big your battery should be and then start researching various options. You will find one that suits your needs well. Once you find the right one, mount it in a battery box and you are good to go!
What Size Solar Panel?

Solar panel sizing is pretty easy too, and ultimately there are a few major criteria you have to determine before you can pick your solar panel.
- How much current will my electrical accessories use each day?
- How much sun will my solar panel receive each day?
Let’s start with the first question. We determined that my electrical equipment will use 31.5 amps per day. Now let’s move to the second question. Depending on where you live, where you will be going, and time of year, the amount of sun (and quality) your solar panel will receive is going to vary.
For example, you won’t have anywhere near the amount of sun during winter as you would in the summertime. Do you live in an area that rains a lot? If so, you won’t receive as much sun. Will the areas you camp at being predominately out in the open, or will you be in forests? These are just some of the questions you need to ask yourself.
I live in Texas where there’s no shortage of sunlight and I will ultimately be going places that should get me a clear view of the sun for my solar panel.
As such, I’ve based my calculations on 10 hours of sunlight per day. I could have gone to 12 hours, but I wanted to be conservative…so 10 hours is a good middle ground.
We know I could potentially use 31.5 amps per day and I will receive 10 hours of sunlight per day. How do we equate this to sizing a solar panel? Well, we need to convert the total amps per day we will be using into Watts…luckily this is an easy calculation:
Next, divide the total Watts used per day by the amount of sunlight you expect the solar panel to receive each day in order to determine the solar panel size required.
Last step…solar controllers cannot transfer 100% of the energy from the solar panel to your battery. There are two different types of solar controllers: PWM and MPPT. PWM controllers have an efficiency rating of 80% (in general) and MPPT controllers have an efficiency rating of 92% (in general). I have a PWM controller, so we will be using 80% efficiency.
We’ve done it! This means the minimal sized solar panel I would need is a 47.25-Watt solar panel…but we will just round this to 50-Watts because a 47.25 Watt solar panel will be pretty hard to find.
This is how you would calculate what size solar panel and battery you would need by hand, but if you want to save some time I recommend using the solar calculator from Renogy. It uses the same principles I outlined above, but the online calculator does all the work for you…you just have to input a few pieces of information.
Renogy 50 Watt Solar Starter Kit

There were many different options in solar systems on the market, but I ultimately went with the Renogy 50W Solar Starter Kit for my DIY overland trailer. This kit comes complete with a 50W solar panel, cables from your solar panel to charge controller, a 10A charge controller, and cables from your charge controller to your battery…all at a very reasonable price.
This was about the perfect size system for my overland trailer, as I needed a 47.25 Watt solar panel and this kit comes with a 50 Watt solar panel.
Here is a detailed overview of what you get in this starter kit from Renogy:
- (1) 50 Watt Monocrystalline Solar Panel
- (1) Wanderer 10 Amp PWM Charge Controller
- (4) Mounting Brackets (with Hardware)
- (2) 20 ft 12 AWG MC4 Adapter Kit
- (2) 8 ft 12 AWG Tray Cables
Pretty much everything you need is in this kit!
The real question is how do you install it and how well does it work?
DIY Overland Trailer (Pt. 2): Solar-Powered Electrical System Step-By-Step Install
Installation is very easy and will vary from install to install, so I’m going to fly through the process as it is pretty self-explanatory and will no doubt be different from each application.
Step 1. Mount Your Solar Panel
Find a spot to mount your solar panel.
You want to make sure the mounting location is secure, will have a good view of the sun, and also is installed at an optimal angle. There are various websites that have suggested mounting angles (and the angle is different in summer versus winter), so be sure to do a little research to find what angle would be best for your region.
For me, I installed my solar panel at a 30-degree angle.
Step 2. Mount Your Charge Controller
You can really mount the charge controller anywhere, but it needs to be in a location that won’t get wet and maintains temperatures under 110 F. I mounted my charge controller in a custom junction box located on the side of my DIY overland trailer.
One thing I do want to mention is you need to ensure the charge controller doesn’t get too hot. Unfortunately, Texas temperatures get pretty toasty, so maintaining proper temperatures is a concern for me. I decided to install a small cooling fan inside the junction box with two vents to help provide ventilation and cooling. So far, this fan has done the trick!
Step 3. Connect Charge Controller To Battery
Connect your charge controller to your battery. IMPORTANT…you need to connect the battery to your charge controller before connecting the solar panel.
Step 4. Connect Panel + Controller
Connect your solar panel to your charge controller.
Step 5. Organize Wiring & Enjoy!
Clean up the wiring as necessary and be amazed as this Renogy 50W solar kit harnesses the power from the sun to charge your battery!
How Well Does It Kit Work?

I have had limited experiences testing this setup, but I have taken it off-grid 3-4 times and each time it has kept my battery charged and powering my electrical accessories.
It really is so cool to be able to have electricity anywhere I go.
What is really neat about this system is that you not only have power anywhere you go, but your battery will be properly maintained, as the charge controller has various “charging stages” to prolong your battery life.
Probably the best part about this kit is that nearly everything you need to start charging your battery is included in the kit…all at an affordable price.
I looked at options from companies such as Goal Zero, such as the Goal Zero Yeti 400 or the Yeti 500X Power Station, and while these options would have worked, they were extremely overpriced in my opinion. Not to mention that I would have needed to spend a small fortune to get a Goal Zero kit that provided a similar capacity for my electrical needs.
What Are the Downsides to the Renogy Solar Kit? Or Any Solar Kit?

Everything has some sort of downside…that’s just life. The Renogy 50 Watt solar kit is pretty awesome, but it does have two main drawbacks in my opinion. The first is simply a common drawback amongst all solar systems, and that is just that you need to have sun for these systems to work properly. While this typically won’t be an issue for me, there is the potential to run out of battery capacity due to a lack of charging. If your solar panel and battery are sized correctly, you can greatly reduce the chance of this happening.
The Charge Controller
The second drawback is the operating temperature of the charge controller. It would be nice if the charge controller had a higher operating temperature and if it were waterproof. Renogy does offer other higher-end options that offer higher operating temperatures and some form of waterproofing, but this particular charge controller does not have these features. Since this charge controller isn’t waterproof and is temperature-sensitive, I had to mount it in a waterproof junction box with a small cooling fan.
Overall Impressions of the Renogy 50 Watt Solar Kit

This kit from Renogy is awesome! I can go Overlanding for several days, even weeks, and have power for my ARB fridge/freezer, lights, etc. No need for electrical cords or anything like this…just what is mounted on my trailer from Renogy. I highly recommend this kit.
Back-Up Charging?
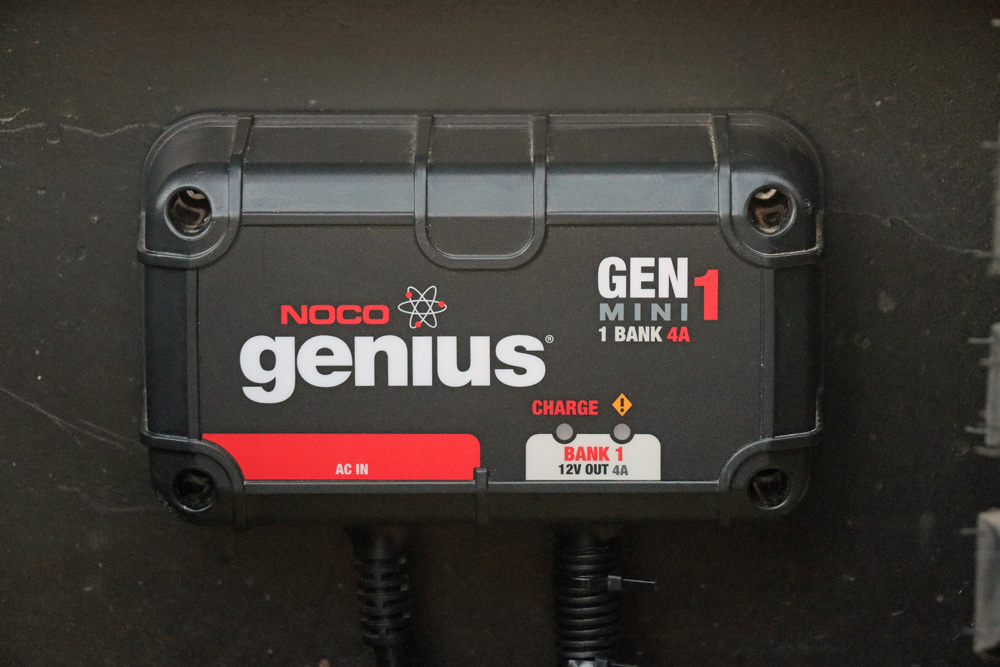
As I mentioned earlier, it is wise to have an on-board battery charger just in case and also if you are at a campsite with electricity. This is why I installed a NOCO GenMini 1 4 Amp on-board battery charger. It is good insurance to have, and I recommend installing a secondary charging method such as this one on your DIY overland trailer.
How Do I Control Electrical Accessories?

There are many different ways to control your electrical accessories, but I chose to utilize a Blue Seas Weatherdeck 6-Gang Switch Panel that I mounted to a DIY junction box. Each one of the switches on this switch panel is a rate for 15 Amps, so no need for relays if you are powering accessories under 15 Amps. This is huge! All you have to do is put in the appropriately sized fuse (15 amps of smaller) and connect your accessories. In order to ground my accessories, I used a Blue Seas Negative BusBar.
Blue Seas Weatherdeck 6-Gang Switch Panel

This switch system has performed great. It is simple, rugged, and highly effective. Just what I was wanting.
Last Word
If you are building a DIY overland trailer or need an off-grid electrical solution, check out the Renogy 50 Watt solar kit and all of the other options they have to offer. They have small kits such as this one and all the way up to 4,500 Watt cabin kits!
Having an appropriately sized solar system is extremely important. Using the methods outlined in this article you can design your own electrical system to suit your needs.
My system has performed unbelievably well and I’m excited to continue using my electrical setup for many adventures ahead of me!
Stay tuned for article 3 of the DIY overland trailer build series…I will be discussing what all I installed on my DIY overland trailer and why!
https://trail4runner.com/2020/07/24/diy-overland-trailer-build-5th-gen-4runner-pt-2/
dinoot.com
looking forward to article 3
Thanks for this incredibly helpful and detailed series! Are you still planning to release parts 3 & 4?
Glad it has been helpful. Yes! I hope to get article 3 out soon…which will cover all of the equipment I am using.
Nice build! I’ve been building an off road trailer myself for some time, and one of the things I did early on was to build an electrical panel for solar charging, my inverter’s, etc. My conclusions from that project are 1) you need a high quality charge controller (I went with a Redarc), and 2) solar panel ratings are ridiculously exaggerated. They’re basically rated for ideal situations that we’ll rarely encounter out in the real world. I have two different panels, a flexible 160 W Renogy panel, and a rigid 170 W panel from some other company. I rarely get more than 60-70 W out of either. I’d also recommend that you get a battery monitor with your setup. I use a Bluetooth capable one from Victron. Allows me to keep a close eye on the entire system and the charge level of the battery.
You are absolutely correct…often times we can’t position our solar panels in the perfect spot, clouds are out, etc. You really have to be conservative when calculating the solar panel size you need. Thanks for your recommendation! I’ve actually been looking at a battery monitor, so I will be sure to give the Victron one a look. Thanks!