In this third article covering my DIY overlanding trailer, I will do a brief overview of everything I have installed. It is a lengthy list, so let’s get started!
If you missed the first two posts, here they are:
- DIY Overland Trailer (Part 1) – Why Trailers & Types of Trailers
- DIY Overland Trailer (Part 2) – Mods to Consider and Getting Started
- DIY Overland Trailer (Part 3) – Detailed Look at Add-Ons and Accessories
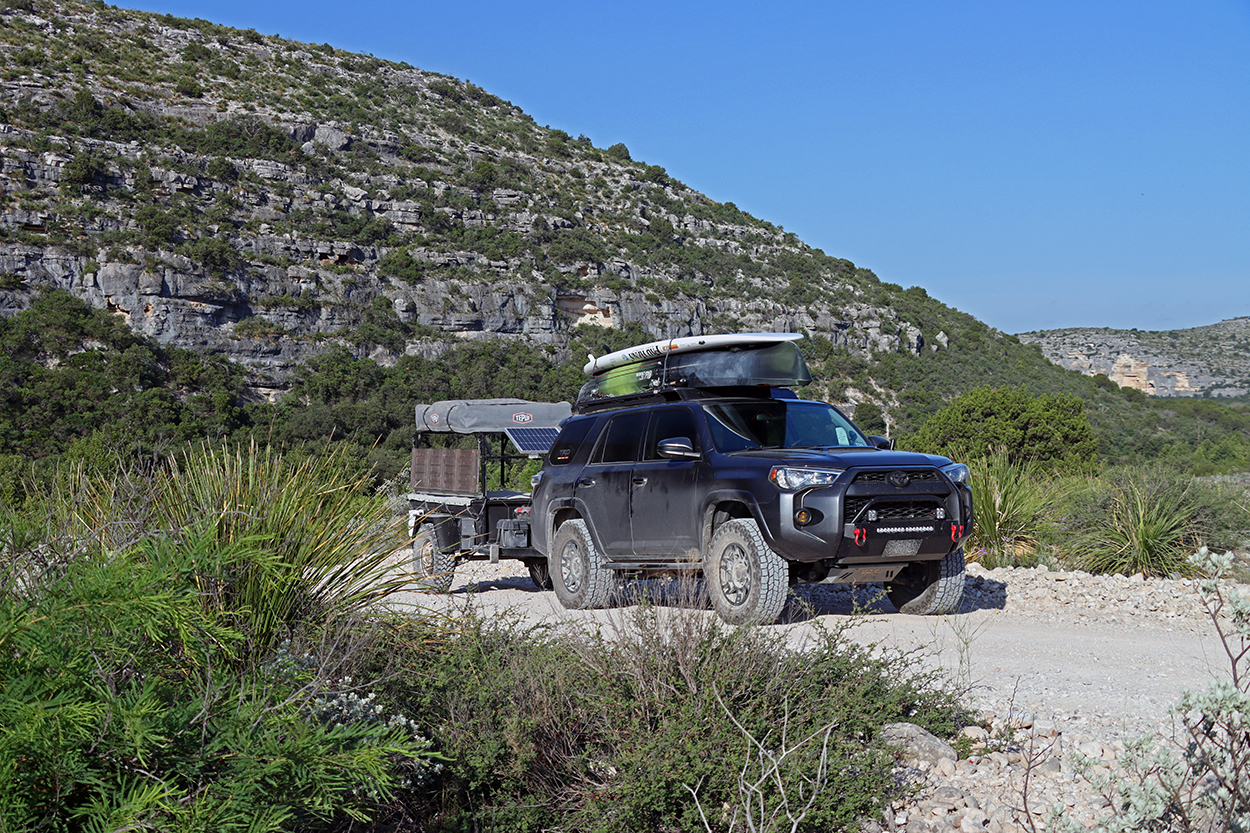
I based my overland trailer build on a 1964 M416 military trailer. As discussed in Article 1, this trailer was in decent shape when I first purchased it, but some work was required to get it ready for my adventures. I think using a military trailer is a great option for a DIY overland trailer because it’s often more rugged than a standard trailer and usually has some off-road capability.
The M416 was the perfect fit for me, as it had enough space to accommodate all of my needed equipment, but it wasn’t so large that it would hamper traveling. In fact, this trailer is so good for overlanding that I feel confident saying I can go just about anywhere my 4Runner can with it. I’ll throw in the disclaimer that backing up in tight spaces is excluded (as backing up with a trailer in off-road terrain is tricky), but it truly is capable of following my 4Runner where I want and need to go.
Table Of Contents
Hitch
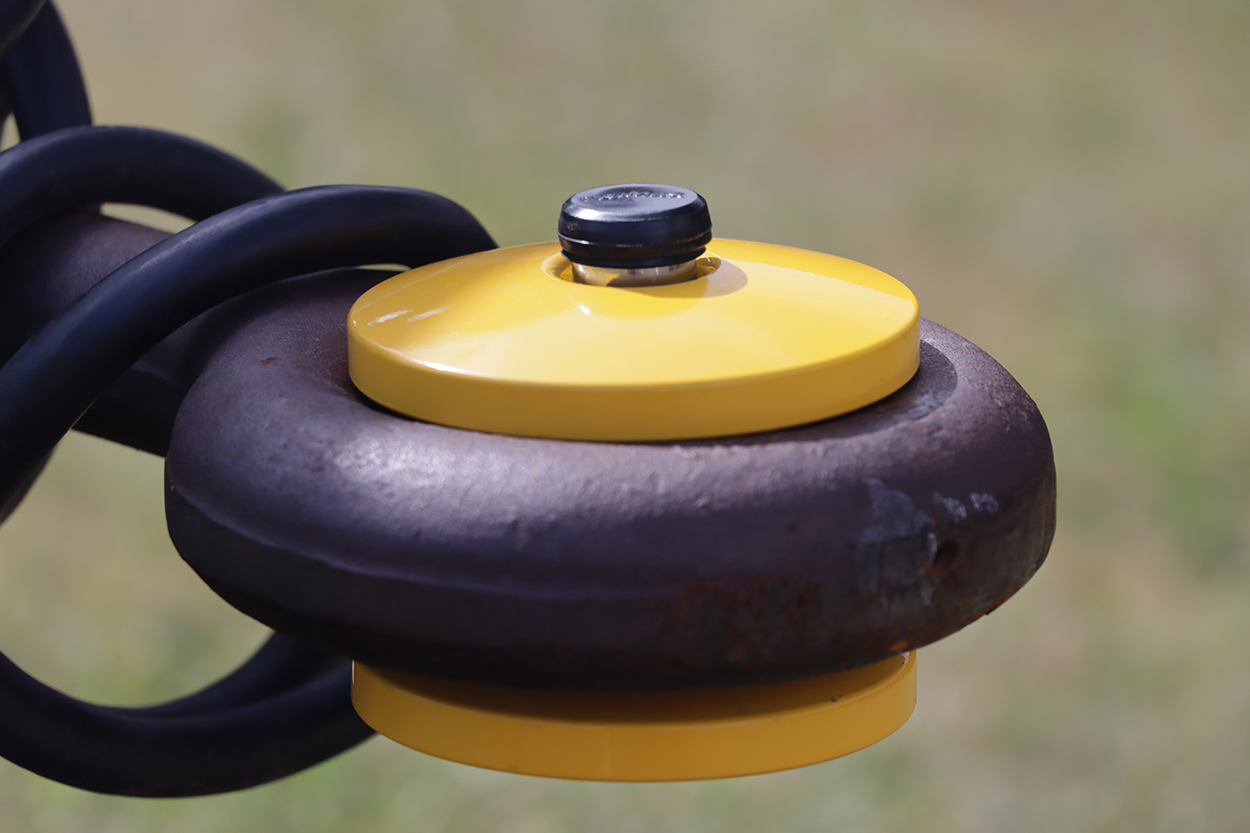
The trailer hitch might not seem like a design aspect, but it most definitely is. Especially on an overlanding trailer!
I used the standard pintle hitch that comes with M416 trailers; however, a standard ball hitch was also considered. I eliminated a ball hitch due to limitations with articulation.
The pintle hitch is very simple, allows for articulation, and is a great option for an off-road trailer.
There are other, higher-dollar hitches on the market which probably offer even better performance. Still, I utilized the existing hitch to save a little money (and I think it is a good overall design).
To provide a little extra security, I also have a hitch lock so that someone can’t easily steal the trailer.
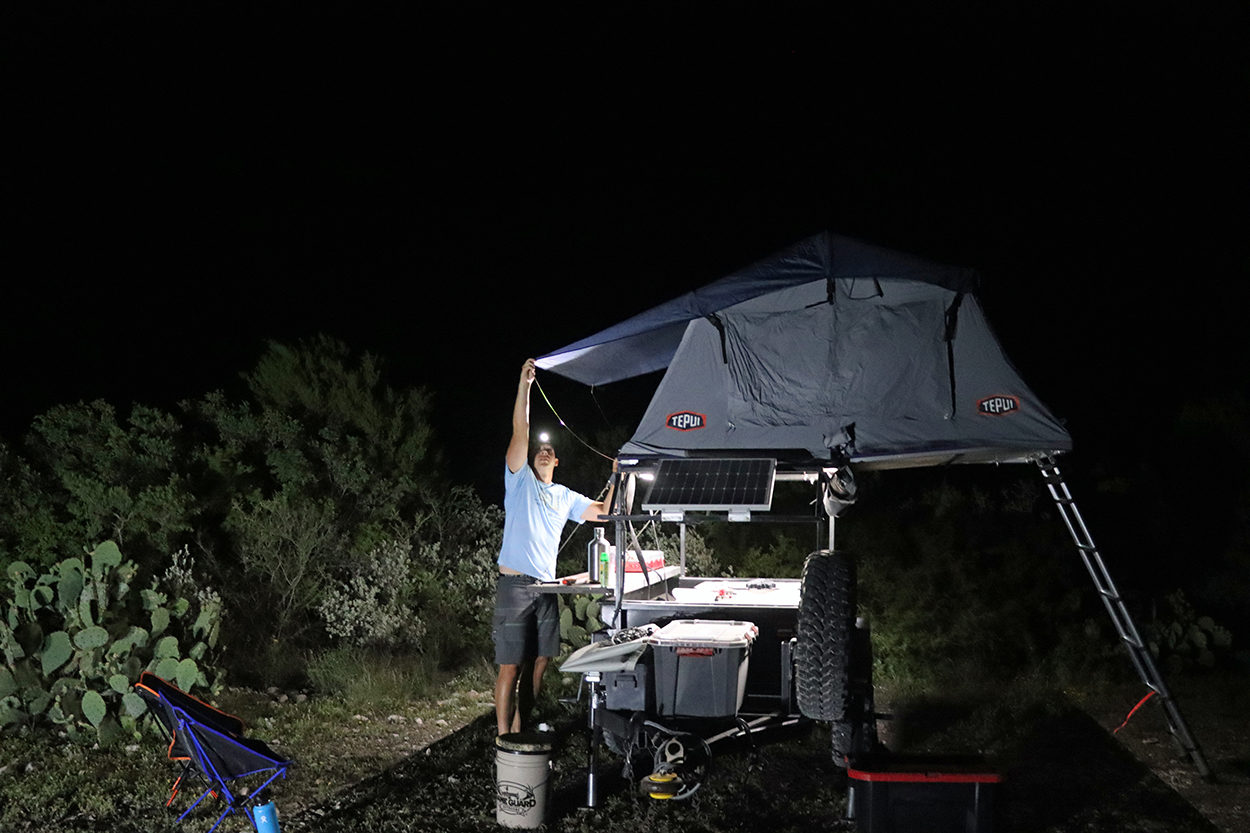
Tent
A rooftop tent is a crucial element of an overlanding trailer. In fact, I’d argue it is the second most important component, right behind the trailer itself.
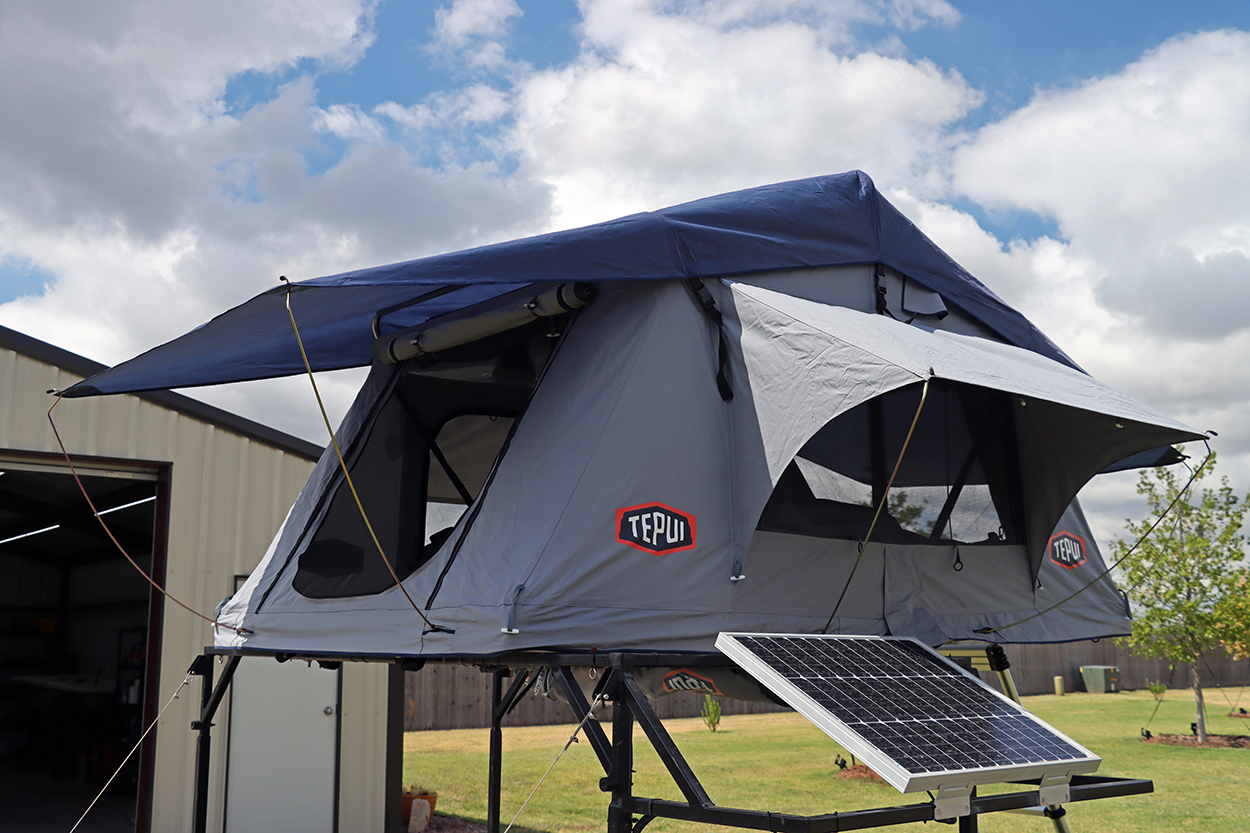
I researched tents thoroughly. There are LOTS of rooftop tents on the market right now. It seems like everyone is trying to make one and, in return, make some money. In general, there are lots of good options. There are certainly some cheap, low-quality options out there, though. By no means do I want to say that the tent I got is the best, but I do think it is a great option. Speaking of options, there are two main options – soft and hard.
Hard tents generally pop straight up, or nearly straight up. These types of tents are the fastest to set up and a great option, but they are more expensive than soft roof-top tents and typically don’t offer quite as much space.
Soft roof-top tents take slightly longer to set up and typically fold out… like a book. The benefit of soft rooftop tents is that they are much larger and cheaper.
At the end of the day, I went with a Thule Tepui Kukenam 3. The Kukenam 3 is a soft-roof top tent and comes in at a rather affordable price. This rooftop tent is primarily designed for 3-season camping (spring, summer, and fall), but can be adapted to withstand winter temperatures. As the name implies, this tent can sleep 3 people, but I will only use it for two people max. Yes, you theoretically could fit three people in the Kukenam 3, but it would be TIGHT!
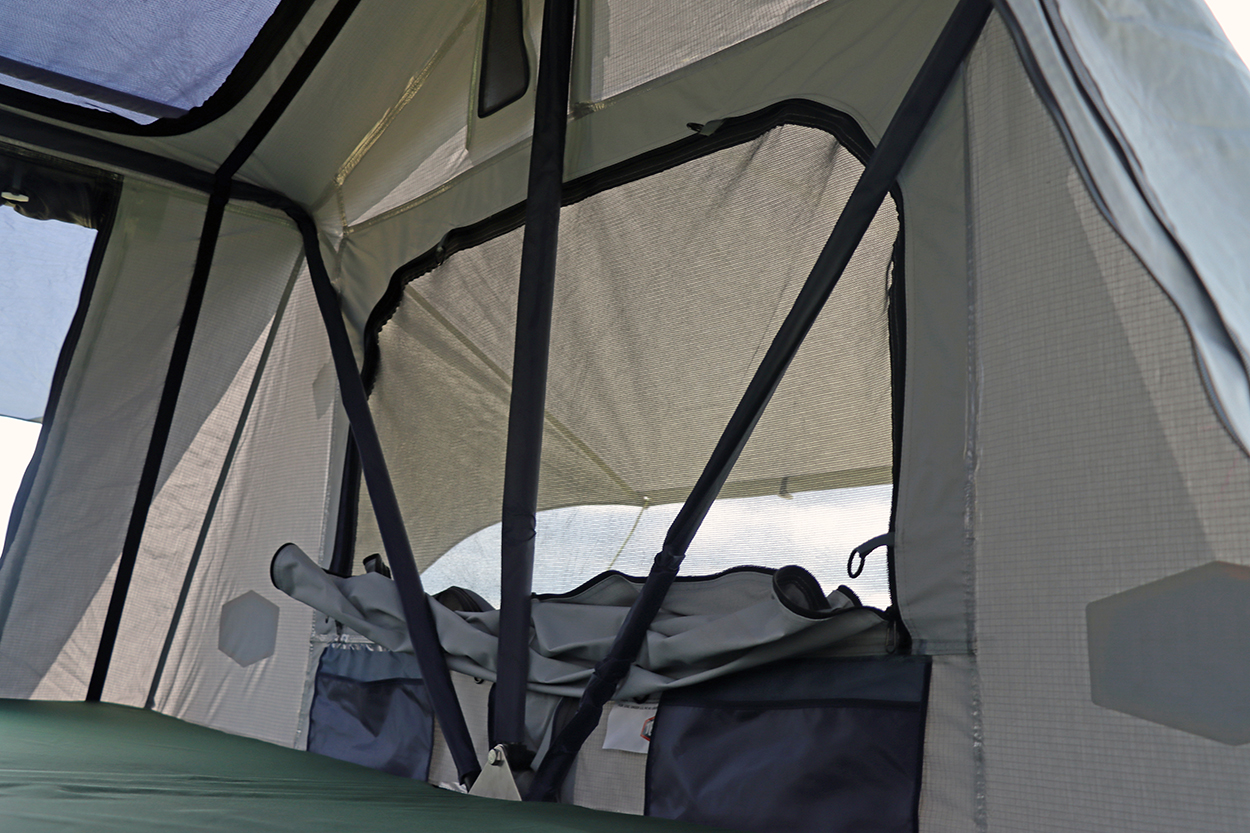
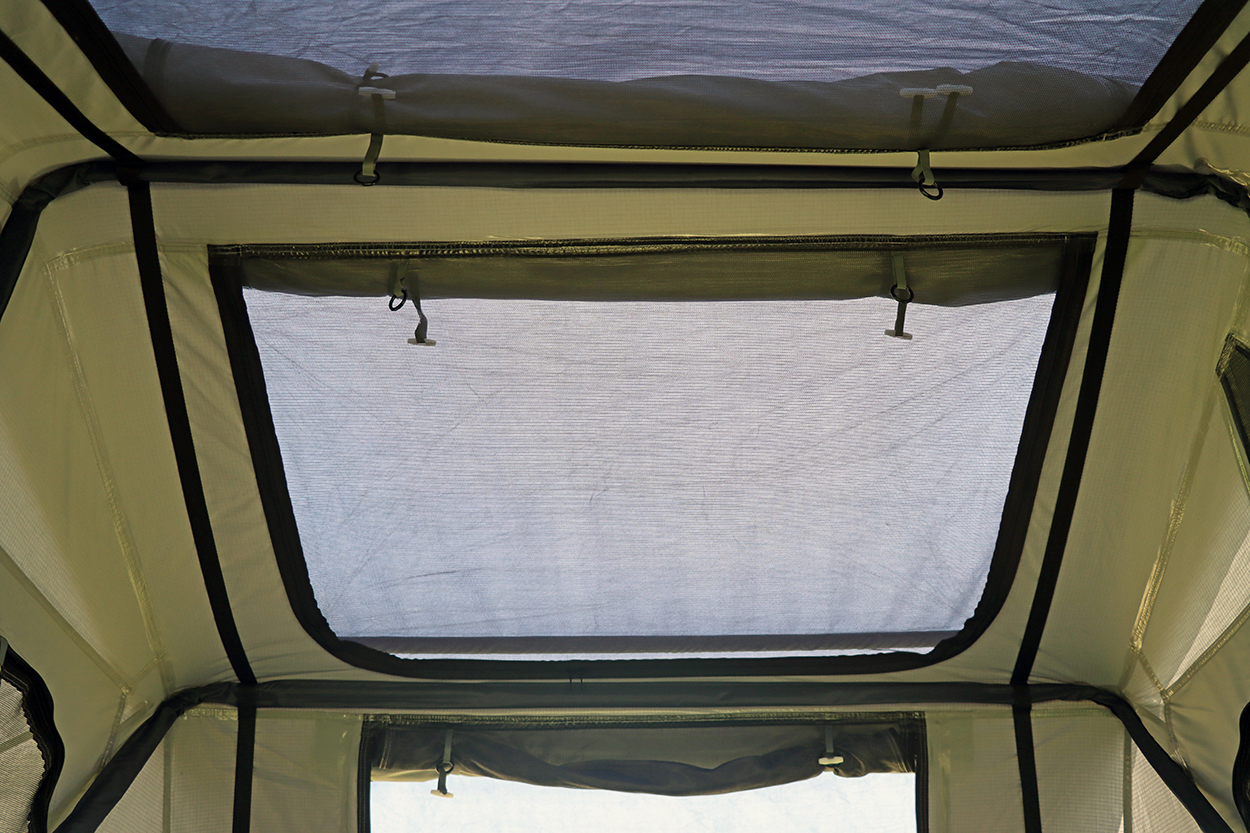
I went with the Kukenam 3 for a couple of reasons, and the first was quality. This tent has good quality materials and design. Second, I really liked the tent features. The tent’s design allows you to have plenty of ventilation if needed, or none at all. Third, this tent was affordable. It wasn’t cheap, but it was definitely competitively priced compared to some tents on the market. Last, it just seemed to fit my needs well (and my 6’-4” frame). Your needs might of course be different, so research tents and see what is best for you.
Like I said, there are a lot of good options…find what works best for you, your application, and your budget.
Fridge
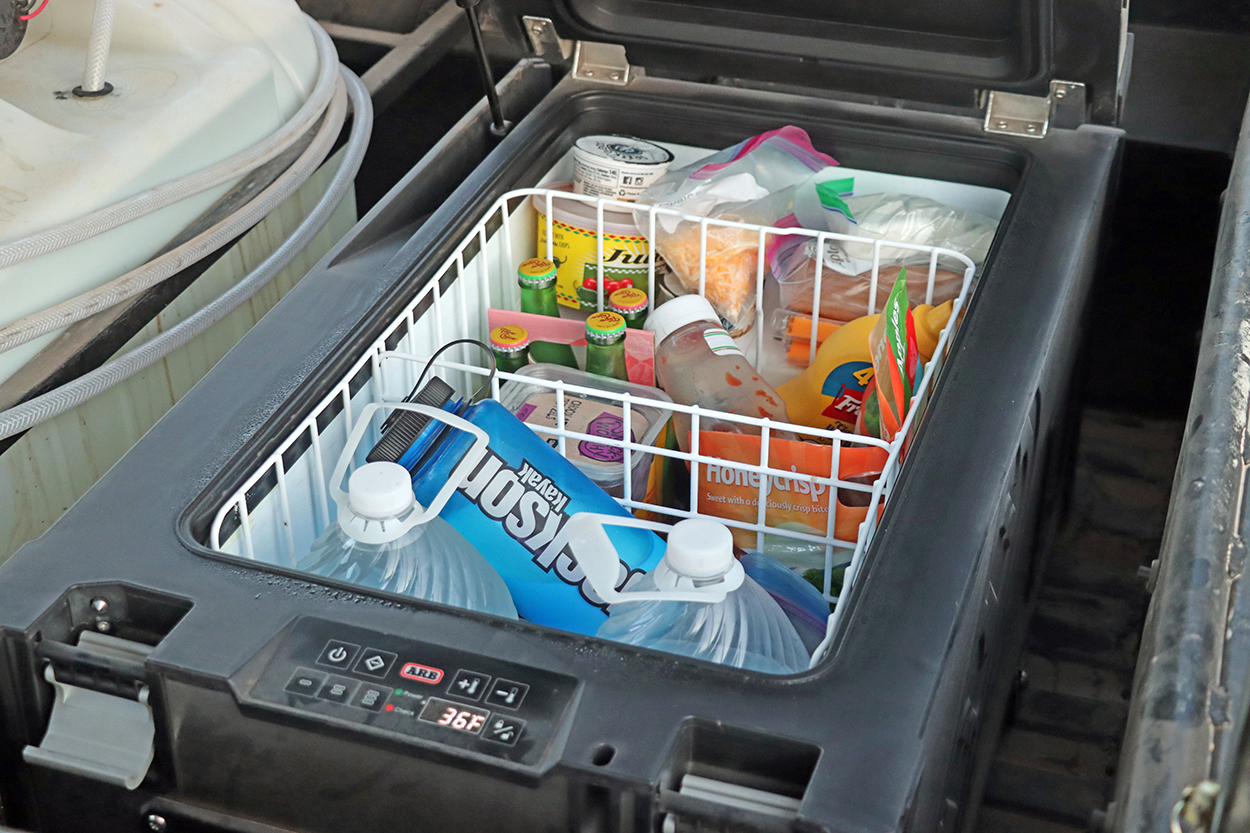
Yes…a fridge! As I mentioned in Article 2, you can get away with a cooler, but a cooler requires ice, and ice doesn’t last forever. Using a cooler also takes up a lot of space, as a large portion of its volume is taken up by ice. In addition, ice melts, and all of your items inside the cooler will be exposed to water… so you will need zip-lock bags to protect your food.
I ended up going with an ARB Elements fridge freezer. You can read the full review here, but I chose the ARB Elements for a few reasons:
- Weatherproof capability…it is called the “Elements” fridge for a reason
- Fridge/freezer capability
- Size
- Durability (ARB makes incredible fridges)
You can read my review to get all the details on this fridge, but the short and sweet is that the ARB Elements is an excellent choice for a trailer build like this!
Electrical
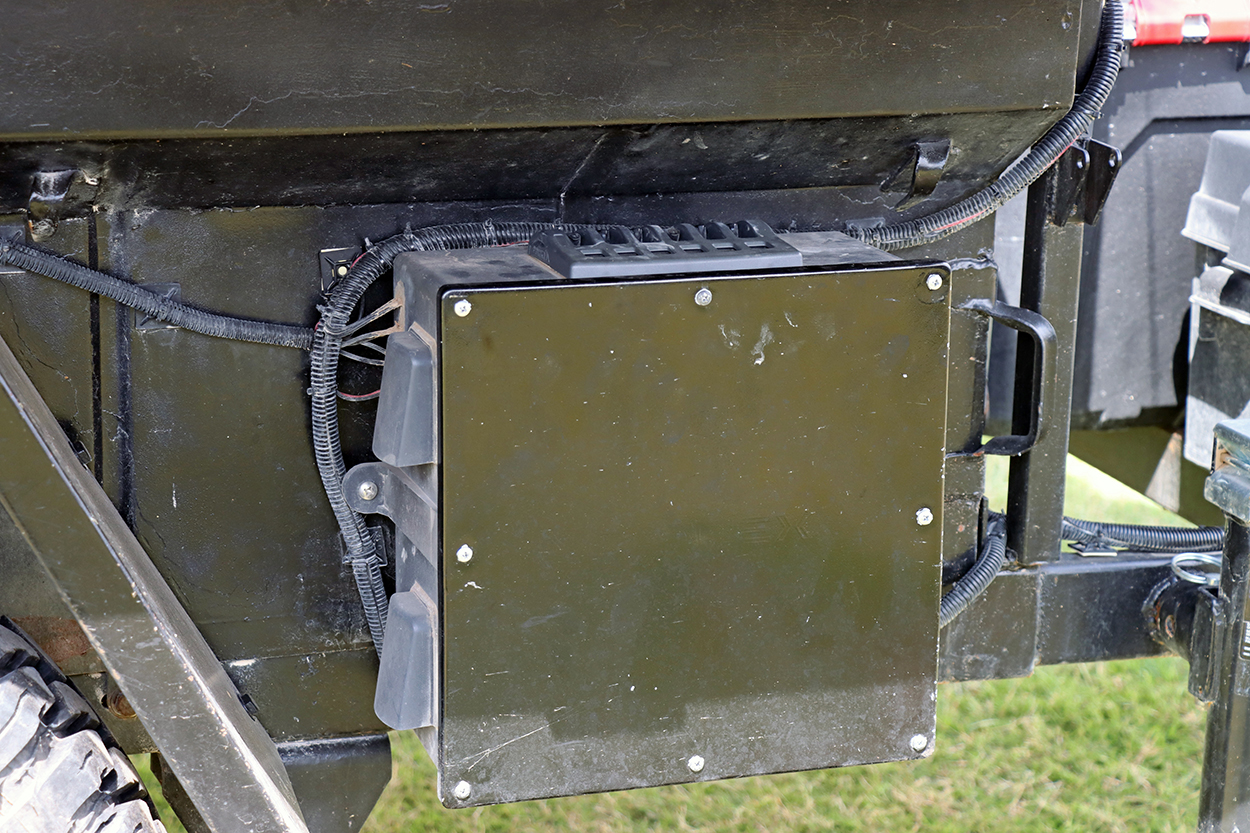
Designing an electrical system from scratch is a lot of work! There really isn’t a “one size fits all” design. It all comes down to what you need/want to power.
For example, I debated installing an inverter quite a bit. I ultimately decided against an inverter because I couldn’t find a good use for it. Most of my electronic devices can be charged via USB, so a 12V USB outlet was sufficient. You might need an inverter, though… depends on what you plan to power.
For me, I wanted to power the following devices:
- ARB Elements Fridge
- Water Pump
- Overhead LED Camp Lighting (White)
- Overhead LED Camp Lighting (Red)
- Dual USB Outlet Charger
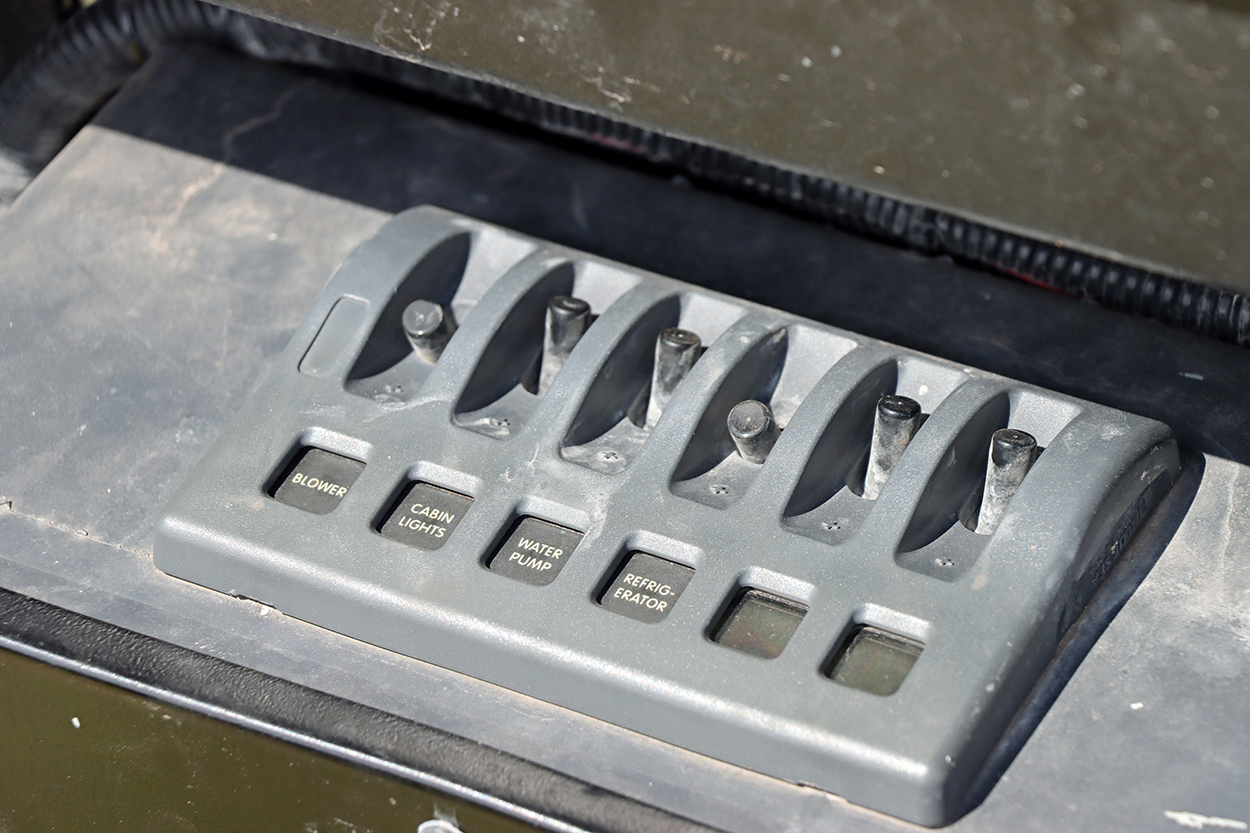
The heart of my electrical system is the Renogy solar setup. I have a 50-watt solar panel, Voyager 10-amp charge controller, and an Interstate Battery SRM-24. All of my devices are controlled through a Blue Seas 6-gang Weatherdeck panel mounted in a custom electrical enclosure I made.
You can read all about the electrical system in Article 2 of this series, but my quick opinion is that I think it works great! My setup is affordable, rugged, reliable, and versatile. I designed the battery to power all my devices for two days on its own, and with adequate sunlight, the solar panel and charge controller provide indefinite power!
Without diving in too deep, I do want to mention that electrical systems for something like this can be overwhelming if you are not familiar with how DC electronics work. You will more than likely be tempted to build a minimal system because you don’t want to complete the electrical design…DON’T!
Many higher-end overland trailers you purchase come with awesome electrical systems, and a large portion of the trailer’s cost is associated with the electrical system. Electrical systems are very helpful when done correctly, and I am a firm believer that any overland trailer should have at least a minimal electrical system.
Having a quality electrical system makes a huge difference! For example, I didn’t think I wanted lights on my trailer (what was I thinking). I was going to use flashlights and headlamps. This was because I didn’t want to complete all of the wiring required to power two different sets of lights. However, having hard-wired lights hooked up to your electrical system is a must! Same thing applies to my fridge…I originally was going to run a cooler, but a fridge is so much more convenient.
Just remember that you might have to put a little more work in on the front end, but it is well worth it in the long run.
Lighting
One of the most crucial elements of safety is adequate lighting. As I previously mentioned, I originally was going to use my Coast headlamps and flashlights, and I do use them all the time when I am camping with my trailer; however, I felt that having hard-mounted camp lighting that I could turn on with the flip of a switch would be necessary. As such, I installed two different sets of camp lighting.

The first set I installed was Diode Dynamic white led strip lighting. This is my primary lighting and is designed to allow me to see everything I need at my base camp. I use these lights for cooking and general tasks around the trailer that require good lighting.
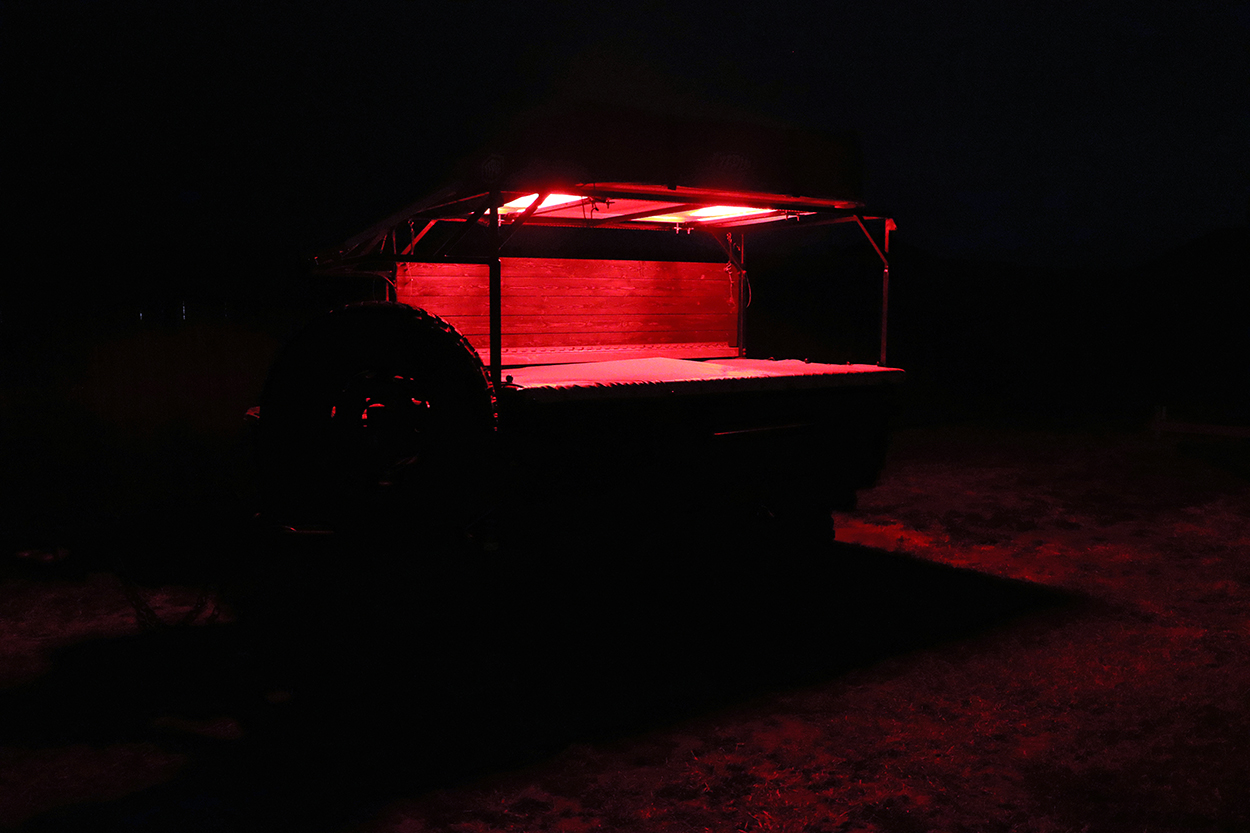
The second set was Diode Dynamic red LED strip lighting. These lights are designed for the times when you are relaxing around the campsite and don’t want the bright white lights drowning out the stars, but you still want some light to navigate around (and see any potential rattlesnakes). In addition, I’ve found that red light attracts fewer insects than white light…and research supports this.
I highly recommend installing hard-wired lights that you can control with a flip of a switch. Having lights hard-mounted and wired eliminates the need to find a flashlight or headlamp, temporarily mount it to your trailer, and recharge. LEDs use very little energy, too. You need to have hard-wired lights!
Charging
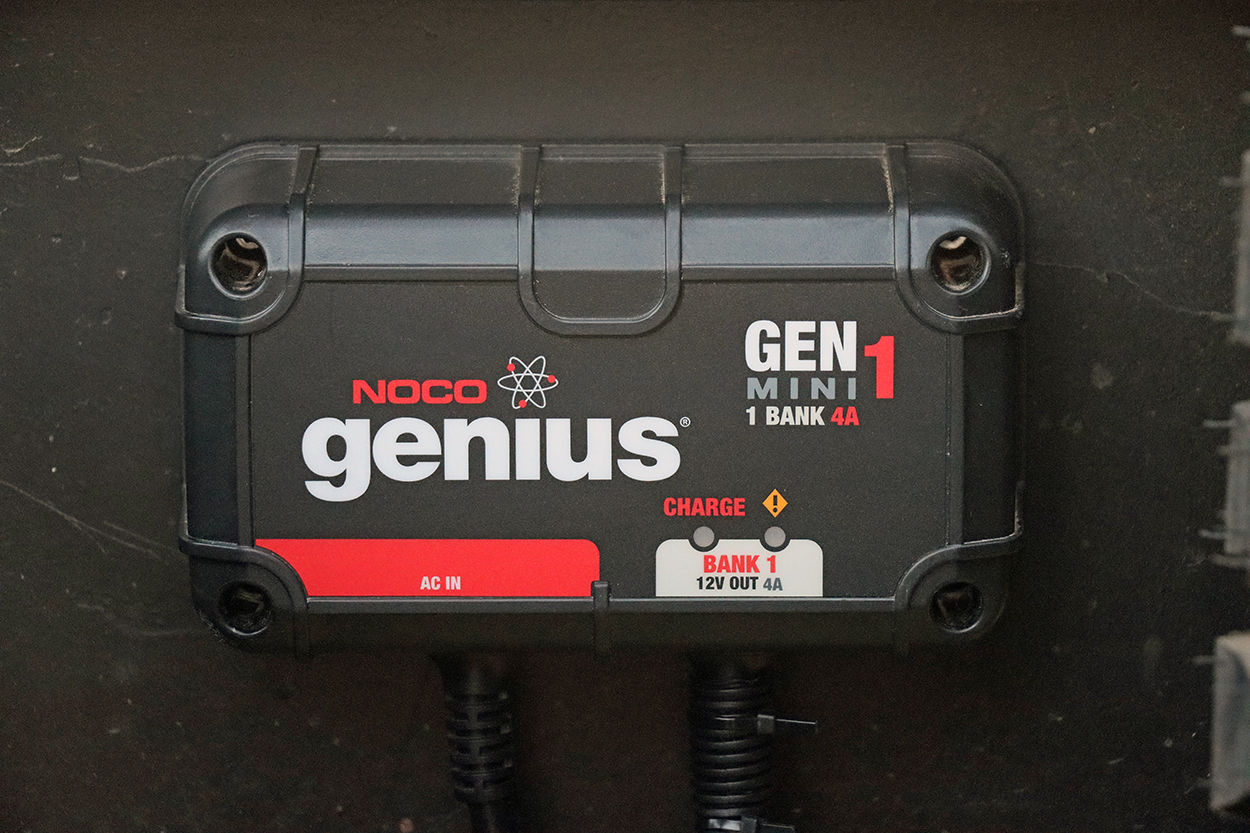
I mentioned that I have a Renogy 50-watt solar panel and Voyager 10-amp charge controller, which provide power to my Interstate battery. This system has worked flawlessly. I’m a firm believer in solar being a must on an overland trailer, but you should also have a second, redundant power source.
I use a Noco GenM1 4-amp on-board charger. This charger uses standard 110V power and charges your battery. You might be wondering where you can find a 110V outlet out in the wilderness…after all, isn’t this an overlanding trailer?
The intent of the on-board charger is not to find a magical power source in the woods, but to allow you to fully top off your batteries at home before leaving on your adventure. In addition, I know I have used my trailer to camp at state parks. Most state parks have 110V hookups.
The charger is simply a reliable secondary power source if needed. I won’t say it is a must, but I do believe it is a great item to have.
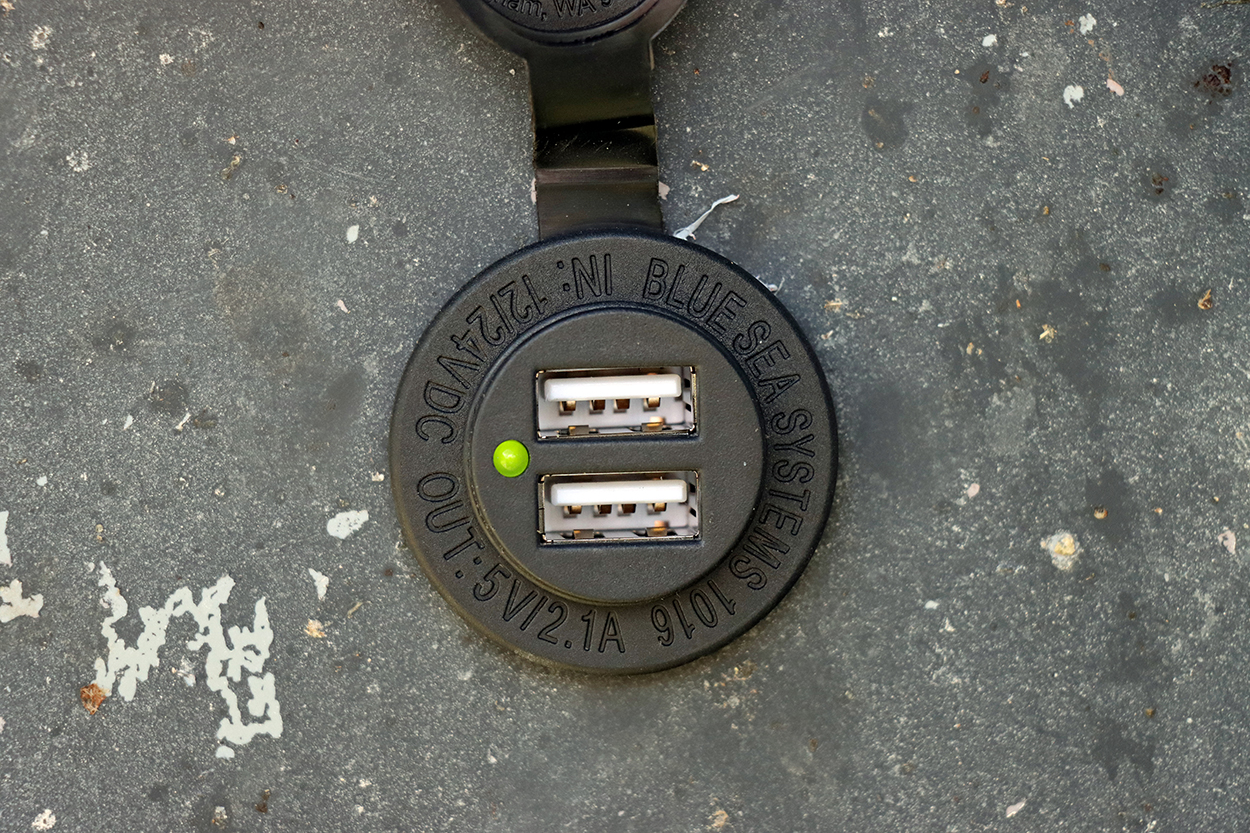
In addition to charging the main battery on my trailer, I also have a Blue Seas dual-USB charger outlet mounted in my main electrical enclosure for charging my phone, lights, camera, and other devices.
This is a great item to install and will help you keep all your devices charged!
Water
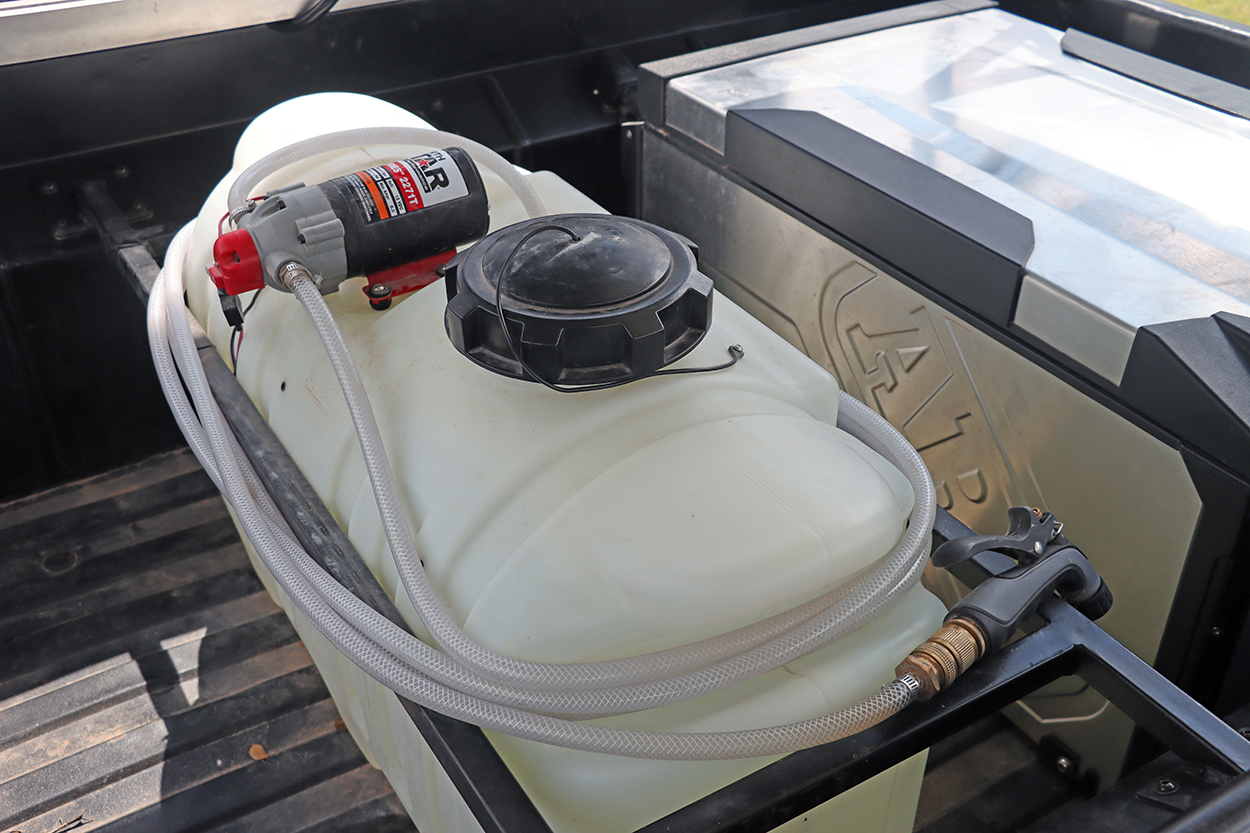
Currently, my water system is used only for showering, washing dishes, and cleaning up. I do not have an on-board potable water system. Can you make an onboard water system for drinking water… yes.
I do believe it is important to mention that there is a proper way to make a potable water system and an improper way. If you intend to use your water system for drinking water, you need to ensure that all components are NSF-61 approved.
I will mention that you probably won’t have any issues if you don’t use NSF-61-approved materials and products; however, long-term use and/or use in certain environments could pose a potential risk to your health.
For me, I found it much simpler to pack a few gallons of water in my cargo area, so I don’t have to worry about filter systems, disinfectants, maintenance, etc. I most definitely could have made a potable water drinking system, but I didn’t have a need. If I intended to go off-grid for longer periods, I would have installed a filtration system, but packing a few gallons of water is much easier.
My water system is essentially a 26-gallon sprayer tank from a hardware store, a 2.2-gallon-per-minute diaphragm pump, a reinforced nylon hose, and a sprayer attachment.
My initial design did not have the sprayer attachment on the end of the hose…But I believe one is needed. Without a sprayer attachment, you can only control the water flow with your electrical system’s switch. Having a sprayer attachment lets you use water on and off while you shower or wash dishes, without wasting precious water. In addition, the pump has a built-in pressure switch that automatically shuts off when you are not using the sprayer attachment.
All in all, my water system is very simple, but it works great for what I wanted it to do!
Table

My original plan for this overland trailer was to have a portable, folding table that I stored in the cargo area. Similar to the hard-wired lights I ultimately settled on, I decided that a hard-mounted table would be most beneficial and worth the extra effort upfront… and it sure was!
I made a custom fold-down table along one side of the trailer, approximately 6’ long and 18” deep. The table itself is constructed from wood, and I used a piano hinge and an aluminum angle to secure it to the trailer.
Stainless steel tabletop options are available, but at a very hefty price point. I kind of like the way the wood looks, and it is much cheaper.

Stainless steel wire cable supports the table in the open position, and permanently mounted bungee cords secure the table when folded up.
I really can’t emphasize how much convenience this table offers. It is so easy to set up the table and have a nice spot to prepare dinner, set up gear, or work on it. Without exaggeration, I can set up this table in under 10 seconds, and it only takes about 10 seconds to put up as well.
Having equipment that makes your life easier not only saves you time but also makes camping and overlanding that much more enjoyable. If you decide to build an overland trailer, make sure to incorporate a quick-fold-down table like this one… it is a must!
Stove
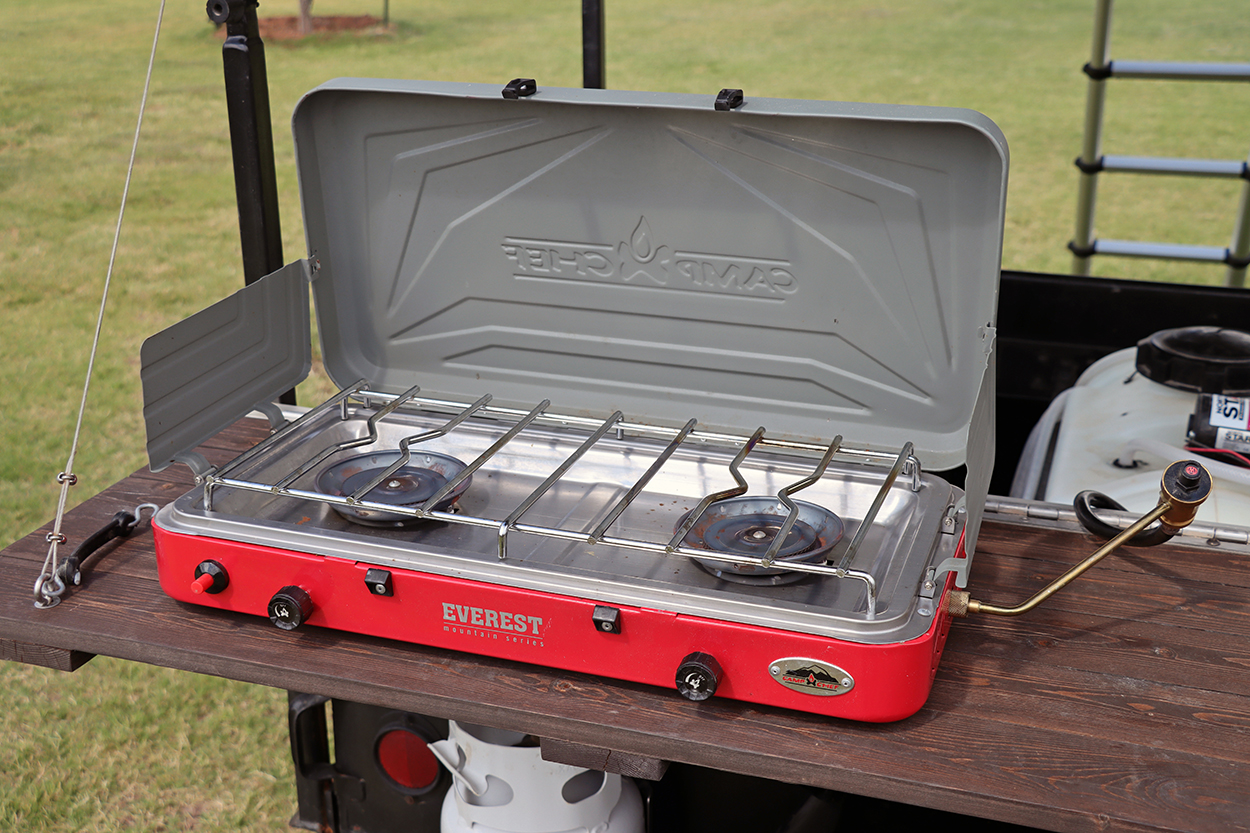
Having the ability to cook food is crucial. Yes, you can go overlanding with food that doesn’t need to be cooked, but having a hot meal at the end of the day (or to start your day) is well worth it.
I use a Camp Chef Everest 2-burner camp stove. There are lots of camp stoves on the market, but I liked this one the best. I only needed two burners, and these can put out heat… over 20,000 BTUs!
The Everest can accommodate pretty large pots and pans, and also has wind shields to help prevent your burners from going out with gusts of wind.

I think the Everest is a great stove and has performed flawlessly for me. If you boil a lot, this is a very good option. The burners can get a pot of water boiling quickly!!
I’ve cooked fajitas, burgers, and much more on the Everest, and it has done a great job!
Propane
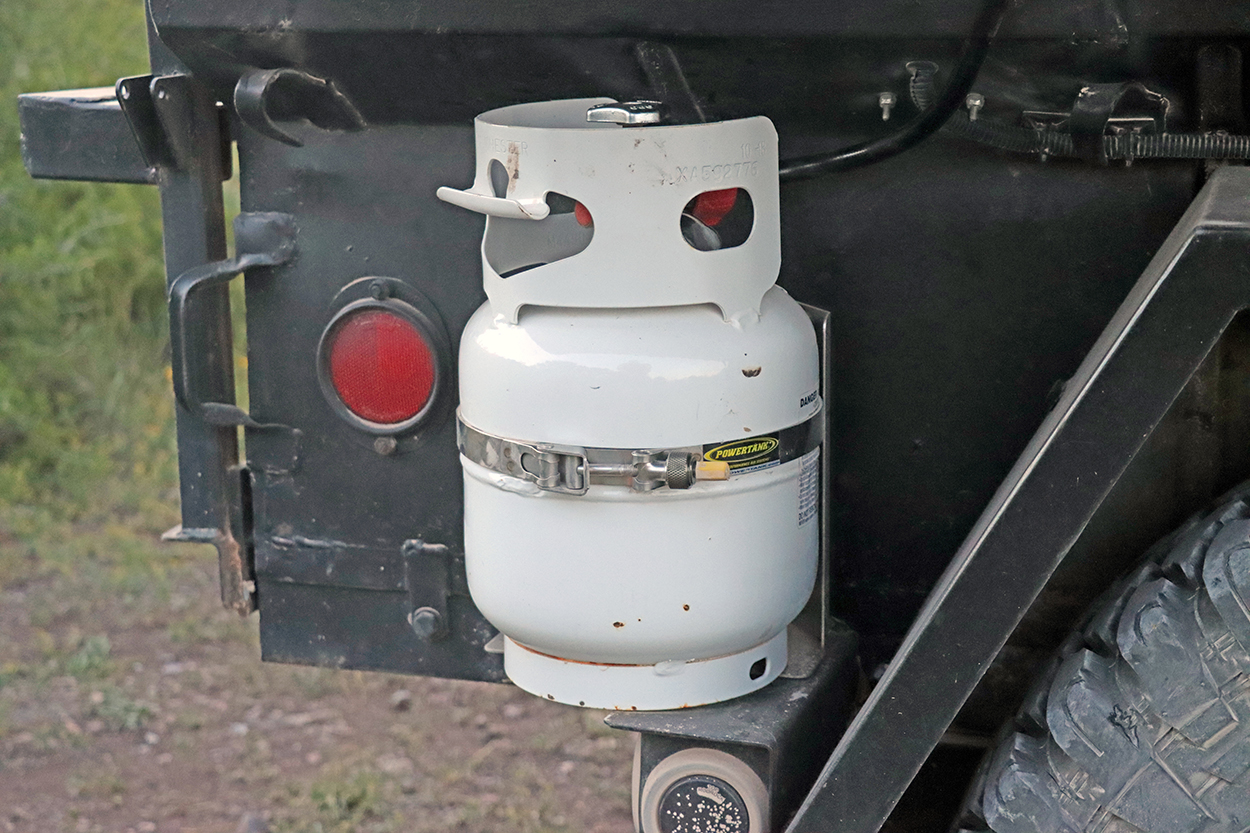
The Everest needs propane to work, so I purchased a 5-pound propane tank. I researched options, with 1-pound disposable propane tanks and 20-gallon refillable tanks among them; however, I ultimately settled on the 5-pound tank. Why?
I could actually use a few 1-pound tanks, no problem at all (and I still do for day camping trips sometimes), but I didn’t want multiple small tanks lying around. In fact, I’ve cooked several meals on the Everest with just a single 1-pound tank. I felt like I needed a bit more capacity just in case, though. On the opposite end of the spectrum, a 20-pound tank is
way oversized for operating a stove and a small water heater.
The 5-pound tank seemed to be a good middle-ground option. It is also refillable at any station that can refill a 20-pound tank. The only downside is you can’t just go to a grocery store or gas station to swap tanks, because a 5-pound propane tank isn’t as common as a 20-pound tank.
This tank has worked flawlessly for me, though, and I have it mounted to a PowerTank bracket, which is attached to the back rear corner of my trailer. The nice thing about this setup is that the propane tank is out of the way, and I have plenty of capacity.
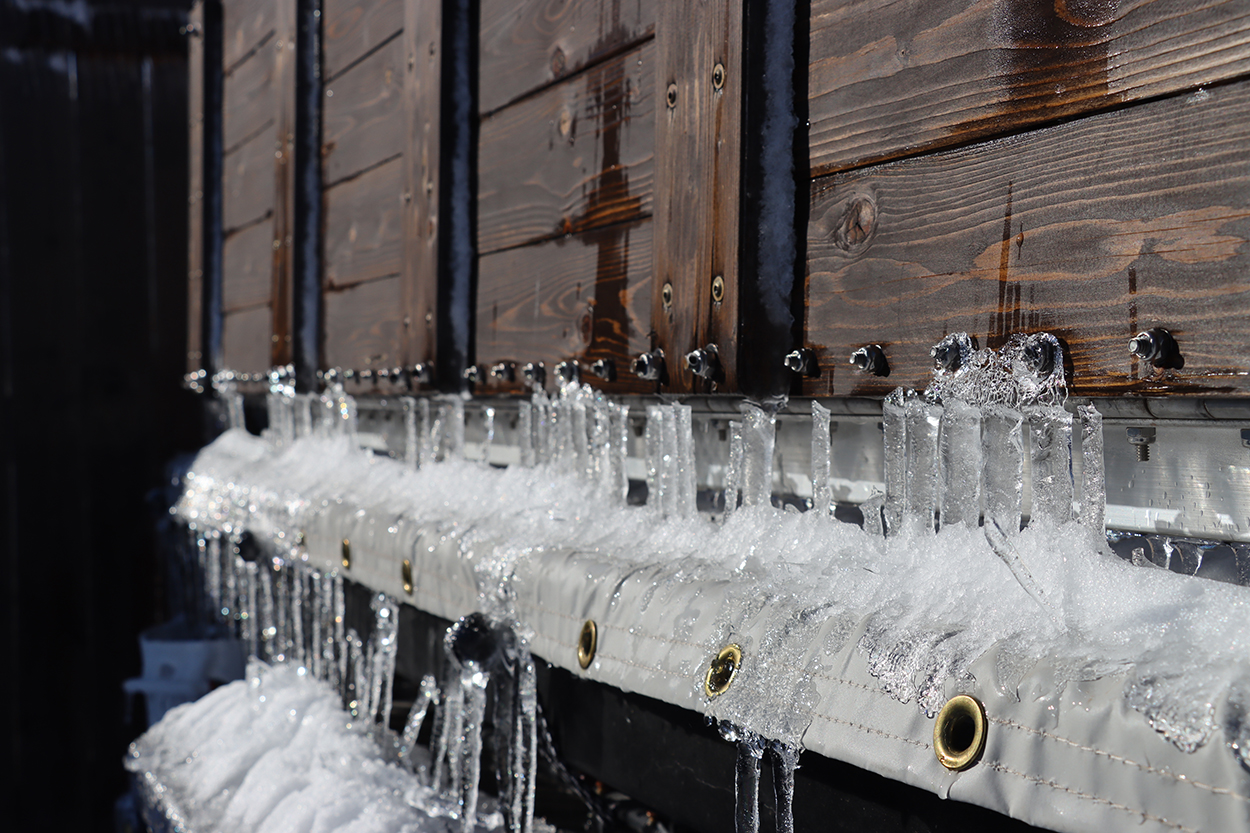
Tarp
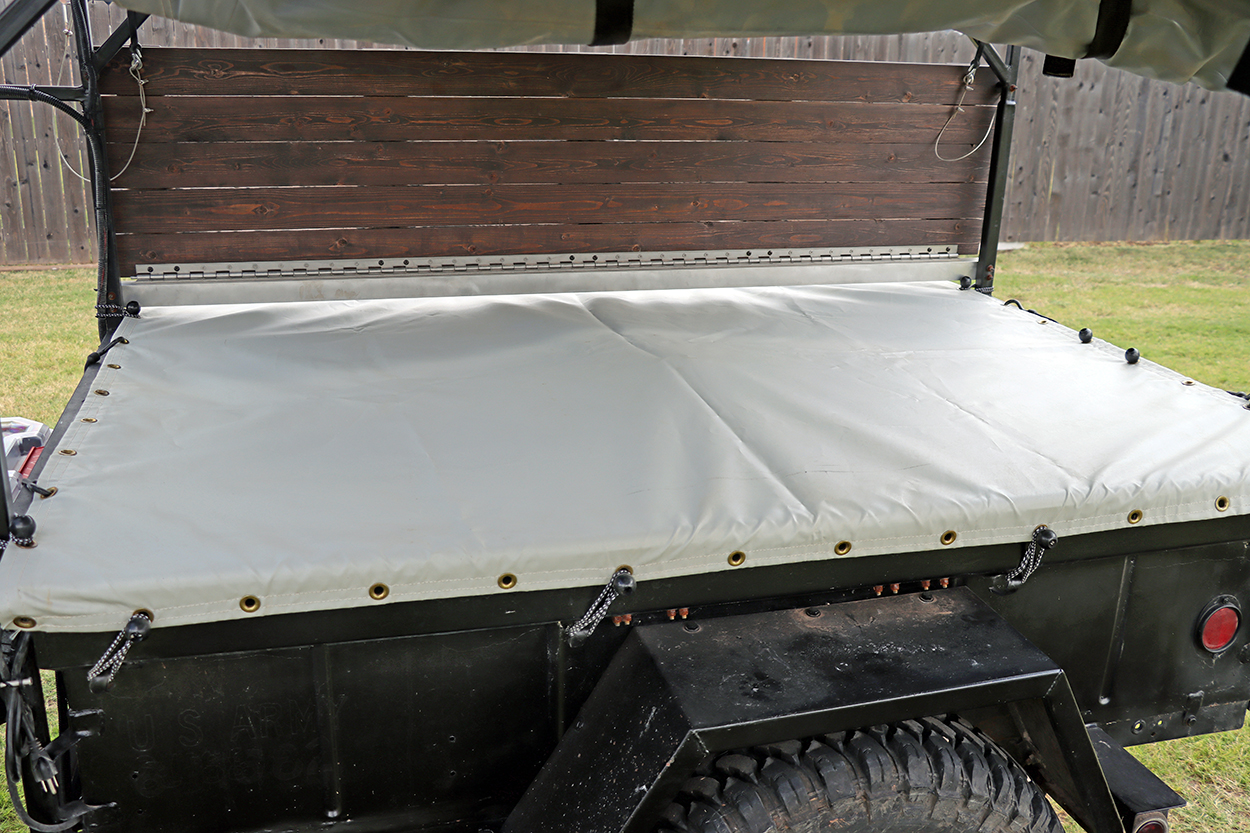
I eventually added a custom tarp from Tarps Now. While my Elements fridge is capable of handling, well, the elements, and anything I put in the cargo area of the trailer will be inside a storage container or protective case, I still wanted to provide a bit of protection from dust, sunlight, and moisture.
The tarp I chose is 22 oz. vinyl-coated PVC with grommets spaced at 6” intervals along the edge of the tarp. The tarp is 6’2” long and 4’8” wide, which has worked very well for the size of my trailer.
I use small bungee cords to fasten the tarp to my trailer, and luckily, the M416 military trailers have good tie-down locations.
While a tarp isn’t an absolute must, I do think it will help extend the life of all my systems inside the trailer, such as my fridge and water system. I drive down many rocky, gravel roads to get to my camping and fishing locations, and the tarp does a good job of keeping much of the dust and dirt off my equipment.
 Tarps Now did a great job on the tarp, and I would recommend them for your application if you decide to utilize a tarp.
Storage Container
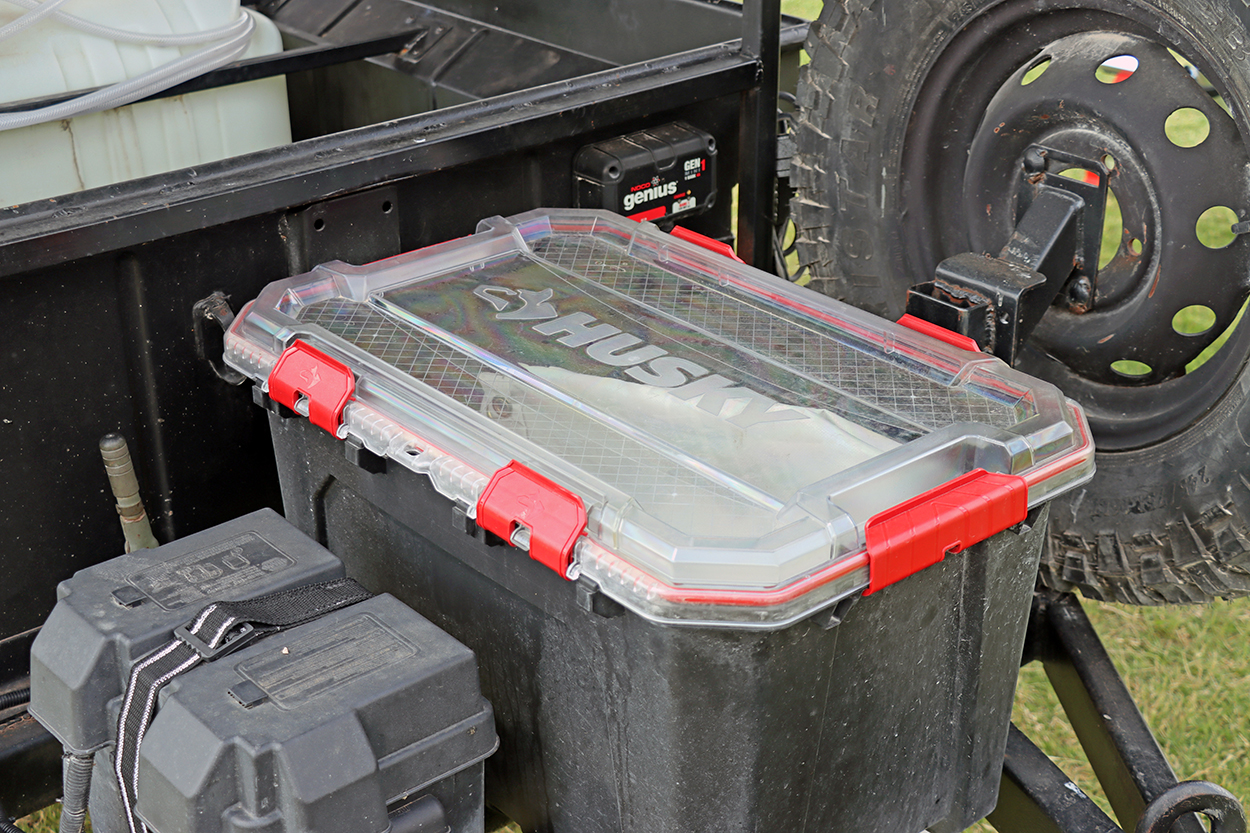
I have a permanently mounted storage container on the front hitch area of my trailer. Originally, I had a trailer tongue box, but dust and moisture found their way inside. As such, I had to upgrade to a more weather-resistant box.
Pelican makes some great cases that I almost purchased; however, I couldn’t justify spending that much on a storage container. After a lot of thought, I got a weatherproof storage container from my local hardware store for less than $30!
This case isn’t as rugged as a Pelican, cannot be submerged in water, and perhaps doesn’t look as good, but at a tenth of the cost, it is a great option … and I’ve had zero issues with it so far.
The case I went with has performed great, keeping out moisture, dust, and debris! It has held up to some abuse, too.
The storage container that I purchased is a great case, and I recommend giving it a shot!
Stabilizer Jacks
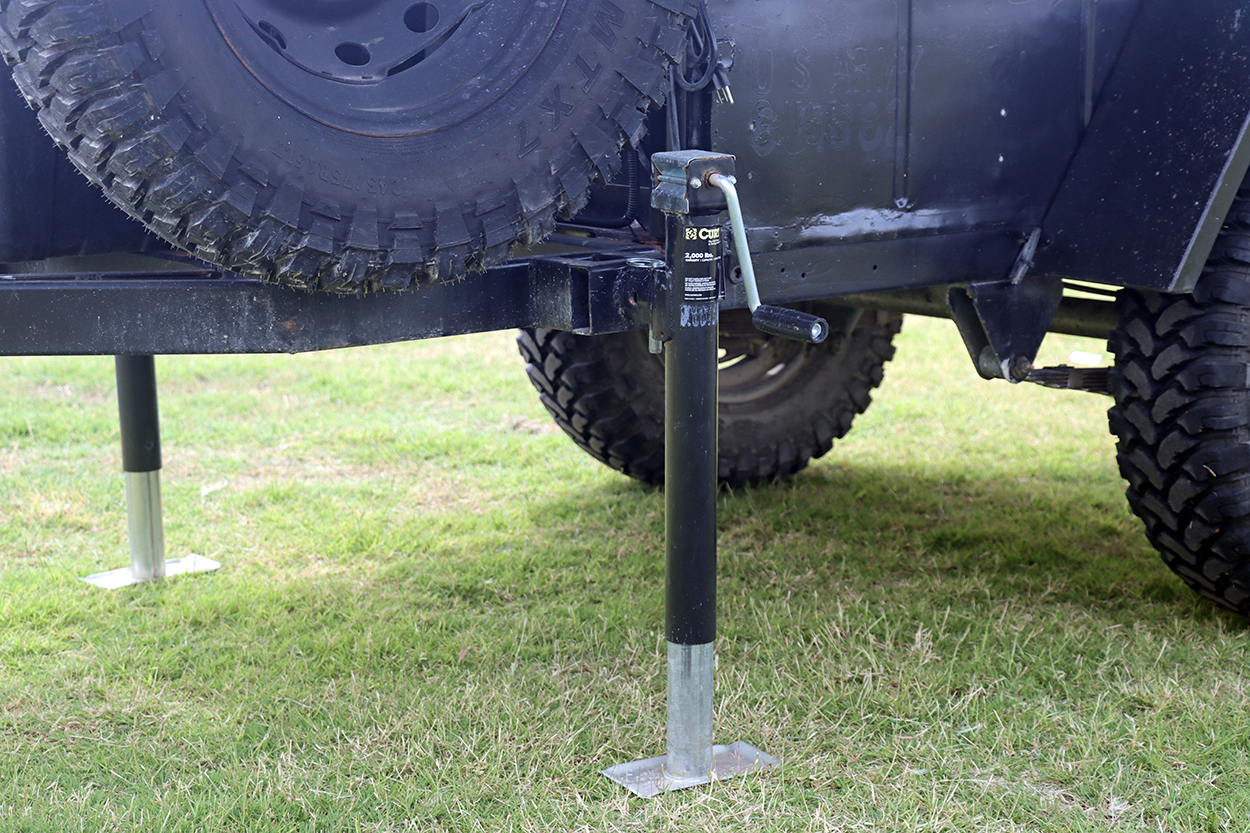
The M416 comes with a fold-down support, but it is non-adjustable and kind of a hassle to utilize. I installed two stabilizer jacks at the front of the trailer for, of course, stabilization, but also for loading and unloading. Before, I had to lift the hitch off my vehicle manually. This was doable, but very heavy!
Now, I can use the front stabilizer jacks to lift/lower the pintle hitch onto my car…much easier and safer.
Tires
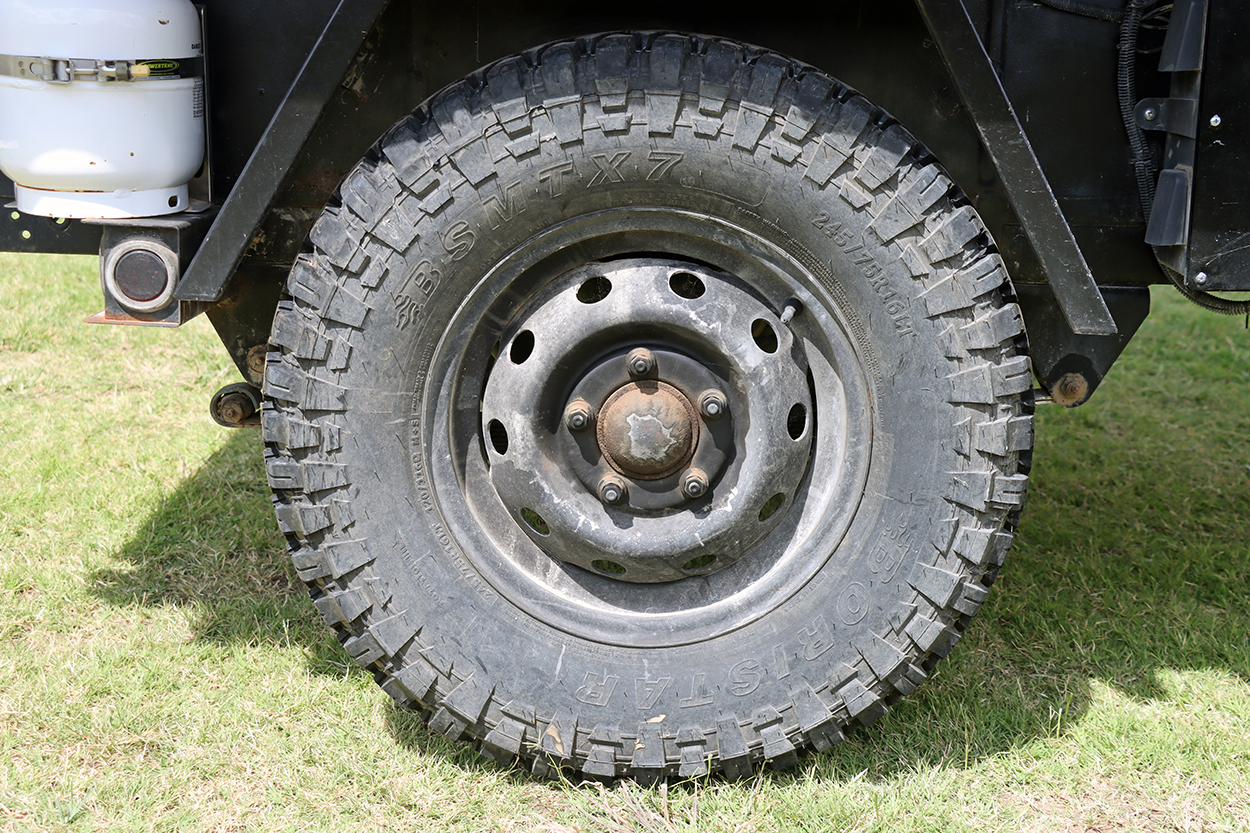
The person who owned this trailer before me had actually upgraded the tires to a 245/75R16LT tire from Boristar. I don’t know much about Boristar, but the tires have held up great and provide great traction off-road.
These tires probably aren’t the ones I would have selected, but since they are in good shape, I won’t upgrade them anytime soon.
It is important to note that good traction tires on the trailer are super important for an overland trailer! Some people have the misconception that you are just pulling the trailer, so why does the tread matter much?
It matters severely when you are off-road, driving on a bank, and your trailer starts to slide down the bank while your car stays put. This can be very dangerous.
Having beefy, good traction tires allows the trailer to stay put and follow your vehicle safely.
These tires from Boristar have some significant tread, and I haven’t had much slippage yet. In the future, I’ll probably upgrade to the same type of tire on my 4Runner so that everything matches, but for now, these tires are doing just fine.
Final Thoughts
In summary, these are all of the main components that make up my overlanding trailer! What I really appreciate about the trailer I built is the functionality and cost. It has proven to be very functional and durable, but I was able to build it at a fraction of the cost of other options out on the market.
I truly believe that building a DIY overlanding trailer is a good option if you are in the market for purchasing an off-road overland setup.
You will save a ton of money, learn a lot of neat skills along the way, and you’ll have a custom-built setup at the end of your journey.
Yes, it is time-consuming, but well worth the time if you can spare it. The main thing to consider is whether overland camping is right for you compared to traditional tent camping or, at the opposite end of the spectrum, using a travel trailer.
I recently purchased a travel trailer, so in my final article covering a DIY overlanding trailer, I will discuss how my overlanding trailer compares to a travel trailer and traditional tent camping. In addition, I’ll discuss some things I might have done differently and the equipment that I plan to install in the future.
Stay tuned until Article 4!