
Victory 4X4 Lower Control Arm Skid Plates + Superior A-Arm Protection: Step-by-Step Install For the 5th Gen 4Runner
Why Skids on Lower Control Arms?
I have heard the question “Why do you even need a skid plate on your lower control arms?” many different times before.
I always pose the answer as another question, why protect items that are almost a foot above the ground and not protect another critical component area that is only a few inches from the ground. The lower control arms hang low, and can only be moved up with a larger diameter tire.
While the factory lower control arms are heavy gauge steel they have a lot of contours and gaps that can get hung up on rocks or logs.
One of the biggest jams I have ever been in was when I drove over a thick branch and my driver tire kicked up the branch like a seesaw to the other side of the vehicle. It wedged between the tie rod and drag link bar of my steering of my XJ.
Luckily, it didn’t cause any major damage but I did loose steering until I was finally able to carefully break it out. I could have easily bent any of my steering components that could have been expensive can be a pain to replace.
Another common scenario is if you are on a rock or above a rut and the front wheels slide off the first thing that is going to make contact is the lower control arms.
Why Victory 4X4?
If you have been following along with my build, I have used a bunch of Victory 4X4 for my protection.
While I have had a few issues with Victory 4X4 in my build they make solid protection and are hitting a price point that is very competitive.
Victory 4×4 install guides and reviews:
- Victory 4X4 Blitz Front Bumper Install + Review
- Victory 4X4 Skid Plates
- Center Console MOLLE Panel
- Victory 4X4 Blitz Rock Sliders
Just about every single company that makes plates offers its own lower control arms skids.
There are options for steel or aluminum and different designs. I choose the Victory 4X4 lower control arms for a few reasons.
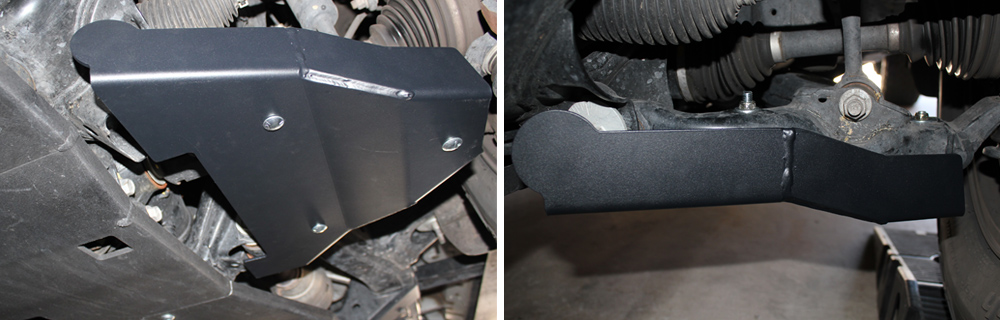
First is because they are 3/16” steel, being only a few inches off the ground they can take a beating. Plus with steel the approximately 10 extra pounds, over what aluminum weighs, is unsprung weight so it will not add stress to the suspension.
However, it will still add to the huge overall rolling mass that our overland vehicles contain. The second is design, I like the fact that the front edge extends in front of the lower control arms bolt for additional protection against rocks. The edge not only extends up the front but also the rear of the lower control arms.
As the rear is important because eventually you will have to put it in reverse, and when you do it is nice to know there is still a nice rounded edge that won’t catch your vehicle up.
The final reason is price, for $149 for powder coat skids plus free delivery it really can’t be beaten.
Find it Online:
- Victory 4X4 Lower Control Arm Skids – Check Price
Victory 4×4 LCA Skid Plate Step-By-Step Install

Normally Victory has a PDF and Video for their installs, however, not on this one.
I figured it was a pretty straightforward install until I got under the vehicle and realized the hole that lined up with the tire side bolt was not large enough.
Before I broke out the drill, I called their tech support to verify that I am not wrong. Chris did a great job ensuring my questions were answered.
I began the install for the second time.
Included Bolts & Placement For Installation

For the sake of simplicity, the bolts near the tire will be called tire bolt, then the hole closest to the bumper will be the front bolt, and the inside will be the rear bolt.
Tools Needed:
- Drill
- ½” Drill Bit
- 14mm Socket and Wrench
- Degreaser and Paint
Step 1. Use 1/2″ Drill Bit To Widen Hole Nearest Tire

At the small hole nearest the tire use the ½” drill bit to widen it out. A sharp bit will help with the steel.
Once complete, use a degreaser to clean it up and hit the bare metal with paint of your choice to keep rust at bay.
Note: The supplied bolts look like the same sizes, however, there are 4 – 3 ¼” and 2 – 3 ½”. The longer bolts are supposed to be for the tire bolts and spacer, but more on this later.
Step 2. Use 14mm Socket To Loosely Tighten Tire + Front Bolt

I started with the tire bolt and aluminum spacer, as it is much easier than trying to place it later.
Use a 14mm socket, but I am sure that a 9/16 was probably the correct size. I loosely tightened the tire bolt and the front bolt, as you need all bolts in before torquing them down tight.
For these two bolts, there is not enough space for a deep socket, as you do want to damage either the CV or steering boots.
Make sure you’re using the right bolt sizes for placement

The rear bolt is where I came into issues it did not extend beyond the opening on either driver or passenger lower control arms.
I called Chris at Victory 4X4 again and he confirmed the bolt sizes and placement were correct.
I am not sure if there has been a change from Toyota on the lower control arm dimensions but it seems that longer bolts were in order. A short trip to the hardware store solved the issue.
Final Thoughts
Once installed they look great, but it’s way to clean for my vehicle.
They won’t stay clean for too long on my vehicle as fall is in full swing and the Desert is finally bearable.
These lower control arm skid plates provide a ton of protection for little sacrifice to weight or my wallet.
They are an extremely low profile as they contour to the lower control arms. Looking at the skids from head-on they only give up a slight amount of ground clearance, however, you can see how much protection is offered as it nearly goes to the top of the arm, and fully covers the bolt from rock damage.
Did u end up picking up another 3 1/2 bolt for the the back side. I’m at the same road block. Bout to head out to the hardware store as well.
For sure, the longer bolts are needed.
Thanks for the review. Have you had any issues with the nuts that secure the skid to the LCA coming in contact with the adjacent rubber boots? Seems like there is an increased risk that the nuts could tear into the boots upon articulation? Thoughts? Thanks.
Good Question, however, there are no worries as the all move together for the most part and there is plenty of clearance. I’ve had them to the extreme and no issues.