
Morimoto XB LED Fog Lights Installation & Review on 5th Gen 4Runner
We picked up a set of these Morimoto XB LED fog lights after being so pleased with the new Morimoto 2Stroke 2.0 LED H11 low beams.
These fog lights are going to provide a bright white (5500k – pure white), an easy install, all while being a DOT-approved (street legal) application. Similar to that of the current 4Runner factory LED fog light upgrade, yet offering a few more features.
If you are looking to go LED, increase your light output, and widen your beam pattern, these Morimoto XB LEDs are a great choice.
Although there are other popular fog lights for the 5th Gen, most higher lumen output options aren’t street legal and are really made for off-road use rather than on-road.
One notable highlight is that the Morimoto XB LEDs are adjustable. With a twist of their aiming adjustment screw, you can aim your fog lights up or down. This is pretty convenient because most of our trucks sit at different heights and getting your fog light pattern just right is a huge plus.
Morimoto is well known for making quality lights with everything from their in-depth tested light outputs, precise beam patterns, stunning build quality and more. There were some conversations around the interwebs that this specific fog light did not fit the 5th Gen fog light housing.
There were some guys that left the product great reviews and others that claimed it did not fit. We wanted to see for ourselves what these fog lights were all about and exactly where the fitment issues were coming from if any at all.
The Morimoto XB LED Specs:
- Morimoto XB LED Lights: Check Today’s Price
- Don’t forget the adapter – H11 Adapter: Check Price
- Light Source: 3x Philips Luxeon-T
- LED Optics: Kuria-2 Projector Fog Lens
- Intensity: 2400 Lumens (1200 per fog light)
- Kelvin Rating: 5500K (pure white)
- Input Socket: Sealed H11 Male
- Weather Rated: IP67 Waterproof
- Lens Material: High Impact Polycarb (UV-Resistant)
- Shell / Heat Sink: Powder Coated Cast Aluminum
The kit will include two fog lights and two adapters (you may need to add the adapter kit separately). The H11/H9/H8 Male adapters are what you should be adding, and yes they are compatible with our H16 fog light. The fog lights are passenger and driver side specific. You can note the orientation by the writing on the bottom of the fog light.
Morimoto XB LED Installation

This is going to be a quick overview of how to install the Morimoto projector fog lights for the 5th Gen 4Runner. For this install, we are going to take off the front bumper to install and mount the lights. Removing the front bumper is not required but since we had our front bumper off for another project, it did help and allowed us to get better photos.
If you are unsure on how to remove the front bumper, check out C4 Fab Lo Pro Install.
For fitting the actual housing, the tabs are a little too wide and don’t perfectly slide into the slots on the bumper. You have a couple of options here, you can shave off the plastic on both sides around the outside, or just pinch the two tabs and slide them into the slotted tabs.
You essentially have the same option for screwing the other side down. You can bore out the two holes in order to get a little more play, or you can pinch/squeeze the tabs into place, and screw them down. Based on the images, you can see the amount needed to squeeze. It was minimal.
The adapters don’t come pre-assembled so you will need to check the polarity of the lights
Step 1: Test polarity & Plug Prongs into Socket

To test the polarity, you can start with the fog light housing and nothing yet assembled. With the fog lights turned on, you can disconnect the factory fog light housing and plug the prongs into the OE socket. If the first attempt does not work, just switch the orientation of your positive/negative wires.
Once you have the correct polarity, plug in the prongs to the supplied male socket.
The jagged edges of the prongs go towards the outside of the plug. You may need to gently wiggle them back and forth for them to slide in. Push them all the way in until the rubber grommets are seated at the end of the wires.
Reverse the Polarity if needed

If you plug your lights in and they don’t turn on, you need to reverse the polarity. Doing this is simple. Grab a tiny flathead screwdriver and from the inside of the prong, pull to the outside, then turn your screwdriver so it’s perpendicular to the head of the prong and press down. It will pop right out. I have had to do this a few times.
Connect Fog Light Wiring Harness to H11 Adapter

Connect the socket from the fog lights into the H11 adapter.
Test the Fog Lights

Once you have the adapter and socket from the fog lights connected, test your lights again to make sure everything was correctly connected.
Fitting the Fog Light Housing to Bumper

Because the tabs on the fog lights are slightly too wide for both the screw holes and the slots on the inside, you will need to make an adjustment somewhere. As I mentioned above, you have a couple of options here.
Outside screw holes:
- Bore out the holes for the screws
- Pinch the tabs inwards and drill down your screws
Inside tabs:
- Shave off the outside edges so they slide into place
- Pinch the tabs inwards and slide the fog light housing into place
I chose to pinch the tabs in on both the inside and outside of the fog light housing. The fitment is tight but not overly tight that it’s damaging your 4Runner or the fog light housing.
At first, I was concerned about the plastic bending, putting a strain on the fog light housing. But, after seeing everything come together, my worries went away. To each their own, though. Each method will get the job done.
Top View of Lights Mounted

Here you can see the screws on the outside and the tabs on the inside. Everything fits and we are ready to through the bumper back on. Again, you don’t need to remove the bumper for this install. Hopefully, the photos we got will be enough to give you a good idea on how you want to approach the install.
Headlight Aiming Adjustment Screw

To measure the beam pattern, mark a line on a wall with some painters tape. Park your 4Runner on a level surface about 12 feet away from a wall, garage or any other flat forward facing surface. Either raise or lower each side until you have reached your desired fog light height.
To adjust the fog lights, you’re going to tighten it or right to tighten and raise the level of the fog light or left to loosen or to lower the level of the fog light.
- Right to raise the lights
- Left to lower the lights
That’s it, you should be good to go!
Final Test & Adjust Fog Lights to the desired height
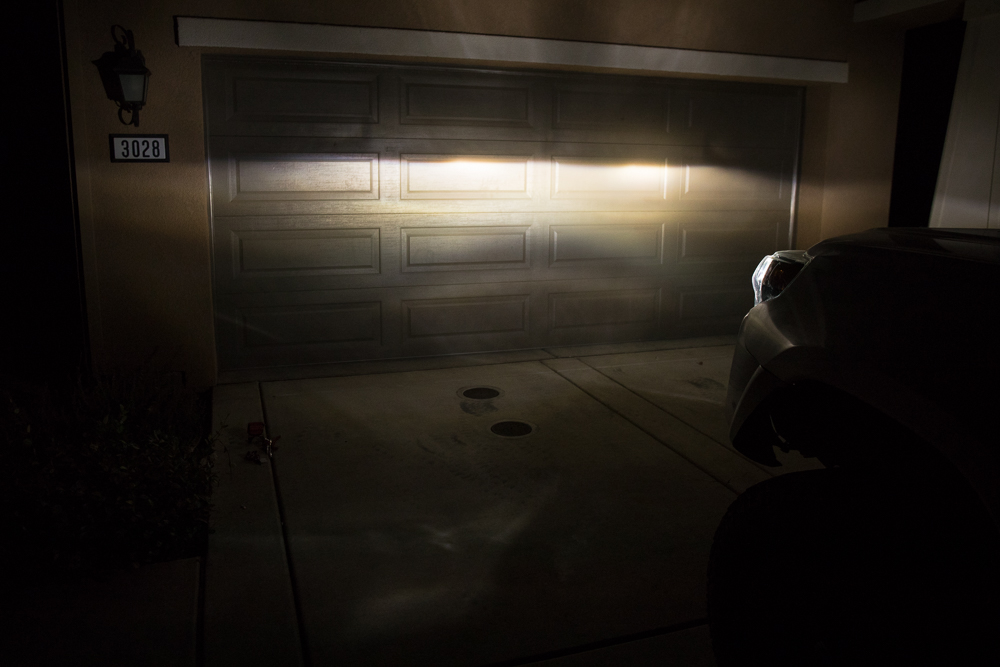
We put the Morimoto 2Stroke 2.0 LED (H11 – Low Beam) and the Morimoto XB LED Fog Lights up against our other 4Runner with Xenon Depot H11 HIDs and KC HiLiTES Gravity G4 Fog Lights. The results are shown below.
Although we are comparing apples to oranges with the LEDs vs. HIDs, it still gives you an idea of what you can expect.
With the fog lights, the comparison below really gives you an idea of how sharp the cut-off line is on the Morimoto XB LED Fog Lights.
Morimoto 2Stroke 2.0 LED (H11 – Low Beam)
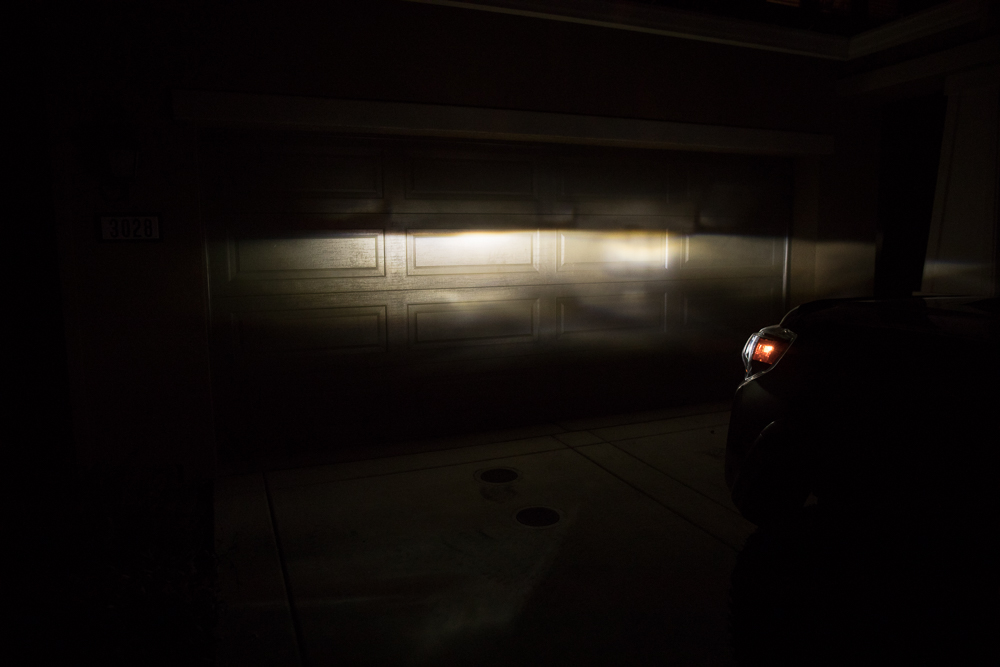
Morimoto H11 + Morimoto XB LED Fog Lights

Morimoto XB LED Fog Lights after Adjustment

The adjustment screw is AWESOME. After I adjusted the driver side fog light down to meet the passenger side, I tested the lights by hitting the trail. The fog light pattern seemed a little low to me so I adjusted them back up to where the low beam pattern starts. This ended up being perfect. Having the flexibility to adjust your low beams that easy is nice. With other lights like the Baja Squadrons, you need to get creative in how you adjust your lights.
Xenon Depot H11 HID
Xenon Depot HID with KC Gravity® LED G34

Do these LED fogs need to be trimmed on the side of the tabs that insert? I have to use some force to get them in to where I can insert the screw on the other side. And there is still a gap that is seen in the outside.
These don’t fit flush or as good as factory, I would skip these considering the price.
The only fitment issue I have is that the fogs do not sit flush with the bumper. There is a small gap where you can see past the fog light into the bumper. I debated between these and the Toyota fogs and I ended up with the Morimoto. I like the look and you cant tell unless your looking up close but I bet the Toyota LED fogs sit flush and would provide a similar output.
I have had these fogs for the last year and absolutely love the appearance and the performance of these fogs, Morimoto makes amazing products
How did you mount the lights? Did you squeeze fit the tabs or sand them down/out? I really like the factory look of these fog lights and the fact that you an adjust them is awesome.