
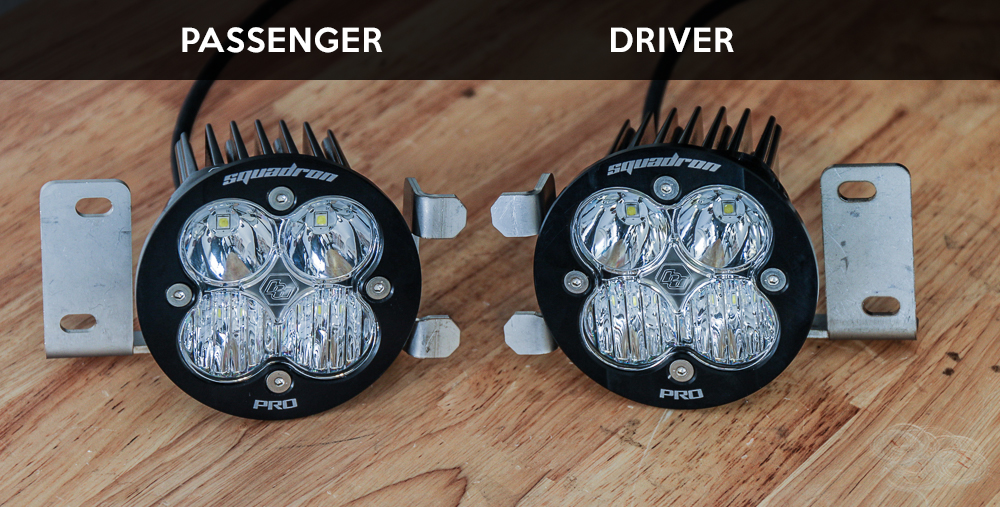
Squadron-R Pros Fog Light Install with Flush Brackets: Rounded Bezel Fog Pocket Kit
There are plenty of options when it comes to squadrons. But, these squadrons might not be the best option for your fog lights as they are a little too bright. We recently wrote an article on the LED fog lights and they were pretty impressive. This is another good option to consider for your fog light housing.
Off-Road LEDs or LED Bulb?
The Squadron-R Pros and Sports are going to be much brighter than an aftermarket H16 LED bulb, but this also might be a problem. The Pros are too bright to run on-road in every day driving conditions.
These lights are not street legal and not DOT (Department of Transportation) approved for on-road use. This means you run the risk of being flashed by oncoming drivers.
If you want to use your fog lights as daily driving fog lights, then you should probably look at a set of H16 bulbs. We installed a great set of Philips LED H16 bulbs in our other 4Runner and they work as advertised. Even with the stock halogens headlights, the H16 bulb washed out most of the orange/yellow hue that the halogens project.
Squadron-R Pros – Overview
If on the other hand, you don’t care about getting flashed or have plans of wheeling often, then keep reading. LED lights by Baja Designs are truly the way to go when it comes to off-road lighting. These lights can be mounted as ditch lights, fog lights, and many other areas.
Enjoy 4,900 lumens utilizing 4 Cree LEDs. The Squadron-R Pro’s lightweight and powerful capabilities make it the ideal companion for all of your late-night off-roading adventures. Relish high-performance and durability with nearly 50,000 hours of auxiliary light. As always, Baja Designs offers a 30-day satisfaction guarantee & a limited lifetime Warranty.
Baja Squadron Options
Black/ White Face options, Flush Mount options, with Amber Light options as well. They also come in multiple pattern options; including Driving/ Combo, Wide Cornering, Spot, and Flood.
Squadron Lineup
- SAE Kit: Check Price
- Squadron-R Sport Kit: Check Price
Step #1 – Getting Organized

The first thing you should do is get familiar with the kit. If you ordered the fog light bracket kit, it comes with the conversion wiring kit and the brackets. What you are looking at here is all you need for this install. All you need is what is pictured above. If you are doing a ditch light install, then you will need the other wires that the kit comes with.
Step #2 – Allen Down Brackets

Step #3 – Bracket Positions
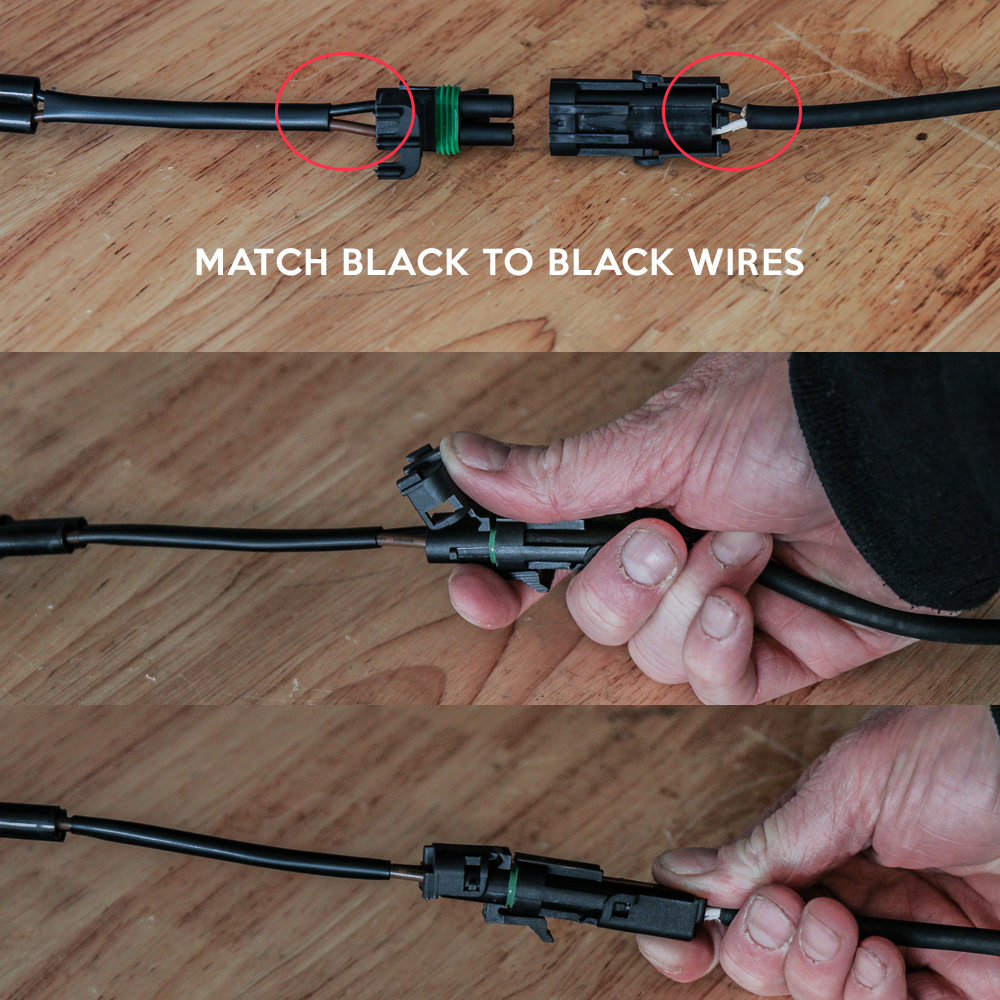
Step #4 – Connect First Section of Wire


Step #5 – Connecting Conversion Wires
Step #6 – Assembly Almost Complete

Step #7 – Remove Squadron Plate for Bezel

Step #8 – Allen Down Rounded Bezel

Step #9 – Ready to Install Baja Fog Light Assembly

Step #10 – Remove Fender Liner


Step #11 – Push Fender Liner Out of the Way

Step #12 – Remove Factory Fog Light Assembly

Step #13 – Install New Fog Light Assembly

Step #14 – Test Lights

Step #15 – Ziptie Loose Wires

(PASSENGER) Note – Splash Guard Housing

You will not be able to use this splash guard again. You should save your OEM fog light housing and this splash guard just in case. This splash guard will not fit back into place with the new Squadron brackets.
Pros or Sports – What is the Best Option for Fogs?
The Pros are bright. Extremely bright. They are so bright that we will probably take them out of the fog light assembly and order a pair of Sports cornering lens. The Baja Design Pro’s are not meant for on-road use. The Sports are going to be bright as well so it is on you to use your best judgment in what to buy.
The difference between the driving/combo and the wide cornering is how much light they throw off. The driving/combo lights will send a wider light (both laterally and vertically), causing people to think we are running high beams. The cornering lens will send wider light, more laterally over vertically, but you will still see up/down increased performance from the Sports over the factory fogs.
We are going to grab a pair of the Sports and then use the Pros as the ditch lights.
Xenon Depot HID Low Beams

Xenon Depot LED High Beams

Factory Fogs with Xenon Depot LED Low Beams
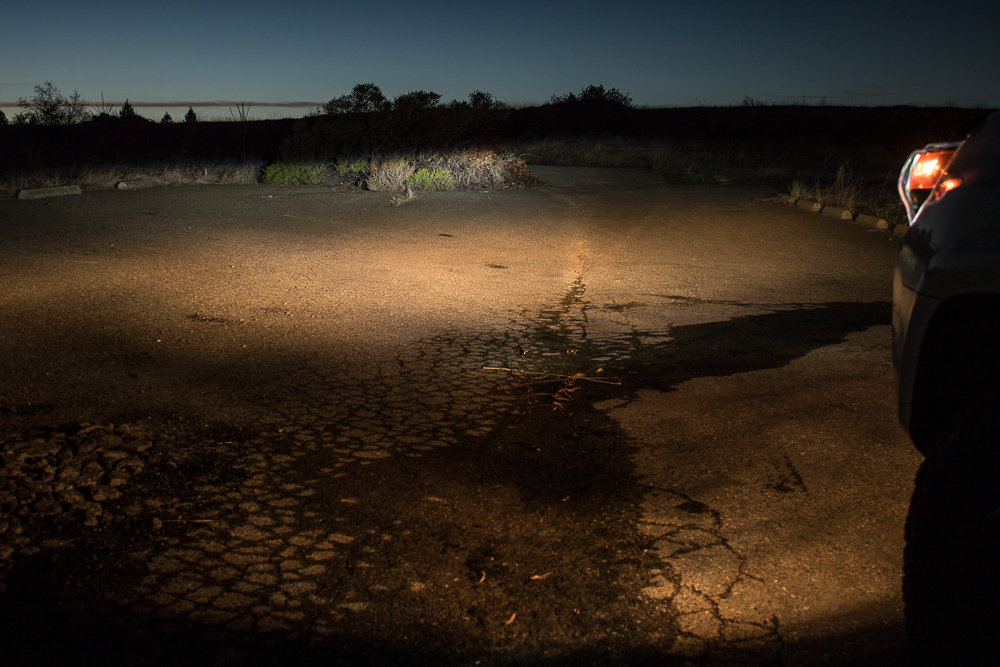
Baja Squadron-R Pros with Xenon Depot Low Beam HIDs

Do i still need to get the bezel kit? Cos im already running the sports wide cornering that comes with it
Curious if you think the Baja Squadron White SAE lights are worth the extra $230 over the Diode Dynamic SS3 White SAE fog lights?
did anyone who after installing these, thier DRL lights werent working? but when you pull for high beam, the high beams work?
great write up, thank you.
Thanks for the write up. Just received mine. There are two issues I think should be updated.
1. There are rubber pads that must be installed on the brackets. Must be new as the kit you have does not have them.
2. There are lock washers and flat washers in the kit. I can not find any info as far as placement for these.
As far as I can recall, the pads were for the passenger side (don’t have the instructions in front of me) and were probably for the 10-13 4Runner.
Also, keep in mind that this is also the kit for Tacomas so not every piece of hardware will be used.
Can you contact us send over a few photos? I can update the post here.
Your site has tons of great and useful write ups.
More so, I am impressed by the fact that you were able to take (very helpful) images in areas in which one can barely squeeze his hand in, let alone a camera. For example, getting images from the passenger side is no easy task.
Just finished installing the Squadron Pro Driving Combo. I connected the lights to my sPod (yup, the fog light switch is not connected to anything now)
I can dim them to be useful on road and use full intensity for a killer off road performance
Thanks for a great site!!!!!!!!
That’s awesome. Yeah, I know that is how Max from Explore4R.com has his fogs wired. That is a great option to control the light intensity, good call there!
Did this install over the weekend. This awesome guide helped so much. Getting the fender liner out of the way was some what tough while not trying to break any of the clips. Went with the squadron sport amber wide. Such a huge upgrade over the stock fog lights. Order through Rago Fabrications, great service and had the lights and the brackets in a nice kit. It also helped getting into the tight spaces by turning the front tires out of the way. Gives you a bit more space to work.
I have been putting this install off on mine. I didnt know how in depth it is. Like the article! Looks like it will take less than an our to do both sides.
Forson,
Really easy install, the only part that took a bit of patience is removing the splash guard on the passenger side. Other than that, the install is quick. I would say 35-45 min, tops.
OMG!!! This too much. I don’t know if I can get by. They are not blinding but the amount of light and spread in the evening is ridiculous. I think I am going to return them for the Squadron-R Sport. Would I be using the same bracket and the install I am assuming is the same.
Shaf,
They are bad ass right!!! Totally worth every penny, huh! I would strongly recommend the sports over the pros, if you are using them in the fog housing. Even with the sports, it will still be incredibly bright. The same bracket on both the pros and the sports.
I just this install and it was extremely easy on the 2017. I got the Squandron Pros Wide Cornering Amber and WOW! these are incredible. Super bright in the daytime with full sun. I have not seem them at night yet. I am going to roll the dice and hope that these do not blind anyone coming or from behind. I am hoping the amber in wide will be diffused enough not to bother and no tickets from the Five-Oh. The only minor item I forgot to do was zip tie the excess but I an not too worried about it and will get at it whenever I have to get down there again. Thanks for the recommendation.
Next mod I want to do to mine except in yellow
g_5280 on instagram
Gabriel,
Awesome, yeah this install is super fun, easy and the results are amazing. Whether you go with the Baja Design Squadron Sports or the Pros, you will not be disappointed. I honestly don’t know how I drove without these lights for so long.