
Alpine PWE-S8 Underseat Subwoofer Step By Step Install On the 5th Gen 4Runner
The stock 4Runner sound system may not have enough bass for your preferences.
An under-seat subwoofer is a great option to get more bass without taking up lots of space in the trunk. After a lot of research, I chose the Alpine PSE-S8 and I am pleased with the results.
It helps to fill in the missing bass nicely. It’s not a window shaking monster, but I listen to some bass-heavy music and am still happy with the improvement over the factory sound system.
If you are not looking for something incredibly bass-heavy but rather crystal clear sound with punches smaller punches of bass, check out the OEM audio plus system. It’s going to be a little more expensive but everyone that installs it seems to really like it.
Products & Parts Needed For Install:
- Alpine PWE-S8 Subwoofer: Check price
- 1000W Wiring Kit: Check price
- Wire Crimps: Check price
- USA made crimper: Check price
- T-Taps: Check price
- Wire Harness Tape: Check price
- Zip Tie Surface Mounts: Check price
- High Temp Tape: Check price
Alpine PWE-S8 Underseat Subwoofer Install
- Remove Seat
- Cover Vent
- Attach Subwoofers
- Run Powder Supply Wire Through Firewall
- Connect to Battery
- Organize 12V Line in Engine Bay
- Organize 12V Line Near Footwell
- Remove the Center Console
- Tap into Stock Speaker Wires
- Attach New Speaker Wires
- Tap Remote Wire
- Attach All Wires to the Sub Harness
- Clean up All of The Wires
- Attach Remote Control
- Connect the Ground & Final Adjustment
- End Results & Final Thoughts
OVERVIEW OF WIRES

A subwoofer can pull quite a lot of amps so you will want to use a thick wire for the power supply and ground.
The wiring kit will come with 4 wires that you will use.
Assuming you buy the same kit linked above, you will use the blue wire for the 12V supply. This will be connected directly the battery, passed through the firewall, and then connected to the subwoofer.
The black wire will be used to connect the subwoofer to the closest ground, in this case, one of the bolts for the seat.
The clear speaker wire will be used to connect the subwoofer to the stereo.
The grey wire will be the “remote” wire that you will connect to a 12V source that is only on when the rest of the accessories are on, in this case, a 12V outlet in the center counsel. This will tell the subwoofer when to be on.
The wiring kit will also come with a large fuse that you will connect inline to the power source line. The subwoofer will also come with a wire harness that you will solder or crimp all of the connections to. It will also come with remote control.
Step 1. Remove Seat

Start by disconnecting the ground on the battery and then wrapping the ground in a rubber glove or similar so it won’t accidentally make contact later.
If you leave the battery connected with the seat disconnected you could possibly cause a fault in the airbag system.
Remove the 4 bolts holding the seat to the floor and then disconnect the wires under the seat. I leaned my seat back and out of the way instead of removing the heavy seat entirely from the vehicle.
Also, remove the kick panel trim to the left of the seat.
You can remove it fairly easily by just grabbing it and pull up on it. Don’t worry about breaking this trim.
Step 2. Cover Vent

The foot vent under the seat will blow directly on the subwoofer and possibly overheat it.
Cover it with duct tape or similar. I used some high-temp tape.
Step 3. ATTACH SUBWOOFER

Attach the supplied brackets to the subwoofer only on the side closest to the vent.
Place the subwoofer as shown in the photo, centered with the seat bolt holes and as close to the vent as possible. I used some ¼” screws I had on hand to screw the brackets into the carpet.
You can find some similar screws at your local hardware store.
You should only use the brackets that are closest to the vent because there is padding below the carpet here that will prevent the screws from rattling on the metal floor.
If you use the brackets closer to the rear of the vehicle there is no padding so the screws will likely rattle on the floor.
Step 4. Run Powder Supply Wire Through Firewall

Use an X-Acto or similar knife to cut a small hole through the large grommet on the firewall near the ABS module.
Push the thick blue wire through the hole. A small amount of soap will help with this.
Look for the wire from the driver’s side footwell and the wire should be easy to spot. Pull it through roughly 7 feet.
Step 5. Connect to Battery

Connect the blue wire to the positive line on the battery. A ring crimp will work well for this.
Step 6. Organize 12V Line in Engine Bay

Run the wire between the fuse box and battery and then along the driver’s side engine bay wall.
Attach the wire to the wall with the zip tie surface mounts. Find a convenient place to mount the fuse on the wall and then cut the line to attach it.
Step 7. Organize 12V Line Near Footwell
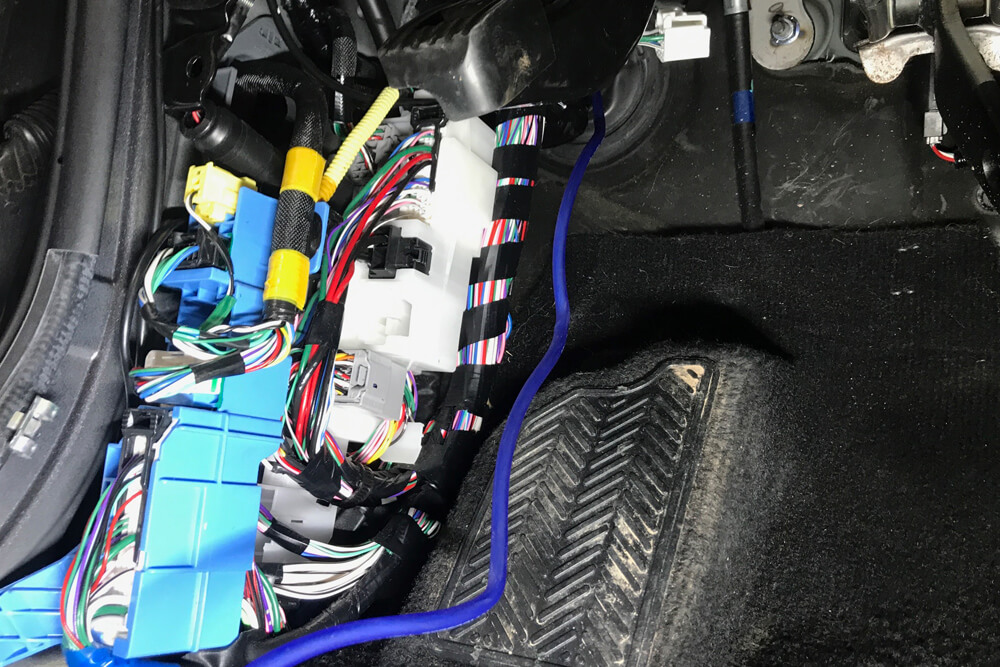
Remove the plastic trim on the left side of the footwell.
There are a few clips holding it in as well as a plastic bolt toward the back. Tuck the blue wire behind the existing wires so that it won’t be in the way of the trim.
You can then run the blue wire along the door and then tuck it under the carpet so that it comes out where the rear driver’s side seat bolt attaches.
Step 8. Remove the Center Console

There are a number of videos online that can show this much better than I can type it.
In summary, start by removing the two long pieces of trim on each side of the center console. They are just held in by clips so you can grip and pull on them to pop them off.
Next, remove the AC controls by removing a few bolts and then pulling on it.
Finally, remove the radio by removing the 2 bolts holding the bottom of it in and then pulling outward on it. Remove all of the connections on the back.
This is also a good time to remove the shifting trim. Remove the shift and transfer case knobs.
Step 9. Tap into Stock Speaker Wires

Use the t-taps to connect the speaker wires.
There are reports of people having problems when using the front speaker lines so use the rear speaker lines instead.
Find the connector with the wires matching what is in the photo.
The front left positive line is green with the negative being blue. The front right positive line is pink with the negative being yellow.
Step 10. Attach New Speaker Wires

Run the new speaker wires from the head unit location down to the shifting area.
Attach the crimps that came with the T-taps and attach them to the T-taps on the stock speaker wires.
Step 11. Tap Remote Wire

Use another T-Tap to tap into the green and white 12V line that goes into the armrest storage.
This will tell the subwoofer when it should turn itself on. Ignore the ground tap in this photo, it was for a different project.
Step 12. Attach All Wires to the Sub Harness

Run the new speaker wires from the front of the shifter area to the back.
Pull the wires down to the subwoofer by going under the trim as shown in the photo.
Also, pull through the remote control wire that came with the subwoofer. Attach a crimp to the existing ground wire.
Then, crimp or solder all of the wires to the subwoofer wiring harness as shown in the manual.
Step 13. Clean up All of The Wires

Wrap all of the wirings in wire loom harness tape to give a cleaner appearance.
You can also use some zip tie surface mounts to hold the wiring to the subwoofer.
Step 14. Attach Remote Control

There are many possible options for where to mount the remote control.
I chose to mount the remote as shown in the photo above as it gives easy access near the natural resting position of my hand.
The subwoofer comes with Velcro, but I opted to use some 3M VHB double-sided tape.
Step 15. Connect the Ground & Final Adjustment

Replace the seat. Then, connect the ground ring crimp to the nearby bolt.
You may need to scratch up the connecting surfaces of the bolt with sandpaper so that you get a solid ground connection.
End Results & Final Thoughts

In this photo, you can see how much the subwoofer sticks out with the seat in the far back position.
Test the subwoofer with some bass-heavy music. Adjust the subwoofer remote from the min to max position and listen for the difference. If the bass gets louder, it is set up correctly.
If it gets quieter, the phase is wrong. If the phase is wrong you can easily flip it by flipping the phase switch on the subwoofer.
Enjoy your added bass!
Just completed this install of the same sub and have a couple notes for anyone else wanting to try it. I was able to mount mine turned sideways to this article, wires facing the passenger side of the vehicle, so that it fits entirely under the driver’s seat and is invisible.
It looks like it’s going to be a tighter fit than it is, just wire everything up so the wires come out of the center console area and they go directly down into the sub below your seat. I used one bracket per side of the sub, like the author, only staggered so the bottom left and top right. Once it’s wired I bolted the seat back down and inserted two screws into the bracket from the back seat where they’re barely visible, then I removed the seat again and screwed down the other side (front of vehicle) and then re-bolted the seat. It looks flawless, or well, it doesn’t look like anything because you can’t tell it’s there. I also didn’t find it necessary to unplug the airbag wires from the seat, and why risk it? I sat it upright as far as it would go, and then just tipped it backwards into the rear seat.
Mine is a 2020 model and couldn’t find a wiring diagram for the rear speakers so here goes – On my head unit, it was the black 10-pin connector. The first two columns on the connector are the front speakers. The rear speakers are the third and fourth column, with positive being on top, negative on the bottom, use these. The fifth column is empty.
All in all I think it’s a great little unit, fills out the sound nicely to rock/metal and some modern pop songs and classical music. If you’re wanting to hear every bit of rap and hip-hop bass, you shouldn’t really be looking at a single 8″ woofer, but it could be worse and is still better than factory. Thanks to the author for the article, it is the reason I chose this unit.
Thanks a lot for sharing your incredible ideas. It is an appreciated and pretty tip for all those music lovers. What a Fatal post for those who want to upgrade an existing subwoofer with a new one.
Is it possible to remove the lower air duct completely?
Is there a reason you didn’t use a Line Out Converter when tapping into the speakers wires? Thanks!
The sub can take already amped inputs and automatically process them. In theory you could get a converter and plug the outputs from that into the RCA inputs of the sub, but that would be unnecessary.
Thanks! I am thinking about doing one to start then adding another if I like it!
Completed this install on my 4runner, sub used is same as in post, provides a nice but small thump, sounds now like oem should, but it vibrates the seat alot, when sitting in another seat other than the driver (where mine is installed under) it sounds and feels like a normal oem sub, I would recommend this install if you want oem level bass and dont have a big budget for a custom fitted box. install thread is thorough and recommended
At first the vibration was weird, but after getting used to it for a few weeks it feels normal now and I actually really like it. You could also do this under the passenger seat if you really hate vibration and the install should be really similar.
I would not have tapped into the factory wiring like that. i would have used either the taco tunes harness or get the male and female metra harness and tapped off of them. tapping into factory wiring can cause all sorts if headache’s
What headaches would you expect that to cause? I have had it installed for about 5 months without any issues.