
While we’ve covered the top seven dash mounts for the 5th gen 4Runner, this article will solely focus on the Rago Fabrication kit.
The mount itself is simple and sleek, and it works great with numerous aftermarket accessories. This kit was designed to add versatility to your 4Runner’s dash. It has a low-profile design and is made to blend in seamlessly with the dash.
This kit also requires drilling, so if you do not want to drill into your head unit, then a no-drill kit, such as the Labops Gear mount, may be a better option. However, no other company on the market offers the same level of versatility as this kit. With its 11 mounting points, it’s hard to find another option that can give you as many mounting points.
Table Of Contents
Product Overview

The Rago Fabrication Dash Mount allows you to attach multiple accessories, such as a phone, GPS, and tablet holders. Other device mounts can also be attached to the top of the plate, utilizing seven mounting holes that take standard 10-24 hardware.
It’s equipped with (11) 10-24 self-clinching nuts, which let you mount your accessories in various positions. Also included in this kit are the adjustable accessory mounts for both the driver and passenger. These two accessory mounts most often have a CB radio or HAM radio microphone mounted.
Some state that the digital clock’s visibility is blocked, but I think this depends on the driver’s height. Taller people cannot see the clock, while shorter people may still be able to. If you want to retain the clock’s visibility, then this mount may not be your best option. It comes powder-coated black with all of the hardware needed for installation.
Installation

Installation requires minimal tools. The process requires patience, as it involves drilling holes into your factory dash that can’t be undone.
Tools & Materials
- Needle Nose Pliers
- Drill w/ 3/16 bit
- Marker
- Philips Screw Driver
- Small Level (Optional)
- 10mm Socket
- Magnet Stick (Optional)
- 4mm Allen Wrench/Hex Key
- Provided Hardware
Step 1. Remove Center Console Trim

Remove both the transmission and transfer case shifters by turning them counterclockwise.
With the shifters removed, gently pull up on the center console. It is best to grab the center console by the cup holders and pull it up.
Note: After lifting the console a few inches, disconnect the white wire harness pictured on the right in the image above. If you have seat heaters, be sure to disconnect them as well.
Step 2. Remove Climate Control Surround

The next step is to disconnect the climate control surround. Grab the sides next to the main two knobs, gripping the plastic, and pull back toward the shifters. Once it has popped off, you must disconnect the wire loom and the clip holding it in place. You can use needle-nose pliers to disconnect the plastic connector from the climate controls.
Place the climate controls aside for now. Lay a cloth against the shifter levers so you don’t damage anything.
Step 3. Drill Passenger Side Hole

These are the most important and nerve-wracking steps, where you drill holes into the dash.
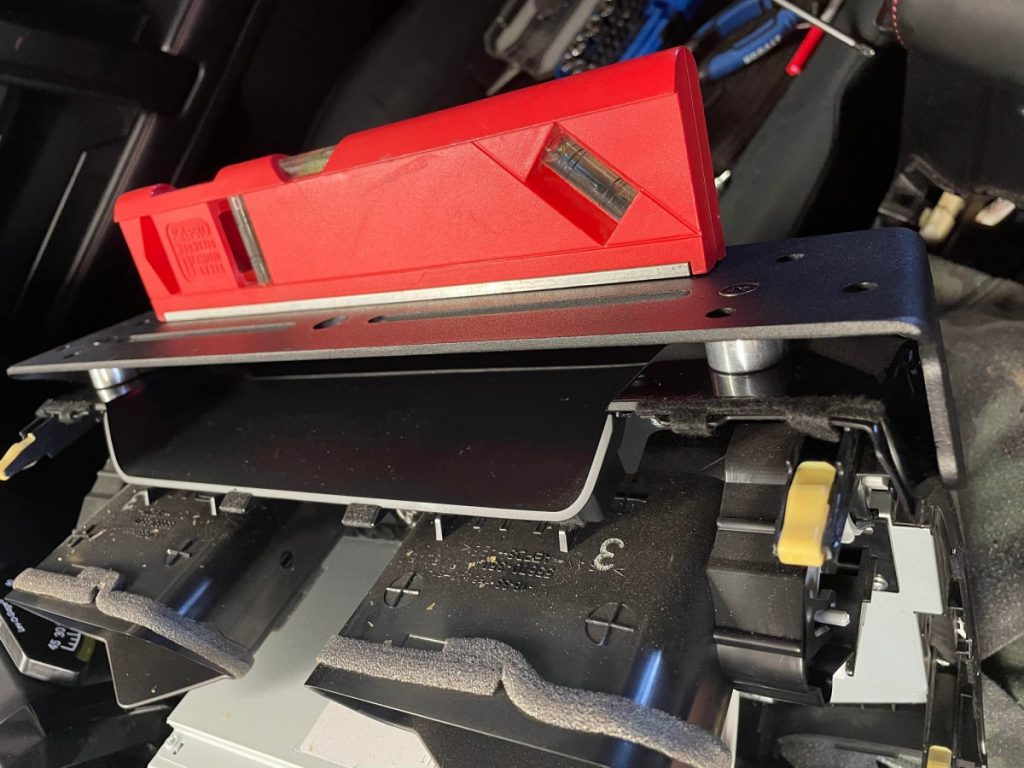
Take the mount and place it on top of your dash, as pictured above. Make sure that you use the spacers supplied in the kit. The spacers go between the mount and your factory dash. Once lined up, place a bolt provided to mock up where you need to drill.
Be sure to leave a small gap between the dash and the mount up top. This will ensure that vibrations do not rub or damage the dash. I placed a small level on top of the mount to ensure it was flush and level.
Once you have identified your desired mounting location, proceed with drilling. You will need a 3/16 drill bit. Next, place the small bolt through the hole and continue to the next step.
Step 4. Drill Top Mounting Holes

The driver’s side is a bit trickier, but not too difficult; it is mostly the same process as above.
Ensure the mount is still level and flush, and that there is no rubbing or contact between it and your factory head unit. Then, mark the driver-side hole to be drilled. Now, go ahead and remove the level (if utilized) and pull out the two longer bolts on top of the mount.
This is where it gets tricky. Where the bolts were on top, drill straight down. The 3/16 drill bit will fit through the mount and spacer. Ensure you drill down as straight as possible.
Step 5. Drill Driver Side Hole

Now that you have drilled out the two top holes, you still need to drill out the driver-side hole. You can’t drill the driver’s side because the steering wheel is in the way, so you will need to uninstall the car stereo first.
To do this, use a 10mm socket and wrench and disconnect the four upper bolts directly underneath the car stereo (I already removed two bolts before taking this picture). Then, pull the head unit toward you with one hand on the bottom and the other on the top.

You can drill your driver’s side hole with the head unit removed. See above for reference.
Step 6. Install Top Mounting Bolts
Now that you have drilled all your holes, you can install the mount. Thankfully, the hard part is over.
First, put the spacers between the mount and the dash. Once you have the spacers and bolts through, you must add the washer and nut to secure the top bolts. I utilized a magnetic stick to secure the washer and nut. This allows you to hold the washer and nut in place vertically.
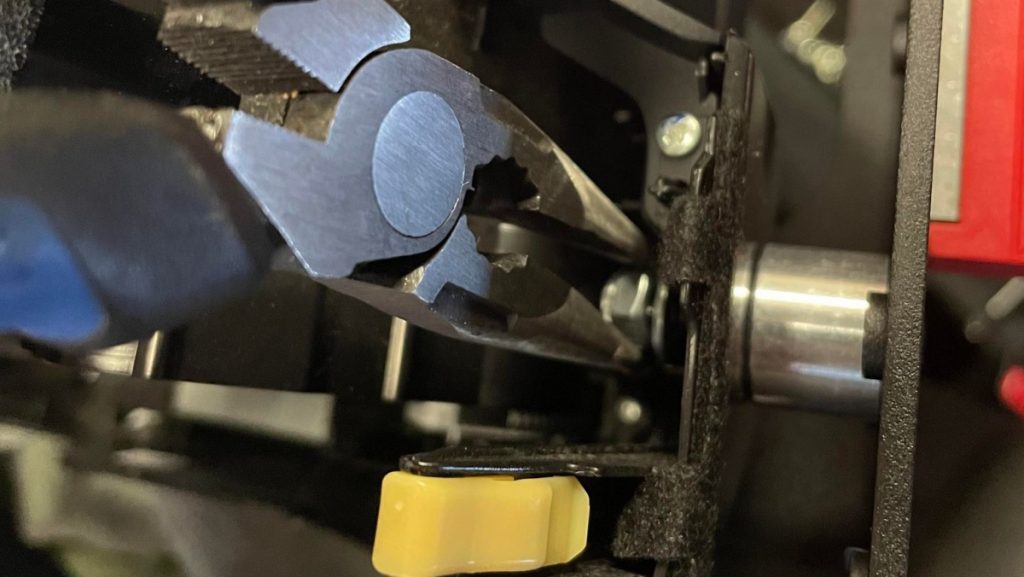
I used my other hand to tighten the bolt. Once the bolt and nut mate, I used needle-nose pliers to secure them. See the image above for reference.
Step 7. Install Side Mounting Bolts

This is the final step in installing the mount. Compared to the two top bolts, the driver and passenger sides are fairly easy to install. They are secured by a small bolt and nut, which can be tedious due to the nut being round and the lock washer mated to it.
It’s best to use the needle-nose pliers to hold the nut and use your free hand to turn the small screw until it takes hold of the nut and begins to tighten. After the bolt and nut are mated, use a screwdriver to tighten them up. Do this for both the passenger and driver sides.
Step 8. Reinstall Head Unit

Now that the mount is installed, double-check that it is level. Once you are satisfied with the positioning, reassemble everything in the reverse order of the steps above.
Final Thoughts

The thought of drilling into my dashboard worried me, but after numerous positive reviews, I knew I wouldn’t regret it.
To see the clock on the top of the dashboard, I must recline back in my seat, but that’s fine with me. I always have my phone mounted up anyway, which serves as an alternative clock. The mount has a durable construction and is laser cut and CNC-bent P&O steel. It will last, that is for sure.
The rugged construction makes it ideal for off-road, and I noticed no vibrations at highway speeds.
This mount is ideal for adventurers, overlanders, and travelers alike. It allows multiple accessories to be used at once; I purchased this product to use a RAM Mount to hold my cell phone while off-roading.
So far, it has not failed. I look forward to many years of use of this dash system.
Evan, why are you removing the center console trim and shifter knobs in step 1? My understanding, having pulled my head unit out a few times myself, it is not a necessary step.
The plastic trim on the right and left of the climate control knobs can be pulled off directly without any prior parts being removed, at least for an SR5. Is this different for higher trims (I see you have a manual transfer case shifter)?
I have the same trail premium trim, I cant figure any reason why you would need to take out the center console trim. I just popped out my whole radio and took it inside to install the rago mount.
Thanks for your reply, Dillon. I have a 2016 Trail Premium 4Runner. I took off the trim to the left and right as a precautionary measure to not damage it while installing the Rago Dash Mount.