
If you have been following the overland scene for the past few years, you would agree that rooftop tents are one of the most popular accessories that you see on builds. Rooftops are not a new concept, but in the last few years, there has been an explosion in the popularity of the overland movement.
We’ve seen many companies jump into the rooftop tent market. While some of these companies are merely copying each other or rebranding a generic tent imported from overseas, others are genuinely trying to innovate. C6 Outdoor is one of those companies that is really bringing something new to the table with their Rev tent.
Table Of Contents
My Current Sleeping Setup

My sleeping setup mostly depends on whether I’m traveling solo or with my wife. For the former, I usually sleep in the back of the 4Runner. When my wife comes along, we sleep in a traditional ground tent.
Both setups have their pros and cons, and they have generally worked just fine. However, having a rooftop tent was always on my radar, as it seems so convenient, enjoyable, and fun.
I have to admit that I also love to try different gear. This is not only to satisfy a specific need but also out of curiosity. Many people describe the rooftop tent as a game-changer, so I finally gave in and decided it was time to try something new.
During my research, I came across many discussions online about the utility of rooftop tents. To my surprise, it is clearly a polarizing subject. Some say that it’s totally unnecessary and a waste of money. Others can’t camp without one. Of course, there isn’t a right or wrong answer; it’s entirely up to your style of travel and, more importantly, your budget.
In my case, rather than a necessity, I was moved by curiosity and my enjoyment of trying new gear. The rooftop tent market offering is huge and is constantly growing. There are tons of different styles, features, and price points, ranging anywhere from around $1000 for a basic soft shell tent to around $5000 for a top-tier hard shell tent packed with features.
Not knowing if a rooftop tent would fit my camping style, I thought it would be wise to start with something reasonably priced. After a few days of research, I stumbled upon the C6 Outdoor Rev tent. In addition to a very competitive price, I was intrigued by their tent design and functionality.
Lightweight Champion

The C6 Outdoor Rev tent offers similar features to a traditional soft-shell style rooftop tent. However, it goes one step further in that it can also be set up on the ground or in the bed of a truck.
It’s a 2-person tent with a 4″ foam mattress coming in at a total weight of only 25 lbs. With the majority of the tents weighing anywhere from 80 lbs to 200+ lbs, I have to admit that the featherweight of the Rev tent and its price point are what led me to purchase one.
Being so light, the C6 Outdoor Rev tent doesn’t affect your center of gravity as much. It also means that I can install and remove the tent easily by myself. That allows me to have the tent installed only when I need it, saving the increasingly important MPGs. The tent is very compact when closed for easy storage when not in use.
Part of the reason why traditional rooftop tents are bulky and heavy is that they include a rigid sleeping platform. That provides a foundation for the mattress and acts as a mounting point to the rack.
C6 Outdoor took a different approach, which is quite clever in my opinion. If you already have a roof rack, the rack itself is your sleeping platform, so long as the rack is at least 84″ long and 48″ wide with 8″ or less spacing between the crossbars. If your rack is smaller than that or you don’t have a rack at all, you can buy an additional fold-out platform to provide the support needed for the tent.
When closed, the tent’s dimensions are about 47.25″ x 42″ x 8.5″. While deployed, it offers an internal space of 47″ x 81″ x 38″. There are four doors in total (one on each side), each including a bug screen. Inside, there are pockets to store your gear as well as hooks to hang lights. On top of the base layer, there is a non-removable dual-layer waterproof fly, which makes it a four-season tent. The tent base is made from heavy-duty, waterproof nylon, which also serves as the storage case when the tent is folded for transport or storage.
Unboxing & Setup

The tent arrived in two different cardboard boxes, which makes it convenient and cost-effective to ship. However, that means some assembly is required before use.

Here’s what you’ll need to assemble the base/mattress of the tent:
- A layer of rigid foam
- A second layer of softer foam
- Quilted mattress enclosure
To assemble the base, join together two pieces of hard foam and place one piece of soft foam on top. Then, slide them into one side of the quilted cover. Repeat these steps for the other side.
Note: The quilted cover is split in the middle to allow the mattress to easily fold when the tent is not deployed.

Next, take the tent (which is attached to the tent cover) and unfold it. Then, unzip all four windows.

Take the mattress base and slide it in from either window located on the shorter side of the tent. You can help the mattress slide through the tent by accessing it from other windows.
At this point, the basic assembly is done. You can fold the tent and go camping, but I recommend doing a full setup at home first, to get familiar with the tent poles and the whole assembly process.
Unfortunately, the tent can’t be folded and packed with the poles fully installed. At first, I thought that I had to slide them in and out every time, but after speaking with C6 Outdoor customer support. They told me that the poles can remain in the sleeves and just be broken down and folded inwards.
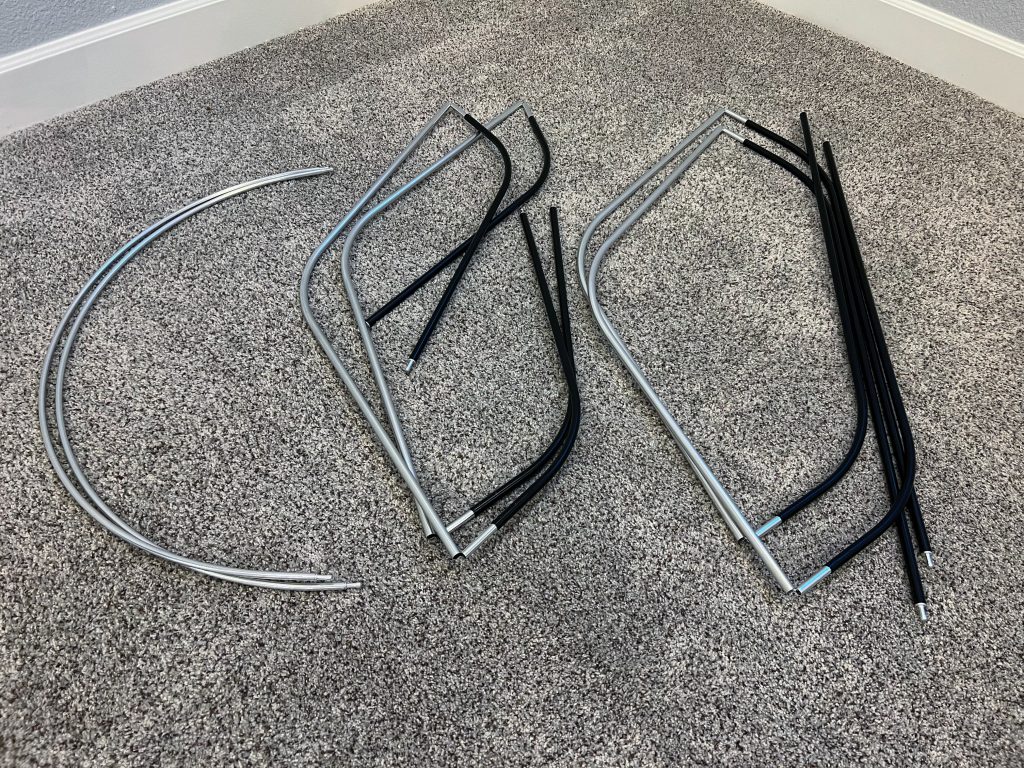
There are six poles in total; four for the main tent structure (the longer ones go in the middle and the smaller ones on the side sleeves) and two for supporting the two big side windows.
Please start with the longest poles and slide them in through one side, securing them into the metal rings attached to the tent base. Repeat the process for the shorter poles.
Then, take the last two poles and slide them across the side window openings on the longer side.
That’s all! It’s definitely not the fastest tent to deploy, but once you have done it a few times, it should take only 5-7 minutes.
To complete the setup and secure the tent, it depends on where you plan to use it. For a truck bed, just slide the tent in. If you’re sleeping on the ground, you can use the included stakes and guy lines to anchor the tent for windy conditions. To mount it onto a roof rack, you have two options to choose from, depending on the brand of your rack.
For Frontrunner and Yakima roof racks, C6 Outdoor provides compatible mounting hardware (eye bolts). For any other brand, they have a universal option that uses straps. The adjustable straps loop around the crossbar and attach to the metal rings of the tent with a carabiner. I like the first option more, so I ended up buying some t-nuts and eye bolts compatible with my Sherpa rack.
Optional Accessories

C6 Outdoor sells the tent as a standalone item so that they can offer it at a lower price. That’s also so you’re not forced to buy additional accessories if you don’t need/want them. In my case, since I already have a ladder on the back of the 4Runner, I opted not to buy one for the tent.
Here are some accessories that might be useful depending on your application:
- Tent platform – in case you only have crossbars
- Platform annex – if you want some additional covered space
- Tent footprint – if you want an extra protection layer
- Shoe bag
Installation

As mentioned before, something very clever about this tent is that you don’t need to use a dedicated platform, as traditional soft-shell tents do. A roof rack is all you need (given it matches the dimensions requirements). Not having a dedicated platform makes the tent lighter, more low-profile, and more affordable.

Installing the C6 Outdoor Rev tent is super simple because it’s very lightweight. You don’t need help from other people or a pulley system to lift it.

As mentioned earlier, for roof mounting, you can use either eye bolts or a strap to secure the tent. I think the eye bolts offer a more secure hold, but the straps are more flexible since they can be adjusted in length as needed.
Trail Test

In my experience, the total time to deploy and pitch the tent on a roof rack is about 5-7 minutes.

It’s not as fast as a hard-shell rooftop tent, but it’s not bad at all once you’ve done the setup and teardown a few times. When using the tent on your roof, side steps/sliders are especially helpful for reaching and setting up the poles and pulling the fabric tight. Alternatively, standing on your rear tires also works.
If you prefer, you can set up the tent on the ground first and then move it onto the rack. That’s only possible due to the tent’s lightweight and is something that you can’t really do with other conventional rooftop tents.

The C6 Outdoor Rev tent is sold as a 2-person tent. Even though my wife and I both fit just fine (we are both about 6’ tall), there isn’t much extra space. For additional storage and to keep your things organized, there are side pockets and a few hooks where you can hang a light or other small objects.
Since the mattress also functions as a floor support, it’s a bit on the firm side. However, I don’t think it’s uncomfortable, considering that I tested the tent in below-freezing temperatures. If you’re unaware, colder temperatures tend to stiffen up foam.
Speaking of temperatures, the tent did a great job of keeping us warm the whole time. The tri-layer construction offered protection from the elements while also allowing for some ventilation to prevent condensation inside the tent.

The overall material quality seems good so far. I didn’t notice any manufacturing defects, and the fabric, although light, feels robust. Having multiple layers to retain heat also helps with ventilation, even when all the windows are closed. If you camp in warmer temperatures, opening all four doors should help a lot in bringing fresh air in.
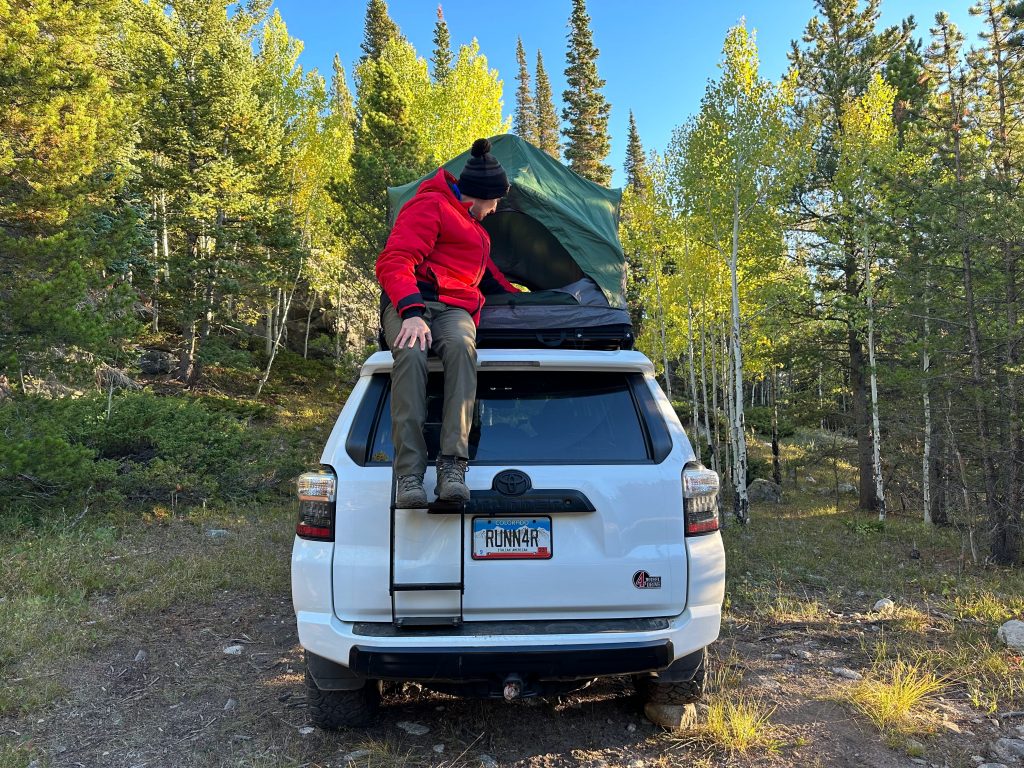
Using my rear ladder to get into the tent is a bit awkward because the back and rear tent doors are smaller than the ones on the side. Getting in and out requires a bit more finesse, especially when going down in the middle of the night to use the restroom. I still prefer not having to fold out a separate tent ladder, but it’s just something to keep in mind.
Final Thoughts

Overall, I think the C6 Outdoor Rev tent is an innovative product within the overland tent market. It’s unique in the way it works and versatile with three different configurations for use.
Given its price point, I think it’s a great choice if you are looking to buy your first rooftop tent without breaking the bank. Its size and weight make it easy to use solo and only when you need it. It would be great for the casual weekend camping trip and doesn’t require committing to a semi-permanent install.
On the other hand, the setup process and time are something to consider. They’re not a deal breaker in my opinion, unless you are a hardcore overlander doing long trips or constantly setting the tent up. In that case, a hard-shell rooftop tent with a quick setup time is probably a better choice.
Thanks for reading, if you have any questions please let me know in the comments below! Or, connect with me on Instagram @trail_runn4r. See you on the trails!
Any tips for getting the window “hoops” installed correctly?
Yeah, just tight. I just need to spend more time with it. Thanks for playing!
Not really, what issue are you having? Yes, they are a bit tight but doable. Start with one side, then for the other you can try pulling a bit (inward) on the fabric to release some tension.
I’m skeptical of the 5-7 minutes, but we’ll see this weekend.
Best breakdown on this tent I’ve seen yet. I hunt on weekends, so this fits the bill better than a heavy tent that’s a pain to take on and off. Thanks for the review. I’m in Texas and last year bought a very well known overlanding hub style ground tent that has been terrible in the wind. Honestly, the rev tent design looks like it would hold up better.
Thanks for the feedback, John! Hope you’ll enjoy the tent.
The tent does not seem as taut as most ground tents. I wonder how it would stand up to stiff winds. Seems as though there would be a lot of flapping around.
I haven’t camped on very high wind conditions yet but once you stake the tent to the ground (or roof rack) the poles create a good amount of tension already. For additional wind proofing you can also use the guy lines like you would do with a normal tent. Hope this helps!