
Arb Air Locker Manifold & Solenoid Step by Step Install on the Mountain Off-Road Enterprises Bracket
We just had Nitro 4.88 gears dropped in so we added an ARB front Locker.
If you are running a front or rear ARB Air Locker in your 4Runner you’re going to need a compressor and the air locker manifold kit plus a solenoid. The solenoid should come with your air locker kit and the manifold kit comes as a separate package.
The assembly of the manifold and solenoid are both pretty straightforward. All you really need is to figure out where to mount the manifold.
Why Air Lockers?

First, why lockers?
Air lockers replace the existing differential that our 4Runner came equipped with. The main goal of an air locker is to offer enhanced traction offroad by locking the differential, forcing both axles to rotate at the same speed. They are also stronger than our factory differential which generally speaking, reduces stress on the driveline.
The ARB Air Locker is a selectable locker which means its 100% switchable (on/off). You can turn it on and turn it off depending on what you are trying to do with the vehicle at that time. This allows your 4Runner to behave normally around town while still giving you all the added benefits that you need off-road.
They are also great for not destroying the trail you are driving. They allow you to approach an obstacle in a slow, safe and controlled manner which increases traction and reduces the harmful impact you may have on the environment. Instead of roasting your mud terrains in a rut (creating deeper water runoff ruts), you’re essentially protecting the trail beneath you by slowly controlled-crawling over obstacles.
Mountain Off-Road Enterprise (MORE) Bracket

We are running the Mountain Off-Road Enterprise (M.O.R.E.) ARB twin compressor bracket on the passenger side of our 5th Gen 4Runner and that’s where we’re going to mount our manifold. In all practicality, the manifold kit should be mounted within 7″ – 10″ of your compressor due to the length of the provided manifold air line, however, you can get an extended braided air line from Amazon or any welding supply store.
The M.O.R.E. bracket has two bolts that hold the top portion of the bracket to the lower portion of the bracket.
ARB provides brackets on the manifold kit however they are just shy of reaching M.O.R.E. bracket bolts. They are also a little bit long as they push the manifold out, forcing it to collide with the air switch valve or “air pump check valve” which is part of the air injection pump system.
Tools & Materials
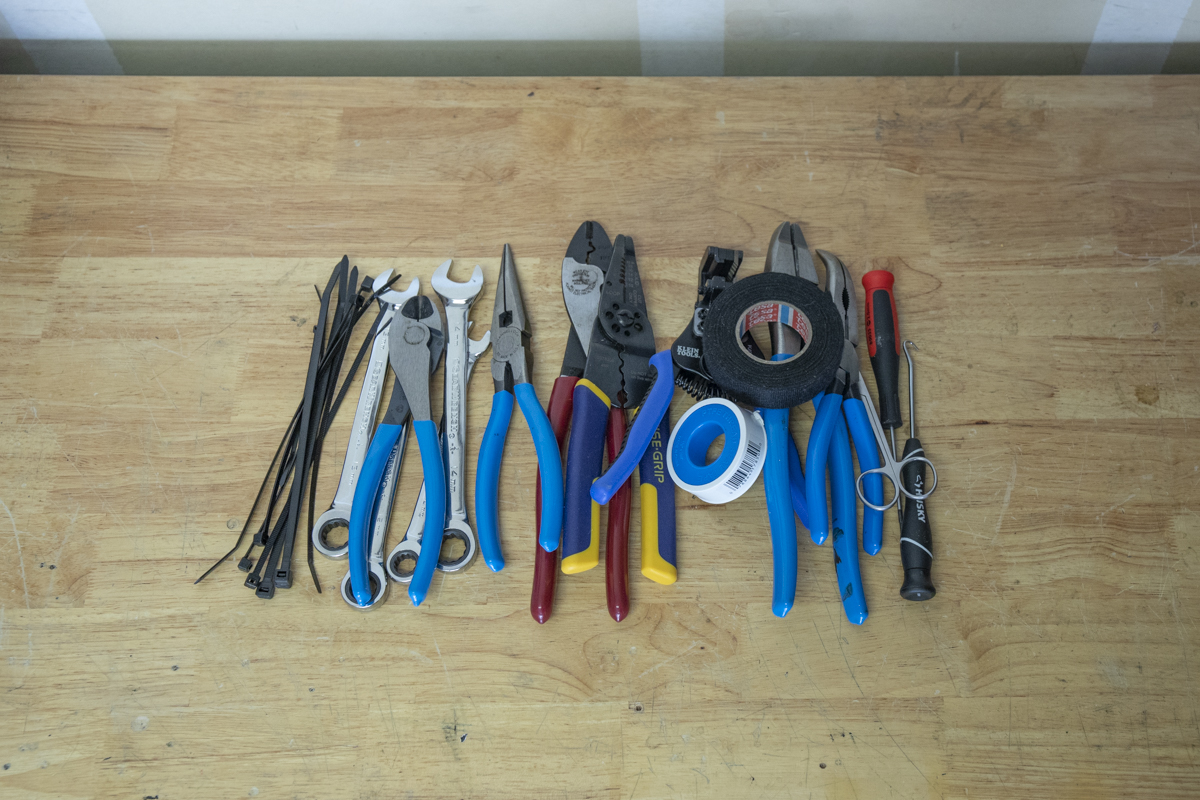
Tools
- Pliers
- Metric Wrenches
- Electrical Crimps
- Electrical Wire Strippers
- Wire Cutters
- Tessa Tape
- Thread sealant tape/ plumbers tape
- Heat Shrink
- Ring Terminals
- Buttsplice Connectors
- Surgical Scissors
Materials
- ARB Manifold Kit
- ARB Solenoid
- ARB RD132 Air Locker (Toyota 8″ Front or Rear 30 Spline)
- Switch-Pros Quick Connect Harness
- ARB Twin Compressor
- M.O.R.E. ARB Twin Bracket
- Manifold Mounting Brackets
- Optional: 1/4″ Quick Connect Coupler
- Optional: Extended Braided Air Line (I use the same line for my MORRFlate)
Installation Overview

Manifold Brackets: For our install, we found some L brackets (3″ x 3″) in the garage (Home Depot or Lowe’s will have these) and drilled some new holes to accommodate mounting points on the manifold and the M.O.R.E. bracket.
Switch Wiring: We are connecting our locker switch to the switch Pros ARB Quick Connect harness. This is run as an individual switch for the locker on the switch Pros 9100. If you are running an sPOD, consider their ARB quick connect harness.
Locker Switch Clips: If you are running the ARB twin compressor then you likely have two switch clips (front and rear locker) running along the provided ARB compressor harness. These would have been provided with your ARB twin compressor kit. When we installed our compressor, we loomed up the clips and saved them for this day.
Compressor & Locker Air Line
This manifold and solenoid install assumes your air locker and air compressor have already been installed. If you want to see a step-by-step install on the compressor check that out here. This install assumes your ARB front or rear locker air lines are already connected to your lockers waiting to be connected to the solenoid(s).
Pull out your ARB compressor harness, expose those locker switch clips and let’s get started!
Step 1. Manifold Kit & Air Locker Parts
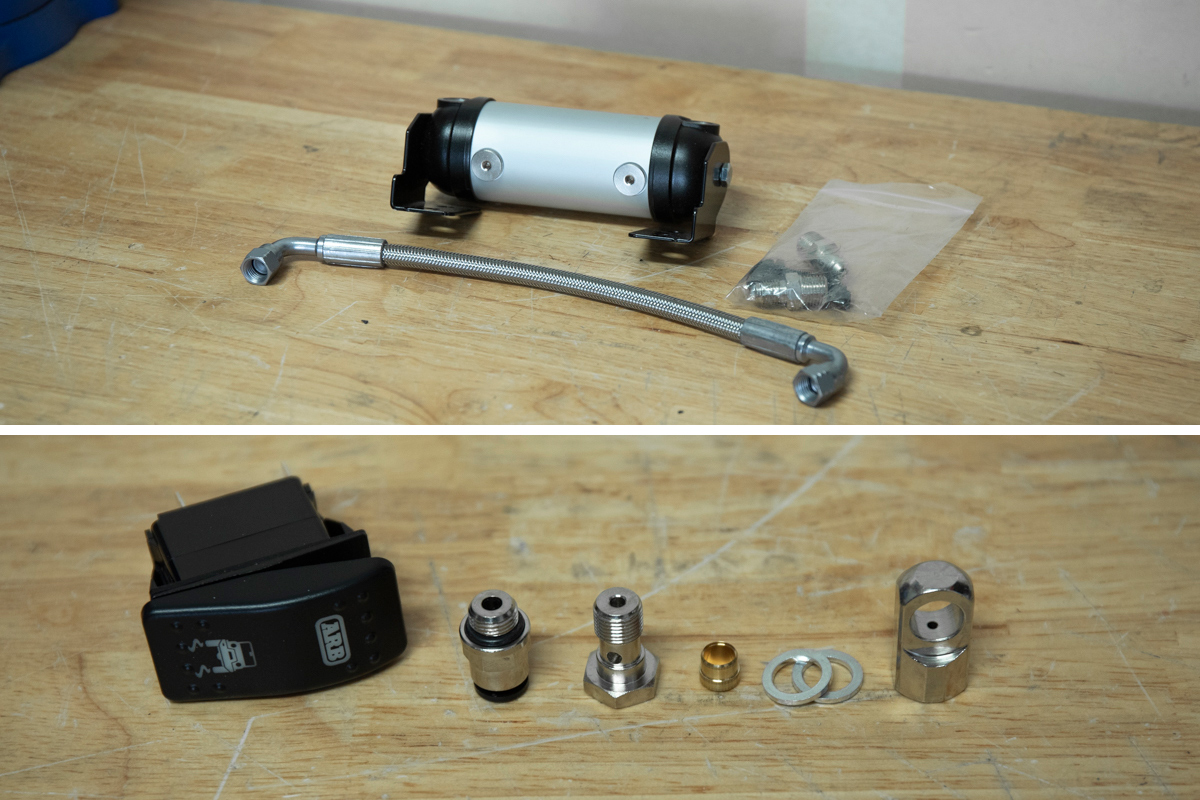
We ordered two kits for this installation; The ARB Air Manifold Kit and an ARB Air Locker. Unpack both boxes and get familiar with each. Depending on your installation you may or may not need each part. For our installation, we are not going to use the switch or bulkhead fitting kit provided in the ARB locker.
Step 2. Manifold Mount Location on M.O.R.E. Bracket
The brackets provided on the ARB manifold are too far apart to reach the bolts on the M.O.R.E. bracket. Because of this, we had to find new brackets that would extend out to the bolts.
Step 3 (Optional): New Mounting Brackets

Four new brackets, we were able to find some 12 gauge metal galvanized 90° angle strut brackets (L brackets) laying around the garage. You can find these at Lowe’s or Home Depot.
Step 4. Disassemble ARB Manifold

In order to get our brackets in place, we had to disassemble the manifold. Simply unthread the long bolts from each end of the manifold. These long bolts are held in place by a central nut secured in place by another nut.
Step 5. Reassemble ARB Manifold
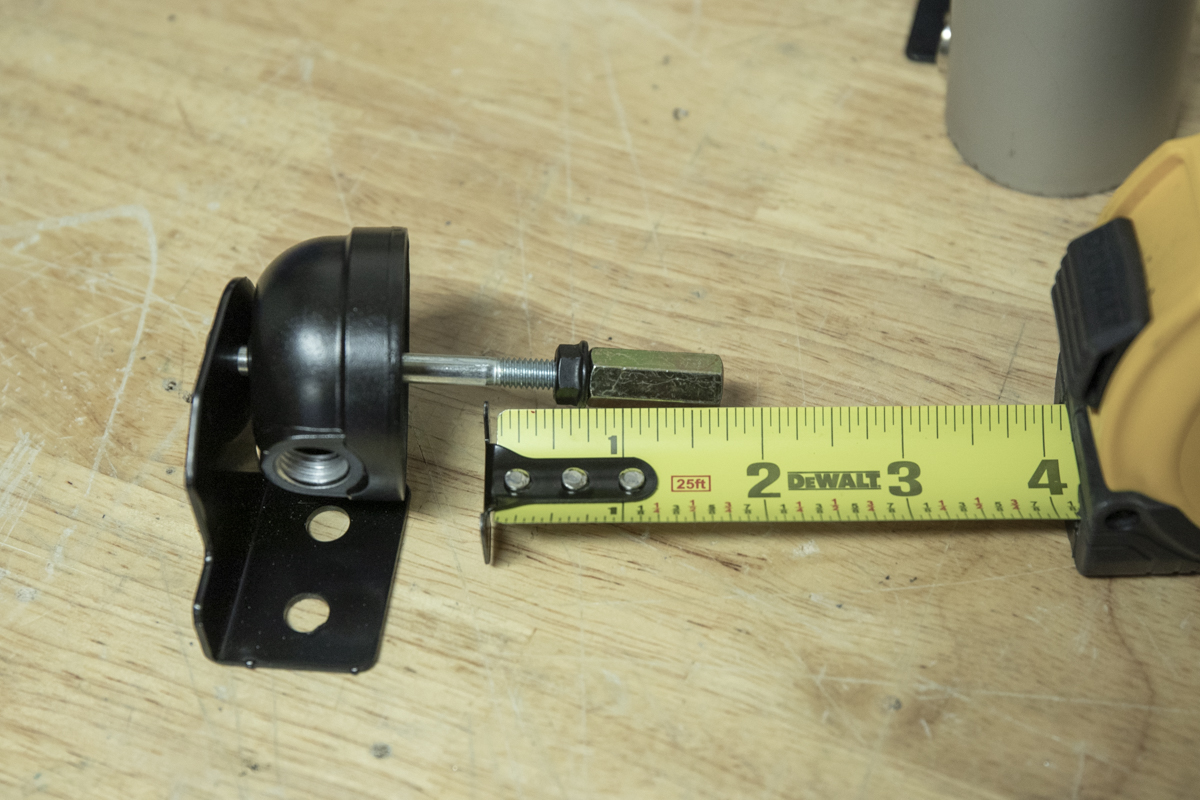
One thing to watch for when you’re reassembling the manifold is the backspace between the threaded portion of the long bolt and the non-threaded portion. You want about a half-inch of threads showing so that you have enough room in the central nut to thread the other bolt into.
Step 6 (optional): Paint New Brackets
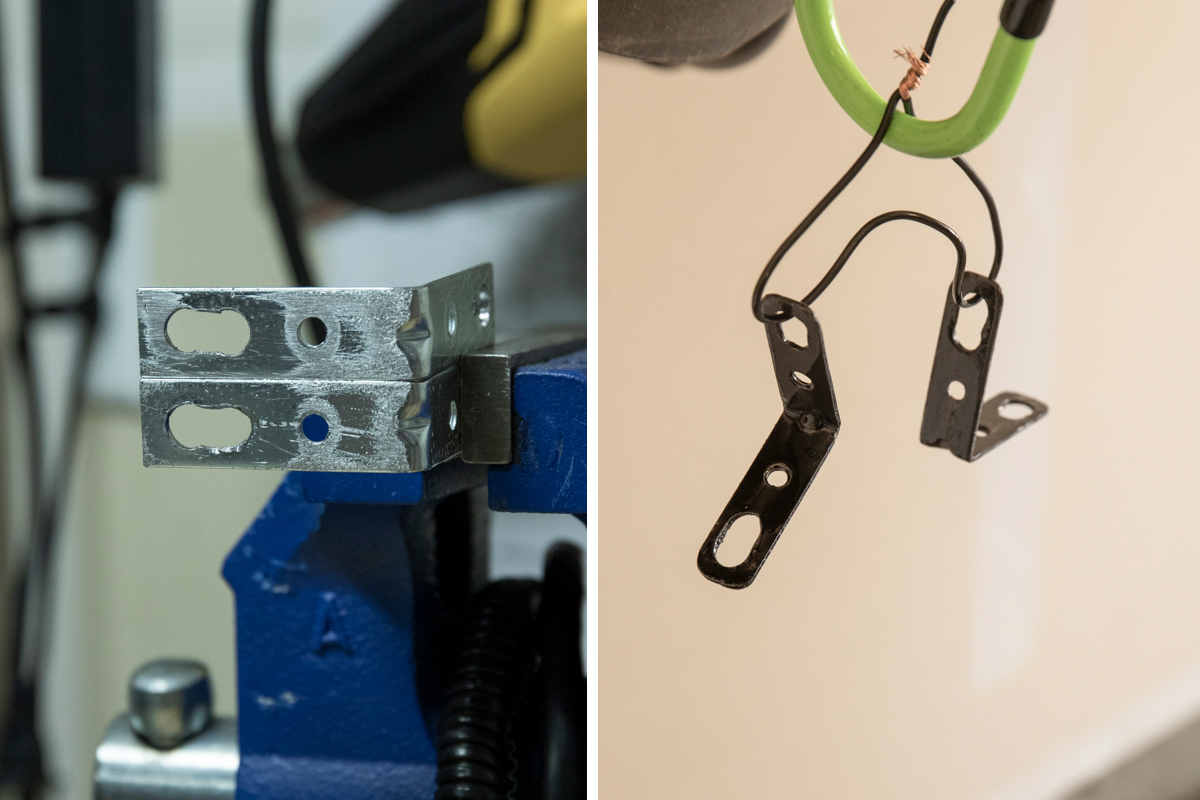
If you have silver brackets and you want them black, sand them down and paint them. Here is how you clean and paint galvanized steel.
Step 7: Position Solenoid, Air Line Fitting, and Coupler on Manifold

Start by getting an idea of where you want your air line from the ARB compressor into the manifold. Then figure out where you want your quarter inch coupler to sit in your engine bay. This is what you’re going to connect to when airing up your tires.
In the photo above on the left, you have the manifold with the solenoid only installed. In the image on the right, you have the manifold with the solenoid, 1/4″ NPT coupler, and air line fitting installed.
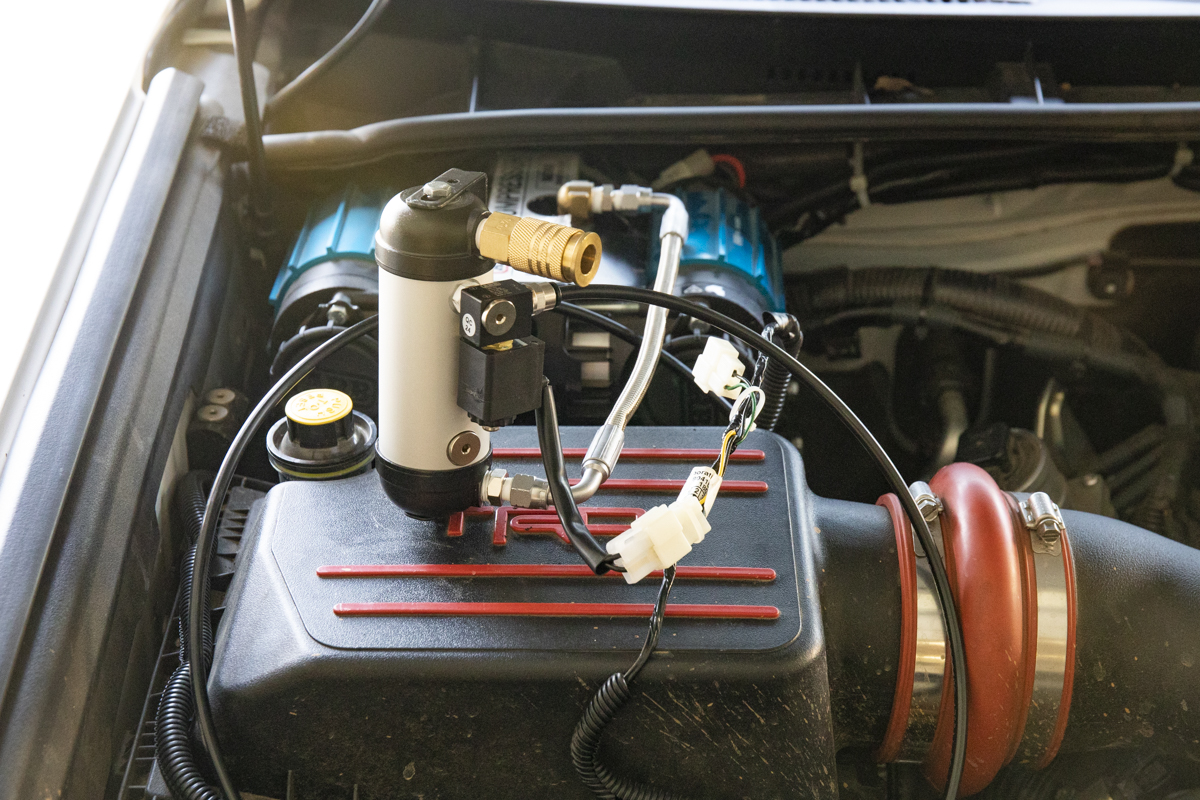
Step 8: Fully Assembled ARB Manifold
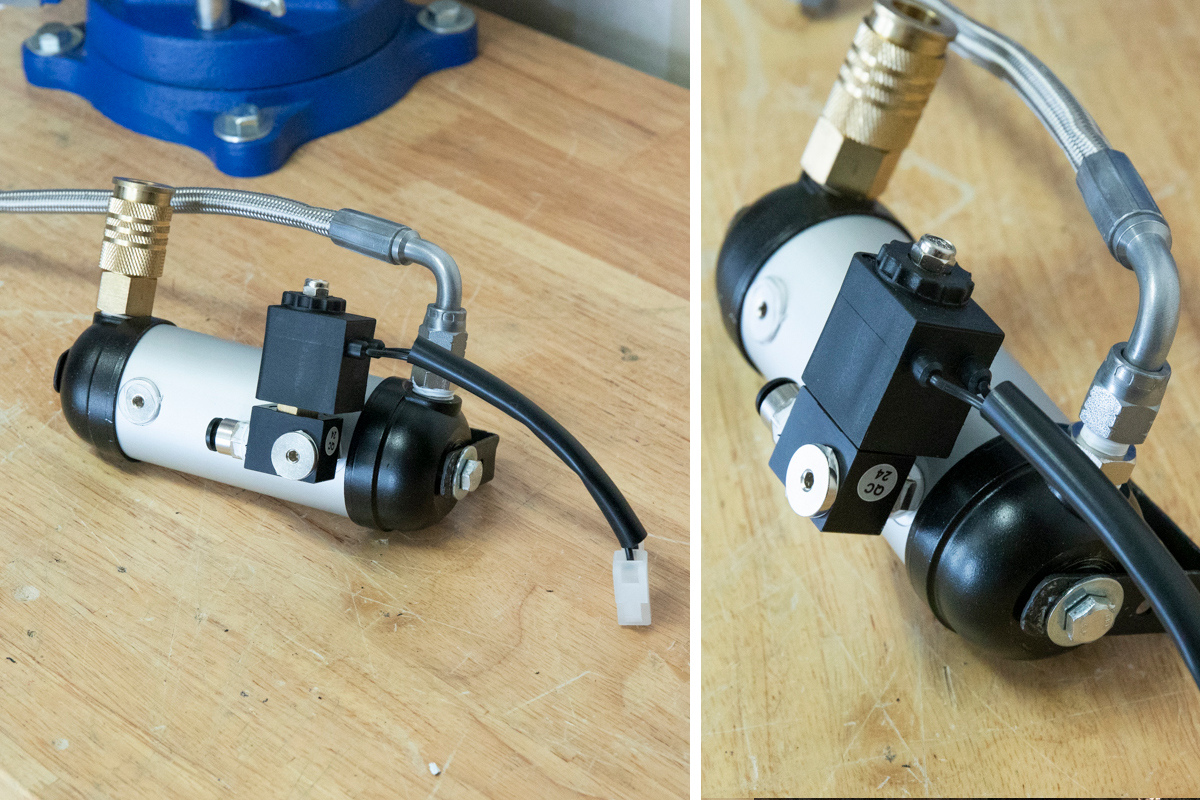
I shouldn’t need to go into too much detail on assembling the manifold as the photos above show you exactly where each part goes. This is what your manifold should look like when it’s fully assembled. If you’re running a secondary air locker then you would have a secondary solenoid mounted in the closed-off fitting location on the manifold cylinder.
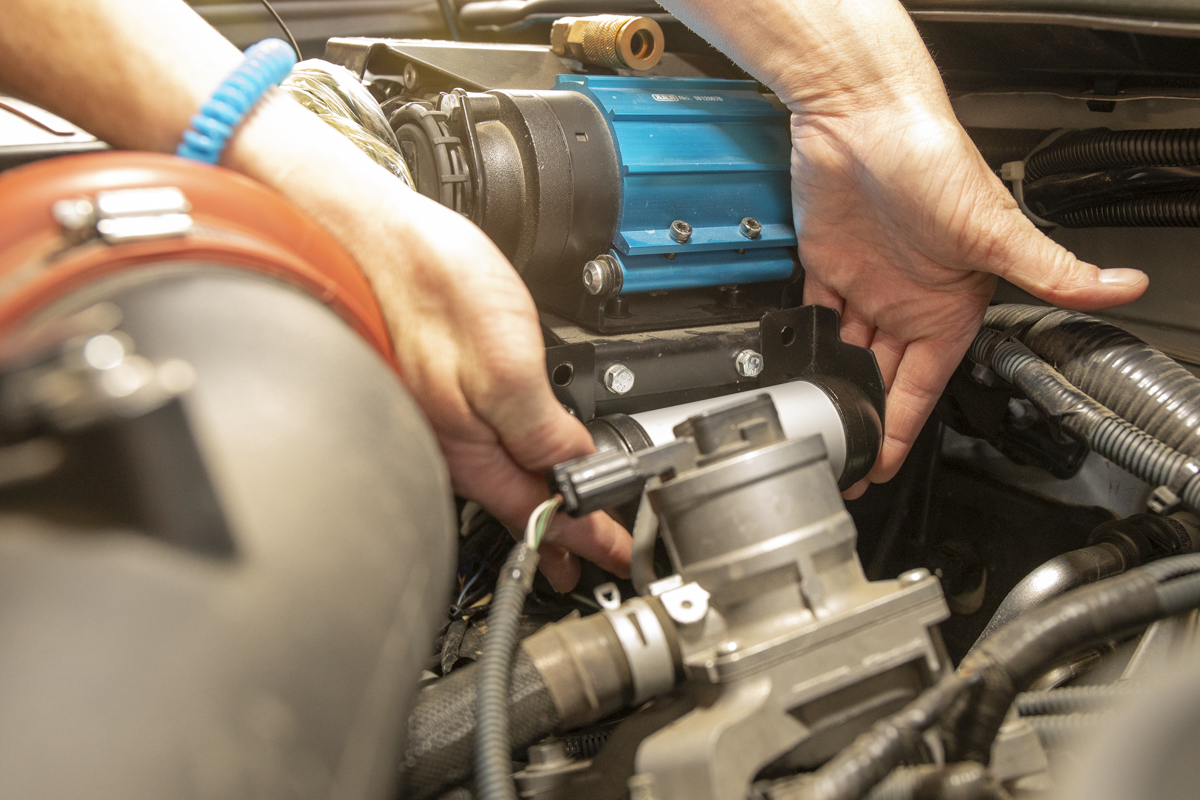
Step 9: Final mounting location

In order to get the bolts through the brackets, we had to bend them out a little bit. Once you have the bolts through the brackets, position them in place against your compressor bracket, or mounting location of choice. From here you will want to get an open-end wrench and patiently get to work, slowly turning and threading the bolts into place.
Step 10: Locker Air Line
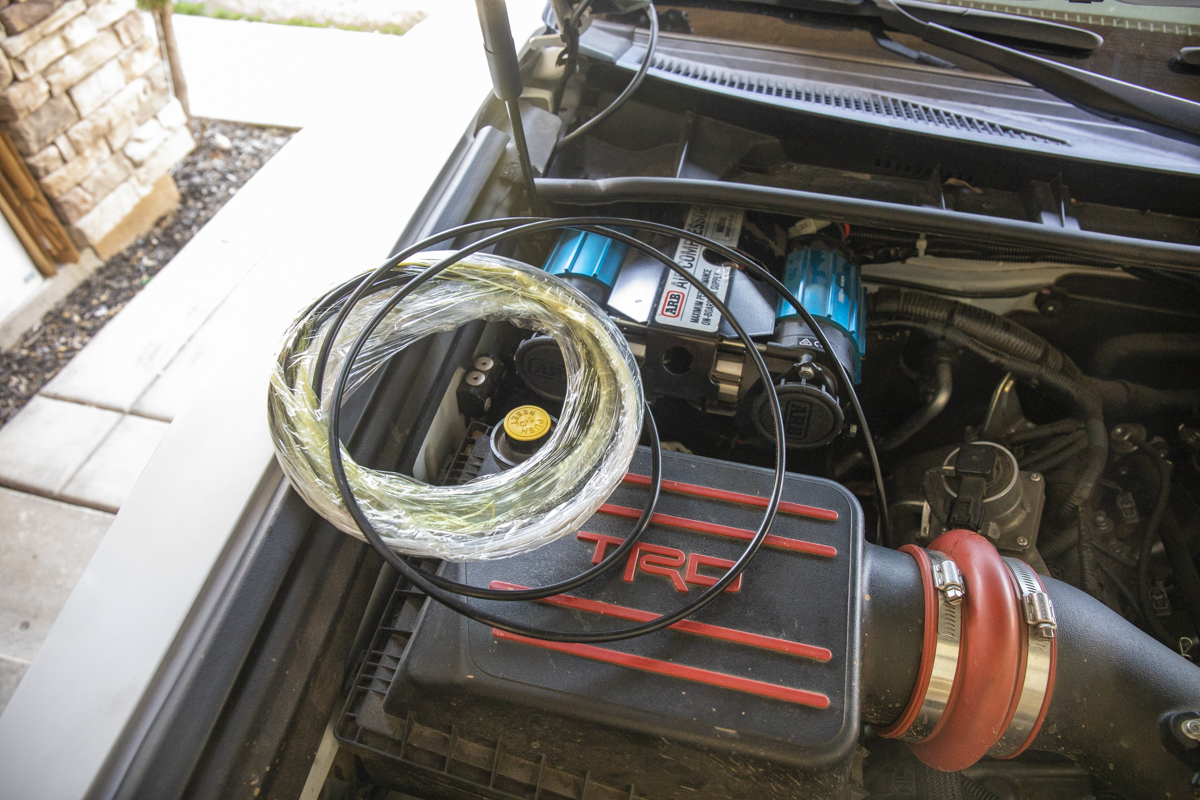
It’s time to wire everything up. Start by exposing your air line coming from your locker. Measure how much line you are going to need and then cut the excess off. Leave yourself a little extra air line for some wiggle room at the end. You can also cut more off once you figure out the exact selenoid mount location.
Step 11: Twin Compressor Wiring Harness
If you already have your compressor installed then pull your wiring harness out.
When we installed our twin compressor we covered the individual switch clips with loom on the ARB wiring harness in case we ever added a front air locker. Now you can uncover your air locker switch clips by pulling back the loom. You should have two locker switch clips in line with your wiring harness. Today we are only going to be using one of those for our single front air locker.
You can see the large bulges in the wiring loom, pictured above. Those are the locker switch clips that we previously wrapped up. See the exposed clip below in step 14.
Step 12: Switch-Pros Wiring Harness and Switches
For triggering the air locker and our ARB compressor, we are using the Switch-Pros 9100 Quick Connect harness specifically designed for the ARB compressor. This allows you to connect each line straight to one switch; two locker wires and one power wire for the compressor.
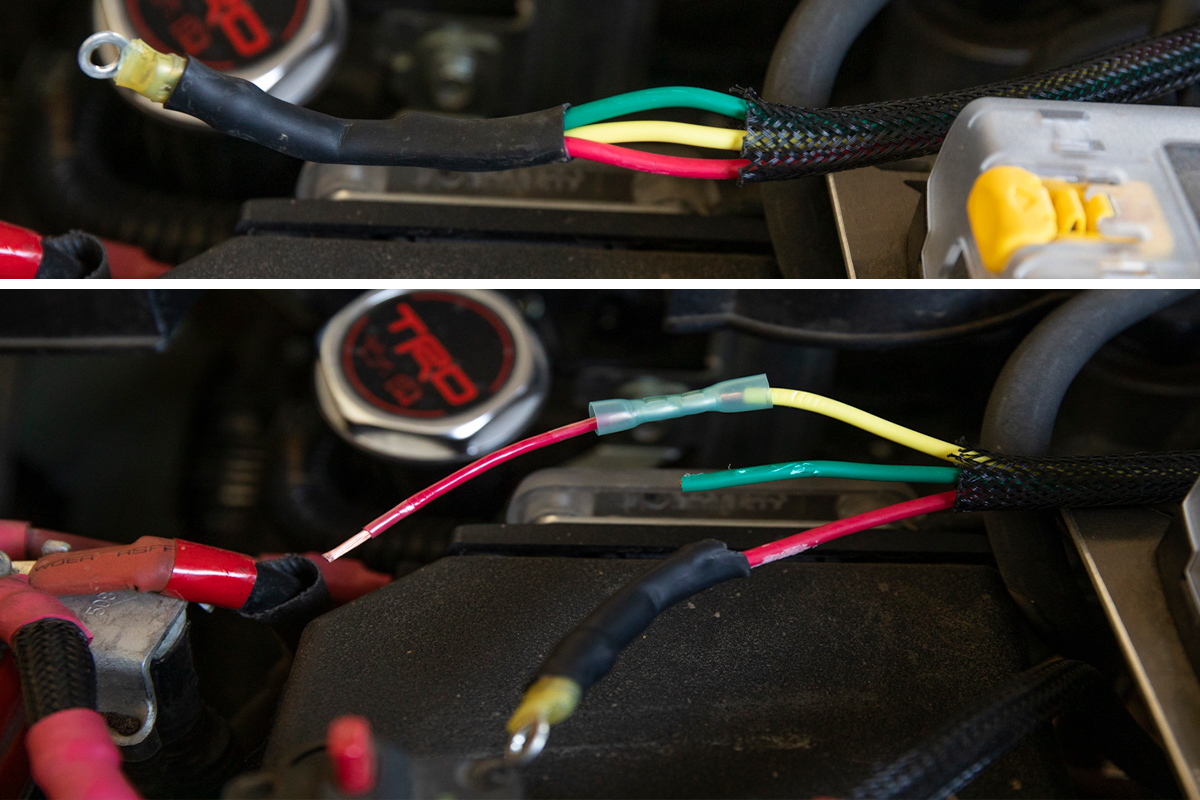
Since we are only going to run one air locker, we only need to expose one wire. In our case, we are using the yellow which is technically the front air locker wire. The green wire is the rear air locker and the red wire is the power that turns the compressor on.
We are going to connect a ring terminal onto the yellow wire, connect it to a new/open switch on the Switch-Pros and close off the green wire with a bit of heat shrink. The locker switch is a very minimal amperage draw, you can connect it to a low amp draw switch.
Step 13: Connect Switch Wires, Air Line, and Manifold to Twin Compressor – Test
Time to test everything up.
How to connect your ARB Manifold?
- Connect air locker air line to “push to connect fitting” on the solenoid
- Connect switch Pros Quick Connect harness to ARB air locker clip
- Connect steel braided air line from the manifold to air compressor
Everything should now be connected up and ready to power on. The most important thing to watch for here is air leakage from the manifold. You have two different o-rings on the unit and four in total. You have the outside o-rings where your bracket bolts down and internal o-rings where the outside end-caps of the manifold meet the central cylinder of the manifold. If any of these o-rings are missing, you will have an air leak and you will be unable to fill your air compressor and/or your air locker.
Once you have verified that the manifold is airtight allowing you to air up your compressor and air locker you can continue with the install.
Airing up the compressor happens in a matter of seconds so don’t be alarmed if you can only hear your compressor generating air for 3-5 seconds. The actual locker takes even less time, maybe 1 second and you may not hear the compressor at all. It doesn’t take much air to move the locker pin in order to lock the front differential.
What you hear:
- Turn on compressor (air compressor fills up in 3-5 seconds )
- Turn on locker (you may or may not hear compressor)
- Tun locker off (you hear a “psss” that sound like a turbo – releasing air – unlocking axles)
How do you know if your locker is engaged?
You can feel it in the steering wheel. When your locker is properly engaged, both CV axle shafts are locked and your steering wheel will become tight to turn. It almost feels like you don’t have power steering. To test it, slowly drive back and forth while slightly turning the wheel. If your steering wheel is tighter than normal then your front CV axle shafts should be locked together and rotating at the same speed.
Here are a few more frequently asked questions about air lockers directly from ARB.
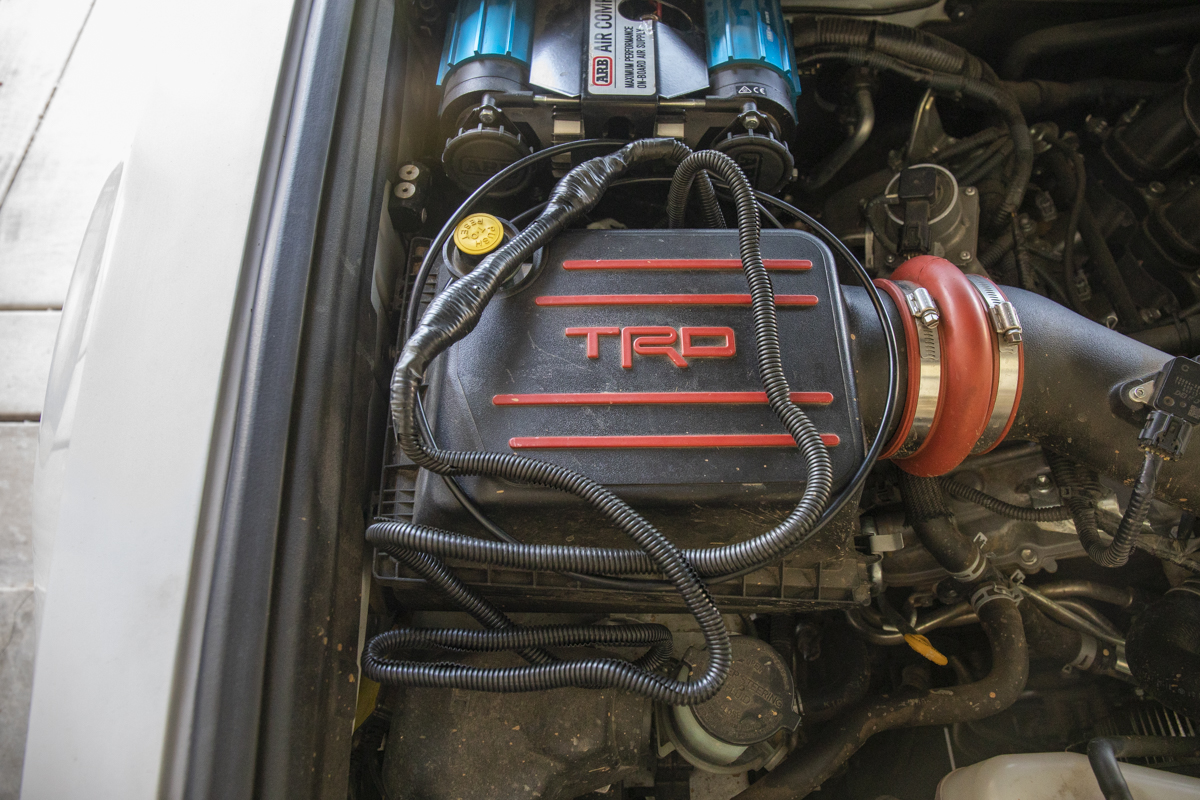
Step 14: Loom and Tape ARB Compressor Wire Harness
If you have fully tested your ARB air locker, it’s time to wrap up the install. Continue on with re-wiring the switch wires and mounting the ARB manifold. We added a new wiring loom around the wiring harness and then added Tessa tape to the exposed wires that were too small to loom. If you’re only running one air locker than your wiring harness should look like the image above. If you’re running front and rear air lockers then you will have two switch clips exposed from the wiring harness.
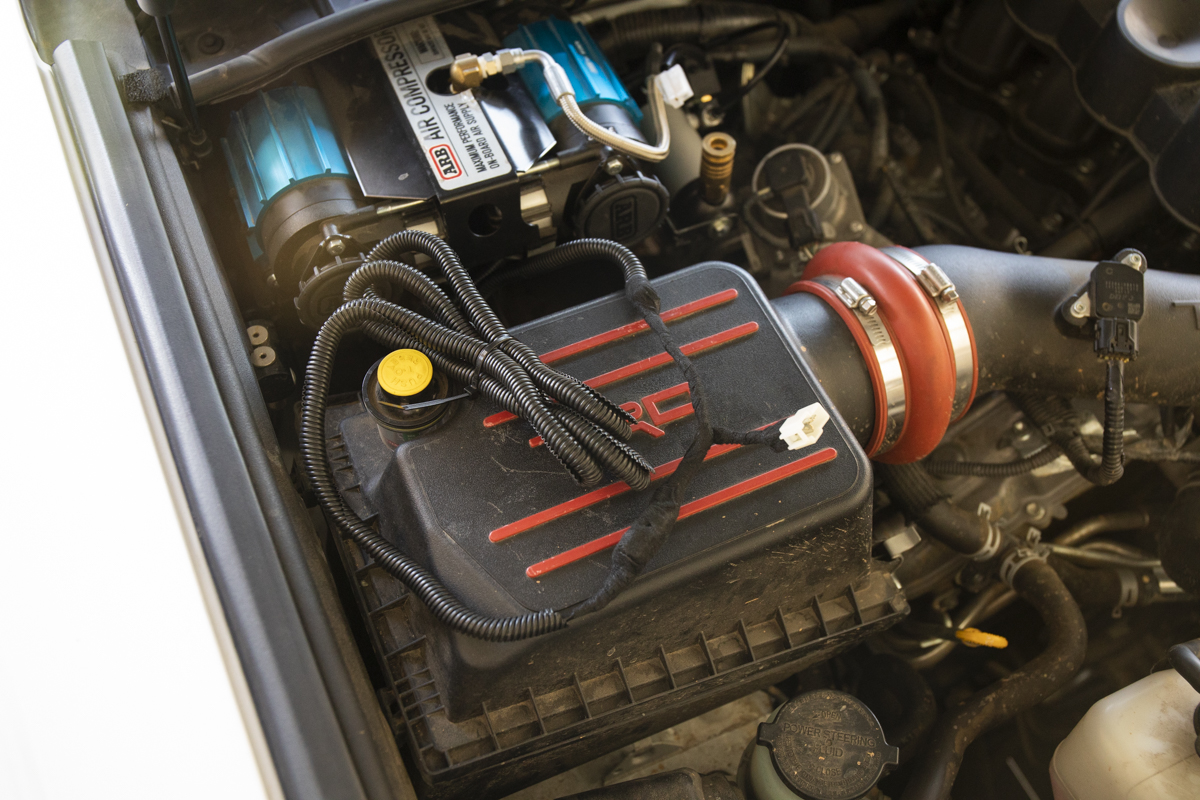
Step 15: Zip-tie and Run Wires Underneath the Compressor
We positioned our excess wiring harness underneath the twin compressor and the M.O.R.E. bracket. We then zip-tied our wiring harness down to the sheet metal in the engine bay.
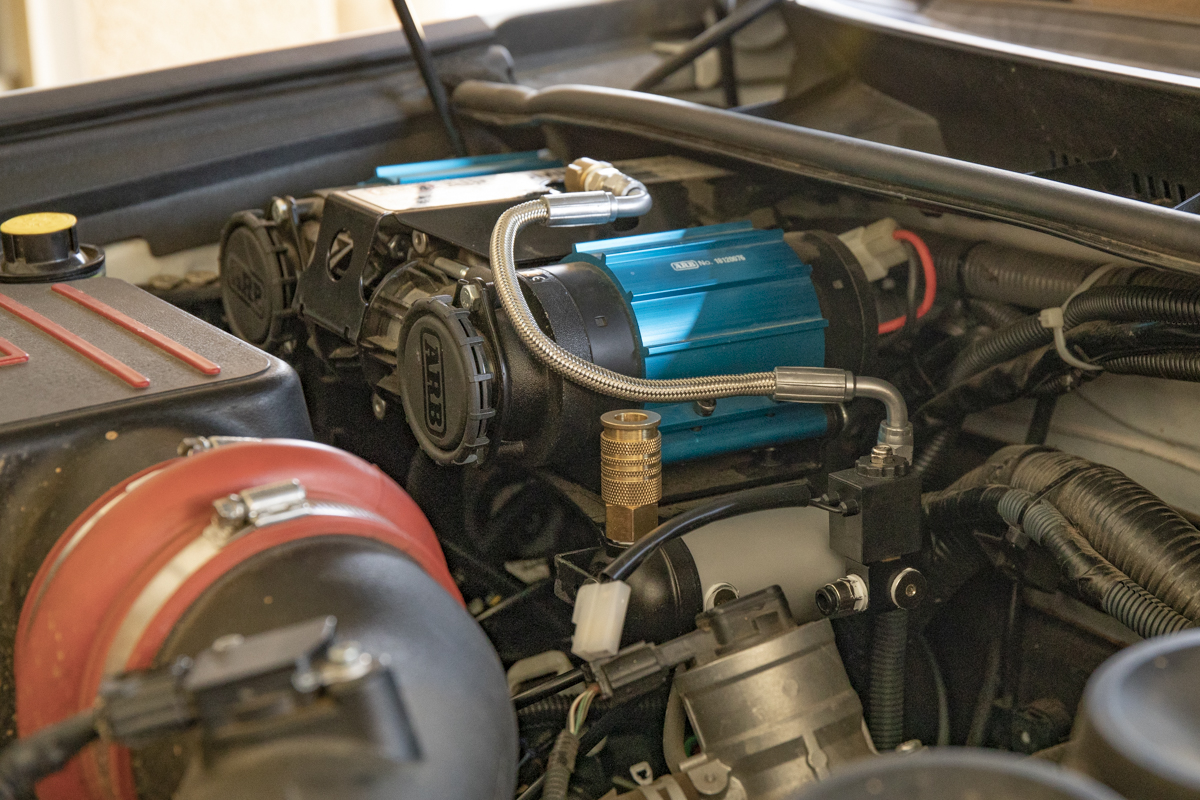
Step 16: Connect the Manifold to the ARB Wiring Harness
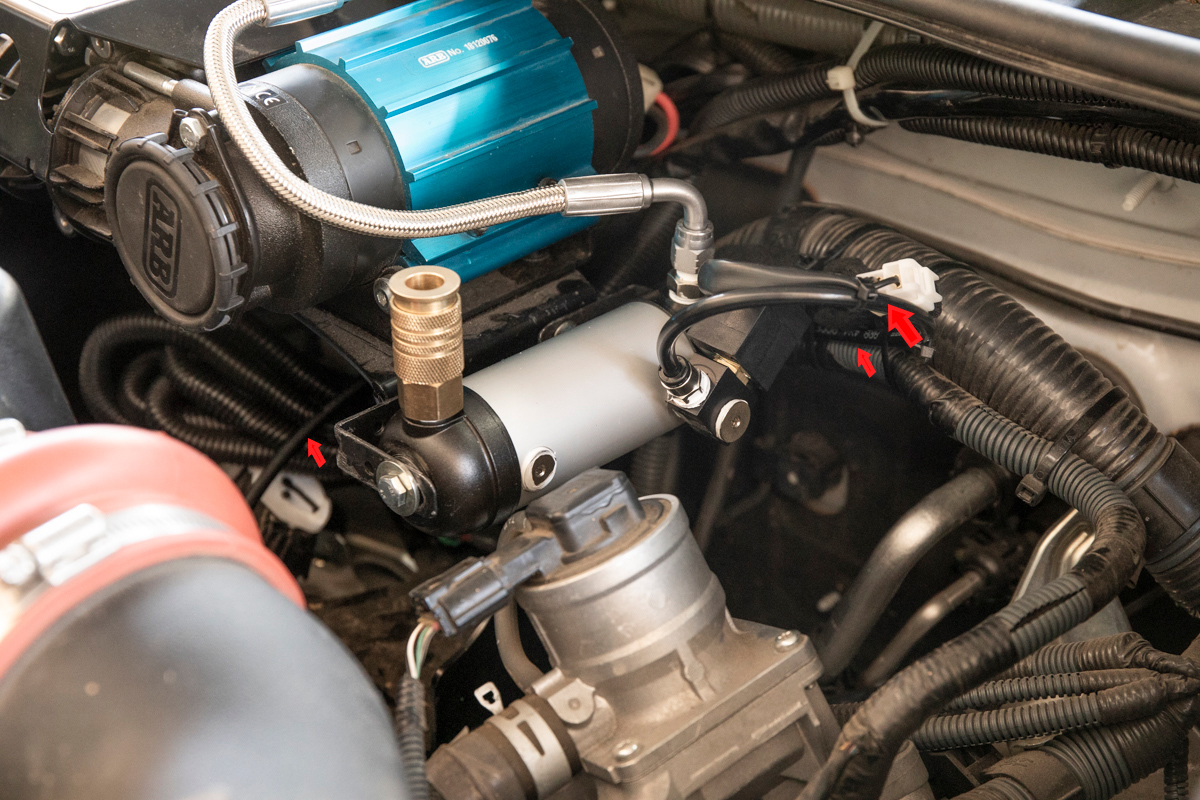
Finish up the install by running your solenoid air line and switch clips back along with the firewall electrical lines. We ran our lines back underneath the compressor bracket. You can see one red arrow on the left-hand side of the image. This is where we zip-tied our solenoid air line down to our twin compressor wiring harness.
Final Thoughts
To anyone that’s not running a switch, you should get one of those installed. It really helps to wire future installs, compressors, lockers and more. It’s much easier and cleaner on your whole build. Switch-Pros and sPOD both make a quick connect harnesses for the ARB compressor and locker switches. I would highly recommend looking into one of those options.
I have the pro8 RLB switch panel. Would those harnesses you mention work on my pro8 switch?
Question regarding to an air tank install. ARB, Viar, etc. air tanks for air compressors. 1.0 Gallon air tank. I am looking for ideas for where to install/mount the air tank. I have a 5th Gen TRD Pro 4runner. Remove spare tire and install there is one option. Looking for more.
Thanks for the write up. I’m about to pull the trigger on a compressor and ARB locker for my 1st gen 4runner and there is a ton of info on installing the compressor or the locker but not on how they operate together. This definitely helped me visualize how the whole system works and how to also accommodate airing up tires as well.
Hi Brenan, was wondering did you already have your rear locker hooked up? if not my question is why a locker in front versus rear. I am going to buy an ARB locker and couldn’t find much on if I should install Front or Rear.
Kyle, yeah I am running a factory E-locker in the rear. All I needed to add was the front locker.
Hey Brenan. Is there an “e”locker front diff option as well for the 5th gen 4R? Or is the ARB air locker the only good option here? I’m running the factory “e”locker in the rear on my 2020 TRD Offroad.
Thanks for all of your hard work along with everyone else that contributes to this website.
Yeah, Eaton makes an elocker for the front 3rd Member for us. Part number for the 3.73 gear ratio is 14219-1 and part number for 4.10s and up is 14221-1 (that includes 4.56s, 4.88s, and 5.13s+).
Dumb question. How do we know what gearing we have?
The factory gear ratio is 3.73. You would know if you had anything outside of that.
Will this work on a limited 5th gen with the torsen? Shouldn’t matter right, as you would only use this in 4Low anyway, so the 4auto torsen feature on the limited wouldn’t affect anything, right?
Yeah, it shouldn’t matter. You should be able to replace your Torsen limited-slip differential with an ARB air locking differential. Call a shop obviously to make sure but I don’t think Toyota made different axle shafts with different splines per model. I know lots of guys with limiteds that are running a front air locker so you shouldn’t have a problem.