
Mountain Off-Road Enterprises (M.O.R.E.) ARB Twin/Dual Air Compressor Passenger Side Bracket – Install and Review
This is a full step-by-step overview of the Mountain Off-Road Enterprises (M.O.R.E.) ARB Dual Air Compressor (CKMTA12) bracket for the 5th Gen 4Runner.
When it comes to airing up your tires, the ARB lineup of compressors is very well known. The 5th Gen 4Runner world is notoriously known for the Sponsored by Wifey air system but it just doesn’t fit my needs, personally. I debated on going with a short-lead system like the Sponsored by Wifey air system but more of a modular air system, like the MORRFlate or even the Indeflate fits my style a little better.
With these two air systems, you still need a compressor and somewhere to mount it if you’re going with an onboard air system.
My engine compartment on the driver side is currently taken up by the Switch-Pros sitting on a power tray so the driver side was out for me.
I knew that adding a dual battery system on the passenger side was an unlikely option for a few reasons so that left the passenger side wide open for an ARB Dual/Twin Air Compressor (CKMTA12) bracket.
Find it online:
- Mountain Off-Road ARB Bracket: Check Price
- ARB Twin Compressor: Check Price
M.O.R.E ARB Twin Compressor bracket:

I had seen a few options out there from 4×4 Labs, and SLEE but neither option offered room for a tank underneath. I wanted the option to eventually add a tank or add something in place of a tank, possibly a small group battery for dedicated power on a fridge…who knows.
I like the idea of having the compressor not take up the entire space, and the Mountain Off-Road Enterprises (M.O.R.E.) bracket leaves a large opening for something down the road, although it is specifically made to fit a 1-gallon ARB tank.
In any case, I like that the M.O.R.E bracket offered room underneath the compressor.
Passenger Side ARB Twin Compressor Mount Install
This is a straightforward, plug-and-play bracket, Made in the USA and fits 4th Gen 4Runners through 5th Gen 4Runners (2009–present).
The bracket is made of 1/8″ steel and can be ordered powder-coated black or red. Do note that ordering a red bracket may take up to 5 business days to ship.
Okay, let’s jump into it.
This install is not going to cover the ARB Compressor Install and Wiring; we have that as well as the Switch-Pros ARB Quick Connect Harness in separate posts.
Step 1: Unclip and Unmount Factory Wiring Harness
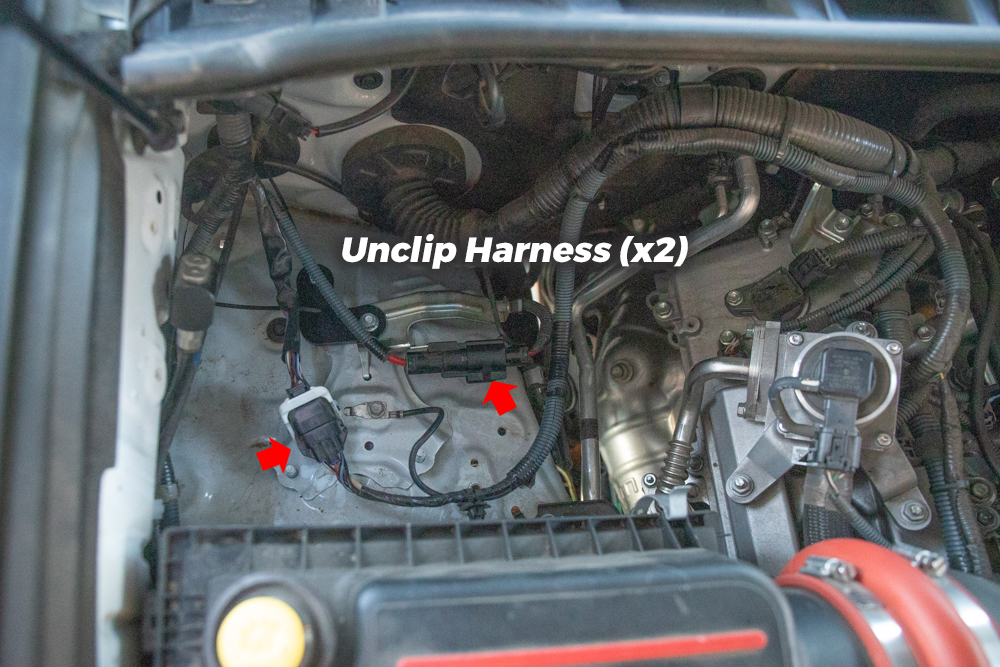
Unclip both wiring harnesses and set to the side. You can leave the metal bracket in place holding the black plastic connection clip upright. Remove the second harness and then toss the push clip connecting the harness to the firewall.
NOTE: I always save my push clips. You never know when a good OE push clip will come in handy.
Step 2: Install Small Compressor Foot Mount

The kit comes with this small foot bracket with a welded in place screw. Thread the first nut on the bracket into place on the OE bracket to secure it into place.
Step 3: Insert Compressor Bracket Mount

Position the bracket on the three bolts sticking up. Two of these are factory bolts and the other is from the small foot bracket.
Step 4: Tighten Down Main Compressor Bracket with Provided Hardware
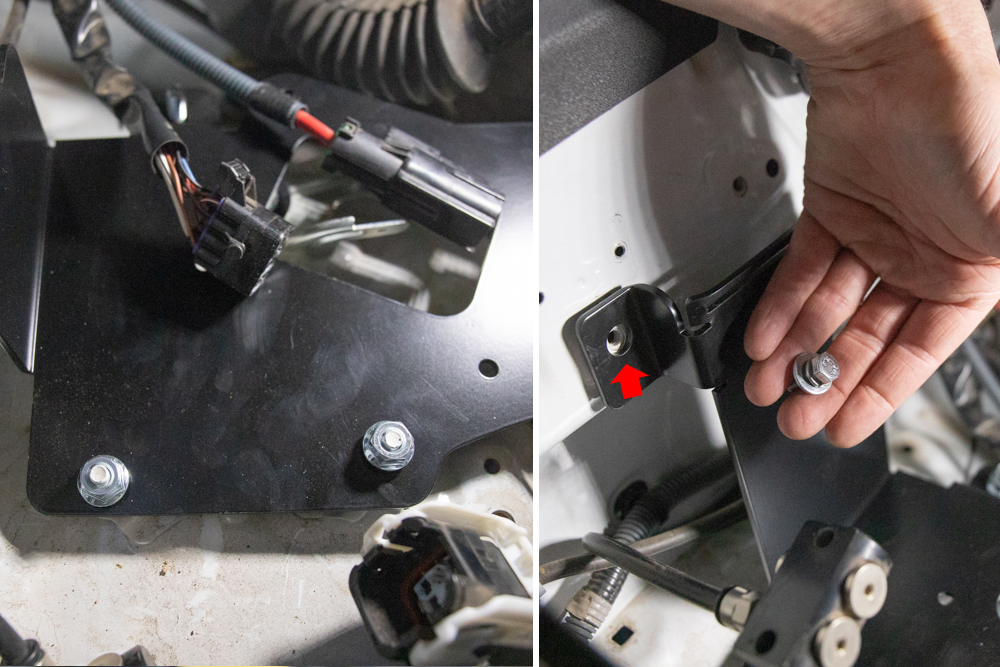
Tighten down the bracket to the bottom along with the side firewall.
Step 5: Reinstall Factory Wiring Harness(s)
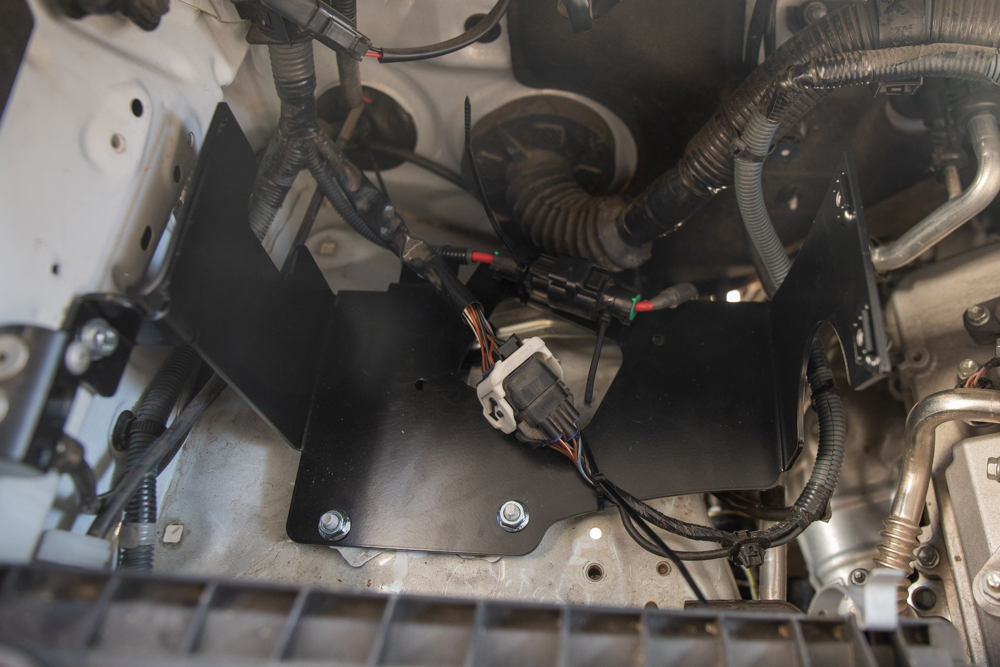
Reconnect your factory harnesses. If you’re running a 1-gallon ARB tank, you will need to find another place to route your factory harnesses. Since we are not using a tank, the harness can fall in line with almost exactly where they were to start with.
Step 6: Slide Top Plate into Slotted Edge on main bracket

The bracket comes with a slotted edge on the lower bracket and a top plate that slides into that slotted edge. Pictured above, you can see the notch on the top plate that slides and locks into the bottom plate.
Step 6 (view): View of Bracket with Top Plate and No Compressor
We pictured this without the ARB twin compressor for reference. You should test fit the bracket first and then attach the compressor to the top plate before you finish with your installation.
Step 7: Attach Top Plate to ARB Twin Compressor

Attach the top plate of the M.O.R.E. bracket to the ARB twin compressor with the provided hardware.
Step 8: Position Top Plate and ARB Compressor in Place

Slide the notched corner of the top plate into the slotted edge of the M.O.R.E. bracket.
Step 9: Pull ARB Twin and Top Plate securely in place on lower Bracket

It may take some effort to pull the compressor while attached to the top plate, back into place. The notched corner will lock into place along the slotted edge of the bracket.
Step 10: Optional (Lift up hood plastics to make room for tank)

You may need to lift the weather stripping in order to get access to the backside of the compressor. This will help you get a grip on the compressor and pull it into place.
Step 11: Secure Bracket/Compressor in place with Provided Hardware

Once the compressor and bracket have locked into place on the top plate of the bracket, you can secure the last two bolts in place and call it a day.
Final Thoughts?
If you are looking for a passenger side compressor mounting bracket, this is s a great option.
Like I mentioned above, there a few options out there but none quite like the M.O.R.E. bracket.
Their design accommodates a 1-gallon ARB tank, so whether or not you want to run that is up to you.
With this bracket, there is more than enough room to run another accessory under/inside the bracket. I have some ideas and will be updating this post or add another soon!
It looks like ARB no longer produces the 171601 model air tank that is shown with the M.O.R.E. mounting bracket. Instead, there is a newer model 171507 tank that appears to have different dimensions/spacing on its mount points. The tank has no CAD specs that I can find in order to compare the mounting hole alignment. Does anyone know if this new tank is still compatible to mount out of the box?
Does anybody have the Dimensions of the Triangle bracket on the fender that the 2 studs are in and the 90 degree bracket mounts I need measurments because my 4th gen don’t have the Triangle bracket on the body mine is a v8 would make it easier to Modify my truck for My M.O.R.E 4th gen bracket which is the same bracket used for the 5th gens I have a 1 gallon tank for mine
Hi,
Nice review, thanks!
I’m looking at installing an ARB twin on the passenger side too. Did you have any issues with the length of the harness? It looks like it might be tight run to the stock battery.
Thanks for the great info!
Cheers,
Mike
Hi does anyone know it this will fit with the S&B Filters cold air intake? Thank you!
Great stuff… any idea if the single ARB would would fit this? Or another passenger side mount recommendations for the single? Last minute adjustments to my build resulted in the Rago driver side mount no longer being an option.
Are there any other options for passenger side mounting brackets? This looks like a tight setup and I hate for it bang around when off-roading.
Love your installs brother, they really do help. I ordered this mount the other day and doing some homework. Curious as to know if there would be enough room for the hood to close if I were to install the ARB quick coupler right to the top of the compressor. It looks like it could be tight and seen you used a 90 degree.
Based on the photos, it looks like the air filter for ARB diff breather kit was removed. Does the MORE bracket and ARB twin compressor get in the way? If so, where are you relocating the ARB diff breather? I am also thinking of getting a switch pro power tray set up so having it on the driver side will also not work. *I have a 2020 4Runner.
Yeah, the compressor sits too close to the fender well for that plastic cap to thread on. I will eventually relocate it but it hasn’t been a priority.
Do you think a deep cycle (on the smaller side) battery would fit under the compressor? I’d really like to have both the twin compressor + dual battery at some point.
Thanks,
dc
Oh man that would be tight. Maybe a Group 25 (Odyssey 25-PC1400T) would work? I don’t know man, its tight over there.
Thanks for the reply. After installing it I agree. I’ll have to figure out a different solution. I’d hate to have to rewire my switch pros + compressor I just installed. Looking like I’ll have to.
Brenan (Anyone),
Using this mount, could you relocate the injection pump underneath using a relocation kit? Anyone tried it yet? If so, did you use a kit like Shrockworks or just fab one yourself?
JB
That seems doable but would be tight. I would just take the air injection pump off and start playing with placement options. I was thinking it would work on the outside of the bracket but if you were to run lockers and add a manifold, that would get in the way. I guess it depends on the build goals.
Thanks for the reply. Ya, not planning on lockers at this point. I’ll keep that in mind though. Still, all that open real estate under our Runner hoods starts to fill up fast!
I was hoping to mount my ARB Twin Compressor on the passenger side of a 2020 TRD Pro, but it looks like the M.O.R.E. mounting bracket is *not compatible* with 2017 and newer TRD Pro and Limited 4Runner models.
I’m not sure why they list that on their site. I would give M.O.R.E. a call. They were very responsive when I reached out. I have a 2017 and it fits perfectly.