
RDJ Trucks PRO-X-TEND Off-Road Fender Flares Step-By-Step Install + Review For 5th Gen 4Runner
Anytime you upgrade to larger tires there are unattended side effects such as throwing mud and rocks alongside the vehicle.
Some people really dig the aspects of a mud splatter, however, my main concern is adding the capability to my rig while also protecting its long term.
When I upgraded to the BFG KO2s in 285/70/R17, I was getting rocks hitting all the way up to the mid door panel and mud was covering the entire bottom half and rear of the 4Runner. It was time to add some protection to the paint and after seeing the labor involved in fiberglass fenders I chose to go with extended fender flares instead.
What options are available?
When it comes to aftermarket extended fender flares, there have been only a few options available and they all seem to be the same exposed bolt style.
If you wanted a smooth option you were out of luck until now. RDJ Trucks has both options available, the pocket style is the PRO-Offroad and the smooth style is the PRO-X-TEND, for the 5th Gen 4Runner. The two options are purely a matter of style preference as they are the same installation.
I went with the smooth PRO-X-TEND as I liked the more smooth factory look over the pocket flares.
Find it Online:
- PRO-X-TEND Fender Flares: Check Price
- PRO-Offroad “Bolt On” Fender Flares: Check Price
Options To Choose From
Besides the two styles, RDJ Trucks also offers multiple options when it comes to the PRO-X-TEND:
- Smooth Matte Black which is paintable and has a 3-year warranty.
- Textured Matte Black has a more aggressive appearance and has a 3-year warranty.
- Smooth Rhino Skin is a bedliner type of coating that is scuff and fade resistant with a lifetime warranty.
- Textured Rhino Skin is an aggressive bedliner type of coating that is scuff and fade resistant with a lifetime warranty.
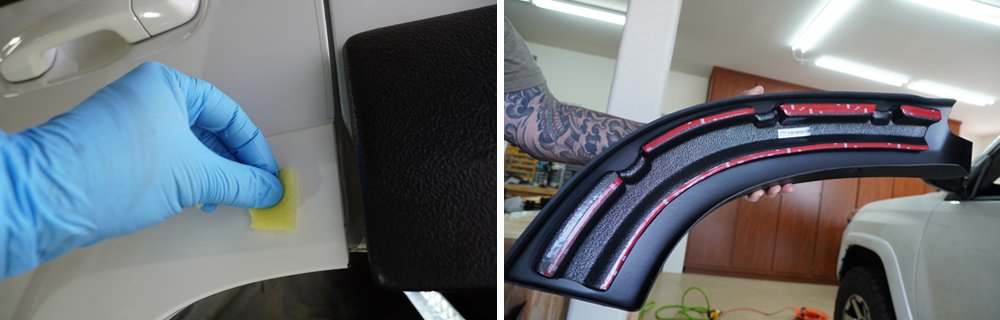
Textured Rhino Skin Option

I went with the Textured Rhino Skin as it should give more protection against the Arizona pinstripes.
I tested one of the small trimmings I made for the durability of the finish. I took a small sharp rock and scratched across about four times with a fair amount of force. As you can see from the below above, the finish did scratch, however, with the texturing, it was not as noticeable and I had to find just the right angle for it to appear. It’s not the most realistic test, not unless you’re really pushing your rig, but for the more likely branches, I don’t think it will phase it all.
Pre-Install Overview
I have read a ton of horror stories when it comes to installing fender flares, as stacking tolerances always seem to end at the fenders. With that in mind, I was prepared for the worst, however, I found the RDJ Trucks fenders to be pretty straightforward.
Let’s get started!
Before you begin the installation, be sure to clean the exterior of the 4Runner, as most of the pieces attach over the factory fenders.
Install Rubber Gasket Around Inner Fender Edge

The next step is to install the included rubber gasket around the upper inner fender edge that comes into contact with the body panels above the factory fender. This is probably the most difficult and time-consuming aspect of the install. The seal has a piece of 3M tape on the inside to hold itself to the fender.
The best way I found is to first remove about an inch of the tape, spread the seal open and attach it to the end; this will hold itself to the fender.
Then, Add Next 3-4″ To Fender

Once attached, I will spread and press the next 3-4 inches onto the fender. You’ll want to pinch the stop point with one hand and, with the other hand, pull the red tape cover towards the pinched end and press the freshly taped area down to ensure bond. Then continue for all the remaining fenders.
With the rubber seal installed, it’s now time to dry-fit the fenders to make sure nothing is missing and that all the pieces generally line up. Don’t worry if they are slightly off as they will be. Before installing, if you do need to make adjustments based on your build, see the trimming section below.
RDJ Trucks PRO-X-TEND Fender Flares Step-By-Step Install
Tools Needed:
- Drill with 5/16” and ⅛” bits
- Cross Head Screwdriver
- 5mm Torx Key
- 13mm Wrench
- Utility Knife
- Sander
Note: Driver and passenger fenders are the same steps for either side.
Step 1. Remove (x4) Factory Bolts

Starting with the front, begin by removing the four (x4) factory bolts shown in the image above; there is no need to remove the other bolts.
Step 2. Install New Flares + Secure Bolts

Place the RDJ Trucks flare into place over the factory and reinstall the factory bolts.
Step 3. Ensure Rubber Seal Is Flush Against Fender Flare
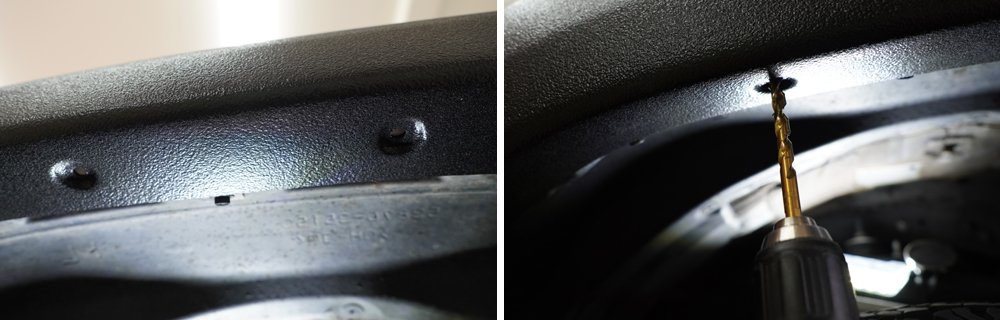
Make sure that the rubber seal is flush against the fender flare and where you want it to sit. Next, use the open holes in the flare to drill (5/16”) into the bottom of the factory flare.
Step 4. Insert Retainer Screws + Tighten

Insert the plastic retainer screws into the hole, and tighten them down with a screwdriver.
Step 5. Remove Rear Hole (With 5/16″ Drill)

The rear hole will also need to be drilled (5/16”) out as well. Then use the same plastic retainer screws into the hole securing it in place. If you notice some trimming, that will be covered later.
Step 6. Secure Front Fender Using Stainless Torx + Nylon Nut

Next, use the hole in the front as a guide to drill (5/16”). Secure the front fender using the stainless Torx (5mm) and Nylock nut.
Note: Instructions say that the washer should go on the outside, however, tt seemed to fit better with just the bolt.
Front Fenders Flares Complete!

Step 7. Remove (x4) Top + Side Factory Bolts

The front flare is a one-piece design, however, with the rear doors being part of the fender flare, it’s slightly more involved.
You’ll want to start by removing the four top and side factory bolts. You do not have to remove the factory mud flaps if you don’t want to.
Step 8. Remove Upper Factory Fender Flare

Next, remove the upper factory fender flare.
These pieces are the only factory parts that must be removed. They are held in by the clips underneath. Start at one end and gently pull, trying not to break anything if you ever want to go back to factory specs. Unless your 4Runner just rolled out of the showroom, you’ll need to clean where the factory flare was trapping dirt.
I didn’t break any clips, however, I did manage to break some of the tabs for the clips. May be able to JB Weld the back if I ever need to.

Step 9. Install Flare Using Factory Bolts On Upper Portion

Place the flare on using the factory bolts on the upper locations and the lower holes will use the plastic retainers. The last step for this section is to use the rear hole as a guide to drill a (5/16”) hole above the mudflap and use a plastic retainer to secure it.
At this point, the door is the only flare left to do. This one takes some patients as there are a lot of alignments happening. Dry fit a few times before sticking and drilling.

Step 10. Secure Alignment Using 3M Adhesion Promotor
Once you are happy with the alignment of the dry fitting, use the included 3M adhesion promoter. This will allow the double-sided tape a more secure grip. Remove the red tape protectors.
Step 11. Align Flare + Press & Hold Down On Tape To Secure

Very carefully align the flare into position and apply a good amount of pressure where the tape is in contact with the 4Runner.
Note: Instructions say 30psi, but not sure how to gauge that. The door gap should be fairly close but not touching when open or close the door.
Step 12. Secure Tape On Underside of Door (Optional)

The next step is optional according to the directions, but if you are taking your rig on rough terrain or have kids that slam doors constantly, then I would highly recommend it, as tape should never be the only holding parts onto a vehicle.
On the underside of the door, use the holes as a guide to drill (⅛”) two holes. Make sure not to go too far and ruin the door rubber gasket.

Use the truss type A screw with a washer to ensure that the flares aren’t coming off (as shown above). As an extra precaution, I used a small dollop of RTV to make sure it is sealed up.
Congrats, the rear fender flares are complete!

Finish Up With Some Trimming! (Optional)
This was left out of the above as it may not be necessary depending on your build and choose aftermarket accessories. However, since I have trimmed the front fender wells and added rock sliders that come up for steps, I needed to do some trimming.
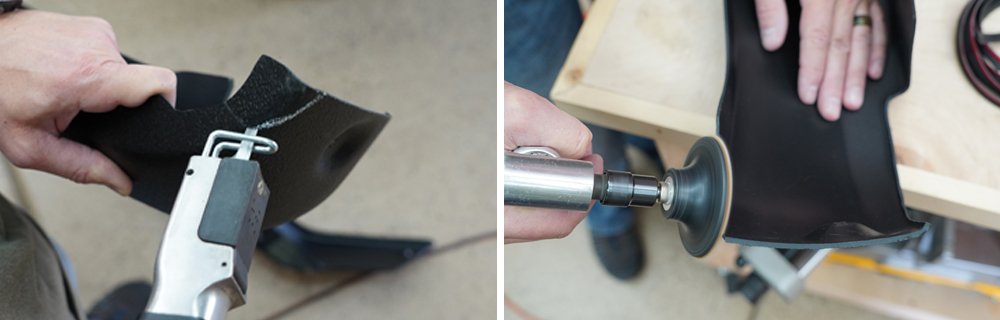
In Dry Fitting identify the areas that are making contact with the fender flares. Mark the area that you will start cutting, go small as you can always cut more. Dry fit again, until satisfied that you have the clearance needed. Cut using your preferred method, pneumatic saw in our case, and just to make sure it keeps a nice finished look, sand it out rounding the edges to match RDJ Trucks design.
As mentioned earlier each build will vary, however here are a few common spots:
#1. Front of Rock Slider (Behind Front Tires)

#2. Inner Fenders Wells (To Match Prior Trim)

#3. Rear of Rock Slider (In Front of Rear Tires)

This can be tricky as it would not sit flush for dry fit until the clearance cuts were made. Make small cuts.
#4. Corner of Rear Doors
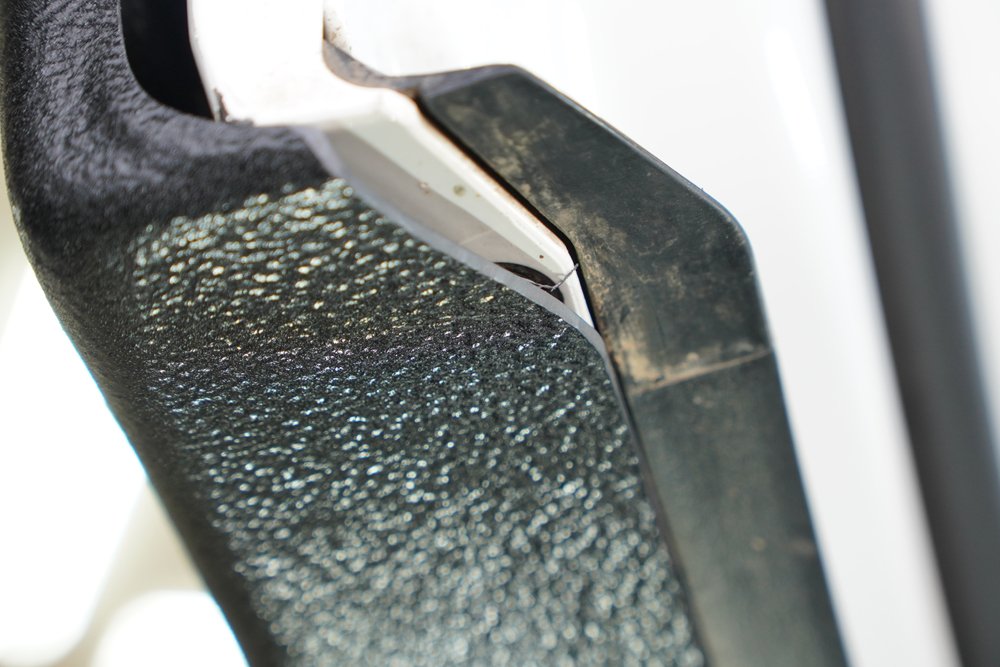
This one was preventive, however, I felt that it could catch on my boys and rip the entire flare off if they weren’t paying attention.
Final Review
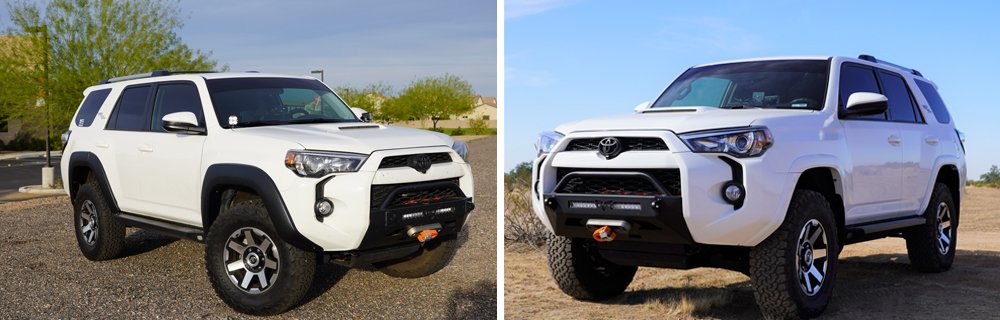
I couldn’t really see where the horror stories came from if your patient it was an easy install. Patience comes at a cost of time, expect at least 4-5 hours. Aesthetically, the style and texture look good and the lines almost match the factory flares on the new Tacoma TRD Off-Road.
However, there are a few small issues.

The biggest one is that they almost make my tires look smaller.
It is probably because of the black color it kind looks like there is more wheel space than there actually is. Another small issue is that the texture makes the mud flaps seem out of place now, but I can hit that with some spray-on bed liner if it really bothered me.
But the real question is how do they perform?

Amazing!
I had a chance to get out shortly after a desert spring rain and there was plenty of mud (and perhaps cow patties) on the trail. I was not taking it slow and, what would normally have been a mud-caked 4Runner was fairly clean. They did their job well!
I would have also posted pictures of some pinstriping or rock damage on the inner flare, but I have yet to actually get any, the rhino skin coating is tough.
My door fender flare was ripped off due to an accident so I am looking to replace with aftermarket fenders. Am I able to install the door piece without the existing door fender?
Do these fit the 2017 4runner limited model?
These things are absolute garbage, I am on my second pair. I have probably taken them off four or five times now. The moulding process whatever they use completely sucks. The back part of the fender flare became separated from the front part, it didn’t lay flat against the body panel and I ended up epoxying it and grinding it down. Trust me don’t buy these save up a little bit of extra money and go for the Line X Ultra.
Wish I had these before I rubbed the paint off the OEM flare on a tree through a tight trail. LOL Probably will be ordering these now since the cost to fix the paint is the same as a set of 4 flares!
Looks awesome and fairly easy install. I’m running a 2018 TRD Off Road, all OEM so far. A couple install questions: Front L/R side, can mudflaps stay inplace with OEM running boards? Front L/R, when drilling are you drilling into OEM fender flares or bodypanel metal? Rear L/R side, why the removal of OEM rear fender flares and at anytime while drilling are you into plastic or bodypanel metal? Much thanks for the install tips and ‘Youtube’ video, which I assume is the same Trevor.
If I had to trim fender to allow more room for my 35s would these help or hinder me?
These things are TERRIBLE if you drive down trails where you brush up against sticks and foliage especially if you have done any modifications to the OEM bumper cover.
Because they are held on just on the underside, a stray stick can easily get inside the flair and rip it off.
The rear door portions are essentially held on with adhesive which performs terribly. Even when re-installed using stronger adhesive the bonding agent between the interior flare spaces and the flare itself fails.
It would have made sense for the company to incorporate clips that could easily mount into the existing holes on the body panels instead of adhesive.
Thanks for your input, where yours RDJ or another brand? I was hesitant during the install but I’ve got thousand of miles of offroad in various environments and haven’t had any big issues. I’ve rubbed them through heavy brush and against some rock and nothing.
They were RDJ, 1/2 of them came off rubbing on medium trail brush on the first run. Once a stick gets in between the flare and the body, if you don’t catch it, it can just wedge in thee and rip it off.
After reading this article and a few reviews, I ordered these for my 2021 4Runner and had them installed by a body shop as it was out of my league. We did have some issues with the left rear fender being over-trimmed at the factory, leaving a gap, but RDJ’s customer service was OUTSTANDING and they went way above and beyond expectations to make it right. I am so happy with how they look. I upgraded the stock tires to Cooper ST Maxx’s and added the flares on stock suspension and it’s just what I wanted. Thank you for the in-depth article, it made my decision easier.
Awesome, glad they worked out for you!
Any issues after more real world use? How much more protection do the flares give you? The RDJ website says the flares have “1.75 of additional tire coverage.” Do they stick out 1.75″ from the factory flares? I have CBI high clearance bumpers in the front and back and wonder how well the flares will be attached to the body panels with so much mounting surface missing. Thanks for your post and info.
Thanks for the questions. They are holding up great with over 700miles offroad and even a few trips through the brush carwash. I didn’t measure how much they actually stick out, but the 1.75 inches sounds right. They have done a great job of keeping the mud and rocks of the side of the 4Runner. The bed liner material is super tough and hasn’t had a single blemish. I cant say for sure depending on the cuts, but you can easily trim the fenders to match and the add a bolt to hold the bottom in. The 3M tape is what really holds it on the factory flares.
Cheers,
Trevor
I did this exact mod about 2 years ago. After a few months had issues with the small portion that attaches to the rear doors. Found a video on YouTube from graybeard. He had the same issue with them coming loose and his were the bushwhacker brand. He used some body adhesive and applied a strip to the flare and then used a pole from a yard tool to prop up against the rivet spot and let it cure for a day. Since then no issues at all.
Do you remember the name of the adhesive you used? My passenger rear door Bushwacker is barely hanging on. I watched that guys video last year, but can’t find it anywhere now. I think it was some sort of Loctite adhesive?
The 3M Emblem and trim adhesive works well. My recommendation is to take and clean everything really well. Then when you apply the adhesive prop something against it to keep solid pressure against it at least overnight (go longer if you can). I used the rubber end of a rack and shovel and propped them against the shorts bolts in the pockets and then wedged the tool end into the ground that kept great pressure over the time frame and didn’t mar anything.
I got a roll of VHB off of Amazon, hopefully that works. BTW 3M emblem adhesive eats through paint, which is why it bonds so well. I wouldn’t use it on something that “may” have to come off at some point during the life of the vehicle. I’m not sure why one of my door fender flares didn’t adhere well, since the other one is rock solid. I cleaned and prepped both sides equally.
The doors really take the most abuse as the are slammed closed constantly. The adhesive promoter was a 3M brand, as was the double sided tape.
Awesome. I think these things are pretty stout, but the rear doors get a lot of abuse with opening and closing. The 3M double sided tape works surprisingly well, but I would highly recommend the under screws as well.
I did all of those and after a few months I had the same issue as several other people. I was just adding that in because both the RDJ and the bushwhacker do this.
I appreciate it, I hope my last for the long haul. I will post an update if there are any issues.
These are killer! My factory flares are vinyl wrapped… These are going on my list of future mods
Thanks! The vinyl wraps look great as well, however, these add a few more inches of protection. I really don’t think you can go wrong with them.