
Yakima SlimShady Awning + Front Runner Mounts Step-By-Step Install + Overview For the 5th Gen 4Runner
Will the real SlimShady please stand up? Come on guys and gals you saw the title of the blog; the lyrical drop was absolutely necessary! All puns aside, let us take a look at the Yakima “SlimShady” awning and how it can be installed.
Full Disclaimer: I actually won this awning through a raffle, which was probably the fourth-best day of my life because I never win anything. The awning was shipped to my door the day before leaving for a beach trip so I was able to really put the shade to the test on a 4×4 friendly beach. Before I give my minuscule review, let us take a look at the mounting options for the SlimShady awning.
Find It Online
- Yakima: Check Price
- Amazon: Check Price
Product Overview & Mounting Options

The awning comes in nice packaging and includes all the parts necessary for mounting to basically any roof rack system/crossbars.
As you can see in the picture above, those bigger block-looking mounts are the factory Yakima mounts. They are pretty bulky at first sight, but they are actually very nice; they clamp down tight and even have a built-in keyed lock for extra security.
The smaller mounts (x3 mounts + hardware) are Front Runner’s EZ awning mounts.
Front Runner’s EZ awning mounts
- Front Runner: Check Price
- Amazon: Check Price
The FR mounts will work for the Yakima awning channels.

Note: The Yakima mounts WILL BARELY WORK on the Front Runner rails, but I was still able to open the clamp all the way and get them installed just fine. You will have to do some finagling to get the Yakima mounts on, AND THEN mount the awning to the brackets. These Yakima brackets will work just fine with other applications, as the brackets will open to 5 inches wide.
For Front Runner rack owners, those FR rails are 5 inches wide as well; hence, the finagling. I ran the awning on my FR rack just fine but ended up ordering the FR awning mounts for a lower profile mounting option.
How To Set It Up On Your 4Runner
Step 1. Attach Mounts to Awning
I believe that the steps for installing an awning are fairly subjective regarding the order of operations; therefore, you may find a better order of steps for install that differ from the order I installed.
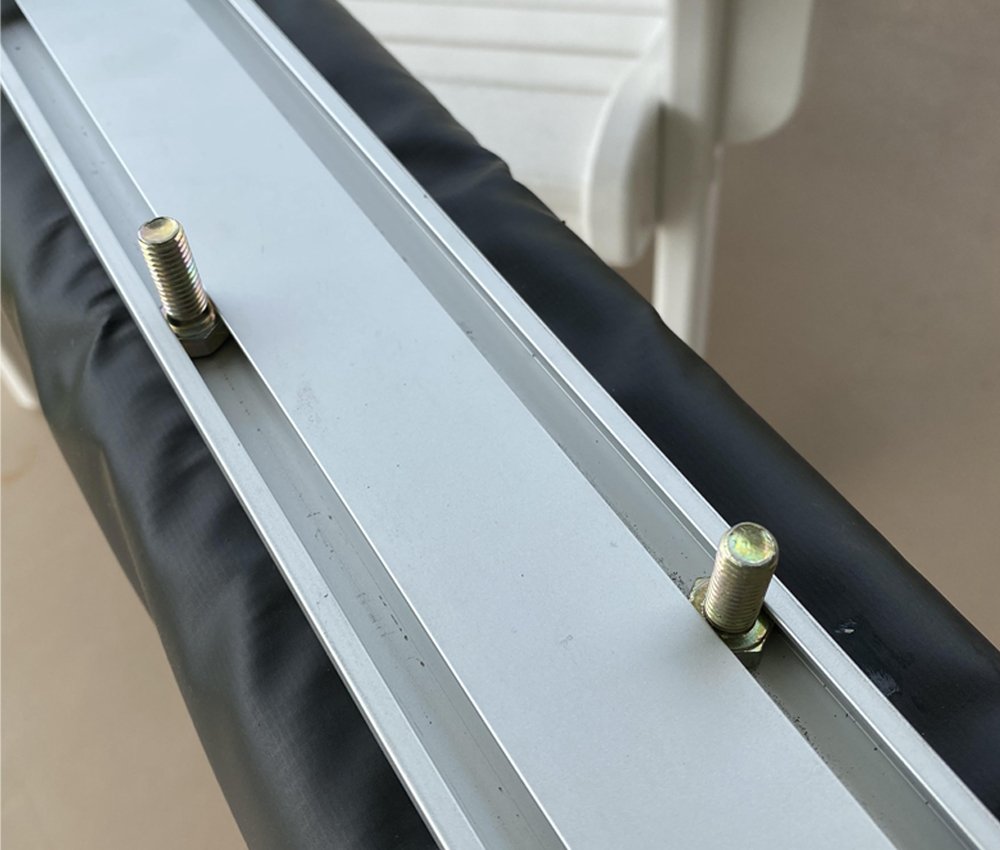
I chose to install the Front Runner brackets to the awning first, then the awning to the roof rack. Either way, installing an awning is much easier with a friend. I have attached pictures of both the Yakima & Front Runner mounts bolted to the awning channels.
Both mounts install the same way, slide the head of the bolt into the channel and use the washers & nuts to secure mount. It is very straight forward; just remember to check your awning direction so you don’t end up mounting the awning upside down. The zipper should be on the bottom.
Step 2. Mount Awning To 4Runner

Leave the bolts loose so your mounts will slide within the channel.
You will want to line up the mounts to your roof rails before tightening. Once you have the mounts secured to the awning channel, you are ready to mount the awning to your vehicle, which hopefully is a Toyota 4Runner if you’re reading this.
Step 3. Mount Awning To Front Runner Slimline II Rack (Optional)

First, remove the corner pieces from your FR rack. You will be sliding 6 nuts total into the top channel of your FR rack side rails. There will be two nuts for each of the awning mounts FR provided.
Not Pictured: These FR mounts do have single holes on the bottom portion of the awning mounts; therefore, you will need to slide 3 nuts in the bottom channel of the side rails. This was impossible to get a good picture; if you are familiar with Front Runner accessory mounts, this should make sense to you.
Step 4. Line Up Awning To Roof (With a Friend)

Next, phone a friend to help you line up the awning to the roof, matching the mounting hole to the nuts in the channel.
This is why you don’t want to tighten screws down (that hold awning mounts to awning itself) before incase your “dry fit” doesn’t align. Once everything is lined up, you can tighten down all nuts & bolts.
Note: Expect to do a couple of test fits to make sure you have your awning exactly in place before tightening everything.

You can see in the picture above on the bottom inside of the side rail the single upside-down bolt that the Front Runner rack utilizes.
The downside of using the FR mounts is the lack of the keyed locked for security the Yakima mount offers, but I can tell you all these nuts & bolts are more of a theft deterrent if you want my opinion. The Front Runner mount option is way more time consuming as far as installing and uninstalling.
If you want to leave your awning on year-round, I highly recommend the Front Runner mounts if you have an FR rack. If you want to be able to easily remove the awning, the Yakima mount is the quicker option. If using the Yakima mounts, your awning will sit above the rails it is mounted to; as you can see in the picture the FR mounts are pretty much flush with the side of the rack.
Note: If you are running a Front Runner rack with multiple accessories, you will want the FR awning mounts, or these ARB awning mounts might be a good option, or finally, something like their moveable awning arms might work for you as well.
You will take up rack space using the Yakima mounts as they would get in the way of an RTT or multiple other mounted accessories.
Final Thoughts

We have really enjoyed owning the Yakima SlimShady Awning.
It seems to be of great quality and does have a nice pattern in the shade itself. We used this awning for 5 days straight on the beach. I had no intention of buying an awning but was so lucky to win this for our beach trip. Our dogs really enjoyed the extra shade. I couldn’t imagine not having it now.

The awning opens by unzipping the black cover and the awning rolls out.
Once you have the shade unrolled, use the retractable poles to set the shade to any desired height. The SlimShady awning is very stable once you have everything setup. I ran this awning for hours on the beach and it performed very well with sporadic beach winds; it never even slightly began to fall over.

The Yakima SlimShady may not be the biggest awning, but it is not the smallest.
It may not be the absolute “bee’s knees” of awnings like the super high-end awning from eezi awn, but it is far from the cheapest. This is overall a great awning. I would consider the SlimShady awning in comparison with other brand awnings like the ARB awning and the recently posted Iron Man awning.
Yakima overall makes great products; I have had the Yakima Fat Cat Snowboard mounts for two years now and they look brand new. Don’t lie to yourself; even the name of the awning is great.
The real SlimShady does indeed stand up!
Curious if you still have the clamp mounts that came with your slimshady? Trying to piece together a home brew awning setup and I think those mounts would be exactly what I need.
I installed a Slim Shady a week ago on my 5th Gen on the stock bars and it is a perfect fit on the 4 runner. The Yakima brackets account for the curvature of the crossbars as well so the backer plate sits vertically. It’s end up being positioned well too as moves out 5 inches from the clamping surface so sits just above the plastic rail caps of the 4Runner.
Some reviews felt the zipper was inadequate and the bag tight. I did not find that at all. The reason I went with the Slim Shady over others is that I have no plans on an aftermarket rack. I will carry a pair of Maxtrax on the bars strapped down and using a cable lock but that’s it. The Yakima mounts are thick but a good solution IMO if you may want to install and remove as needed after a trip. I did a 250 miles trip yesterday and with SoCal highway speeds still managed 20mpg, being heavy footed at times, so not a mileage killer and didn’t note any wind noise.
I purchased mine at REI and was able to utilize their 20% off sale. As an added bonus, the front rail of the Slim Shady is slotted like other brands so can accommodate their 6.5 foot from wind screen addition. As the Slim Shady is 1.5 feet less in extension, an accessory wind screen could provide a little added security and coverage.