
Alpine Halo9 iLX-F309FRN Step-By-Step Install and Review For the 5th Gen 4Runner
Why Upgrade the 4Runner Head Unit?
We all know the factory head unit has a lot to be desired. One of the main features includes Apple Car Play and Android Auto. So much so that the new 2020 stock 4Runners are shipping out with integrated Apple Car Play factory head units.
To bring my 4Runner up to speed with this current trend, I chose to install the Alpine Halo9 iLX-F309FRN. Although being one of the priciest of options, it’s one that comes fully plug and play, with no splicing, adapting, or extra wiring to adapt to the factory harness.
Find It Online:
- Crutchfield: Check Price
- Amazon.com: Check Price
Alpine Halo9 4Runner Head Unit Installation
This install time will take anywhere between 2 to 3 hours based on your experience level. For a video tutorial, click here.
Preferred Tools
- 10mm Wrench
- Panel Tool Kit
- Mini Phillips Screw Driver
Step 1. Disconnect the Battery
Using a 10mm wrench, disconnect the battery.
STEP 2A. Remove the Factory Head Unit

Carefully pull away driver and passenger side trim pieces below the head unit. Then pull away from the climate control. You can see this done in quite a few places on Trail4R.com but here is a good one.
Using a plastic panel tool, remove the cable clip, disengage the factory connector, and remove the whole assembly.
STEP 2B. Remove the Factory Head Unit

Using a 10mm socket, remove the 4 bolts holding the radio in place and remove the radio trim panel by gripping the sides and slowly pulling away.
Pro Tip: Use a protective blanket or towel to cover the shift knob
STEP 3A. Remove Factory Panel Components
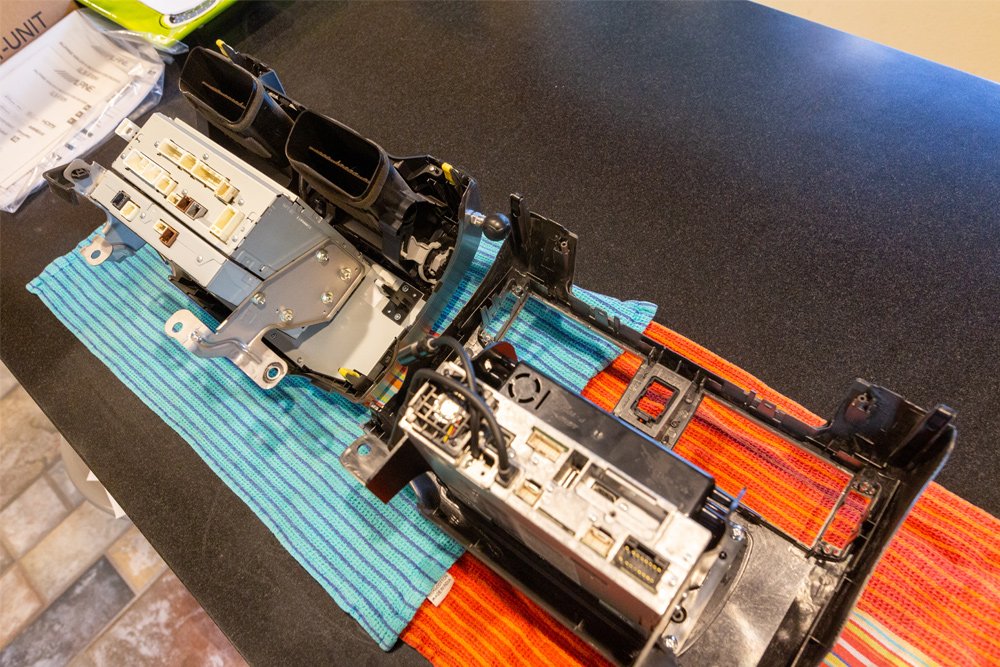
Remove the left and right air vents by using a flat head screwdriver to release the lock tabs on the sides of the vents.
STEP 3B. Remove the Hazard Light Connector

Release the locking tab to disconnect the hazard light on the factory head unit.
You can either use a razor blade to cut the securing tape of the hazard light harness or you can disengage the factory clip with a small flat head screwdriver.
Apply light pressure to the clip holding in the main hazard switch and push it out from the rear to the front of the radio panel.
STEP 3C. Remove the Vent Trim
Using a small Phillips screwdriver, remove the (6) small screws holding in the top and vent trims.
STEP 4. Install Components on the Halo9 Trim

Install the hazard light switch, top and side vent trims utilizing the factory screws from the previous step, into the iLX-F309FRN radio trim. Snap left and right vents into place.
STEP 5. Connect OBD2 Adaptor

Running this behind the dash kick panel up into the cavity behind the head unit.
STEP 6. Running Microphone Wire
This step is not included here, at the time this article is written, I was still deciding on a different placement for the microphone. The wiring of the mic can be found in the installation video here.
STEP 7. Connecting the Harness

Connect the GPS antenna wire, FM antenna, SAT radio antenna and USB adaptors into the vehicle harness.
Step 8. Connect the Maestro Unit
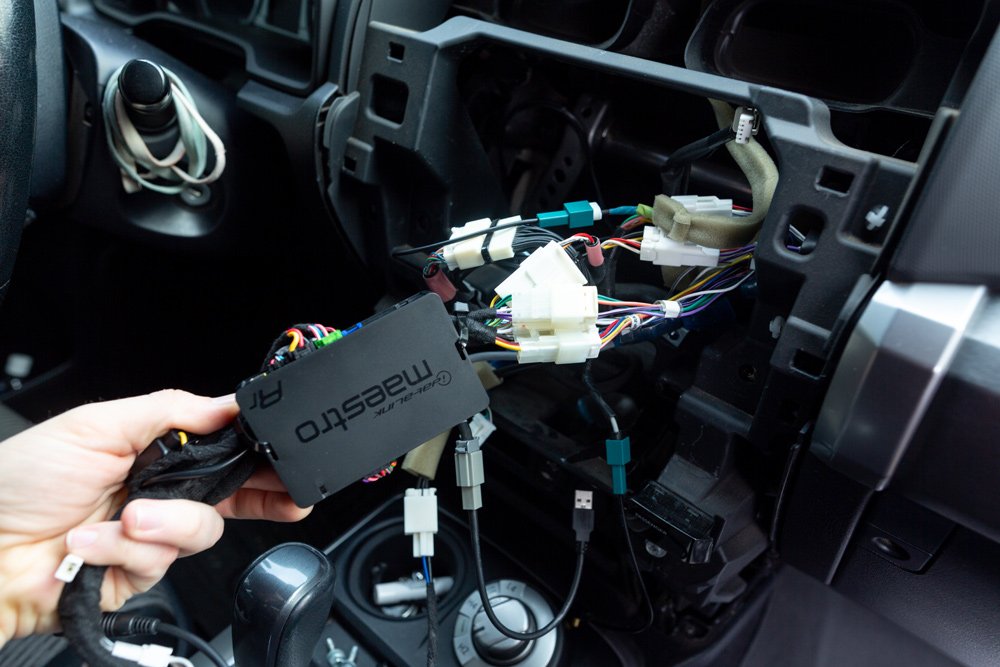
Connect the Maestro harness into the factory harness, this will bridge the factory harness to the rear of the Alpine Halo9.
Note: For reference check the wiring diagram here.
STEP 9. Install the Halo9
Return all removed components to their factory locations, push the harness back into the cavity, and install the Halo9 into the factory location.
Then use the (x2) factory screws from the factory head unit and secure with a 10mm wrench.
Lastly, reinstall all trim pieces.
Step 10. Turn on the Halo9
Turn the vehicle’s ignition to ACC, turn on the unit and select your language.
Important Note: While the vehicle is in park, to access the settings, press down on the emergency brake, release, and push down again, now you will be able to access the settings menu. Go into the settings and turn on the reverse camera.
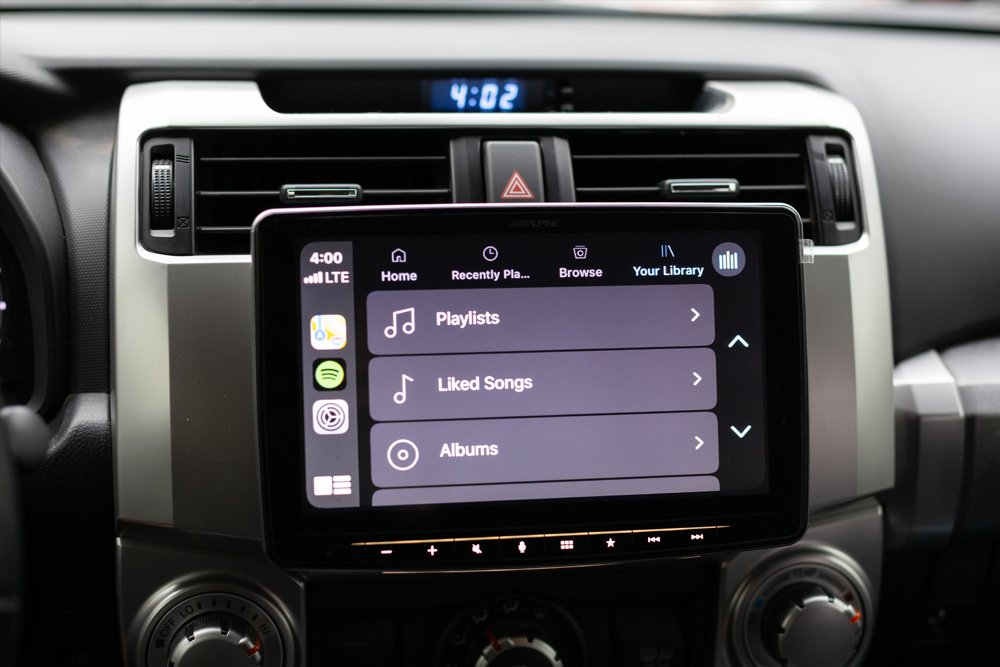
STEP 11. Ready To Use

The new Halo9 is ready to use, keep in mind that you will not be able to access the settings menu unless you are in park, and the emergency brake is applied.
Initial Impressions

The Alpine Halo9 is HUGE! It dwarfs the factory head unit display. Surprisingly, it actually fits the design and style of the 4Runner’s interior.
In the beginning, I thought having a floating display would not mesh with the factory styling, but as floating screens are becoming more and more common in newer vehicles, I found it easy to get accustomed to. The screen appears to sit up high, partially intersecting the above vents, however, it has no real large effects on blocking air to the driver or passenger.
User Interface
The user interface is easy to use and navigate through.
One of the concerns I had about the unit was start-up times. The Alpine Halo9 takes about the same amount of time to boot and pair with my phone in about the same time as the factory head unit.
I haven’t felt like I have needed to wait for my phone to connect to the Bluetooth or via USB for the Apple Car Play, before or during driving.
It all works very seamlessly and it is nice to have an advanced piece of tech in the outdated 4Runner for once.
The buttons on the screen don’t have any feedback, they are touch-sensitive. I was a little worried about having a touch button for volume and such, but they are performing just as well as a true clicky button.
While driving, the larger screen is easy to navigate through, bouncing through the car play menus, running Spotify, directions, pulling up messages, all a breeze.
Previously, my phone was mounted up high in the line of sight for all of this, after running this head unit I found myself off my phone less while driving and letting the car play unit do all the work.
Final Thoughts

It doesn’t take too much to outshine the factory head unit but the Halo9 does it in a big way.
Streaming songs via USB with the factory head unit, I would run into issues with “buffering” when skipping songs in rapid succession, and the Halo9 blows through songs with ease.
One of the small little features that I really enjoyed is that there is a small strip on the bottom of the unit that adds a soft illumination to the center console area.

With the Maestro harness, the Halo9 is able to pull information from the vehicle into a gauge cluster to display a tachometer, speedometer, etc. But most importantly, it can display tire pressures! When airing up, or down, you could relax in your vehicle, and keep an eye on your pressures.
After about a week of use, I had only about two real gripes with the aftermarket unit. The large 9-inch screen fits is at home in the prehistoric platform of the 4Runner. However, driving at night the screen can at times feel a little too bright. While it has a good amount of adjustability, I wish it had a little more. I prefer driving with a nearly dark cabin, and that can be hard to ask for with such a large screen.
Connecting To OEM Audio+ Reference 500 Series
While it is a direct plug and play unit to the factory harness, I am currently running an OEM Audio+ Reference 500 series. Plugging into the factory harness worked great, putting out more power than the factory head unit, but didn’t sound too good when connecting to my OEM Audio+ system, negating the need for all the corrective settings the OEM Audio sound processor is doing. I spent a lot of time adjusting the EQ and settings on the Alpine head unit to get it close to how it sounded before, but I couldn’t get it just right.
I want to give a shout out to OEM Audio+ who reached out to me offering to help reflash their sound processor, so I wouldn’t have to fight it to bring it back to the way it sounded before. OEM Audio+ has some of the best customer service we have experienced.
These two small qualms aside, I really enjoy how simple, and minimalistic the Alpine head unit is. Apple Car play is such a joy to use while driving and makes simple tasks like selecting new songs or playlists easy while driving.
The Halo9 is a HUGE step up and feels right at home in the as a new command center for the 4Runner.
In the end, as much as I loved those features, the plug and play installation, the lack of adjustability in the screen brightness was a deal-breaker.
I have then switched back to the factory head unit, and if I were to do this again, I would probably go with a smaller screen.
Any method discovered to turn off the Alpine rear view camera grid lines? The rear lines from the factory camera also show, making for two sets of grid lines.
My display turns on and off while the system plays. I have a screen for about 3 minutes but then it starts to flicker and then it turns off with sound still playing.
Does the integration allow you to access the vehicle customization settings (lights/door locks) or how much of the original settings menu is available, if any?
Can you run Gaia maps on this head unit?
I’ve had mine for a year now and my navigation has been spotty at best. Has anyone suffered from inaccurate location for a preprogramed Alpine Halo9 Toyota 4runner ILX-F309FRN? It places my location serval miles away from my actual location
Hey, Frank love your site and post. helps me a lot with my upgrade keep up the great work. i just ordered the halo after looking through your review super excited to bring the 4 runner into the current century. any issues or tricks after using it in your rig for the last bit?
Everything was pretty much plug and play. With any new UI, it takes a moment to get used to but it all works pretty seamless with the 4R and the steering wheel controls.
Any idea if this is or will be available with the gloss black bezel?
The bezel is made by Scosche, I am not aware that they have a black one in the works. I have seen others vinyl wrap or repaint the new bezel.
Will this work in a 2020 and what do I need to integrate XM satellite radio?
This should work for the 2020 4Runner. In vehicle specific cases like this, it might be best to contact the manufacturer or Crutchfield.com for support.
Will this work on a 2012 4Runner?
This should work for 2012 with even the non-navigation 4Runner. You can always check via Crutchfield here:
https://www.crutchfield.com/g_300/All-Car-Stereos.html?&o=d#&avf=Y&nvpair=FFBrand|Alpine
I have installed this unit and LOVE it!
Nice install! Can a front cam be wired to this??
You can wire a front camera to this unit, but Alpine requires a secondary product from them to wire up multiple cameras.
Excellent article, Frank. Won’t lie, this makes the Alpine unit look pretty darn good…
Thanks Max! It looks darn good, wish it just had a few more features.
Is it possible to shut off the screen entirely while driving?
Yes, you can.
than why would you complain about being too bright? that is like complaining about being homeless just because you refuse to live in your home and camp in your yard instead.