
Step By Step Installation & Complete Review of the Reference 500Q OEM Audio Plus On the 5th Gen 4Runner
Out with the old, and in with the new.
The stock Toyota audio system was tolerable, but now it’s time to do a full overhaul and find out what I’ve been missing out on.
I wanted all the benefits of an amazing audio system with none of the confusion. Subs, amps, speakers, with various brands, after a while it became more of a headache than an enjoyable upgrade to undertake by myself.
While spilling through pages of which products are better than whichever, to find ways to upgrade the 4Runner’s audio system, ultimately to the creation of the 4Runner Audio System Improvement Guide.
This search led me to the obvious choice of OEM Audio Plus.
WHY OEM AUDIO PLUS?
It’s a complete kit.
But, let me rephrase: OEM Audio Plus is the ultimate complete 5th-Gen-4Runner-specific kit.
The Reference 500Q package comes with a pre-wired harness, speakers engineered specifically for the 5th Gen 4Runner, and a tuned amplifier/digital sound processor for the acoustics of my 4Runner’s cabin.
All with a form-fitting subwoofer for the rear cargo area. Adding the bass, without taking away any of the space.
Shortly after making my choice, I had the opportunity to hear the system for myself in AJ’s Rig (@fotornr) during the Photo Camp Workshop.
After hearing the sound quality for myself, I was sold.
Installation
Kit Used:
- Reference 500Q: Check Price
This install time will take anywhere between 3 to 5 hours (based on your experience level)
NOTE: A video tutorial can be found here.
Preferred Tools:
- 10mm & 14mm Socket
- Panel Tool Kit: Check Price
- Wire Cutters
- Heat Gun: Check Price
- #2 Phillips Screwdriver
- A Friend
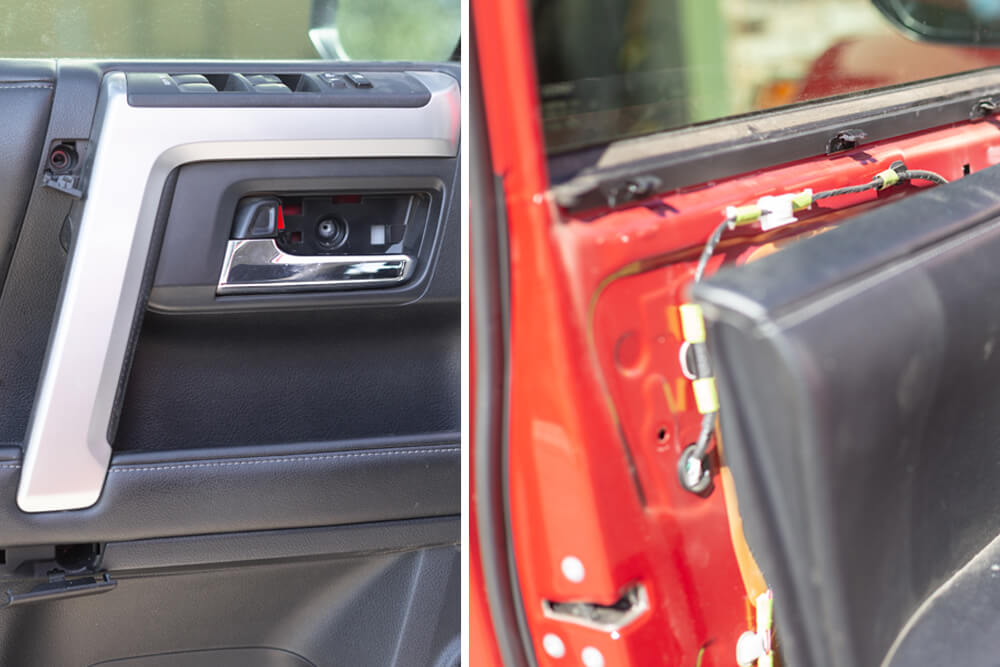
STEP 1. Disconnect the Battery

STEP 2A. Passenger Driver’s Seat
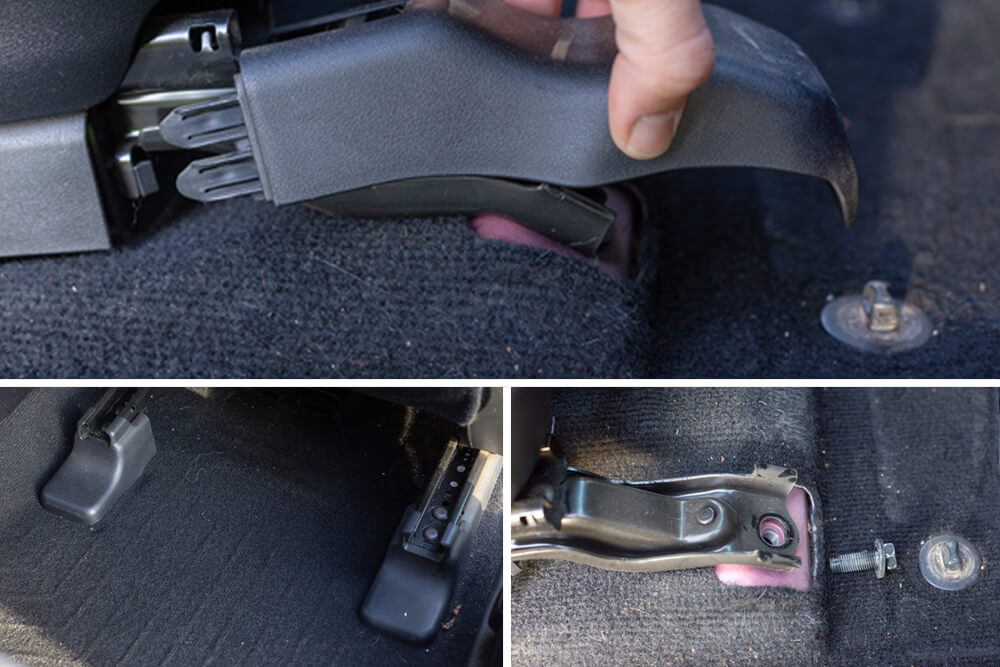
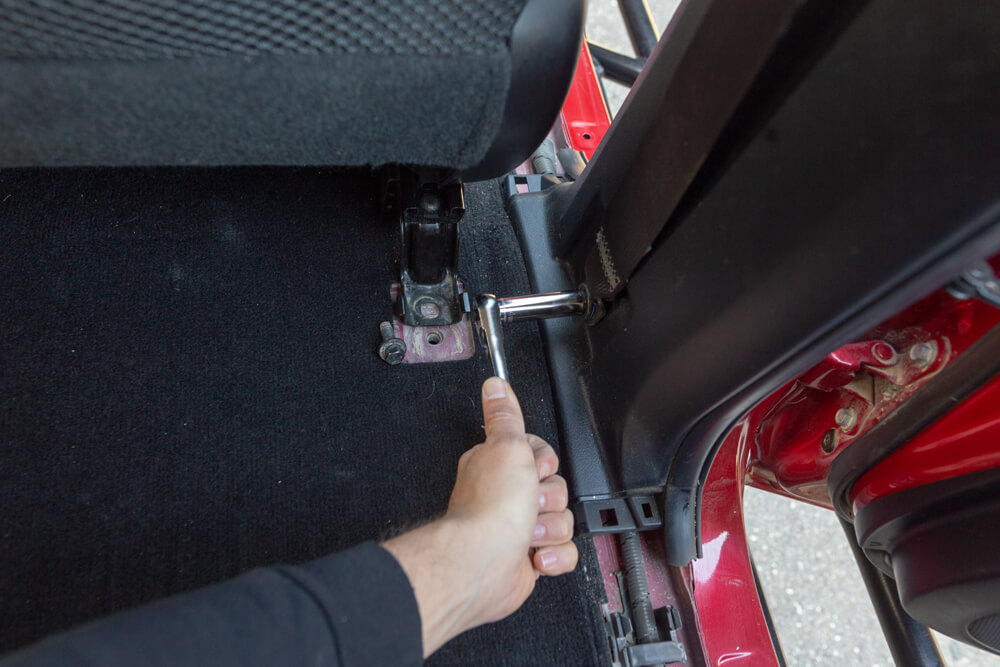
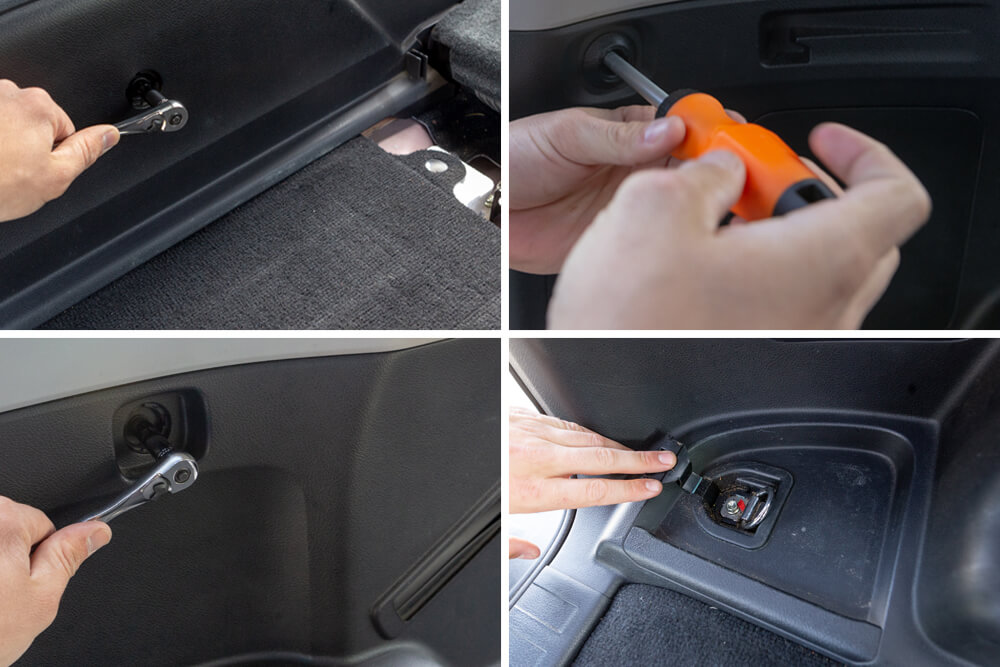
Begin by removing the plastic trim covers. Using a 14mm socket wrench remove the (4) bolts securing the passenger seat in place.
STEP 2B. Disconnect Harness
Gently lift back the seat and disconnect the (3) harness connectors. NOTE: Always be sure the batter is disconnected.
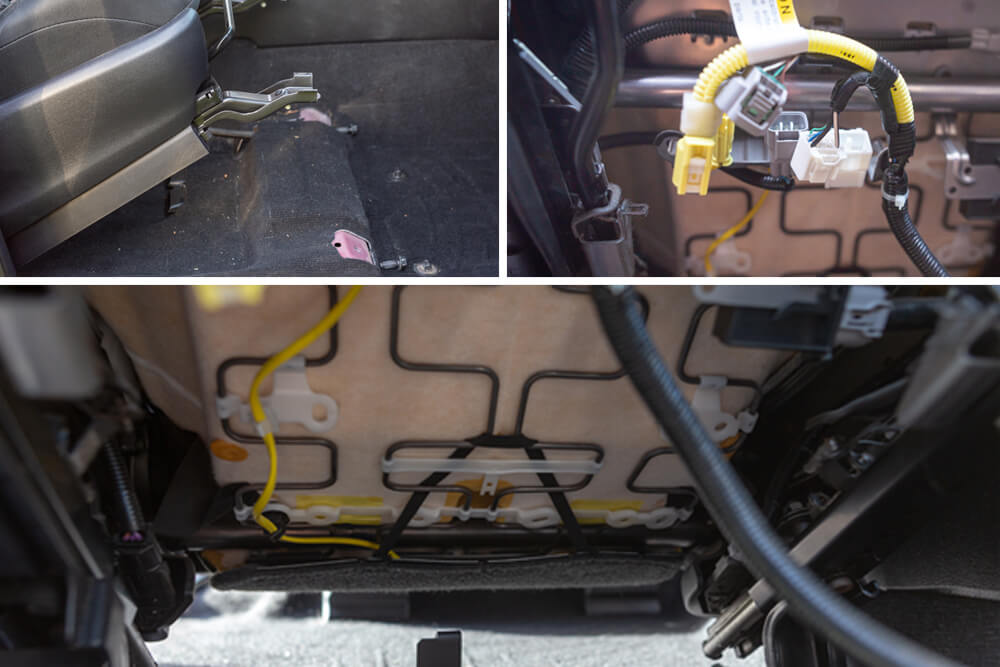
STEP 2C. Amplifier Installation
Apply foam tape to the underside of the spring seat and clip in the amplifier mounting bracket to the spring seat.
Secure the mounting bracket to the seat harness with the provided 10mm bolt. Reconnect the three factory connectors to their locations.
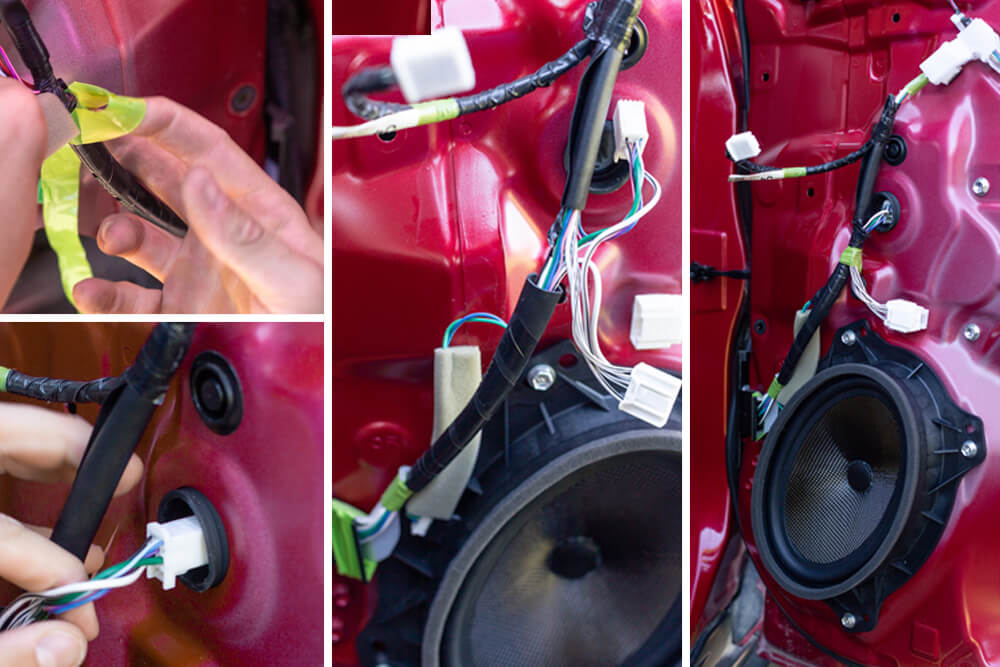
STEP 3. Passenger Side Wiring Harness
STEP 3A. Passenger Side Trim Removal
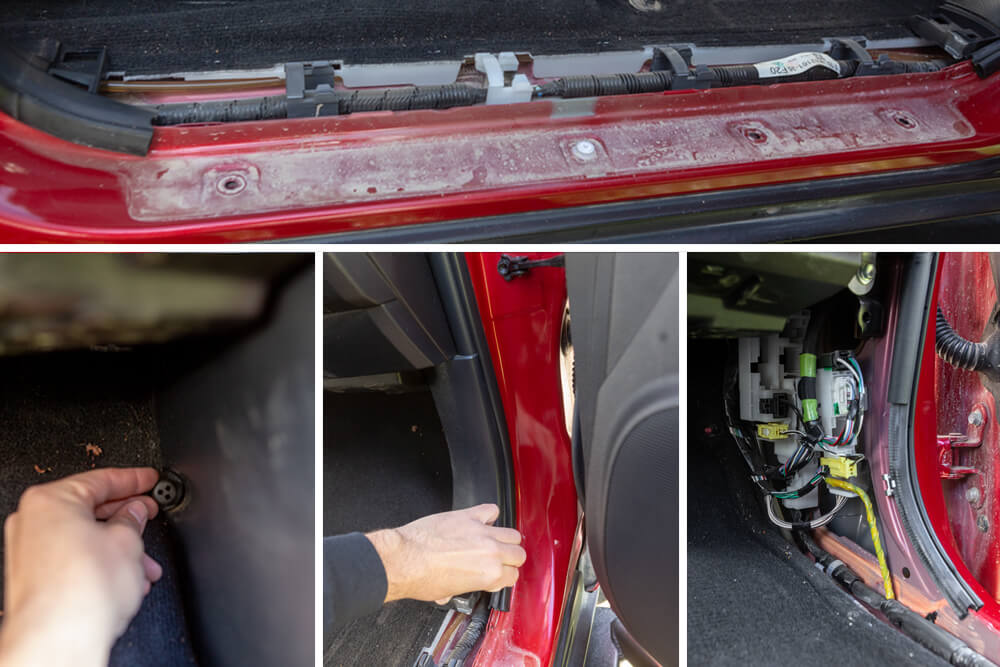
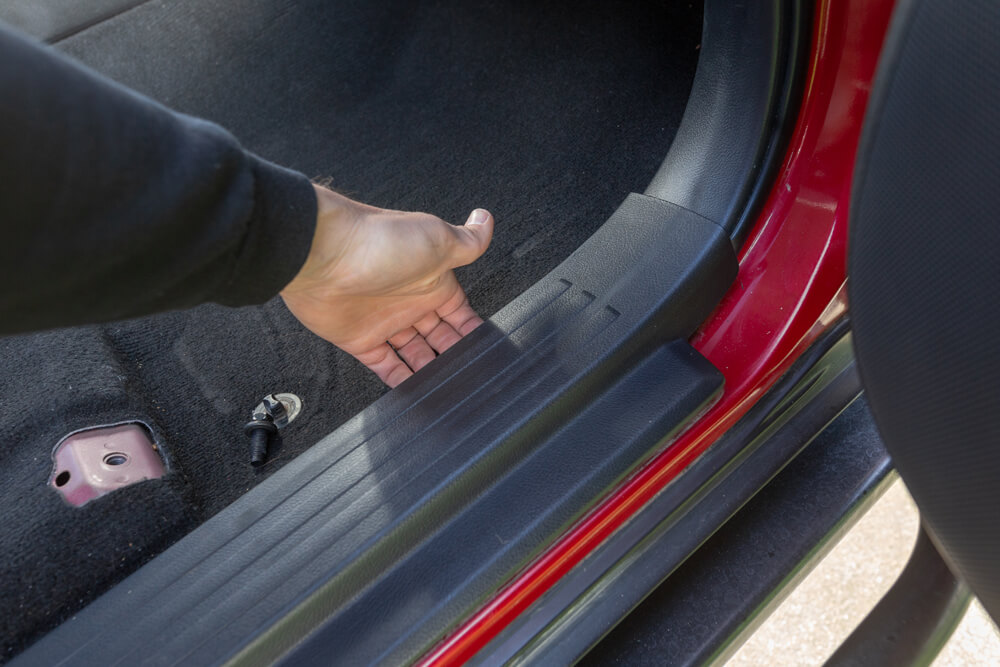
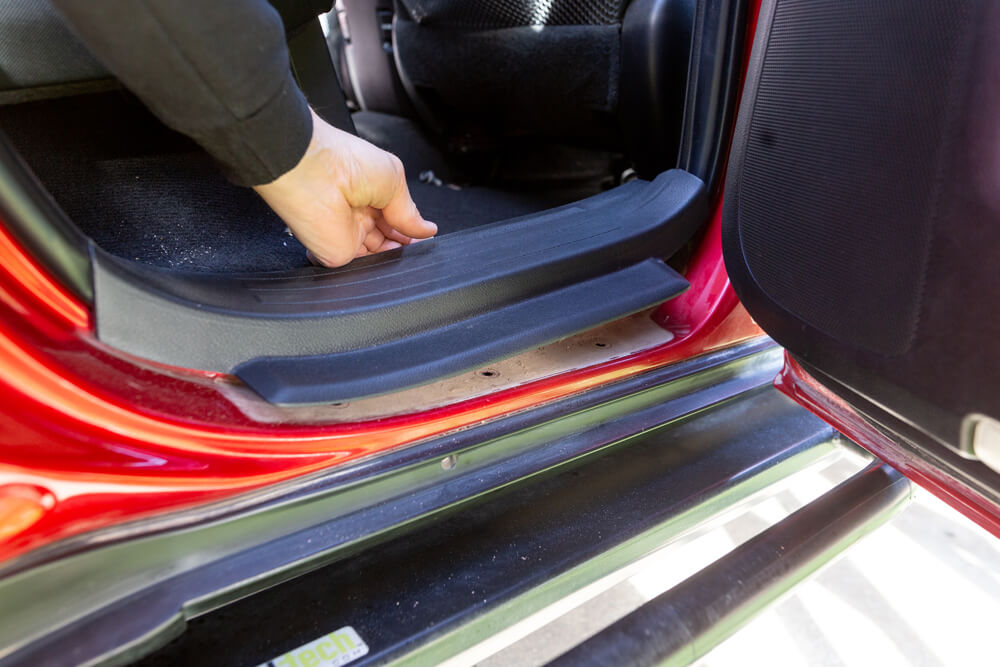
Using a panel tool (or fingers) remove the passenger side front threshold.
Continue by removing the passenger side kick well cover by unscrewing the plastic nut, gently pull away and disengage the factory clips.
STEP 3B. Passenger Side Trim Removal
Remove the passenger side rear threshold with a panel tool (or fingers).
Remove the seat belt trim cover as well as the 14mm seat belt anchor bolt.
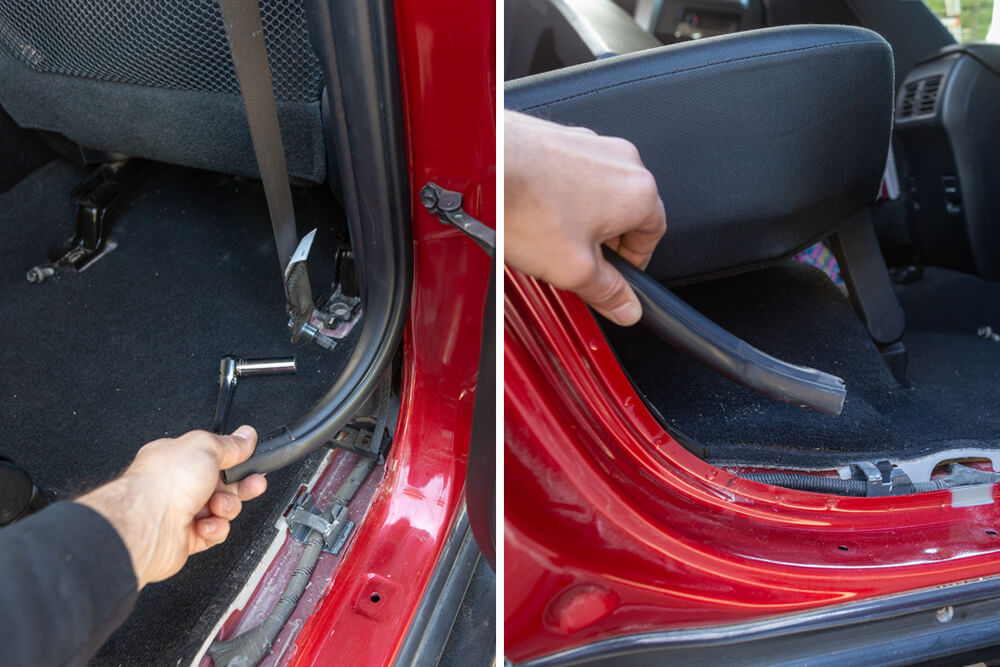
Gently pull away the passenger side weather stripping.
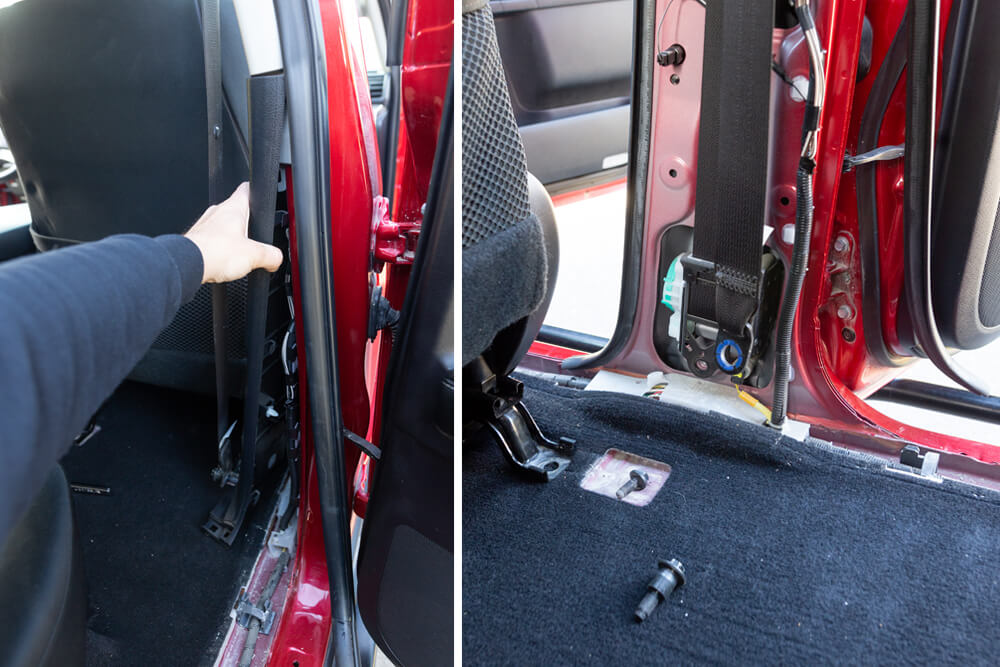
Gently pull away and remove the passenger side B-pillar trim. Unfasten the grey and white carpet clips with a panel tool or flathead screwdriver.
STEP 3C. Quick Sync Harness Connection to Amplifier

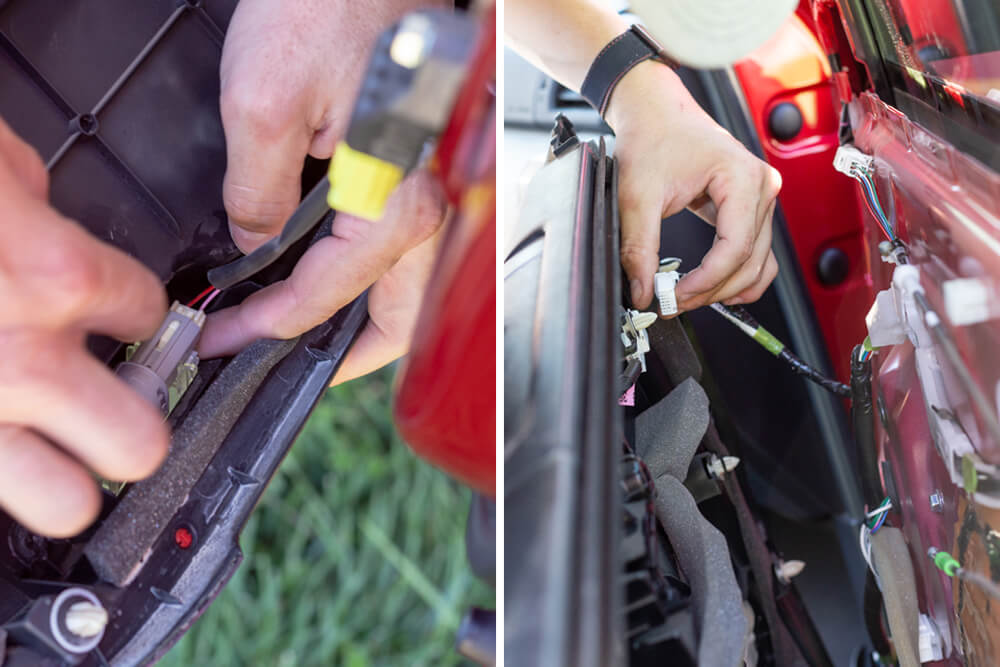
Run the quick sync wiring harness underneath the carpet through the passenger side threshold to the passenger side opening underneath the seat.
Using a 10mm socket wrench, attach the ground connector to the ground location underneath the seat and connect the wiring harness to the 500Q amplifier.
NOTE: Be sure the wiring harness has enough slack for the seat to freely slide forward and back.
STEP 3D. Quick Sync Harness Routing to Factory Radio
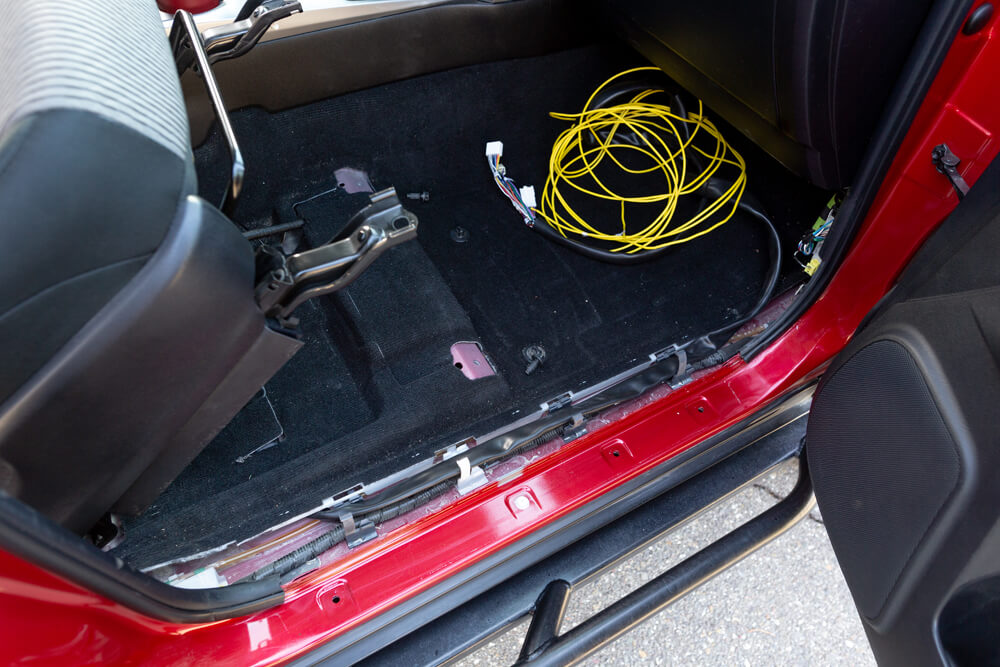
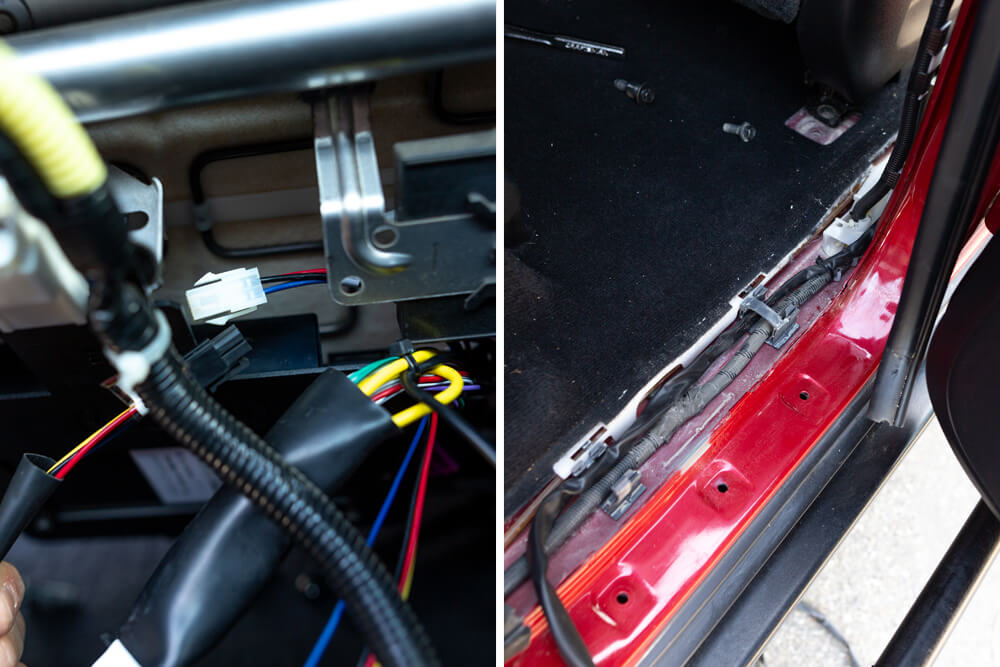
Route the radio and power side of the harness along the passenger side threshold utilizing the factory harness clips to the footwell area.
STEP 3E. Subwoofer Umbilical Cable to Amplifier
Run the subwoofer umbilical cable through the passenger side threshold utilizing the factory clips to the rear of the truck and connect to the Quick Sync harness.
Finish by reinstalling the trim pieces, seatbelt bolt, and weather stripping in reverse order.
Return the passenger seat back into place, reattaching bolts, and clipping in trim pieces.
STEP 4. Behind the Radio
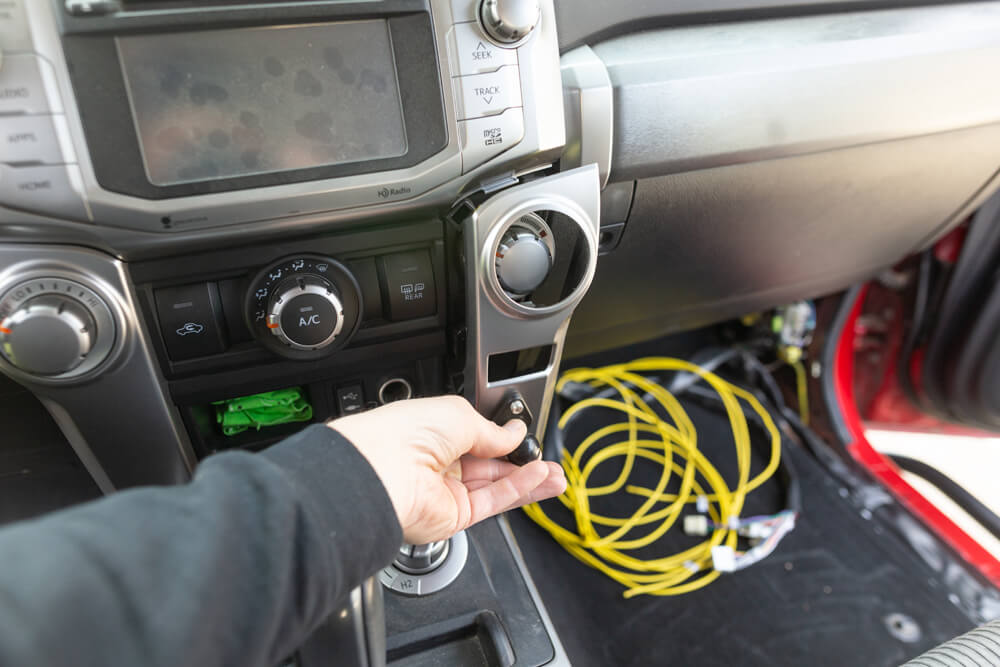
STEP 4A. Remove Trim Pieces
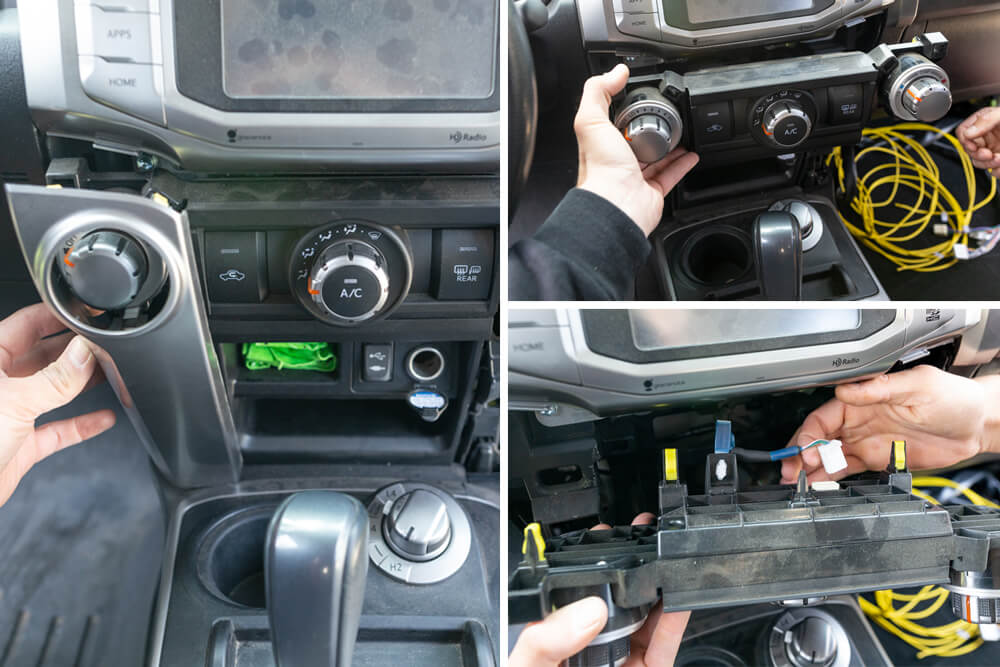
Carefully pull away driver and passenger side trim pieces below the head unit.
Then pull away from the climate control. Using a panel tool remove the cable clip, disengage the factory connector, and remove the whole assembly.
STEP 4B. Remove Factory Radio

Using a 10mm socket, remove the 4 bolts holding the radio in place and remove the radio trim panel by gripping the sides and slowly pulling away.
TIP: Use a protective blanket or towel to cover the shift knob
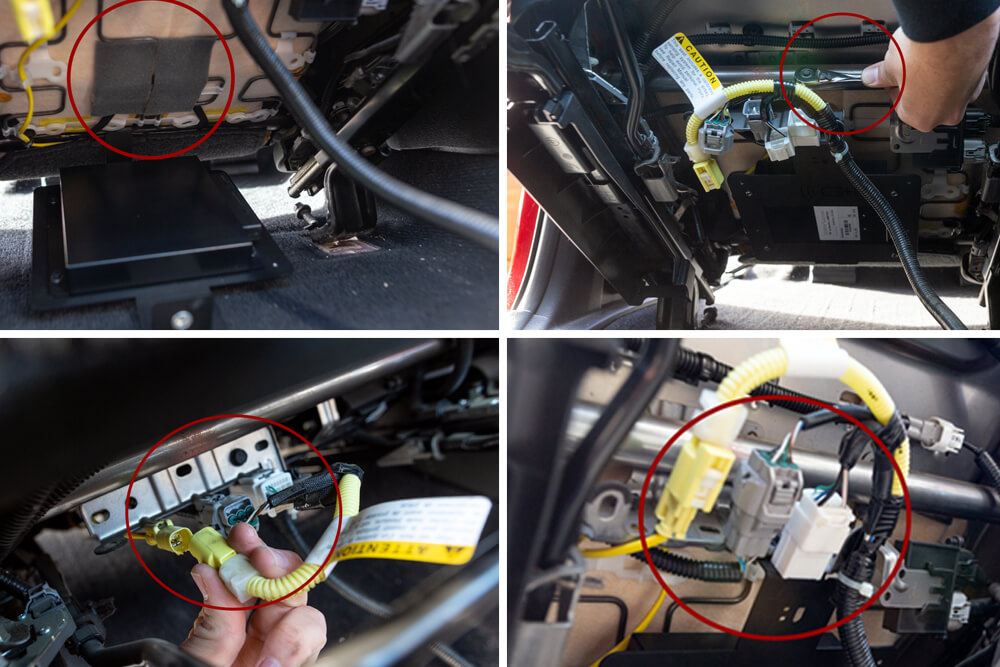
STEP 4C. Running Quick Sync Harness To Factory Radio
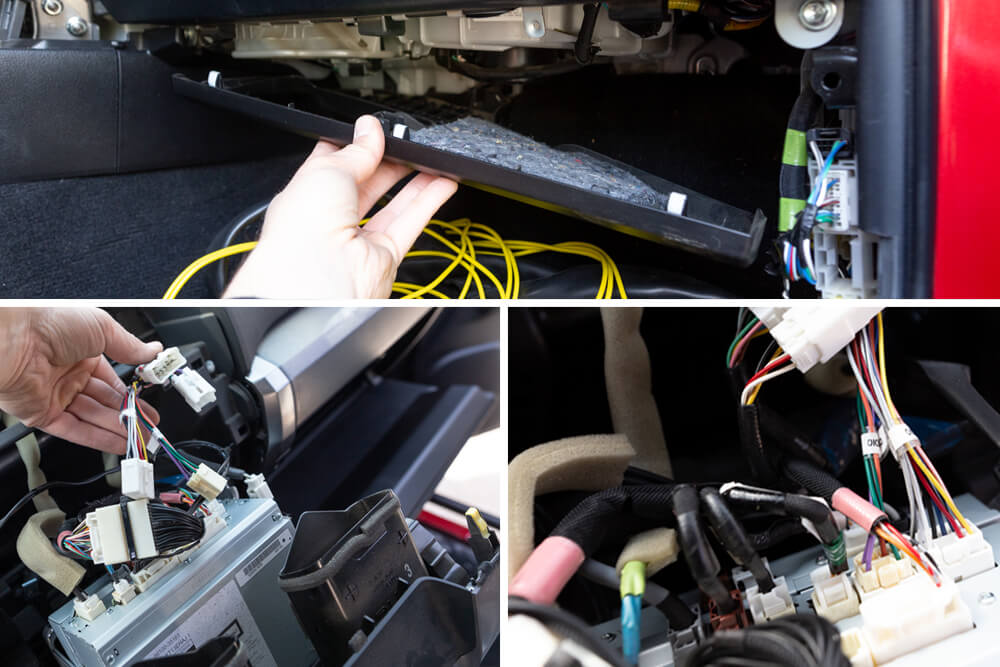
Remove the under glove box panel by pulling directly down and away
Run the Quick Sync harness up through the passenger side of the footwell, up above the glovebox, reach through and then pull over to the factory radio
Connect the factory 10 and 6-pin connectors to the quick sync wiring harness, and connect the male quick sync wiring harness to the factory radio locations.
Finish by reinstalling the factory head unit and connectors to their factory locations.
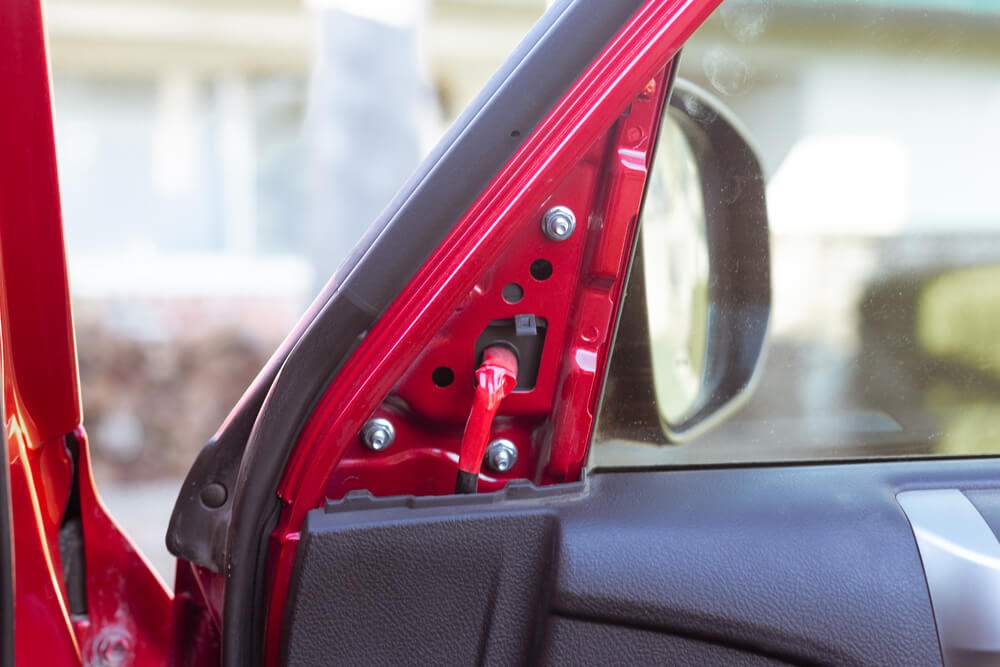
STEP 5. Power Wire Installation

Under the hood, locate the top grommet on the passenger side of the firewall and slice the tip to create an opening to run the power wire.
Attach power wire using electrical tape and pull through the grommet into the engine bay.
TIP: Use a cable tie or wire rod to feed through the grommet
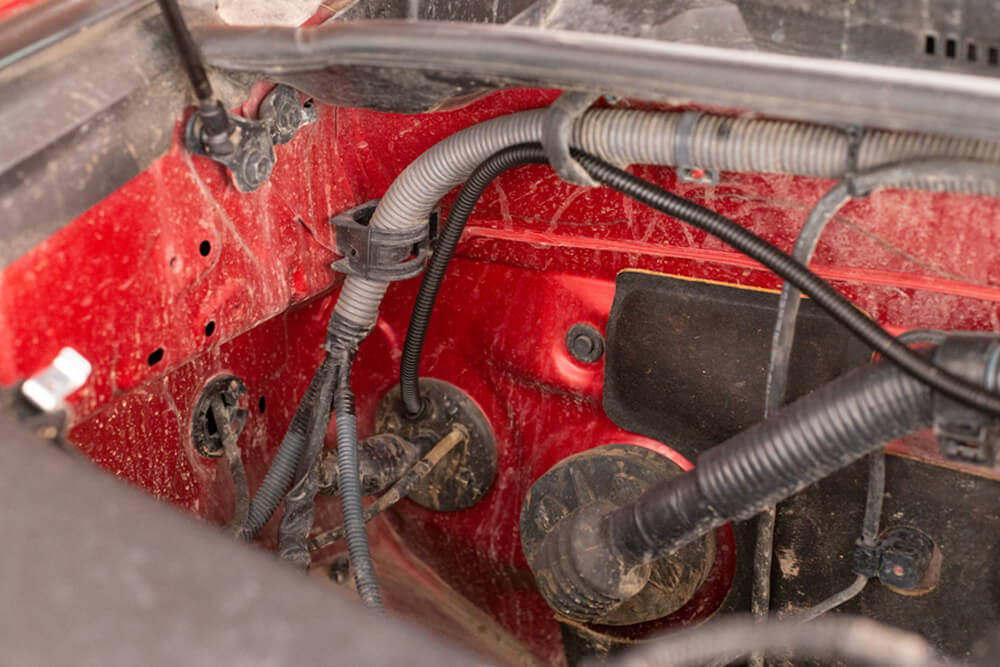
Cover the power wire with supplied wire loom and run along the firewall securing with cable ties, to the battery.
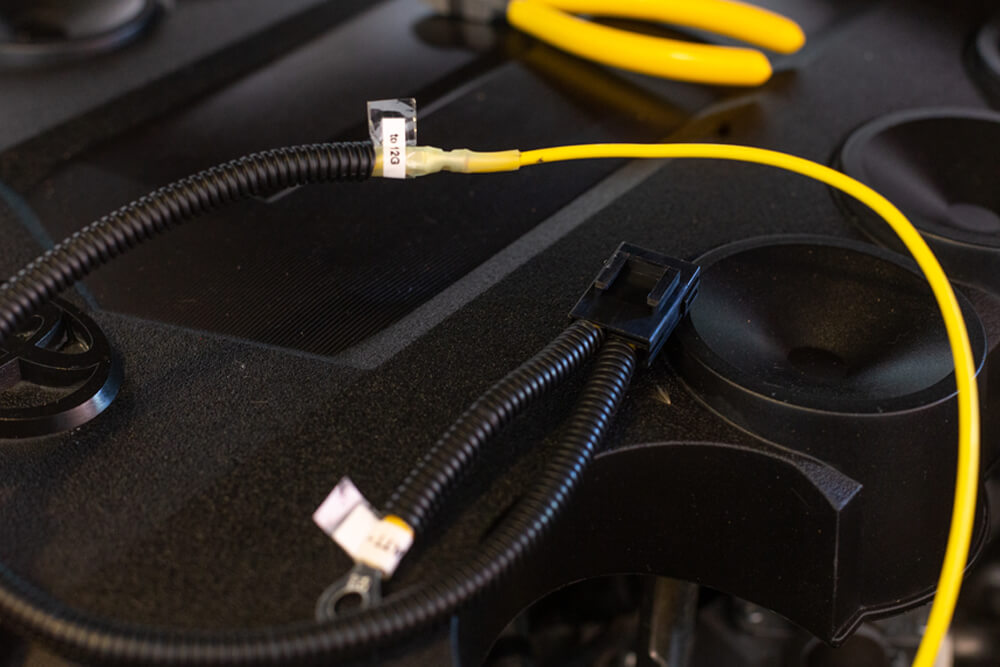
Connect the power wire to the fuse holder assembly and crimp.
Use a heat gun to heat shrink the yellow butt connector.
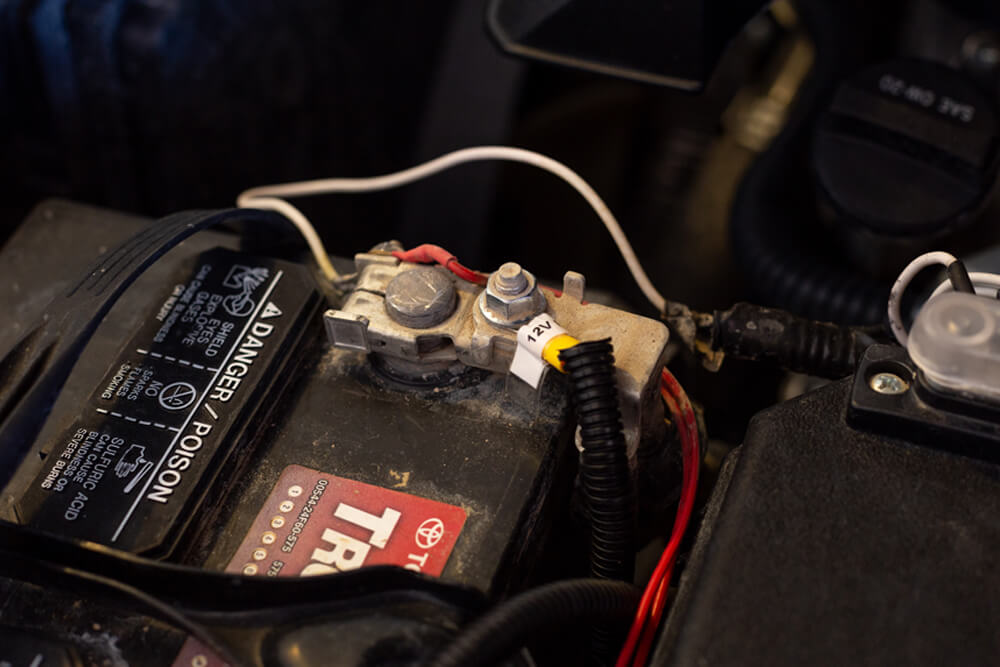
Remove the 12mm bolt from the top of the positive terminal connector to the battery, reinstall and tighten.
Next, reinstall the passenger side kick well panel.
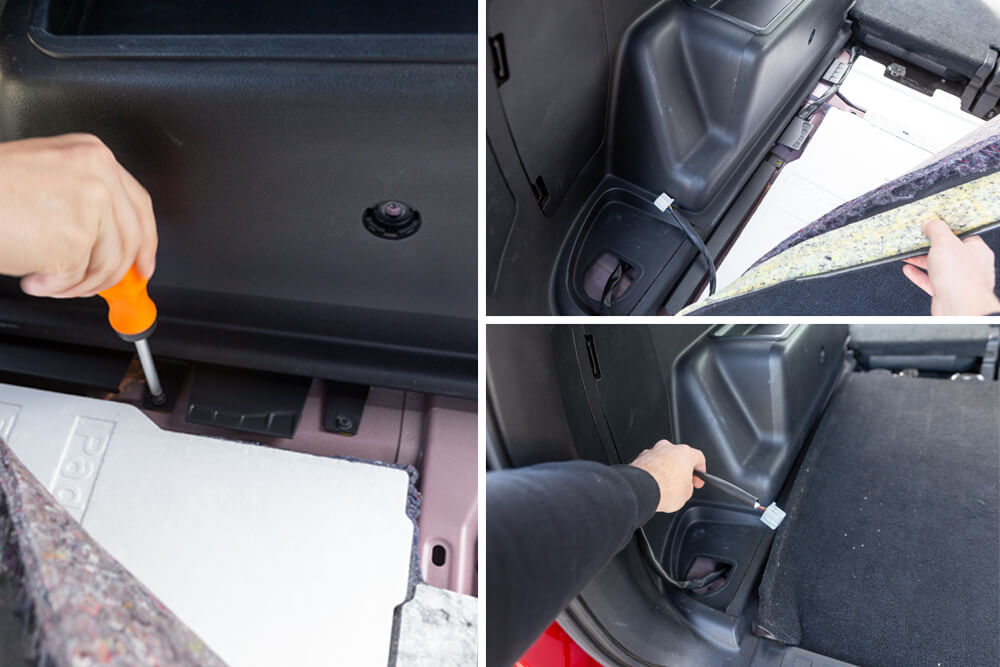
STEP 6. Subwoofer Umbilical Installation
STEP 6A. Remove Cargo Area Threshold
Remove the two 10mm bolts holding down the rear cargo area threshold. Then, completely remove the threshold by pulling it straight out.
STEP 6B. Routing the Subwoofer Umbilical Cable (Threshold)
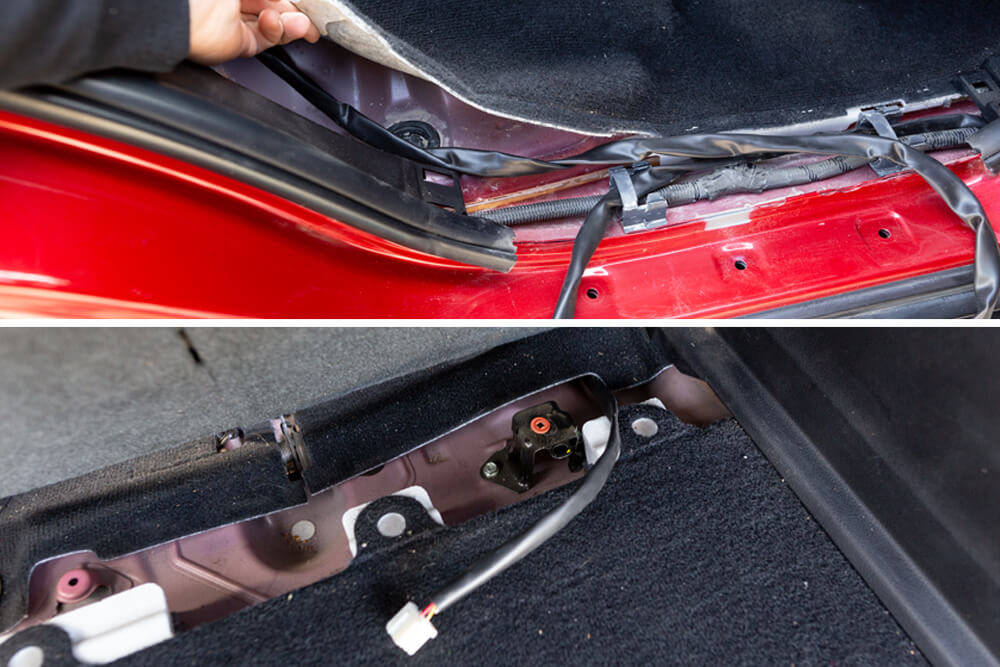
Run the sub umbilical cable underneath the carpet of the rear passenger area into the rear threshold cargo area.
Tuck the carpet back down and run the cable from the passenger side to the driver’s side across the threshold area.
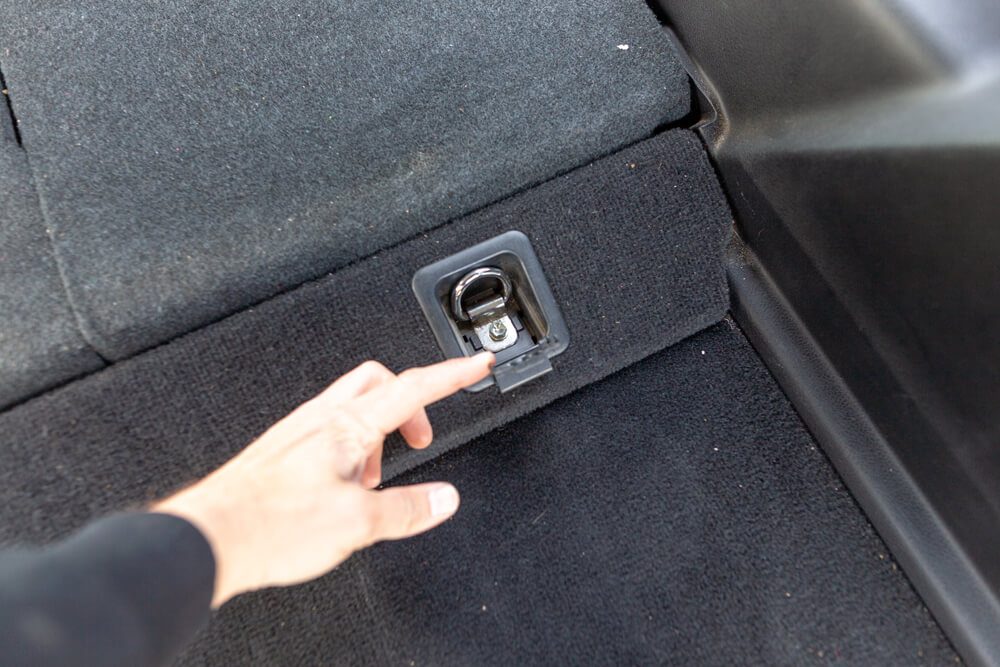
Step 6C. Cargo Area Trim Prep
Remove the two plastic trim covers in the driver’s side cargo area and remove the two bolts with either a Phillips screwdriver or 10mm socket.
Next, disengage the rear cargo net holder and remove the Phillips screw.
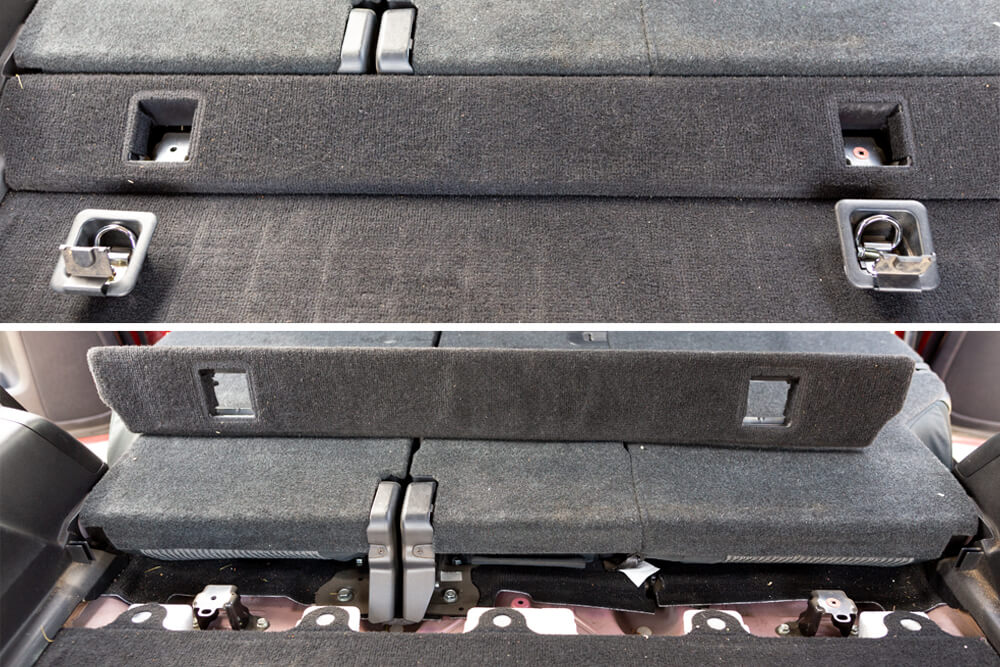
STEP 6D. Routing the Subwoofer Umbilical Cable (Cargo Area)
Remove the two screws holding the side panel in place.
Then, using a panel tool, expose the 10mm bolt holding the rear anchor point and remove it with 10mm socket (the subwoofer connectors will run through this cavity). Run the subwoofer cable through this side panel exiting the previous anchor point location.
Lastly, reinstall the side panel and cargo threshold with all its corresponding hardware.
STEP 7. Subwoofer Installation
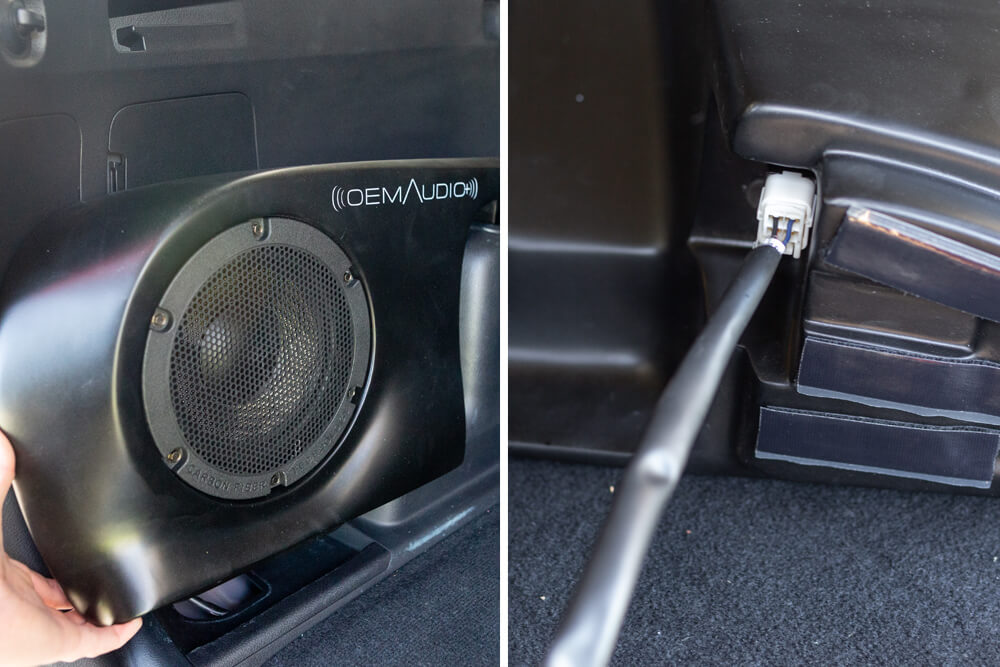
Using the alcohol wipe, prep the velcro strip area and cargo floor mounting location.
Connect the subwoofer umbilical cables to the OEM Audio Plus subwoofer connectors.
Then, slide the subwoofer system into the floor and panel cavity until it rests in place.
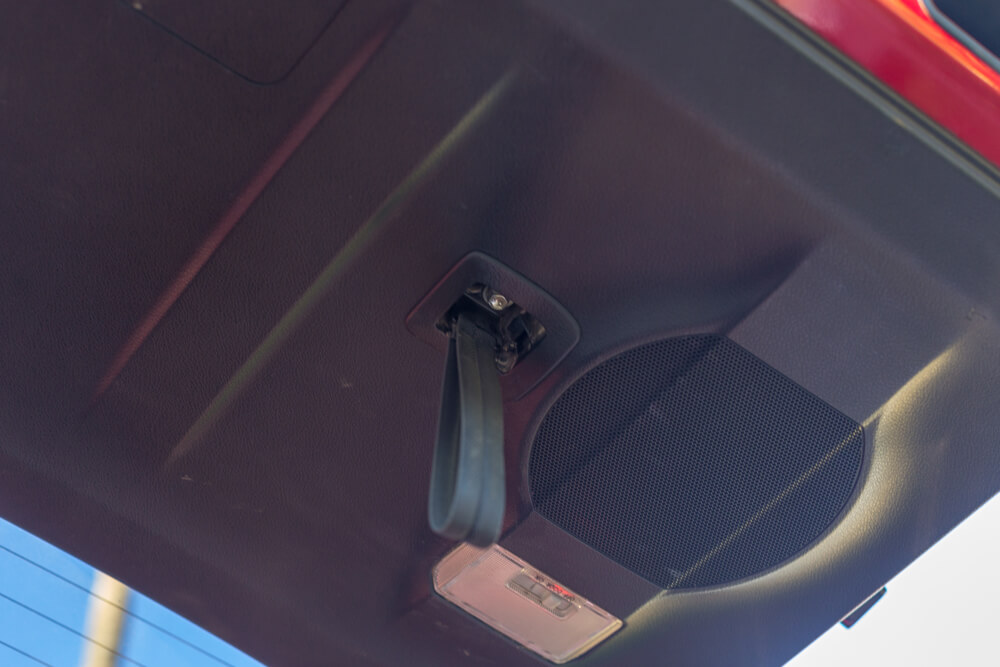
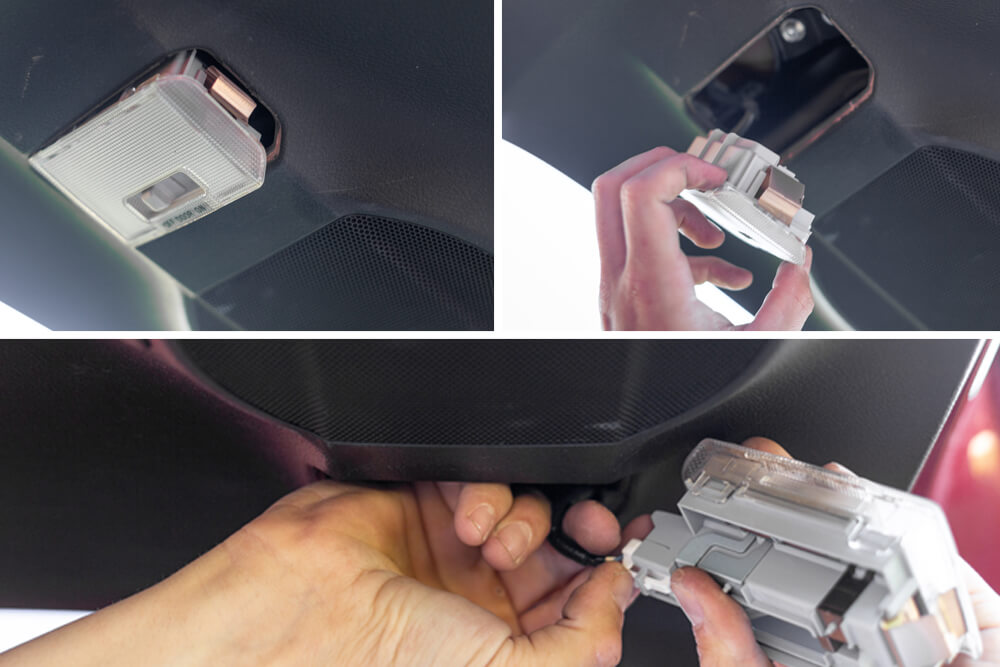
STEP 8. Front Dash Tweeter Installation
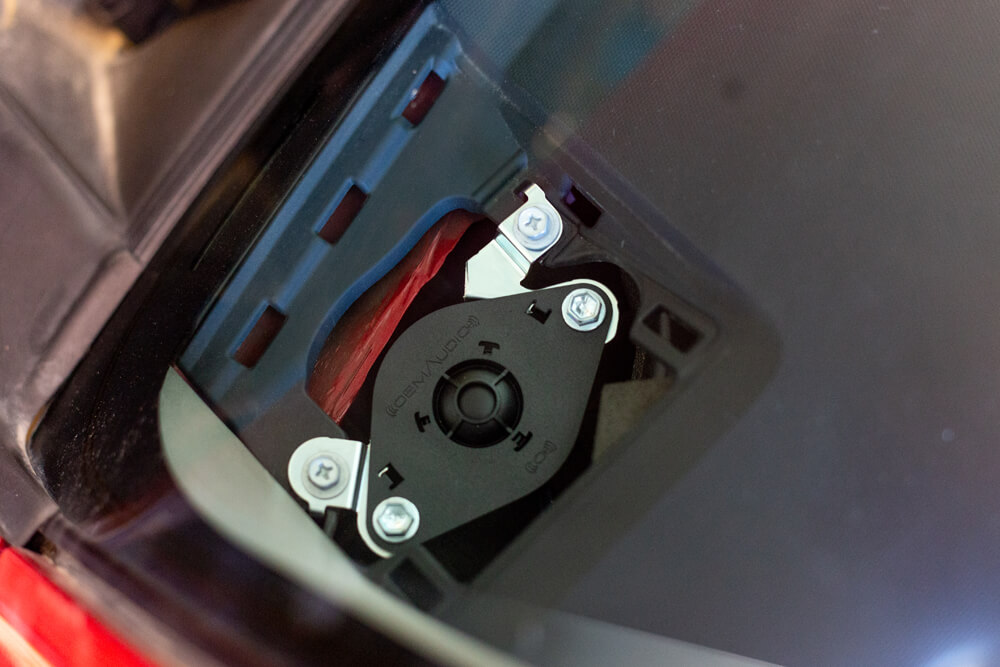
Using a panel tool, remove the tweeter cover found on the dash.
Remove the two 10mm bolts holding the factory speaker in place and disconnect them.
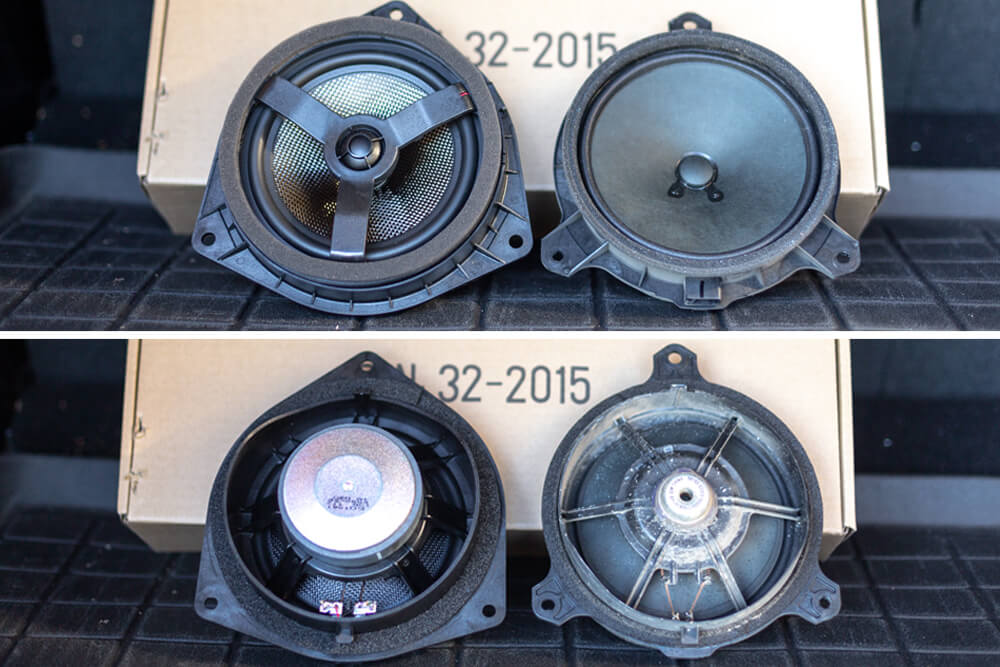
Then, install the OEM Audio Plus tweeter, reuse the two 10mm factory bolts, and then reinstall the speaker grille.
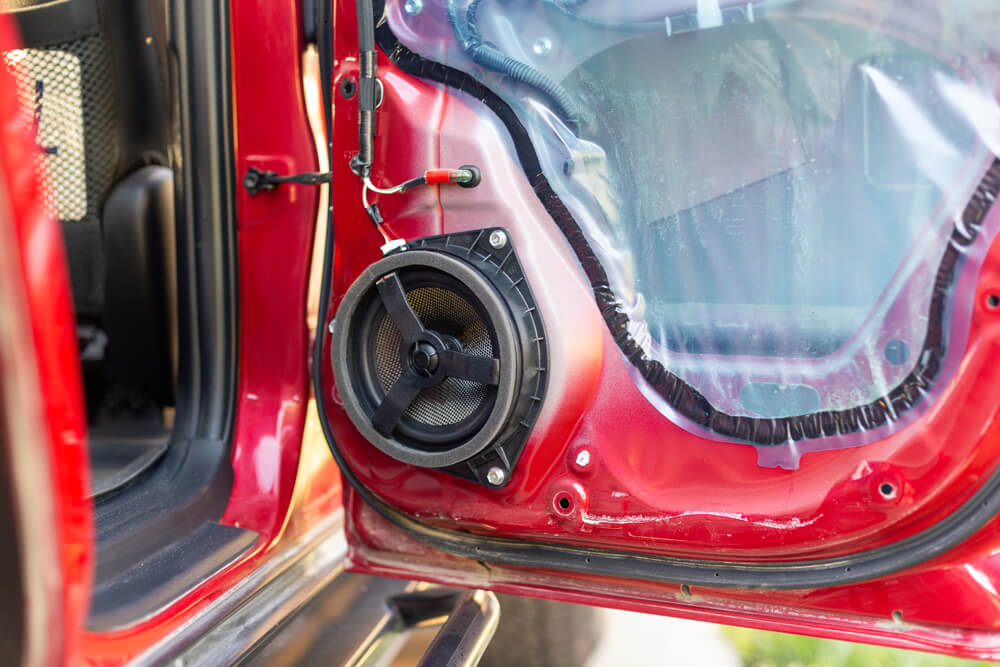
STEP 9. Front Door Woofer Installation
STEP 9A. Front Door Panel Removal
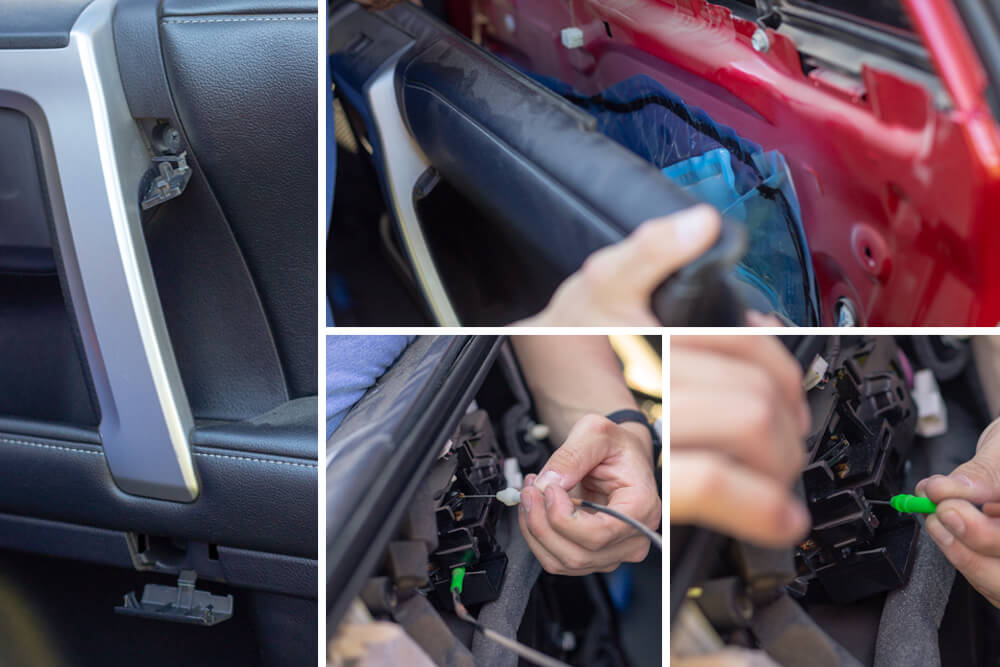
Remove the A-Pillar cover by pulling it straight out from the door.
Remove the covers behind the door latch, below the grab handle, and above the grab handle with a panel tool. And then remove the three screws from those locations.
Starting at the bottom, pull away from the door interior, working your way up.
Disconnect the light assembly from the bottom of the door panel. Remove the latch assembly, unsnap and lift out the connectors. Remove the door lock control from the panel.
NOTE: White on top, green on the bottom.
STEP 9B. Remove Stock Speaker
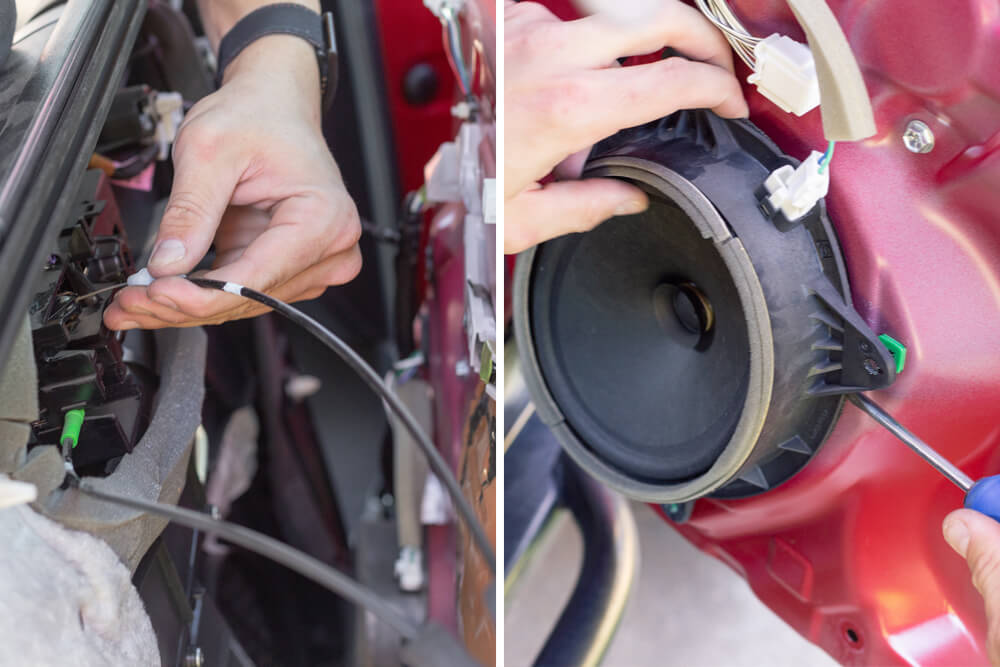
Remove the (4) 10mm bolts holding the door speaker in place, disconnect the connector and remove.
STEP 9C. Front Door Speaker Wiring Harness Lengthening
Unwrap the speaker wiring harness to move the factory speaker connector down to its new location, rewrap, and install the new OEM Audio Plus speaker.
Finish by reassembling door in reverse order.
STEP 10. Rear Door Speaker
NOTE: The rear door disassembly is nearly identical to front door process.
STEP 10A. Rear Door Panel Removal
STEP 10B. Rear Door Speaker Installation
Remove the (3) 10mm bolts holding the factory speaker in place. After that, reinstall new OEM Audio Plus 6.5” speaker. Then, reassemble door in reverse order.
STEP 11. Cargo Hatch Installation
Remove the 10mm bolt from the grab strap location.
STEP 11A. Cargo Door Trim Removal
Remove the (2) hatch light assemblies and their connectors with a panel tool.
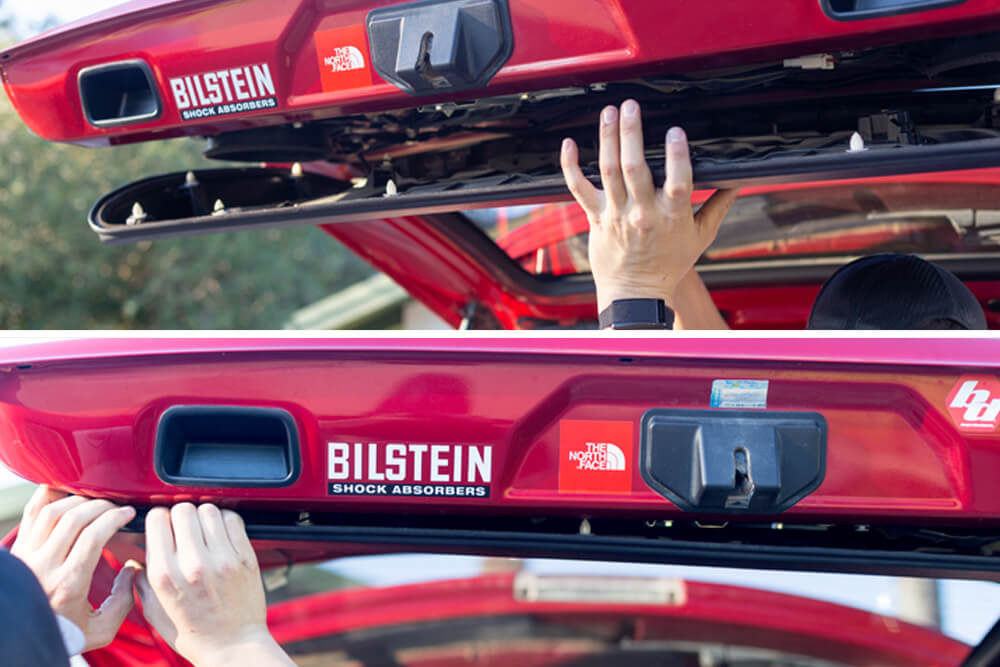
Remove hatch panel by gently pulling away from the bottom working your way to the top.
Step 11B. Cargo Door Speaker Installation
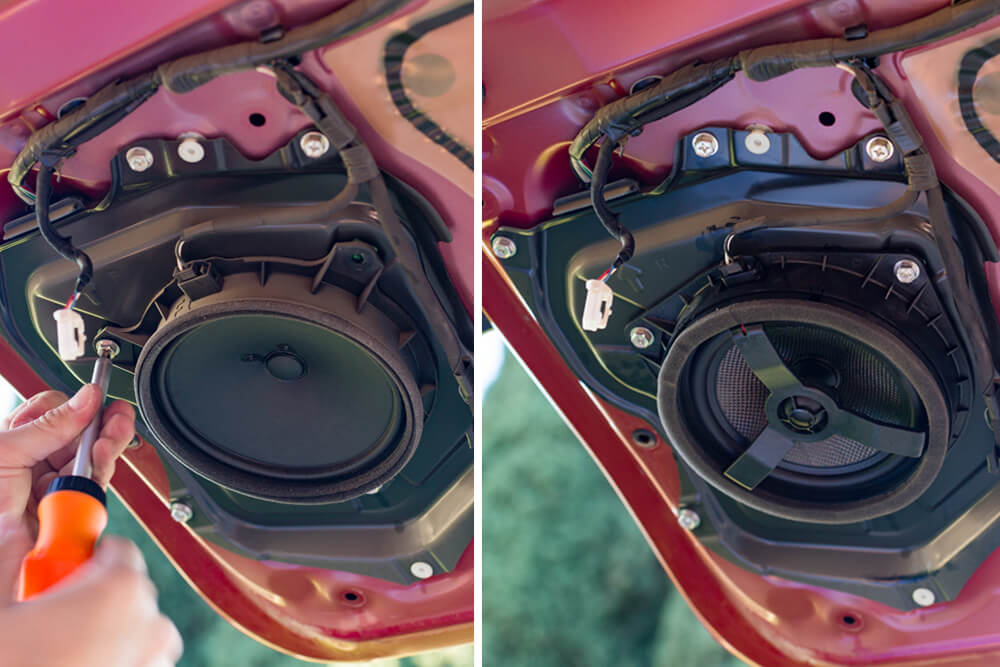
Remove (3) 10mm bolts holding the factory speakers in place and replace them with the new OEM Audio Plus speakers. Reinstall in reverse order. Lastly, install the 30 amp fuse and reconnect the battery.
INITIAL IMPRESSIONS
…WOW
The detail, clarity, it felt like I was hearing each song for the first time.
I found myself skipping from track to track, skipping every few seconds, excited to discover new details in the sound that I’ve been missing out on.
The added bass is a plus.
The form-fitting subwoofer mounts out of the way, utilizing dead space effectively without taking up hardly any cargo space. And for those really wanting to add even more bump in the trunk, the system is expandable and the harness comes pre-wired for a second auxiliary subwoofer.
TIP: To get the best audio quality out of this new system, I highly recommend using a direct USB connection. Before with the stock system, the compressed Bluetooth audio was almost indistinguishable from the USB connection audio.
With the OEM Audio Plus system, those differences in quality become tangible.
Although I enjoy the luxury of never having to plug my phone in with Bluetooth, I enjoy the sound when connected to USB that much more. Besides, it helps keep phone charged.
FINAL THOUGHTS
For the past couple of weeks, I have had the OEM Audio Plus system in my vehicle and it has been an absolute joy!
Turning up the volume no longer has diminishing returns, as the stock audio system had. Depth and detail remain consistent, no matter what volume level you’re at, even MAX.
Although the subwoofers don’t produce those hard booms, it really holds it’s own and performs well. And I didn’t have to sacrifice any cargo space.
So. Worth. It. I should have done it sooner.
The trail4runner website has been an excellent source of information as the new owner of a 2019 base model. Along with the various mechanical and suspension related modifications over the past year, I recently installed the OEM Audio Plus speaker, DSP/amplifier package as a result of the website articles. My experience with the folks at OEM has been exceptional both prior to, and with the purchase itself.
Prior to my actual purchase, I was impressed with OEM’s customer service. First, a prompt response to my inquiry regarding their choice of speakers, and second, their willingness to create an a la carte solution for my particular needs. OEM Audio Engineer Sandy Lirag responded with clear and concise explanation of the system design using the stock wiring of the base model 4Runner. In a later phone call, he spent another 15-20 minutes on that topic, as well as, their rationale for the subwoofer assemblies.
Along with Sandy, Customer Service Representative Jacques Claparols worked to provide the specific components I eventually purchased. Rather than restrict my purchase to the configurations on the OEM website, Jacques worked on my behalf to make possible my eventual purchase, the speaker kit (no sub) and DSP/amp for what I believe is a competitive price.
Keeping the stock 4Runner head-unit, the OEM speaker/DSP upgrade is a remarkable improvement. My “benchmark” music sounds great, and I wouldn’t consider a 4Runner to be a “critical listening environment”. Admittedly, the sky’s the limit for what an individual can spend on car audio, however in my opinion, this upgrade is substantial without the need to empty your 2023 vacation fund. Plus, it’s an upgrade you can enjoy every time you turn the key.
Two areas to highlight from my installation experience.
First, the harness routing from the passenger side over the glove box to your audio head unit is not trivial. Consider the use of electricians “fish tape” to pull the harness through this path. From the head unit, route the fish tape past the glove box, make the turn and descend towards the passenger footwell. The four harness connectors need to be shaped and taped together as smooth as possible, as well as, being firmly secured to the fish tape. You’ll be pulling this bundle through a small space with numerous catch points. If a team of two is involved with your installation, one feeds the harness while the other pulls, with gentle persuasion. You’re not trying to start an outboard motor.
The second area of focus is the harness routing from the amp location under the passenger seat to the door jam. From the body ground point, the harness readily passes under the carpet. Using a dremel tool, by trimming off 1-2 inches of the carpet frame (a plastic molded piece) the harness could then be shaped into the body channel and beneath the retaining clips. Without trimming, the carpet bulged, and the door trim would not lay flat across the entire door opening. No mention in my version of the installation document, maybe in the next release.
From where does this setup pull the signal for the sub amp?
Great write-up! I’m going to pull the trigger on this. Seems easy with 2 people. My question is, if you had to do the install again, would you add sound deadening material? I figure I would, if I have the truck apart anyway…
Hey John, I actually did end up installing sound deadening material a few days after installing this system. The biggest improvement I noticed was more of a decrease of road and ambient noise coming into the vehicle. Less of that road noise allows me to hear my music better at lower volumes.
Just finished install of speaker upgrade only. Took me about 2.5 to do all the speakers. I already had installed an alpine 8” powered sub, and replaced stock hu with a Pioneer DMH 2660NEX. So I didn’t need the oem audio sub which saved me a little time and overall expense. A few subtle notes, it appears to me that Audio Plus has extended the wires on 6×9’s so you no longer need to adjust the stock wire harness to reach the new speaker inputs. (Front doors A+). Also after reading this extremely helpful step by step here and watching Audio Plus’ install video, I figured out you don’t have to pull off door panels 100%. I left all four doors hanging from window weather stripping rail so that it was suspended with a hinge like action. A little awkward on some inner bolts but also saved me a little time, reassembly and lining things back up was very easy with this method, doors took about 15 minutes each. The sound is great worth it to me. The highs in the tweeters alone is a huge improvement for both clarity and volume. I also purchased a couple packs of Kilmat 80 that I will go back in and dead the front doors and front floor boards / cabin area when it’s not quite as hot. Kudos to you guys for creating such and extensive and effective resource for all of us knuckleheads. Peace!
WOW….took my time (over the Memorial Day weekend to install) but OMGoodness, all I have to add to all of the other replys and say is, ” the OEM Audio +” just took my sweet refined ride along with my adventurous spirit, to a whole new level…
Hope you guys don’t mind me asking a dumb question. I bought a used 4runner with this system installed and I noticed that then subwoofer blocks the tire tools in the event that you need to access the tools to change a flat. I didn’t install the system so was wondering if you could advise how I can remove the subwoofer. Does it simply pop up? Do or are there any latches that I need to undo first?
it just simply pops up. I pop mine out all the time to access tire tools, rear tail light, or the rear quarter panel when I am running wires for other projects.
I JUST put the complete system in my wife’s brand new 2019 4Runner trd off road, today… and I’m totally disappointed with the result after spending the 1800.00 not impressed at all with the sound and looking at removing the entire system and returning to OEM
Hey man – that sucks you had a bad experience. If you haven’t already, contact the company. From all the reviews online they have a reputation of providing good customer service.
I’ve emailed them, there supposed to reach out to me today, we’ll see what happens, but there’s nothing there gonna do other that off me a refund after I spend another 5hrs taking a brand new car apart(again) and removing the entire setup
Curious if you ever heard back from the company on this?
Thanks for your review! Do you run this set up w/the factory radio or have you run w/an aftermarket?
I have this run with the factory radio.
Any idea when they will release the second sub? or could I just add a different sub box to this? I need a little more thump.
Spoke to one of their representatives about a month ago. They are saying August for the secondary sub. I’m stoked cause he said they will be incentivizing existing owners 😀
Yep. The install took me a solid 4.5 hrs. I was already familiar with removing many of the panels and trim pieces so if this is your first go a removing them then I’d expect to add a couple more hours to the install. The install video they provide is invaluable. The way I approached the install was to watched each step of the video, pause it, then execute that step on the truck. This made the install a breeze…I never needed to refer to the paper install guide. The hardest part I found was running the yellow power wire. I will also mention Daniel’s customer service…nothing short of amazing. I had a couple questions during the install and each time I called he picked up the phone and answered for me.
The end result is an amazing sound system that puts the factory system to utter shame. If you’re looking for a THUMPIN’ system with a ton of bass, this isn’t for you. However if you’re looking for a system that delivers a full, crisp, quality, and very clean sound, then the OEM Audio+ is the way to go.
Well worth the money I spent and would do it again without hesitation.
I just got my system installed with the dedicated sub amp, and it definitely “THUMPS.” With the sub amp bypassed, its not super impressive, but noticeable. But once you have the dedicated amp and can crank it to max on the controller, it’s very impressive for only a 10″ sub that’s vertically mounted way in the back.