
Full-Width Tube Bumper For the 5th Gen 4Runner: C4 FabHybrid Bumper – Step by Step Installation, Overview and Review
Looking for one of the baddest hybrid bumpers on the market for the 5th Generation 4Runner? Then look no further than C4 Fabrication’s newly released tube-style bumper.
Not only does it give you the ability to mount everything up such as a winch, lightbar, and three different styles of lights, but it also saves weight by incorporating a tube system.
While there are others in the market, such as the Hefty Built Bumper, there’s just something about the C4 Fabrication bumper that not only appeals to the eye but also matches up much better and flawlessly with the body line of the 4Runner.
You can tell C4 took the time to get this one right, as they do with all their products.
Find It Online:
- Hybrid Series (pictured): Check Price
Other Bumper Options:
- LoPro: Check Price
- High Clearance Additions: Check Price
- Overland Series: Check Price
Items Needed For Install?
- 2+ friends to help lift the bumper
- Angle Grinder (or something to cut the bumper)
- Impact Gun
- Wrench w/ Sockers (for light bar and winch)
- Bucket
- Rags
- Masking Tape
- Measuring Tape
- Power Steering Fluid (Dextron III)
- Lift or Jack stands
- Jack
- Level Ground
- Wheel chock
- Razor/box cutter
- Pliers
- Screwdrivers
- Edge Trim
Installation Overview
If you aren’t using a lift such as myself, you want to find an area of level ground to put your 4Runner on jack stands. Not only does this need to be flat, but it also needs to be as smooth as possible to keep not only you but your vehicle as well, safe.
Once you have found your spot, park the vehicle and put the emergency brake on. You may also wish to place a wheel chock behind your rear wheels for extra security to prevent rolling. If you do not have a pair of chocks you can use things such as blocks of wood or cinder blocks to prevent rolling.
If you are not using an impact gun, proceed to loosen the lug nuts on your wheels, but do not remove them entirely. This way you don’t have to worry about the tire spinning while it’s in the air. An impact gun will be able to take them off whether they are on the ground or not.
After you have done this proceed to jack up the vehicle with your jack and place the jack stands underneath the vehicle in the Toyota approved jack spots. Once you have done this, proceed to remove the lug nuts and remove both front tires. You do not need to remove the passenger side tire, however, it can make your job easier so I went ahead and did it anyway to have more room to work with.
Prepare For Install

You then want to begin to move the radiator cover.
You will have roughly 12-14 push style fasteners to remove. You do not need a flat head to remove these ones, just simply push down on the top and it will ‘unlock’ them.
Proceed to wiggle them out. If you have a bumper or winch/lightbar already installed I recommend disconnecting them now.
This allows you to have more room to work with when installing the bumper, as well as any accessories you need for wiring — such as a lightbar and winch.
Make Your Measurements

Now you want to begin your measurements for the bumper.
Do this step before loosening any part of the bumper to ensure measurements will be accurate. I highly recommend checking, checking again, and then checking one last time for good measure to ensure the measurements are correct with theirs. You want to make sure you are also going with the form of the bumper, and not keeping the measuring tape straight. Make it bend!
The measurements are the following:
- From the tip of the line where the bumper and fender meet under the headlight – 3-7/8”
- From where the bumper meets the headlight, following the molding near the fog light – 3-1/2”
- From the fog light bottom left corner (starting above the fog light) going up 1-5/8”
- From the section that meets just before the grille, in between the headlight and grille, take the middle molding and go down – 4-3/4”
- From the bottom of the center grille (it will either be the logo or Toyota written out), go down 1-1/8”
- From the dead center of the grille (logo will be the emblem or Toyota written out), go down – 1-7/8”
Proceed these same steps on the other side of the bumper. If you are a bit uncertain of where these go, you can look at the C4 Fabrication install video on YouTube. The measurements begin at 2:00 and may help get better measuring.
Time To Cut

Once you have triple checked your measurements, go ahead and take a tape and make a straight line through all the marks you made. Thoroughly check these to make sure they are as straight as possible.
Begin to now take off the bumper
There will be roughly 6-7 fasteners that require a flat head to pop out, as well as a 10mm bolt in the grille section. You will also have a few bolts to remove in the wheel well. If you have done a bumper cut similar to mine, you should only have one bolt to remove in the wheel well.
After removing the bumper, on the sides where they meet the fender, you will see a section that is bolted in which the plastic bumper clips. The bolt hole closest to the headlight is all you want to keep. Cut just below the circle and keep only that piece.
Get out your grinder, or whatever tool you are choosing to cut with, and proceed to cut on the marks above your line.
If for some reason you want to take off less than more, you can cut below the line and continue to make adjustments until it fits.
C4 recommends leaving around a half-inch of the gap between their bumper and plastic bumper, as when flexing occurs you can crack the plastic bumper, and even cause damage to the headlight. I left about 3/8” of space between mine.
Because I cut above the line I went ahead and sanded down any cuts that looked a bit sloppy, then applied some Crowles edge trim. I used the kind with adhesive on the inside and heated it up. This not only helped with forming the trim around the bumper cuts but also made the adhesive extra sticky for a better connection.
You may want to do this step after test-fitting and final install of the C4 bumper in case you need to make any cutting adjustments.
Power Steering Line Relocation
Now you want to take care of the power steering line that has always been in the way no matter what bumper you have gone with. While most companies have somehow designed their bumpers to work with it, C4 took it to another level to make sure everything fit perfectly and flush. This allows the bumper to have the least amount of protrusion possible.
To make this work the power steering line must be relocated and replaced with a condenser. This part may seem a bit intimidating to most people, but it’s honestly not hard at all. The most complicated part is twisting the metal line out, which even then is not that hard.
Remove Engine Splash Guards, Plastics, and Lines

On the drivers’ side you will need to remove the dirt shield or engine splash guards, as well as your reservoir system if you happen to have aftermarket shocks that run them. This will open up access to unbolting the metal lines when it comes to that point.
In the front, you will need to also remove the styrofoam piece, as well as the crash bar that the styrofoam sits on. There is a total of six bolts that hold it in place. Be sure to keep those same bolts as they will be used when installing the new bumper.
There are also two wind guards that sit higher up near the radiator. These are attached by two fasteners that will also need to be popped out with a flat head. These are the only parts holding it in. However, you have to pull and twist to get them to pop out. If you already own a c4 Fabrication lo pro bumper like myself, you would have cut them during that install. These pieces are not reused so don’t be upset if you happen to break them as they will be tossed.
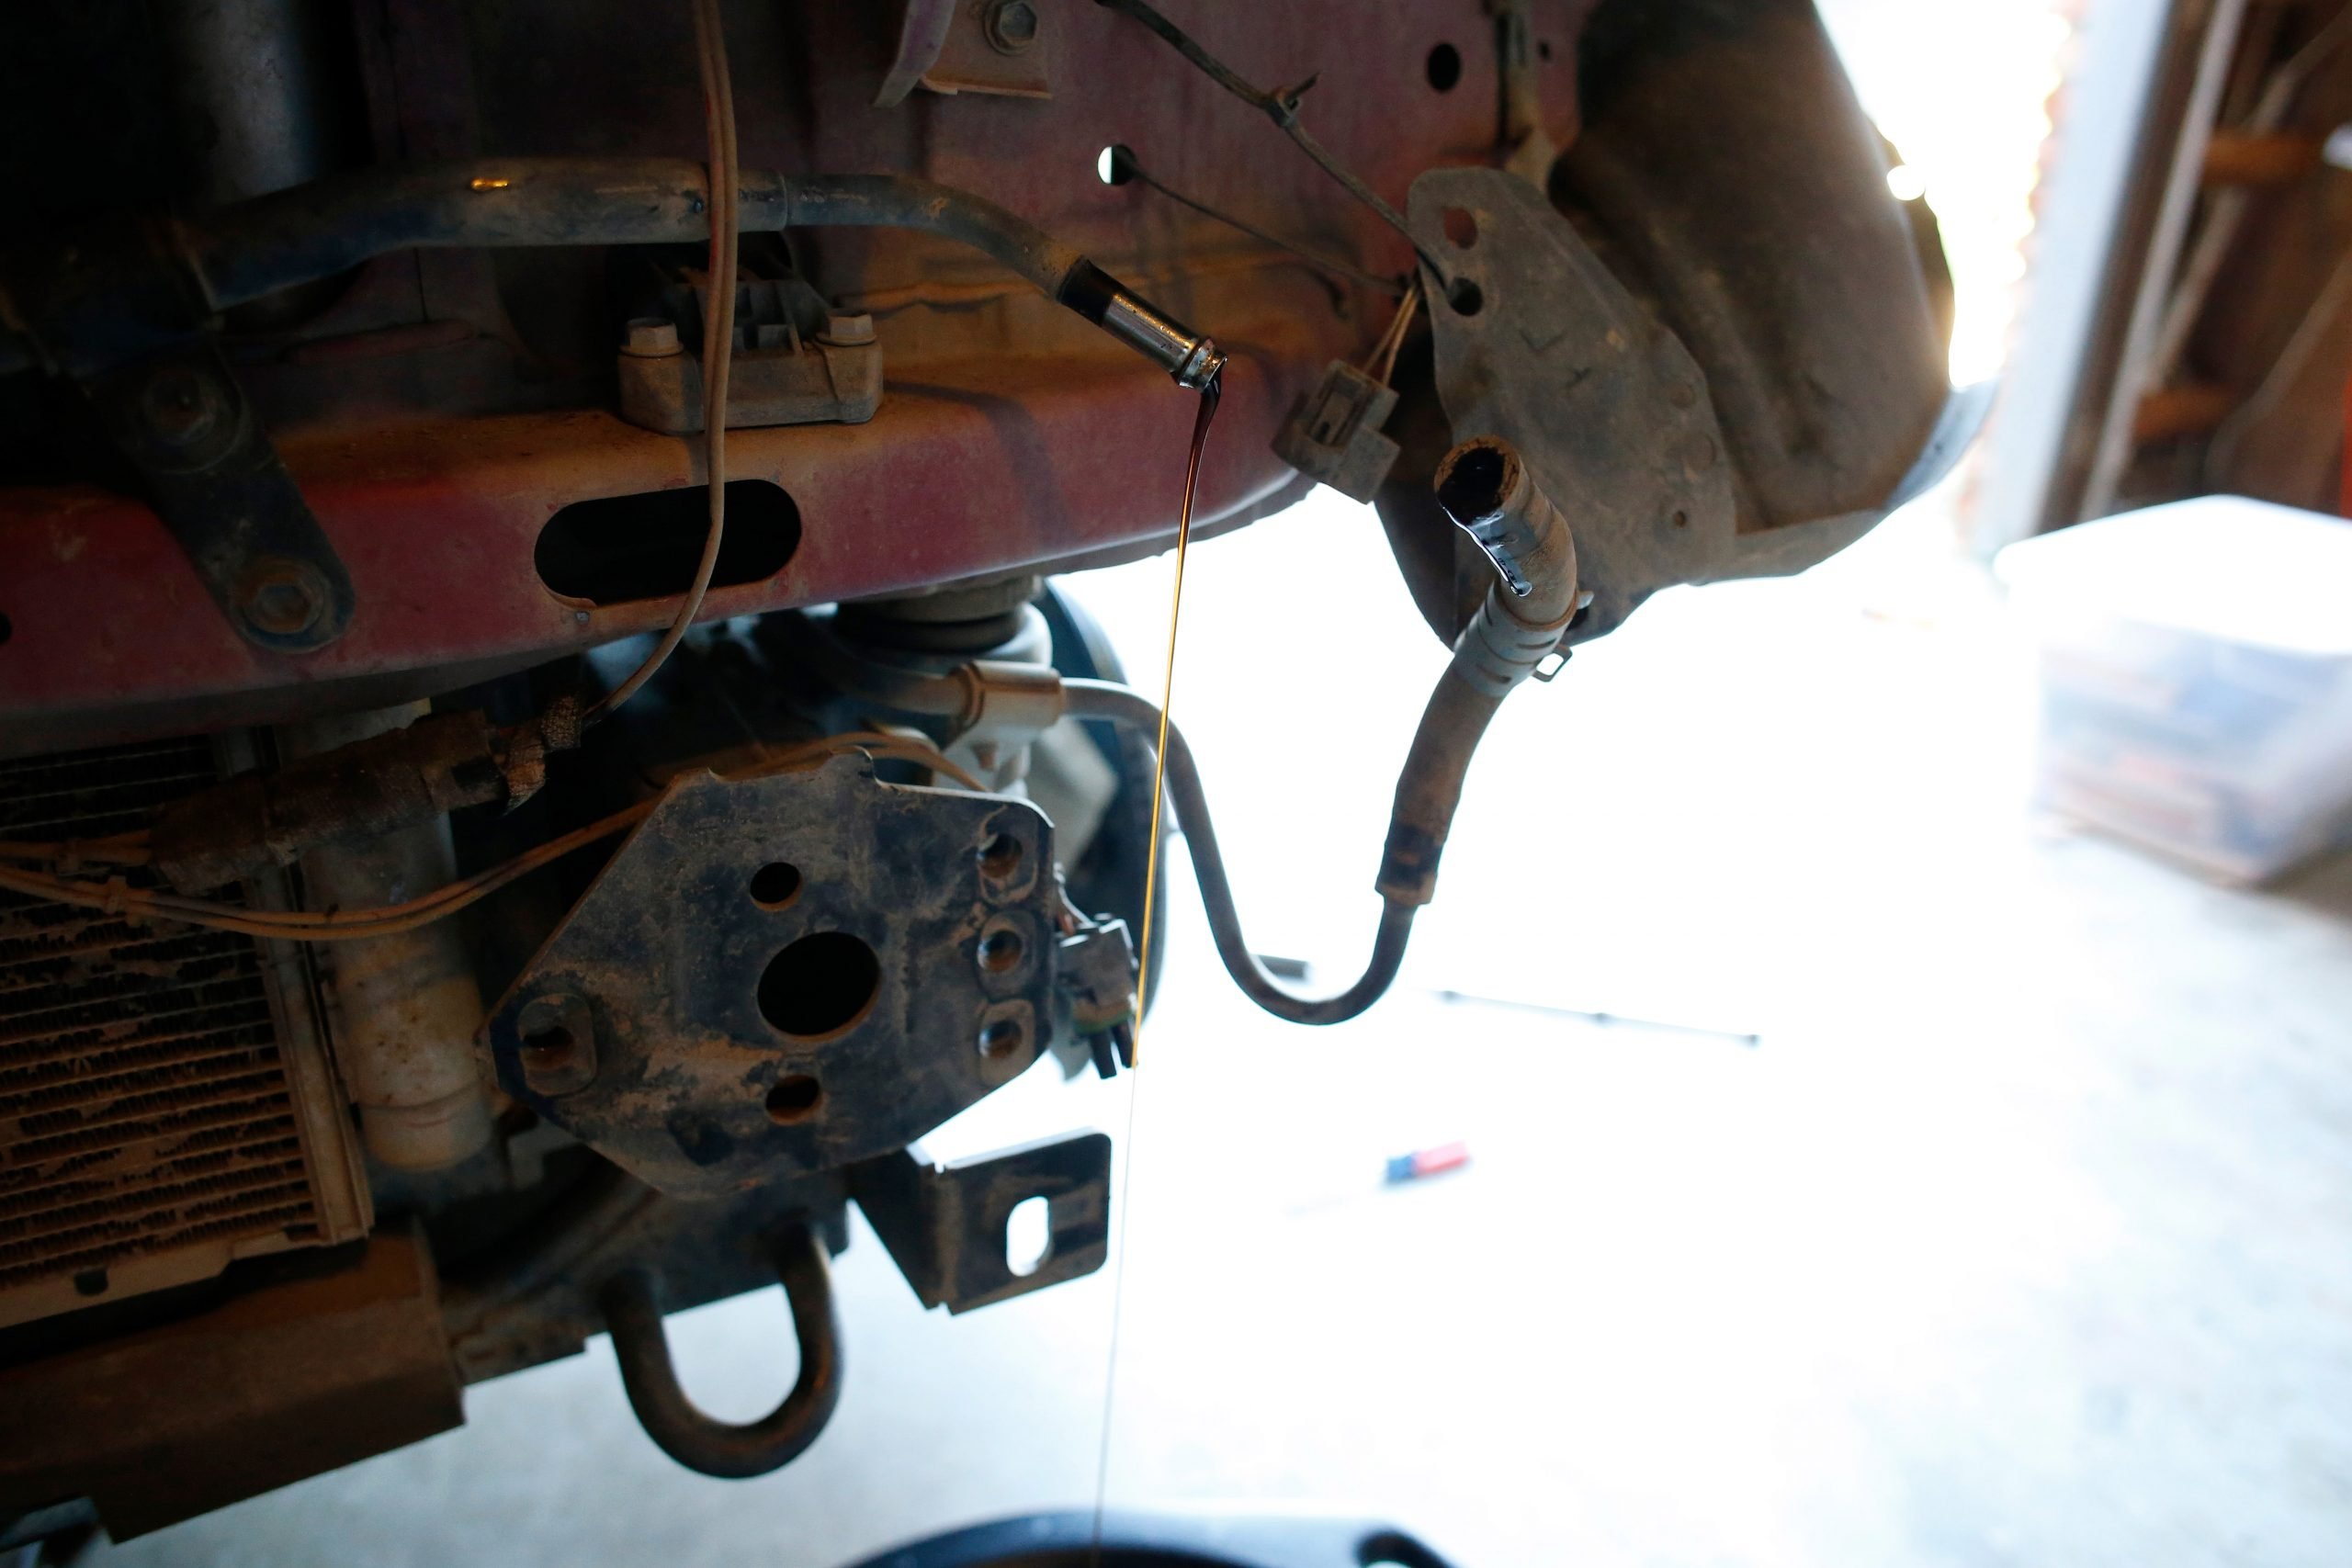
Drain Power Steering Lines
Now you are going to drain the power steering lines. This can get messy, so make sure you have your bucket, or whatever you plan on catching the power steering fluid with. There is roughly a quart of power steering fluid in the system, so you don’t need anything major, but you obviously don’t want this to spill.
On each side of the metal power steering line that runs dead center in front of the radiator, you will have two rubber hoses (one on each side) connecting to the power steering system. Start on the passenger side and remove the rubber hose. After doing so, bend the lower line downwards (it will be facing up), and allow it to drain into your bucket. Once finished either cap it off or tape a rag over it.
Proceed to do the same on the drivers’ side. However, once this finished, turn the ignition to the on position (DO NOT! turn it on). Begin to turn the steering wheel left and right which will help to completely drain whatever is left in the system out. After everything finishes coming out, do the same as the passenger side and either cap it off or tape a rag over it.
Follow the steel line behind the wheel well, where it connects to the rubber line and remove it. There are two bolts that will need to be done to be able to fully take it out. You will then want to go over to the passenger side and do the same. However, the bolt on the inside (behind the wheel well) is somewhat hidden. You won’t need to remove the reservoir to your suspension to get to it, nor the dirt guard, but an extension may be helpful.
The passenger side, however, is a bit more tricky to get out, as the two brackets that help keep it in place need to be removed and or bent to get out. Again these are not going to be reused to if you have another way to take it out easier, go ahead and do so.
You also want to remove the rubber line from the power steering fluid reservoir as that will also be replaced with what C4 includes with their condenser kit.
Installing the Power Steering Condenser

You then want to temporarily fit the condenser that comes with the bumper on the radiator.
Do not fully lock it in until all hoses are connected as you may need to move them around a bit so there are no kinks in the line. I decided to fit mine about dead center of the left side of the radiator. The zip-tie style connections will easily push through the radiator. If for some reason yours stops. Pull it out a bit, then proceed to push forward. It will eventually break-through.
Connect the longest hose (4ft) to the driver’s side, and the other hose to the reservoir. While the driver side has a nice foam piece it goes through, the passenger side only has a metal opening to use (where the AC line goes in). Use some of the edge trim there to help prevent the metal from the possibility of rubbing through the line.
Be sure to use the hose clamps the kit comes with when tightening down the hoses to both the lines and condenser, as the original clamps will not work with them. Additionally use some of the power steering fluid to help make pushing the lines on easier, as there’s a lot of friction when both are try.
Then begin to zip tie the hoses so they aren’t wobbling around while driving or get in place.
You will also want to bend the longer AC line a bit to the left to help everything fit. Do this with your hands and lightly as you don’t want to break it. If you installed the C4 Lo Pro bumper you would have already done this step.
With my winch on the Low Pro bumper I also had to use a dead blow on the center metal support in front of the radiator. This may not need to be done, but if you do, don’t be afraid to smash it back a little bit. Just don’t miss and hit the radiator.
Now pour in the power steering fluid until it is full. Then turn the ignition to on (again DO NOT turn the vehicle on). Begin to move the steering wheel back and forth to allow the fluid to enter the system. Continue to do this until the reservoir is empty. Then proceed to fill it up to the full line again. You will need to do these steps a few times before the system stops bubbling and stays at fuel. You also want to do this now to make sure there are no leaks before installing the bumper.
After visually checking everything and making sure there are no leaks, you are safe to begin the bumper install.
Installing the Hybrid Bumper

You obviously will want to install your light bar as well as winch at this point, before putting the bumper on as you will not be able to do it otherwise. You can also do this step a few days before, or have someone do it while others are cutting and draining the system. It all depends on how much time you wish to save. The main thing to remember to do is to have your lightbar adjusted properly, as it will be extremely hard to do once the bumper is put on the frame.
The lights that sit in the tube section of the bumper can be done at any point as that area is in the open. I installed my fog lights after installing the bumper as it was sitting higher in the air and made it easier at that point.
You may wish to paint the body of the frame below the headlights that are not painted black. If you have a black 4Runner you will be lucky and not need to do this step. Of course, you don’t need to do this step, but it will help everything blend better. I originally didn’t do this, and while it wasn’t exactly a pain to do it would have been much easier before installing the bumper.
After everything has either dried, have a buddy help you lift the 4Runner up to the frame, and the other start to thread the bolts into the frame holes. If there are only two of you, you can thread one bolt on each side backwards and have the bumper sit on them, while you bolt the others in. This is where an impact gun can come in extremely handy.|
You will want to make sure everything is even on each side before completely tightening down the bumper. You also want to remember to put the bolt through the bottom section of the bumper that the lower brace connects to. I forgot to do this when installing, and it can be done after being installed, but it’s just more of a pain to do. This piece must be installed as it strengthens the bumper for things like winching. Otherwise, you could run into an issue where your bumper rips off. Such has happened in the past with earlier bumpers of other companies.
Do not forget to install the windshield washer reservoir skid if you bought one, as it will go in at this point as well. It sits on the outside of the lower bracket.
Make Your Final Adjustments

Once installed and lined up how you see fit, begin to wire and zip tie your winch, lightbar, and anything else you may be installing with the bumper.
You may wish to adjust your coils to your suspension a bit to handle the bumper weight. I added a 700lb coil to make sure the weight would be able to handle it, and even while set around 2”, I’ll probably need to bump it up another .5” to where I like how it sits and ride.
Additionally, you will want to cut the fender liner to how you see fit. I originally heated mine up and remolded it with the Lo Pro bumper cut, but it, unfortunately, didn’t work with this one, so I cut it back and then drill a few holes to zip tie it into areas that had open holes. You can also tap them into the wheel well sheet metal if you like, it’s all just personal preference.
Make sure everything is put back together and connected, clamped down, and torqued down properly, and drive around the block for a few minutes. Then check the power steering reservoir as it will probably have lowered a bit. My system did not take a full quart of the power steering fluid, but probably about 90% of the bottle. You should only need one, but I bought two just to be safe.
The bumper takes approximately 5-6 hours to do on your own. With a lift and a few extra hands it could go by quicker, but if doing in your driveway expect it to take around that long.
Final Notes

I went with Agency6 for the fairlead for the Warn winch. Not only is theirs made extremely well, it is also one of the better ways to protect your winch line, as the fairlead is made in a more smooth round shape, rather than having sharper edges which can cause slices and tears to synthetic rope.
I also went with the Warn VR EVO 10-S for my winch setup as I was pretty bummed with the quality of the Smittybilt X2O 10K winch. While it didn’t fail me, the ropes I had constantly had issues with fraying without any use, and the wireless connection wasn’t nearly as reliable as I would have liked. Thankfully I only ran into issues with it while spooling the rope after cleaning it at home, and not on the trail.
The Warn winch is much beefier and you can tell immediately that you get what you pay for. While they are more expensive (roughly $200 more than a Smittybilt), I highly suggest spending the money on the Warn to ensure you have a piece of recovery equipment that could bail you out in some very bad conditions.
The bumper is phenomenal, not only build wise but also aesthetically. It gives a ton of clearance to fit tires. I currently am on 34” tires and could see fitting 37” tires with no problem. I constantly am getting compliments as well as breaking necks of the people I pass.