
Inner and Outer Tie Rod Replacement on 5th Gen 4Runner – Step by Step Install and an Overview on Part Options
One thing most people tend to overlook when it comes to their vehicles is the tie rods.
Not only are these a crucial part of driving, but they are also a huge safety concern when they begin to fail.
If you happen to be someone with a lift, bigger tires, or an off-roader, odds are your tie rods, both inner and outer will fail prematurely.
What are signs of bad tie rods?
The easiest way to tell you may have a bad tie rod is with your alignment. If you happen to be driving and notice your vehicle pulls to one side or another, even after having recently received an alignment, this could be a key sign to your tie rods failing.
While off-roading you may notice some knocking noises happening, especially when going over rocky terrain. That noise should disappear while on the pavement.
Another way is to inspect each of them thoroughly.
Usually, the outer tie rods will have a lot of play as well as be leaking. Keep in mind the outer does naturally move, so unless it’s extremely loose, it likely is fine.
If the grease happens to be dirty, you know the metal inside has worn down. This is also similar for the inner tie rod, however, when you push in and pull out you’ll feel it move and hear a clunk-like noise. Additionally, the inner tie rod will also have a lot of play.
Neither of these you want as the tie rod is how you steer your vehicle, and the more play you have the closer they are to failing.
What happens when tie rods fail?
You lose control of your vehicle, and where you go is ultimately up to where the vehicle wants to take you. Depending on the road, tire pressure, elements and other things will all play a part.
Needless to say, this is a very dangerous position to be in as you not only endanger yourself and the people in your vehicle but also the people who are on the roadway and near the roadway.
What parts do you need to install new tie rods?

Parts List and Part Alternatives
- Inner Tie Rods (#45503-35070)
- Outer Tie Rods (#45046-69245)
- Moog ES80895 (Outer Tie Rod Alternative)
- Inner Tie Rod Boots (#45535-69015)
- Specialty tool or two large wrenches that open over 1-1/2”
- Tie Rod End Remover Pitman Arm Puller (Separator Kit) or Dead Blow
- Impact Gun or Breaker Bar
- Torque Wrench
- Impact Sockets
- Jack and Jack Stands or Lift
- Penetrating Fluid
- Blue Locktite
- Cotter Pin (unless outers come with them)
- Grease and grease gun if outers require them
- Zip Ties If Inner Clamps Break.
Though you don’t need to change both inners at the same time or both outers, it’s recommended to as they both should wear evenly, meaning if one has or is near failure, the other won’t be far behind.
It is also highly recommended to go OEM for the inner tie rod, as the Toyota ones are by far more superior than other inners. If you are only on pavement and stock, this probably isn’t something you would need to follow, but anyone off-roading should stick to the Toyota OEM inners.
Outer tie rods aren’t as important, and I decided to go with the Moog ES80895 because you can service them with grease on your own, where Toyota brands you cannot. This, of course, is up to you to decide.
How do you install them?

Surprisingly installing inner and outer tie rods isn’t as complicated as they may seem to appear to be. With a few basic tools, you can do this on your own. Specialty tools aren’t needed, but they do make things easier and may allow you to preserve a couple parts if you want to keep them for spare use.
You first want to find a lift to use or have a flat area at your house. You want to place the emergency brake on your car to prevent any rolling, and you may want to use a chock for extra security behind your tires. You, of course, can substitute a cinderblock, brick, or block of wood if you do not own a chock.
After this is done, use your jack to lift up the front of the vehicle, and then place jack stands on the jack points.
Remove your tires and put them to the side. It doesn’t hurt to place a tire under the LCA for another added safety measure.
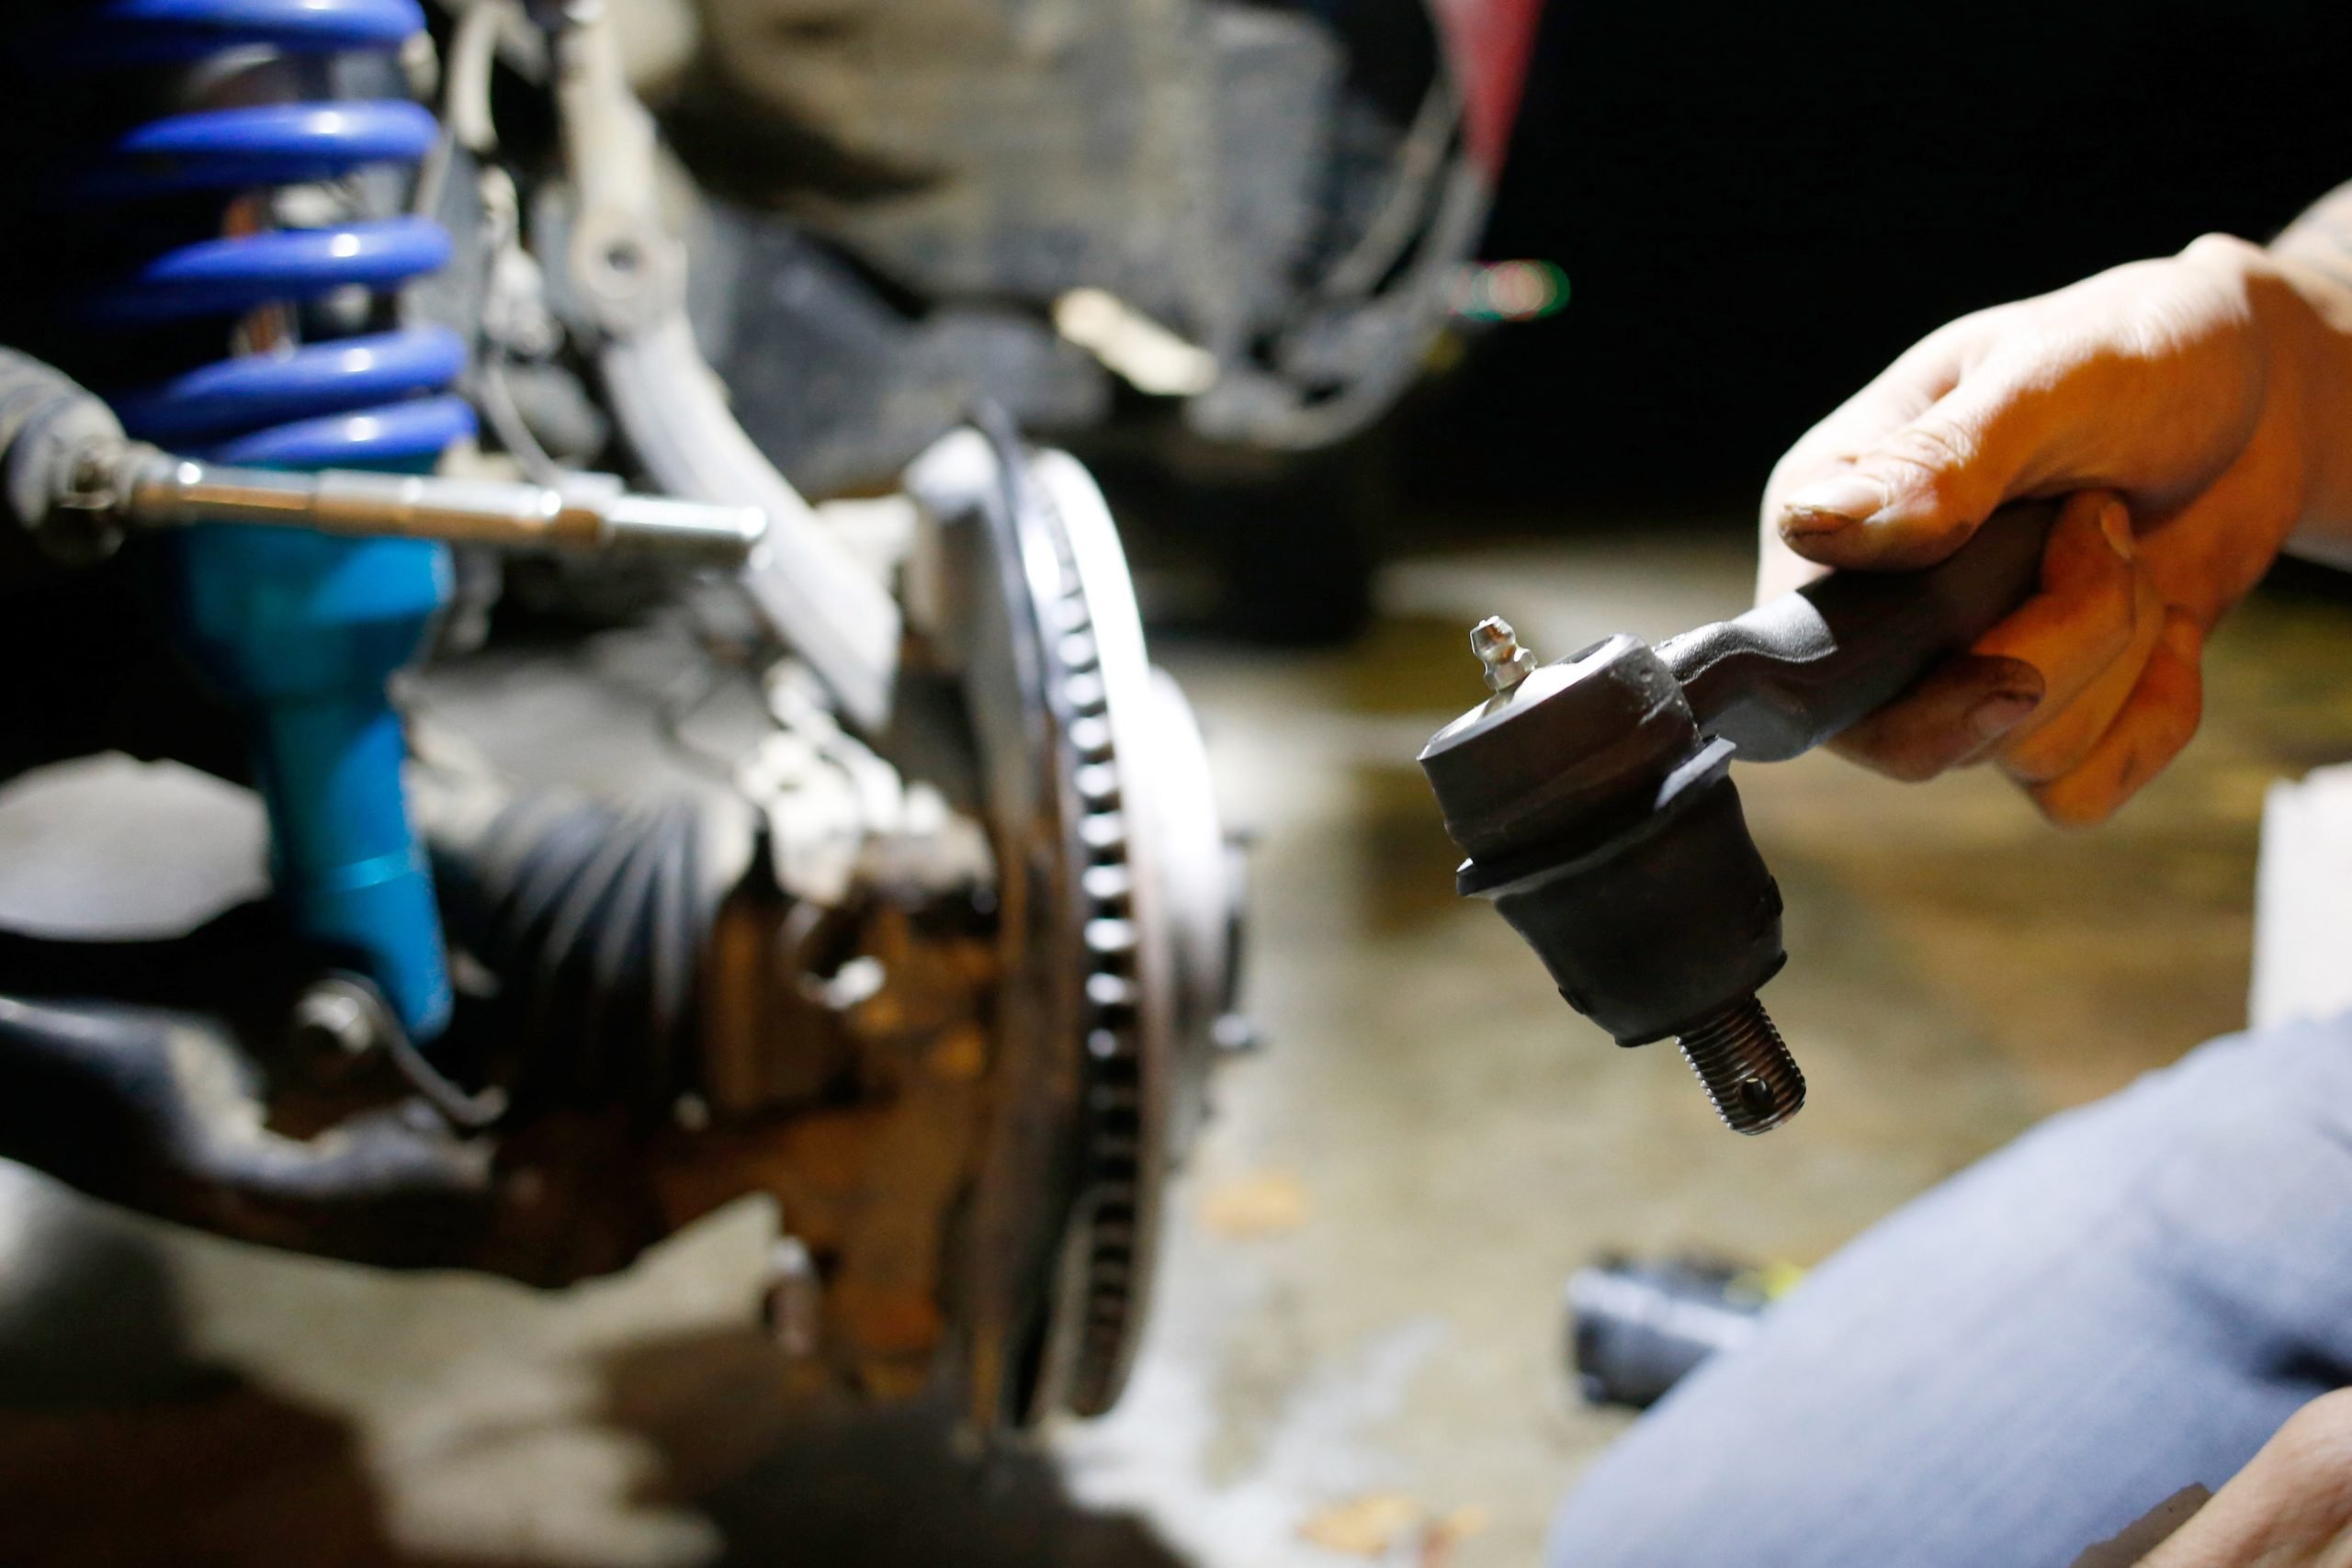
Outer Tie Rod Removal

You then want to begin by disconnecting the outer tie rod. To begin remove the cotter pin that is through the nut with a pair of pliers.
If using a tie rod separator, proceed to loosen the castle nut and remove it. Flip it over and then thread it back on to the bolt, until it is even with the top of the bolt. That way when you use the removal tool you do not damage any of the threads,
You can use an impact gun here if you have one to make things easier, but ultimately a breaker bar will work just as well, as that’s what I used. With about a turn or two the outer tie rod should pop free. You may need to push inward or outward to get it to fully pop out.
If you do not have either a breaker bar or impact gun, you can always take a dead blow and smack the knuckle (not the outer tie rod) a few times against the side and it should knock loose. If you are replacing the outer you can hit that as well, but do not do it if you are keeping it.
Once the outer tie rod falls out of the steering knuckle, proceed to use two wrenches to loosen the adjustment nut that locks the outer tie rod location in place. This can be tough to loosen, and I highly recommend spraying some penetrating fluid to help make the job easier. The key here is, while looking at the out tie rod, to turn the nut to the right, as this will move the nut away from the outer tie rod. Moving it to the left, as you typically would do to loosen something, will only tighten down on the out tie rod further. The outer tie rod itself will loosen to the left.
Once you loosen the nut, put it up to the outer tie rod without tightening, and proceed to remove the outer tie rod.
This is probably the MOST IMPORTANT step to remember, as this will get you as close to the alignment you currently have. Keep in mind you WILL need a new alignment after this is all finished, but this will make the drive to the alignment shop easier.
Whatever position the tie rod is in, specifically the location of the bolt, a full turn back to that same position would be one full turn. For example, if the outer tie rod bolt is facing the 9 o’clock position, a full turn isn’t until you turn it back to the 9 position.
Write this number down somewhere so you do not forget, as you will turn it the same amount of times when reinstalling/installing the new one.
Take off the nut and put it to the side as you will reuse this.
Remove the Inner Tie Rod

You will want to undo the two clamps holding the inner tie rod boot on. It will be easier to get to the clamp closest to the steering rack off if you turn your steering wheel all the way out to the opposite side you are working on.
These clips can be a pain to get off, and if you order new boots from Toyota they will come with new clips. Using a flat head screwdriver and twisting them open is the easiest way to get them off, but this ultimately does break them and make them unusable. You can also use a zip tie when reinstalling if you plan on using the boots already on the vehicle.
Once that is loose, as well as the clamp closest to the outer tie rod, begin to twist and pull and it should come off. If it doesn’t, you can use more of the penetrating fluid to get it to come off easier. Be sure to take your time with this if you plan to reuse your boots as you can tear and cut them in this process if you aren’t careful.
Remove the boot and inspect the inner tie rod.
- If the tie rod moves easily and the grease is dirty or gone, it should be replaced.
- If it still has grease, does not move in and out, and doesn’t move freely, it is okay to continue to use and does not need replaced.
However if you already have your inners, you might as well replace them at this point and save your older ones for breakage on the trail.
You can use two adjustable wrenches to remove the inner tie rod. You want to place one on the steering rack. The spot for it is at the very edge, but is thicker than the normal 3mm wrenches. The other spot is on the inner tie rod itself.
If you opted for the inner tie rod removal tool, you will use that here instead. You still want to use an adjustable wrench on the rack to prevent any stress. You can risk this if you want, as it will still come off, but the rack is very expensive if you cause damage to it.
Unlike other inner tie rods, there is no screw or flat washer with the Toyota tie rod, so do not worry about looking for these when uninstalling and reinstalling.
Reinstall Inner Tie Rod

Once removed you can begin to install the new tie rod the same way you took it off. If installing with wrenches, it isn’t a bad idea to use some blue Loctite to prevent it from becoming loose and backing out.
The main reason for this is because the inner tie rod needs to be installed at 57ft-lbs, and that’s a bit hard to do with wrenches.
If you use the specialty tool you can afford to not use blue Loctite. I chose to still do it for extra security. DO NOT use red Loctite as that is considered to be permanent and must be heated to remove.
Reinstall your boot or new boot, and reapply the clamps.
This is a non-rotational part so if you broke your clamp, or can’t get the new clamp on, you can use a zip tie. In fact, a lot of aftermarket boots come with zip ties for the boot instead of a true clamp. The OEM boot from Toyota will come with both clamps. Put back on the adjustment nut onto the inner tie rod.
Reinstall Outer Tie Rod
If you are using an outer tie rod that is serviceable, I recommend filling the boot with grease before putting it on, but you can do this at either point. The boots take roughly three pumps of grease.
Remember the number you wrote down earlier? This is the number you will want to use when reinstalling. Once you get to the total number of complete turns made, turn the adjustment nut to the left until it meets the outer tie rod. You will want to torque this nut down to 65ft-lbs. This may be hard to do unless you own crows feet, but if you live close to a shop, ultimately tightening it down as hard as you can should be more than sufficient. Whatever you do, do not Loctite this down.
Proceed to reinstall the outer tie rod into the steering knuckle and torque the castle nut down to 67ft-lbs. Then reinstall a cotter pin to lock it in place. You MUST use a new cotter pin here as reusing old ones are dangerous.
Reinstall your tires, put everything away, and take it to your local alignment shop to get it properly aligned. That way the adjustment nut can be properly torqued down (unless you were able to do it yourself), and your vehicle will drive the way it’s meant to — as well as keep you and everyone else around you on the roads and trail safe.
Hi Kiel,
I am in the process of doing this job on my 05. Did you luck out and have the tool to put the clamps back on the boot with the rack in or did you zip tie due to space? I have the tool to put the metal strap on, but it was out of the car at that time.
I also picked up an inner tie Rod tool from harbor freight, but the inner tie rods were too thick to fit into the tube. Rendering the tool useless for this task. Did you find this to be an issue or did you luck out with the tool you got?
thanks!
Ted
You can rent a tie rod tool for free* at most auto parts stores (O’Reilly Auto Parts is a good choice) which is large enough to handle 4Runner tie rods.
*You pay for the tool and then you get a full refund for returning it within 48 hours.