
Step by Step Installation of the GFC (Go Fast Campers) RTT on a 5th Gen 4Runner
If you have some assistance, installing the GFC (Go Fast Campers) RTT (Roof Top Tent) is simple.
The biggest question for this installation is how you get that RTT on top of the 4Runner.
We lifted the RTT with three guys (thanks Jimmy and Tyler), and although I think it can be done with two guys, a third guy can really help keep the tent stable as its positioned into place.
All you need is a few hours or even less depending on the 5th Gen year you have.
Either you have a 2014 – 2015 4Runner or a 2016 – 2020 4Runner. The 2016 – 2020 is an easier install because of the Shark Fin antenna. I am not 100% sure about the 2010 – 2013 4Runner shark fin install. That is a good question for GFC.
There are two types of installs here:
- 2014 – 2015: Manually remove shark fin
- 2016 – 2020: Cut shark fin off
When you are installing the GFC RTT, you will need to remove the shark fin antenna so that it doesn’t interfere with the base.
Once you have removed the shark fin antenna on either year ranges, you will replace the antenna with a provided GFC RTT plastic cap.
For our installation, we are showing a 2014 – 2015 4Runner in which we manually removed the shark fin antenna but I will leave some notes on how the 2016 – 2020 installation works as well.
GFC RTT Installation
There are two parts to this install. The first half of the install is removing the shark fin and the second half is installing the tent. If you have a 2014 – 2015, you need to pull down the headliner to loosen the shark fin nut in order to reinstall the GFC laser-cut cover on the roof. If you have a 2016 – 2020+ 4Runner, you simply cut the fin off and then install the cover.
For removing the shark fin on the 2016 – 2020, reference this install guide.
Once you replace the shark fin with the provided cover, you can install the GFC (5th Gen 4Runner specific) rooftop mounting brackets. Finally, you can then lift the tent onto the 4Runner finally securing it in place.
The process is very simple, the 2014 – 2015 install just takes a little longer.
Tools for Installation
- Socket Set (standard and metric) + Small Phillips screwdriver
- 3/16 and 1/4 Allen Keys
- Oscillating saw or Dremel
- Razor Blade
- Plastic Pry Tools
- Butyl Seal Tape or preferred sealant
- Inch pound torque wrench and an ft-lb torque wrench
- 2016 – 2020 Shark Fin Removal
Remove Shark Fin Antenna (2014 – 2015 4Runner)
Start by removing any MOLLE panels or rear cargo covers that may prevent access to the D pillars of the 4Runner. It helps to remove everything from your cargo area so you free up some space to move around.
Remove D-pillar Plastics & Coat Hook Bolts

Start by pulling back both D pillar plastics and set to the side. You will need to slightly pop-out or loosen the lower side-wall plastics to allow more of the headliner to come down. Finally, remove the coat hook bolts and plastic hook on the headliner.
Remove Headliner Push Clips

Using a plastic pry tool with teeth, you can pop the three headliner tabs in the rear of the 4Runner. This will allow you to pull straight down on the headliner and gain access to the shark fin lock nut. Also, remove the two main headliner push clips that sit above the cargo area. You should be removing 5 headliner push tabs. This will help to pull the headliner down without compromising the rigid structure.
Locate Headliner Shark Fin Nut

Locate the Sharkfin lock nut. You can find it by pulling down on the headliner from the back. Just make sure you have removed plenty of push clips as to not crease or break the rigid headliner.
Loosen shark fin lock nut

Loosen shark fin lock nut, then unclip the radio electrical clip. Once the lock nut has been removed, the assembly will be loose and you can take off the shark fin from the top of the roof. Proceed to pull the fin up and away from the roof.
Assemble the 3D printed shark-fin

Once removed, take the shark fin assembly and place the supplied 3D printed shark-fin replacement on top fastening the two together.
Go Fast Campers 3D printed shark-fin

Replace the new assembly back in place on top of the 4Runner’s roof, and then secure the assembly in place using the shark fin lock nut on the inside of the headliner.
Replace the headliner push clips and then the plastics on the D pillars. You should be all wrapped up with replacing the shark fin antenna.
GFC RTT Mounting Options?
GFC ships a universal hardware kit for their rooftop tent so you have a couple of options.
The most common for the 5th Gen is going to be their 5th Gen specific mounting bracket. You can mount the GFC RTT straight to the factory mounting points using this 5th Gen 4Runner mounting bracket. Using the factory roof rack hardware, you can secure the bracket into place. It’s simple, easy, solid, and does not require drilling.
Another option is to use their universal mounting hardware. These would be used for something like Yakima crossbars or something similar.
The factory crossbars on the 4Runner probably aren’t strong enough if you were considering them. I would look into something a little more robust that is rated for at least 300 dynamic (moving) pounds and 600 static (stationary) pounds.
You will need to remove the factory crossbars from the 4Runner before starting this install. You can reference this article for removing the factory 4Runner rack. Clean the surface area underneath the mounting points while you are there.
GFC RTT Installation Instructions
Mounting Hardware
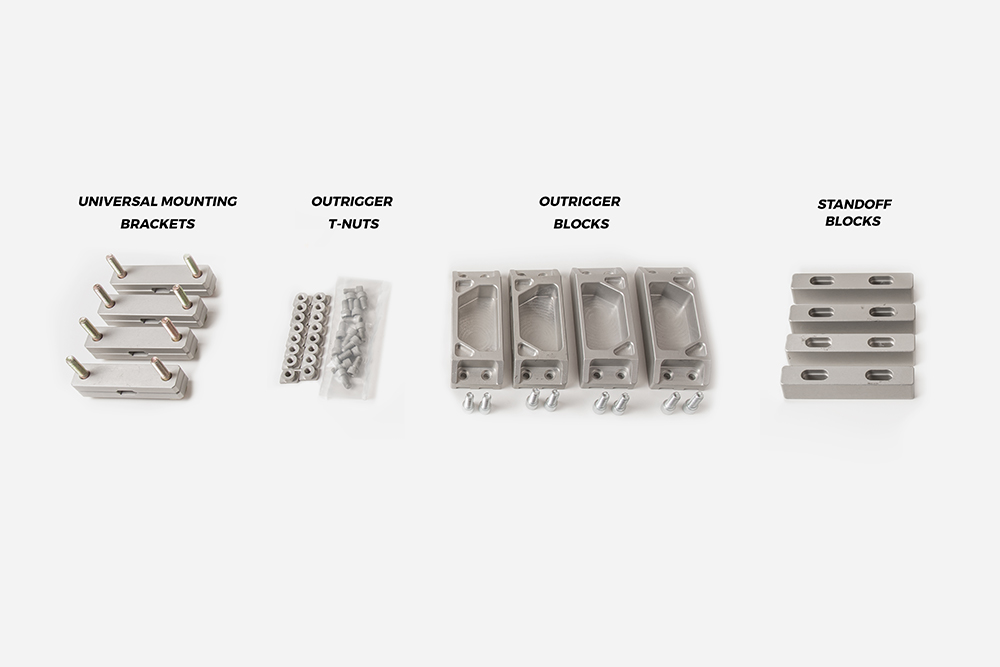
From left to right:
- Universal Mounting Kit
- Outrigger T-Nuts and Bolts
- Outrigger Blocks & Bolts
- Standoff Blocks – Use factory OE hardware
If you are installing the GFC on the 5th Gen, you are more than likely using their hardware kit and bracket. For this, you will need the Outrigger T-Nuts, Outrigger Blocks, and Standoff Blocks. If you are installing the GFC on Yakima, Thule, or other crossbars, you will need the Universal Mounting Brackets.
Place Standoff Blocks into Place

Place Standoff Blocks into Place. The original instructions called for Butyl Seal Tape. We didn’t have any on hand, so we moved on with our install. If you are reading this beforehand, you might want to buy some.
Use Factory Roof Rack Hardware for GFC RTT Brackets

Using the factory roof rack hardware, install the provided 5th Gen 4Runner brackets from GFC onto the roof. There is no drilling. Apply the provided Loctite thread locker on the factory bolts and simply mount the brackets into place.
GFC RTT Brackets Installed

Here is a look at the brackets after they are installed. For reference, you can see the orientation of the standoff blocks and the bracket. Make sure you hand tighten the 12mm roof rack bolts into the brackets.
Lift the GFC RTT Onto Brackets

Lifting the tent on the 4Runner is simple. Grab a couple of friends and lift it into place and on top of the brackets.
Install Outrigger Blocks

The outrigger blocks connect the roof bracket to the RTT. The outrigger blocks act as a middle man for these two.
Thread T-Nuts to Outrigger Blocks

Start by loosely threading the T-nuts to the outrigger blocks. You can do this on all four mounting points. As you tighten the nuts into place, they will spin and lock into place.
Thread Nuts from Roof Rack Bracket into Outrigger Blocks

Continue to loosely thread the outrigger blocks to the brackets using the 5/16-18 cad plated washers and bolts.
You still want everything loosely connected for the last portion of the install.
Test Rear Liftgate Clearance

Slide the GFC RTT platform forward or backward until you are even on both sides. You want to clear is your rear liftgate and ladder if you have one. Then make sure both sides are exactly the same distance from the marked point. We used the outside edge of the RTT and edge of the body at the liftgate (while up).
Once the measurements are consistent on both sides, start to secure the tent in place.
It might help to tighten everything down to about 90% and then move the RTT if needed before you finally secure the RTT to the brackets.
Does it fit in the Garage?

YES! So stoked.
I was not sure if it was going to fit in the garage but it does. This was one of the main reasons I was so excited to run this tent.
The fact that it can fit in my garage is a huge plus because I have everything going against me.
I have a small garage, a 4.5″ lift, and the 4Runner sits on 34″ (285/75R17 – 33.8) tires. After all of that, it still fits with almost 2″ of clearance to go. Next up is 35″ tires so we will see how that pans out. But, for the most part, anyone running a 3″ lift with 33″ tires and a normal garage should have plenty of clearance.
GFC RTT Garage Height Specs
- GFC RTT Height: 6″
- GFC RTT Height W/ Bracket: 7.75″
- GFC RTT Height to Ground: 81.25″
- Garage Height: 82.75″
GFC RTT General Specs:
- 100% Made in the USA
- 6″ thick when closed
- Weighs 135 lbs
- 50″ x 90″ sleeping footprint
- 2″ Multi-density mattress
An Ultra-Thin, Slim and Low Profile Roof Top Tent

The GFC RTT is currently one of the lowest profile RTTs on the market, which is again, why I was most excited about running it. I am able to successfully garage my white 4Runner, keeping it safe from the elements, while I can daily the MGM 4Runner.
This low profile rooftop tent allows me to keep everything together, meaning I don’t need to separate the RTT from my 4Runner and then store the tent somewhere.
That is what I was dreading most about rooftop tents on the market. First of all, I don’t have room to store anything. As you can see, my garage is tight how it is. Having a low profile rooftop tent like this is so important for people with a low hanging garage and limited storage space.
Final Thoughts?


For a compact and slim rooftop tent, you arent going to find many other options out there. Especially rooftop tents made exactly for the 5th Gen 4Runner. This RTT was literally designed for the 5th Gen 4Runner. Sure it can fit other platforms but it suits our 4Runner quite well.
There have been some clamshell copies on the market but none have really shown industry progress. After GFC launched their camper and then this RTT, they have really held their own at the forefront of the low profile sleeping platforms, and this design in particular.
What I also love about GFC as a company is that their team is super innovative like RIGd Supply. They just keep creating new additions, brackets and modular systems to their already stunning lineup of products.
These newer more innovative companies like GFC and RIGd are faster to move and release products while some of the bigger guys like Front Runner can take 1-3 years to release new products.
That continued innovation and market adaptation is a really big reason why I like GFCs rooftop tent for our 4Runner.
I will follow up with a detailed look inside and also go over using the GFC RTT. And then lastly, I will follow up with a final review of the tent.
Hey Brenan, you said it the kit comes with the Universal Mounting Kit, Outrigger T-Nuts & Bolts, Outrigger Blocks & Bolts, Standoff Blocks right.
Where do you use Universal Mounting Kit?
It looks like you do not use the universal mounting kit why is it shown did you buy that?
Also looks like the universal mounting kit, the outrigger blocks do not come with the 5th Gen 4runner RTT Mount Kit. Did they use to?
Brenan, I have this same set up and notice a bit of knocking coming from the rear driver side mount. Do you have the same issue or is yours nice and quiet?
Man, I am getting a Alu-Can for my 5th gen and trying to figure out how to mount it with no roof rack to save the weight and height. Wonder if that mounting kit would work with the Alu-Cab ..
Probably not. The Alu-Cab has completely different side rails but as always – anything is possible.
“The original instructions called for Butyl Seal Tape. We didn’t have any on hand, so we moved on with our install.”
Have fun with a leaky roof I guess?
Tory – well it’s been a whopping two months and I have a leak somewhere. It caused a very important harness connector (lower A-pillar kick panel just left of the E-Brake) to corrode which will result in $1000 repair labor (re-routing wires) and/or $6000 in total replacement (replacing harness) labor. Regardless, I am not looking forward to it. I haven’t tracked it down yet but the first thing I thought about was this comment. It could be from unsealed roof bolts, a wiring harness running through the weather stripping in my windshield, a clogged drain in the moonroof (which I doubt), or condensation build-up in the area near the firewall. I am 100% kicking myself for not going hard with the Butyl Seal Tape or silicone or something – but still shocked as to why I never had water with years of running bolts unsealed. In any case, I will have fun with a leaky roof I guess.
Oh no! Hopefully you are able to find and arrest the source before it does any further damage. I am not sure if a leaky roof mount would be able to drip down near the A-pillar, unless it somehow clings to the roof seam. When you say windshield weatherstripping, do you mean that you ran the wire through the actual seal, or just tucked it into the little gap along the edge of the window and routed under the hood? If it’s the latter, I can’t imagine that would be the issue. When you ran firewall wiring, did you go through the large main grommet or create a new route? It’s also very possible that the leak existed before, and the corrosion has been very slow and creeping. This makes me want to look inside my own kick panels to make sure I’m dry. Good luck and I hope that the repair work you do eliminates any future problems.
Tory, had I not previously installed the Stellar Built Roof Rack without sealing anything, I might have been worried. I ran the Stellar Built roof rack for well over a year through every season, rain, snow, etc. I have also had over a foot of snowpack on my roof while visiting family in Quincy, CA – with time to melt onto the roof after the fact. I was worried about it at first but haven’t had one problem. Basically, the Stellar Built rack that left the factory mount points completely exposed caused zero problems. The GFC RTT on the other hand completely covers the roof and all mount points. So with that said, I am not worried at all about anything leaking through my roof. I understand why GFC has that portion in their instructions, to cover their ass. Now, if this install called for drilling through the roof, then I would seal that point.
The reason why GFC adds butyl rubber to the instructions is the same reason Toyota uses a seal on the factory roof rack in the same location. There are two areas per factory hole that can cause leakage- the first was taken care of when you added threadlocker (inside the threads). The second is around the plastic insert. Waste can leak in between the holes in the sheetmetal and that raised plastic insert. The butyl tape is what adds a seal in this area. It’s great that you’ve gotten lucky with no seal- but it’s cheap insurance against electrical gremlins and a moldy headliner.
I am not disagreeing with you. There is a reason for that step in the process, I agree with you man. I am just saying that we didn’t have any tape on hand, so we moved forward. Also, I made the call because I haven’t had any problems with my rack exposed in the past. If you are reading this overview of the install before actually installing the tent, buy some butyl sealing tape.
No photo of the tent open? :O
I can update the post with an “open” shot. We will have a bunch of open photos on the actual review and detailed look posts.
Sweet! 😀 Thanks for the reply…..
Awesome write-up as always. Are you daily driving this? How is the road noise? I can’t imagine this thing is silent. very curious to see what the road noise is with this and your thoughts on this being a permanent solution for an overland rig.
This is not currently my daily but I did drive it around for a couple of weeks. There is a whistle that comes in at 50mph. GFC does have a wind fairing they sell on their website for under $100 (PLATFORM WIND SKID). I am debating going with that but it’s not high on the priority list right now as the 4Runner sits in the garage all week. If it were a daily driver, I would for sure buy the fairing. I think this makes a great full-time rooftop tent especially if you are running short on garage space (nowhere to store an RTT).
Hey Brenan, is the garage height specs you posted with your lift and tire size as well? I am lifted on 285’s and want to make sure this fits in a 7′ parkade!
Yeah, that was floor to the main weather stripping. With the weather stripping gone, it would have bought me another 1″. For a parkade (parking garage) I am not 100% sure. I know my Stellar Rack + Storage boxes didn’t fit when I tried the garage at Montbleu in Tahoe. I can’t say if the GFC RTT would fit or not.