
Total Chaos Weld-On Lower Control Arm Cam Tab Gussets For – Maintain Alignment Specs When Off-Roading
The 3rd through 5th Gen 4Runner models have their alignment adjusted via 2 adjustable cam bolts that attach the lower control arm to the frame.
By turning the bolts, the lower control arms can be pushed toward or away from the frame at two points, thus adjusting the camber and caster. The cam bolts are held in place via steel tabs on either side of the bolt.
Unfortunately, on stock 4Runners, the tabs are relatively thin-pressed steel that can be fairly easily bent, causing the alignment to become easily off, requiring frequent trips to the alignment shop.
For a 4Runner that only sees paved roads, these are sufficient, but for a 4Runner that is often taken off-road, these tabs will eventually get bent.
Total Chaos provides an excellent solution to this problem through replacement tabs that are made of ¼” thick steel.
Find It Online:
- Total Chaos Lower Control Arm Cam Tab Gussets: Check Price
If you are familiar with disassembling the front suspension of the 4Runner and using a welder, then this will be a fairly straightforward upgrade that should virtually eliminate any bent tabs in the future.
Normally this procedure calls for using a drill and pry bar to remove the old tabs. I tried this at first and it was very awkward and time-intensive.
In this article, I’ll be showing you how to do this with an air hammer and angle grinder instead, making it MUCH easier.
ITEMS + TOOLS YOU’LL NEED:
- Welder
- Angle Grinder: Check Price
- Metric Socket Set: Check Price
- Impact Wrench or Breaker Bar: Check Price
- Air Hammer: Check Price
- Die Grinder or similar: Check Price
- Wire Wheels: Check Price
- Paint: Check Price
- Anti-Seize: Check Price
- Torque Wrench: Check Price
Additional Install Instructions:
ASSEMBLE GUSSETS:

The kit comes with the tabs separate from the backing plate, so they need to be welded together.
Insert the tabs into the side of the backing plate that has the text engraved onto it. You may have to hammer them in, I did not.
WELD GUSSETS TOGETHER

With the gussets held in place, weld a bead as shown in the photo to attach the tabs to the backing plate.
After welding, grind the surface flat.
FINISH WELDING GUSSETS TOGETHER:
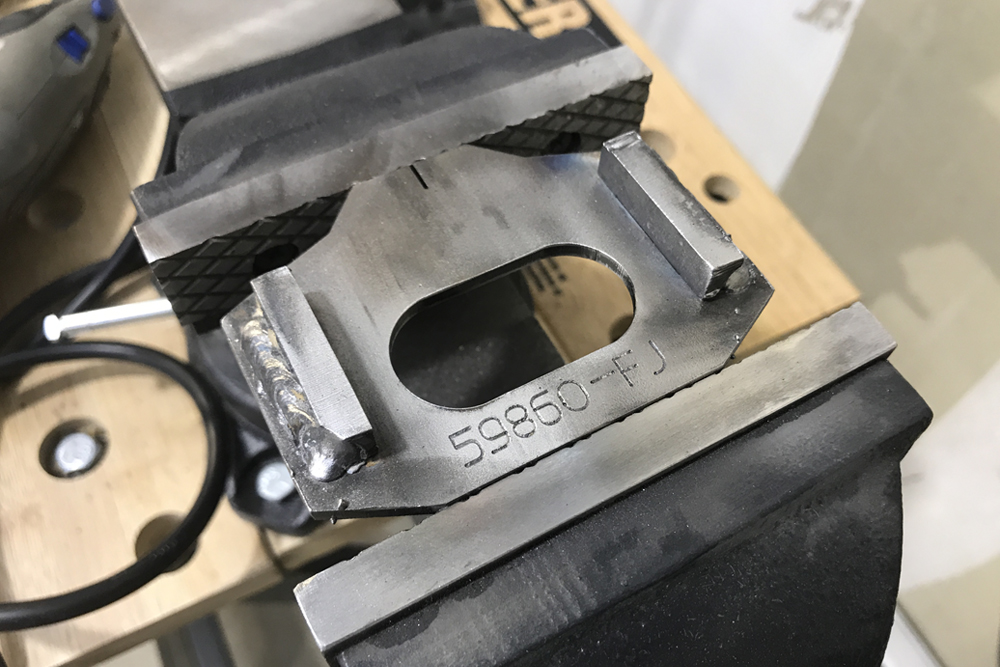
Flip the gusset over and weld the tabs on the outside edge.
Do NOT weld the inside edge. If there is any splatter on the inside surface, remove it so that the surface is flat.
MEASURE EXISTING ALIGNMENT

After completing this install, you will need to get your vehicle realigned. But to keep the alignment close to what it was before, measure the existing cam bolt angle.
You can do this by taking pictures of the cam bolt angle before disassembly, or you can measure the distance of the lower control arm to the frame or skid plates.
Next, jack up the vehicle and get it on jack stands.
REMOVE SWAY BAR MOUNTS

This will be different for a non-KDSS vehicle.
Remove the two bolts holding the KDSS to the LCA. There is a tab on the bottom that holds them on even with the bolts out, so you may need to use a floor jack to raise the LCA a few inches so that you can remove the brackets.
This is a good time to change out your bushings if they are starting to show signs of wear. Moog K200618 is a good option.
Once you’re re-installing everything, getting the KDSS sway bar back in place is always a challenge. You will need to open the valves on the KDSS accumulator assembly.
Using a floor jack to raise the LCA’s also makes this easier. If you are using a ton of muscle to do it, you are doing something wrong.
REMOVE SPINDLE BOLTS

Remove the two bolts holding the LCA to the spindle.
These are the two outermost bolts on the bottom near the brake disk. You do not need to remove the center nut. Support the spindle with a smaller jack stand or other objects.
REMOVE STRUT BOLT

Remove the nut holding the bolt on the bottom of the strut.
Once the nut it out you can tap out the bolt with a hammer and a punch.
REMOVE CAM BOLTS

Remove the two cam bolts holding the LCA to the frame.
Unfortunately, these bolts are infamous for seizing to the inside of the bushings. If you are unable to get them out, you will have to cut them out with a Sawzall and replace them.
When reinstalling them, I strongly recommend coating them in a liberal amount of anti-seize on all surfaces.
REMOVE STOCK TABS

The install procedure from TC calls for drilling out the 3 spot welds and then using a pry bar to pop them off.
This is very difficult because it takes a long time to drill out all 24 spot welds, and the inner tabs have the axle in the way of the drill, so you would have to remove the axle to get a good drilling angle.
Instead, I found that using an air hammer and angle grinder to be much faster, at only a few minutes per tab. Start by using a flat tool head on the air hammer to begin prying the tab away.
BEND TABS AWAY

Continue using the air hammer to bend the tab away as much as you can. When you hit the first spot weld you will probably not be able to continue with just the air hammer.
CUT SPOT WELDS

Use an angle grinder to cut the spot welds.
You won’t have to go very far to give the air hammer something to work with. Avoid cutting too deep.
FINISH REMOVING STOCK TABS

Once the first spot weld is cut, you’ll need to remove the rest of the tab using only the air hammer.
RESULTS AFTER REMOVING TAB

Once the tab is removed, the surface on the frame will look something like this.
It will need to be cleaned up with an angle grinder flap disk.
GRIND SURFACE FOR WELDING

Grind the surface flat and clean as shown in the photo above.
You should also grind clean the outside edge of the mount on the frame. A weld bead will be going here later.
MOUNT NEW TABS

Reinstall the cam bolts, but with the new gussets held in place.
Align the inside slot of the gussets with the slot on the frame. There are two different shapes of gussets provided.
It should be clear while mounting them in place in which gussets will fit where.
WELD NEW GUSSETS

Weld the new gussets in place.
Place a weld bead on the outside edges of the gusset. NOT the top and bottom as this could restrict the movement of the cam bolt.
GUSSETS WELDED IN PLACE
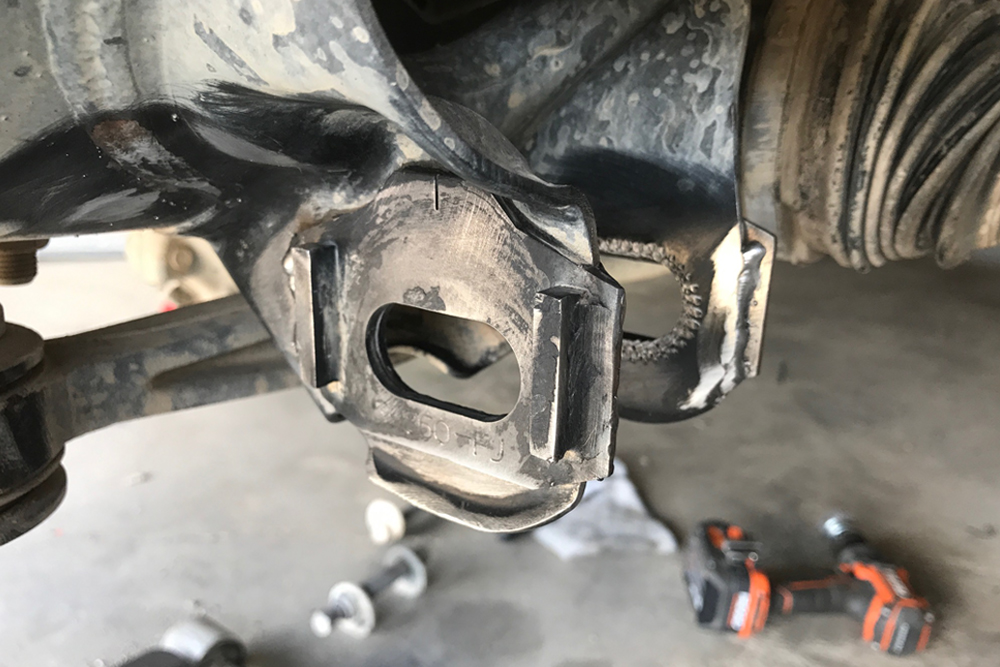
Here you can see where the gusset was welded.
GRIND INSIDE OF MOUNT

You will likely have to grind the inside of the LCA mount flat so that the bushings can fit back in place.
GRIND GUSSET SLOT

If the gussets and the frame slots are misaligned the bolt may not be able to slide smoothly from side to side.
Test if the bolt can slide, and if not, grind the inside of the slot using a die grinder or similar tool until you can.
PREP FOR PAINTING

Use a wire wheel to knock off any weld slag and prep the surface for painting.
I also wiped it down with acetone, so the paint bonded well.
PAINT

Paint all bare surfaces.
I’ve had extremely good results using Krylon Rust Tough Semi-Flat Black Paint. I’ve been using it for all my metal painting projects and found that it goes on evenly without primer, dries quickly, and is about as durable a paint as you can get for a non-2 part paint.
REASSEMBLE EVERYTHING
Once the paint dries, reassemble everything in reverse order.
If you loosened the KDSS accumulator valve bolts, don’t forget to tighten them before starting the car.
TORQUE SPECS:
- Cam bolts: 129 ft/lbs (after adjusting cam bolts to close to the original position)
- Bottom of strut nut: 70 ft/lbs
- LCA attachment to spindle bolts: 118 ft/lbs
- KDSS bracket bolts: 55 ft/lbs
- KDSS accumulator valve bolts: 80 in/lbs
- Wheel lugs: 76 ft/lbs
FINAL RESULTS
My 4Runner sees allot of off-road use.
The stock tabs were beginning to bend and were giving about ¼” of play side to side. I installed this upgrade a few weeks before going to Moab, where I did a number of rough roads including the 7-mile rim, Poison Spider, Hells Revenge, and Fin’s n things.
During the trip, I had to keep up with the rest of my group consisting of a lifted jeep with massive tires, so I was hitting the rocks pretty hard.
After the trip, the cam bolts are still rock-solid with no indication of movement.
Hello. I’m installing TC long travel kit in Toyota hilux. My question is that can we reinforce and use the same gussets.as it’s hard to get parts in my area?
Thanks for the great write-up. I have bent and cracked tabs on my 3rd gen and was considering this mod. My only concern is whether or not the 3rd gen LCA mounts are stout enough to handle the air hammer and grinder. Not much room for error when the fram is involved…
I took my 5th gen to my local dealer to install the Bilstein 6112/5100 lift with ome springs in the back. They had performed a wheel alignment two weeks earlier when I put 17-in wheels and larger tires on the rig but before the lift. When they finished the lift install they were unable to complete a wheel alignment because the cam tabs had been bent flat by the rookie tech who had performed the wheel alignment two weeks earlier. 🤦♂️
Now I’m stuck in purgatory driving a loaner Yaris while my brand newly lifted rig sits at the dealer while they try to figure out how to unf*** the situation.
Needless to say very frustrating but I really appreciate this write-up as it sheds so much light on what the problem was and gives me a whole lot of information to use when I talk to the dealer on Monday about however they are proposing to dig themselves out of this one.
Thanks!!
Great write up! What type welder did you use? I’m thinking of buying a flux core wire welder because there more affordable, you think it would work for this job?
For this project I used a cheap eBay flux core welder to put the tabs together and had my friend use his gas welder for attaching the tabs. The flux core could have worked for attaching then as well, but you will be doing more grinding to remove all the slag left over.
Bryson,
Killer write up man. Are you going to tackle your own alignment after this or do you take it in?
I took it in. As far as I know, its virtually impossible to get a good alignment without the very expensive equipment the shops have.
Sound about right. Thanks!
Whoa! Great write up. Not that many would tackle this themselves, but kudos dude!
While I’m not skilled in welding, I’ve been around the industry for part of my youth. My grandpa was an industrial welder for 30 years. He’d like your work. I think that’ll do it!
Cheers and safe travels.