
Early 5th Gen (2010, 2011, 2012, and 2013) to 2014+ 5th Gen Toyota 4Runner Front-End Conversion
This installation is going to be the same for all early generations:
- 2010
- 2011
- 2012
- 2013
Parts List:
- Trail Bumper # 52119-35914
- Trail Valance, Silver # 53901-35240
- Trail Valance, Black # 53901-35250
- Valance Retainers x13 # 75392-35220, NAPA # 665-5135 (Same as Fog Light)
- SR5 Bumper # 52119-35912
- Bumper Reinforcement # 52021-35140
- Reinforcement Extension, Left # 52026-60050
- Reinforcement Extension, Right # 52025-60050
- Energy Absorber # 52611-35040
- Headlight Right # 81130-35541, TYC # 20-9511-00-1
- Headlight Left # 81170-35571, TYC # 20-9512-00-1
- OE projectors and light pattern are better than TYC
- Headlight Grommet x2 # 90189-05142
- Can use NAPA # 665-1050 (nylon nut) and # 665-2196 (screws)
Support Brackets
- Right # 52102-35100
- Left # 52103-35110
- Center # 52521-35060
Side Retainers
- Right # 52115-35151
- Left # 52116-35151
Fog Light Assembly
- Right # 81210-12230
- Left # 81220-12230
Fog Light Bezel
- Right # 52127-35100
- Left # 52128-35080
- Fog Light Retainers x2 # 75392-35220, NAPA # 665-5135 (Current chrome strip has a few)
Grille
- Upper Grill # 53101-35080?? (Can come painted in factory colors)
- Lower Grill # 53112-35060
Parts you can modify instead of buy (See below for instructions how):
Fender Liner
- Right # 53875-35150
- Left # 53876-35150
- 2 Wire Turn Socket # 90075-60028
- Or Dorman # 86424 (small spade terminals)
- Dorman # 02254 (3/4” bypass cap)
- Deflectors
- Right # 53293-35020
- Left # 53294-35020
The 2014+ Front Bumper Reality
When looking for a 4Runner the 2014+ SR5/Trail front end always appealed to me. Unfortunately, the features I was looking for were only available on the Limited model which still did not have the front end I desired. Because money was a factor I ended up in a 2010 Limited that had everything I was looking for. Well, almost.
I still really liked the look of the 2014+. I came across a post of someone that had done a 2014+ swap and the thought that I could do this to mine took over. I started a parts list to figure out cost and as I started adding up everything I realized my dream would probably never come true.
Then one day while out wheeling with my family I came across a group of 5th gens. One of which had a full steel bumper so I asked: “what did you do with your old stuff?” When he replied “it’s just sitting in my garage, you want it?” my eyes lit up. My estimated budget was just cut in half and my dream could become a reality.
Whether you bought your 4Runner before 2014, or the SR5/Trail models didn’t have the features you wanted or your budget at the time just didn’t allow it, there is no denying the 2014+ front end (non-Limited) is the best looking and has the best potential to look even better.
Well, lust no more! In this article we will walk you through, step by step, how to swap your 2010-2013 to a 2014+. This write-up is not to achieve a factory OE finished product, simply the necessary parts and procedures needed to get the 2014+ to fit and look good. Along with a few budget saving options.
Buying Used Parts
Best advise to save money is “buy used”. A lot of people getting steel bumpers don’t care what happens to there old parts and you can pick them up cheap, or free! A full steel bumper requires you to remove pretty much everything from the headlights down.
If you bought all these parts new you would be over a grand so if you pay someone a couple hundred for them, and you are lucky enough to find the correct color bumper, you will save tons. Contact a few of your local off-road specialty shops that sell/install bumpers and tell them what you want to do and see if they have anyone getting a bumper soon.
Also, check Craigslist. You can find many parts on Craigslist in either new or near-new condition.
Bumper Swap Installation
For reference, it took me, by myself (taking notes and pictures) about 6 hours. Granted I had all the trim pieces (fogs and bezels, lower grill, trail valance) already on the bumper.
Once you have everything ready, just pick a day and make it happen.
Note: When referring to “bolts” (10 mm, 14mm), this is the size socket needed and not the actual size of the bolt. Please read all of the instructions before starting.
Organize Bolts
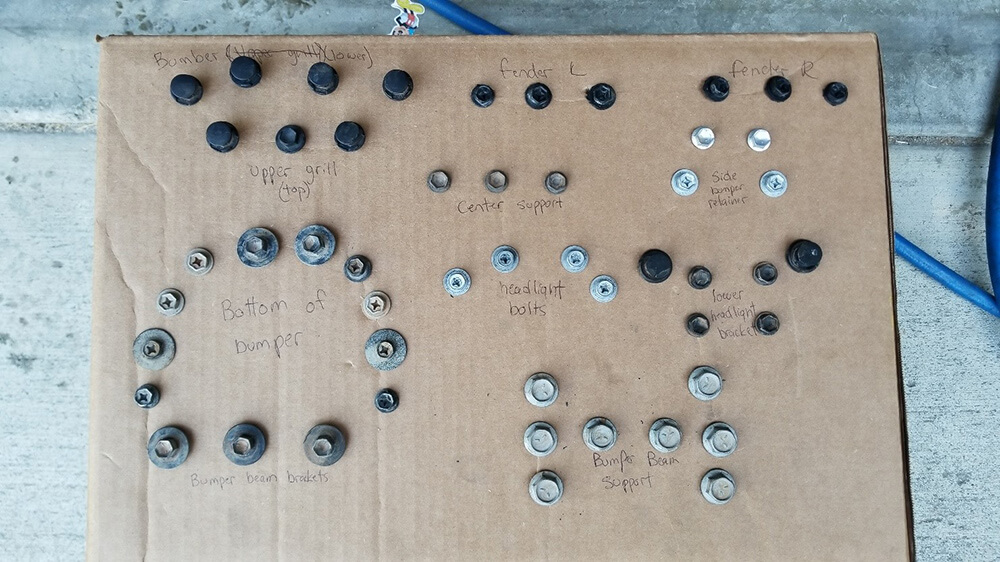
Make sure to keep track of the bolts as you’re pulling them out so you know where they go later.
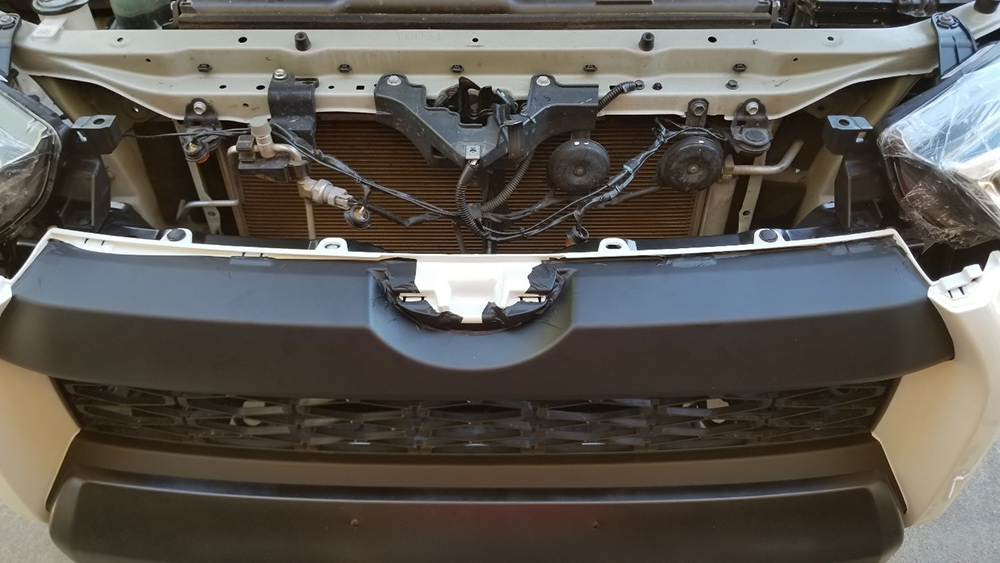
Radiator cover
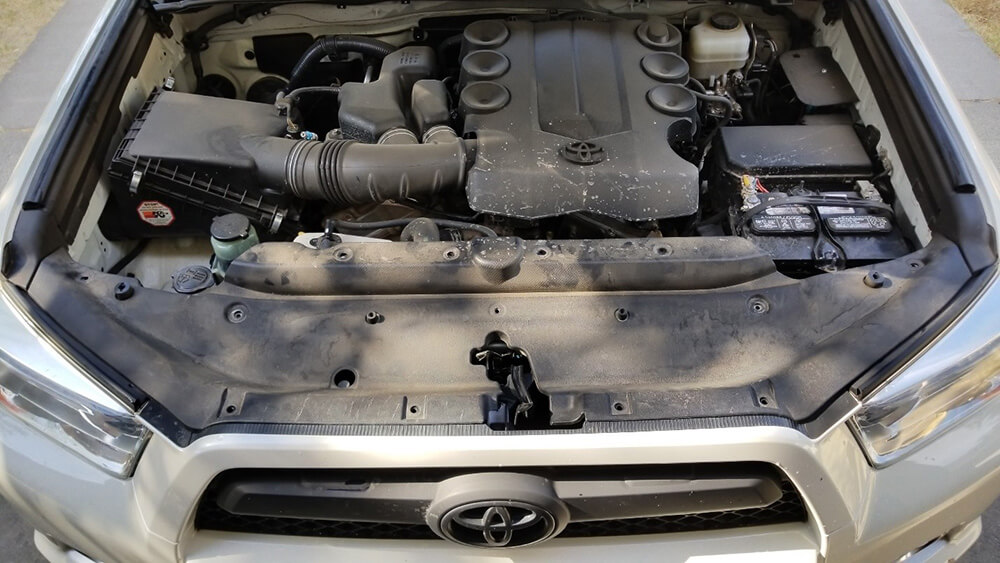
Remove the radiator cover piece held in by 13 push pins. To remove push down the center of the pin. Pull up one at a time being careful not to drop any.
With a 10 mm socket remove the center bolt for the upper grill along with the 2 push Clips. These come up easy with a small screwdriver underneath.
With the same small screwdriver remove the four lower push Clips holding the bumper to the center bumper support.
Remove Fenders
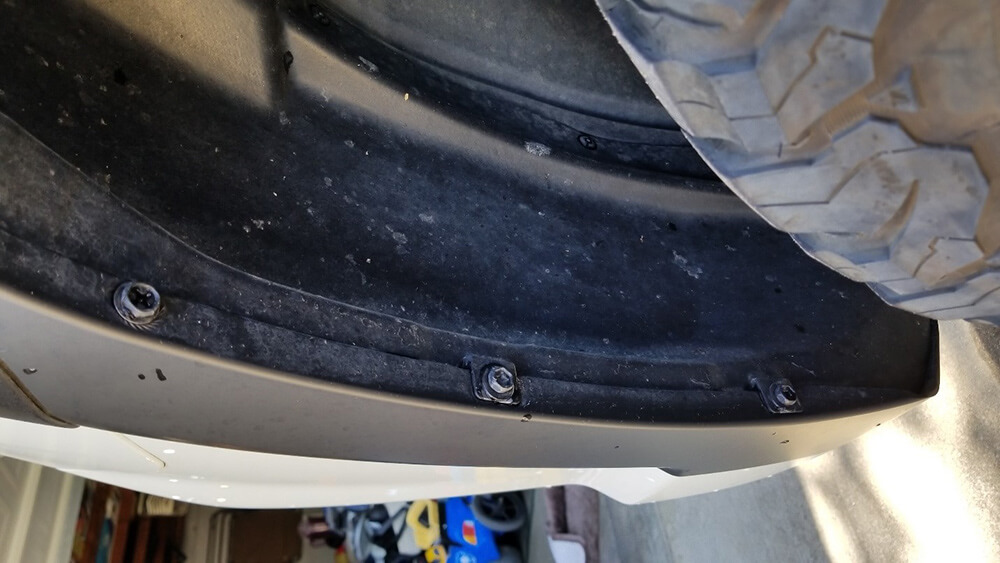
Move over to the fenders and remove the three 10 mm bolts (per side) to the fender liner. Go underneath the 4Runner and remove the five 10 mm bolts on each side holding on the bumper.
From underneath pull the fender liner back enough that you can reach in and disconnect the fog lights and running lights.
If you’re running any aftermarket lights that were secured to the bumper you need to disconnect those as well.
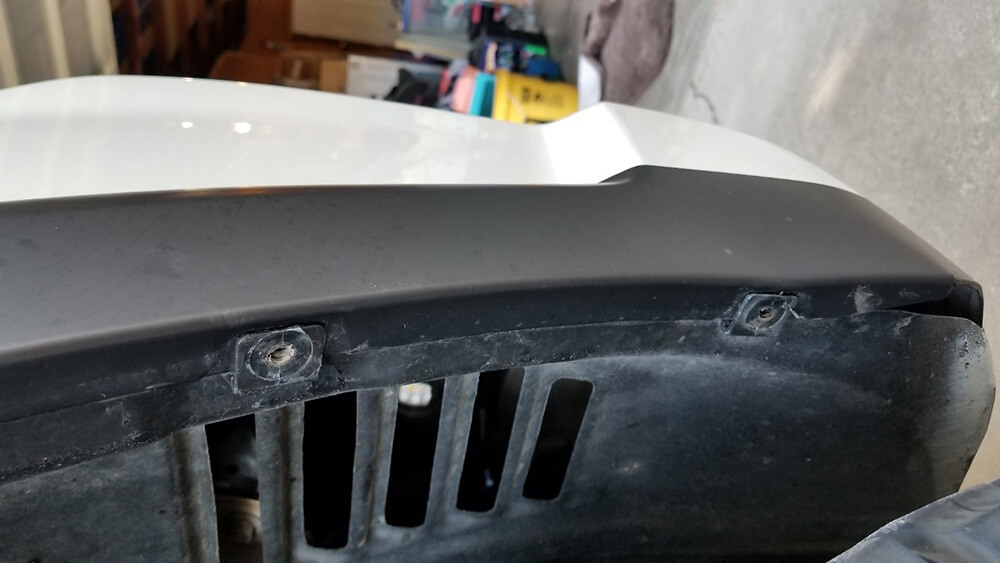
With a larger screwdriver/ trim tool go back to each Fender and push the black plastic Clips off the fender. There are two on each side.
Remove Bumper
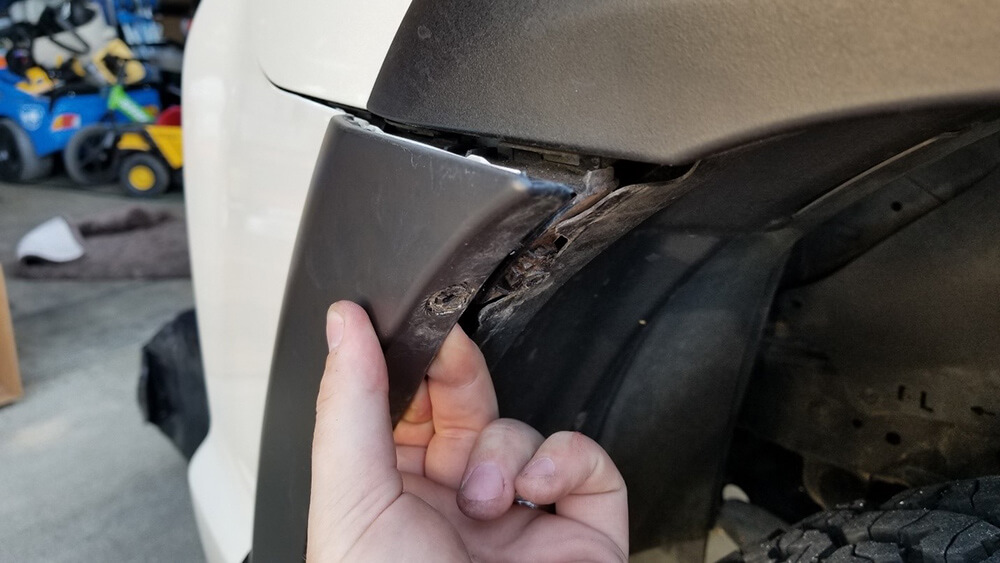
Before you pry the sides of the bumper off put something padded underneath in front of the bumper to catch it in case it falls off.
To remove the front bumper place a hand in between the fender liner and the bumper. Then pull the top towards the tire until it releases and then pull down slightly for the rest of it to come undone.
Set the bumper assembly aside, gently. You may be able to sell it.
Center bumper support
Next, remove the three 10 mm bolts holding on the center bumper support and set it aside.
Remove Side Plastics
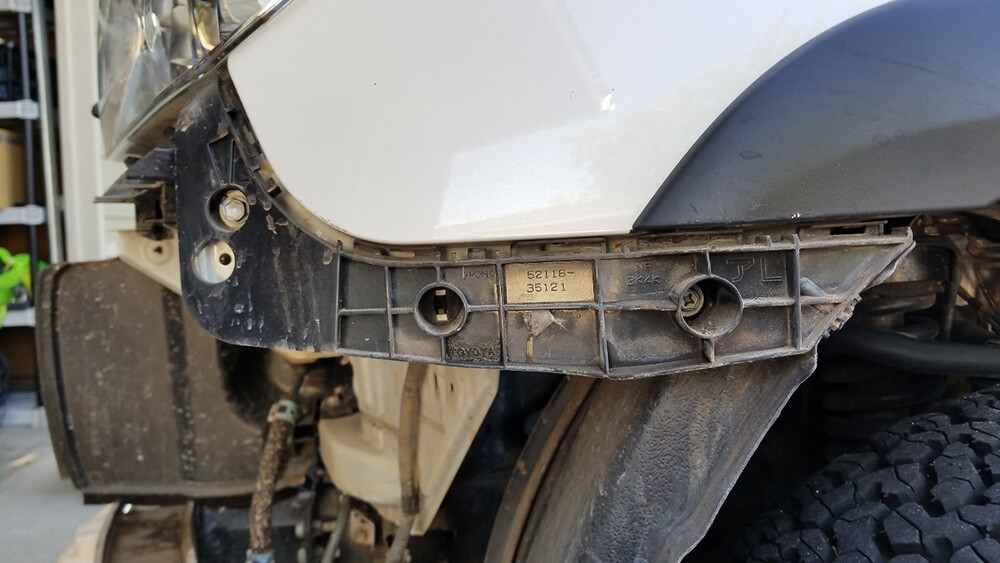
Remove the two 10mm bolts on each side bumper retainer. Tilt forward slightly and with a small screwdriver push up on the bottom tab to release the clip.
Remove Headlights
Moving on to the headlights. Move aside the plastic cover on the side of both fenders to uncover the 10 mm bolt behind them. The other bolts are easy to spot.
Remove 2 Metal Bracket Bolts
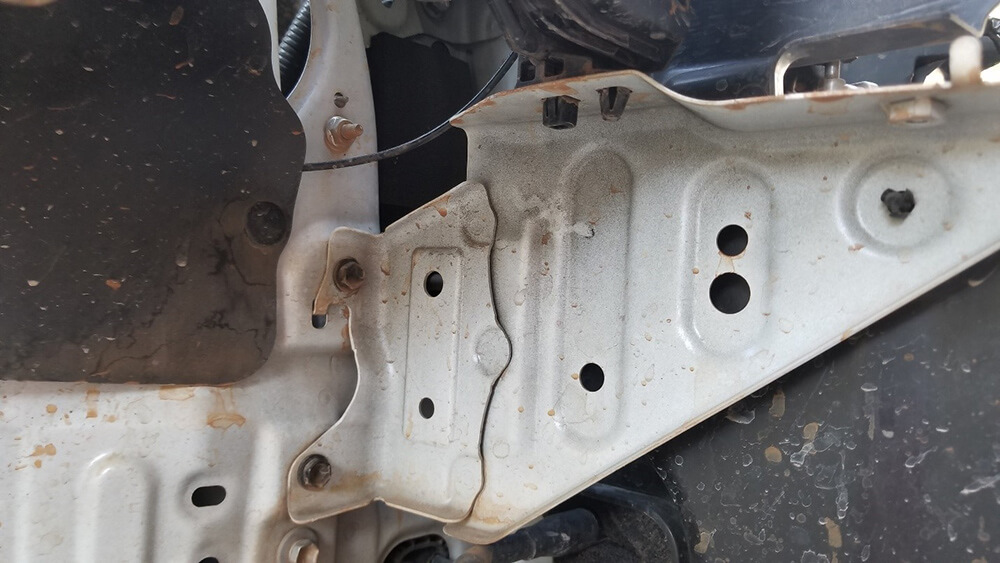
On the bottom side of the headlight, there are two plastic Clips attached to metal brackets. These metal brackets have to be removed anyway so just unbolt the two 10 mm Bolts from the subframe and remove the whole assemblies as one.
If you are transferring any bulbs I suggest putting them aside to keep them safe. Or in the new housings.
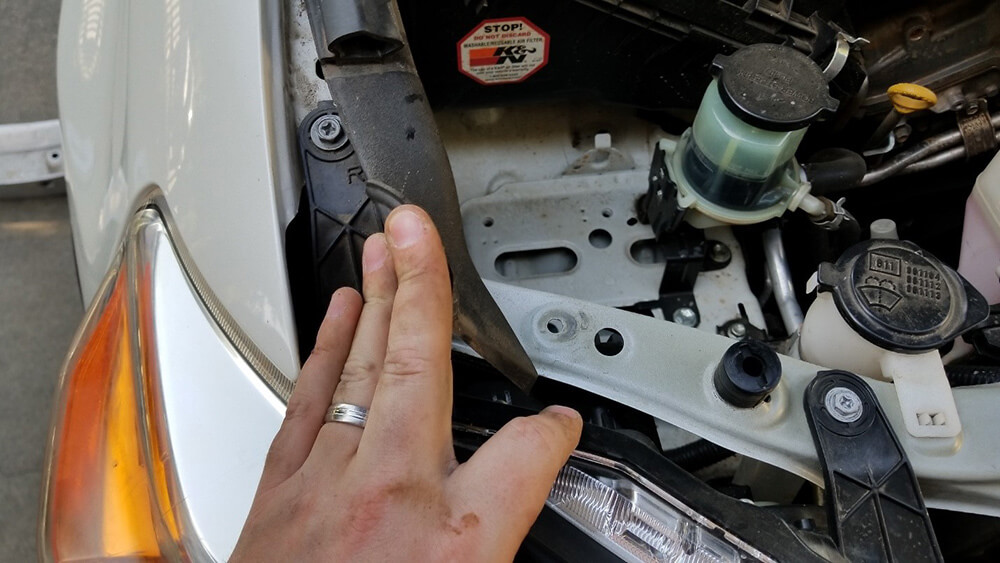
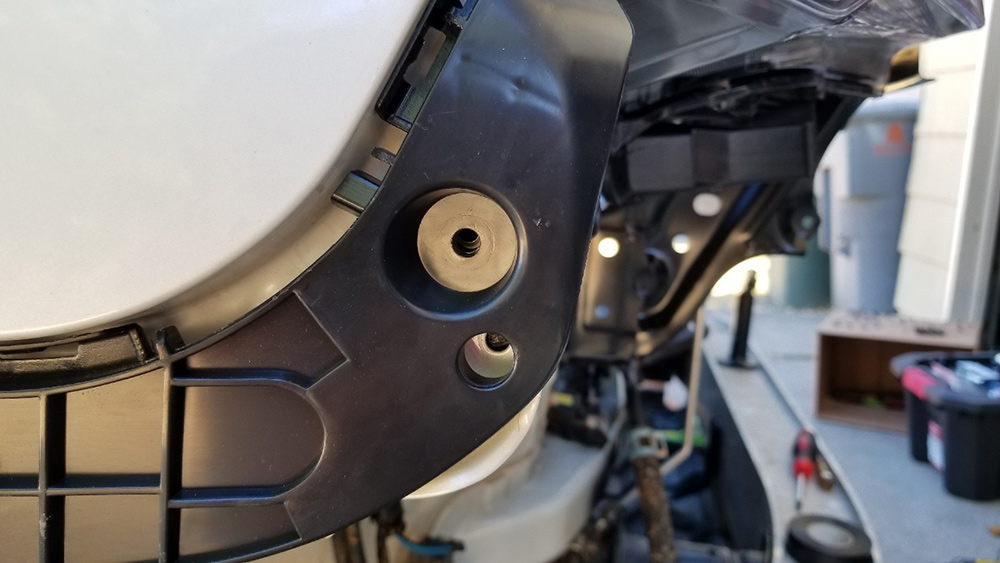
Remove Plastic Cover
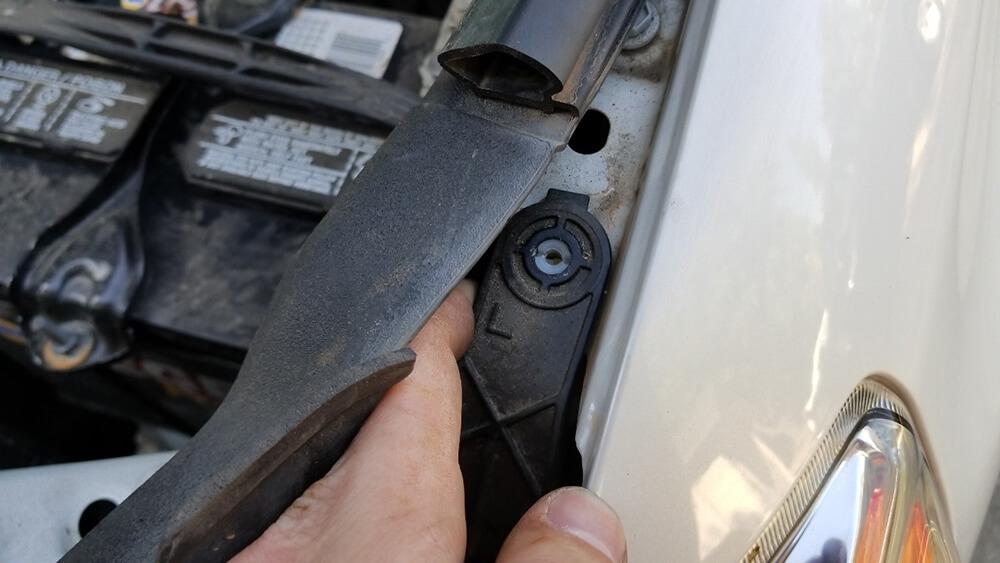
If you move the plastic cover that was hiding the 10 mm bolt holding in the headlight assembly you will see the headlight tab sits over a raised plastic ring, where the bolt went. You will need to lift that tab over that piece to be able to move the headlight assembly forward.
Gently move the headlight assembly forward so that you can disconnect the parking light on the side that you were unable to reach before.
Set the headlight assemblies aside.
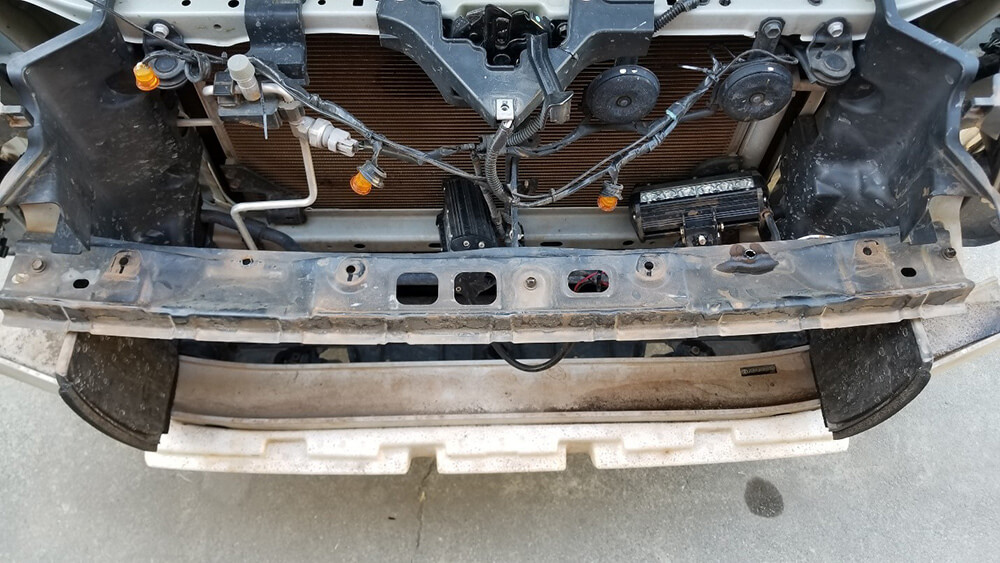
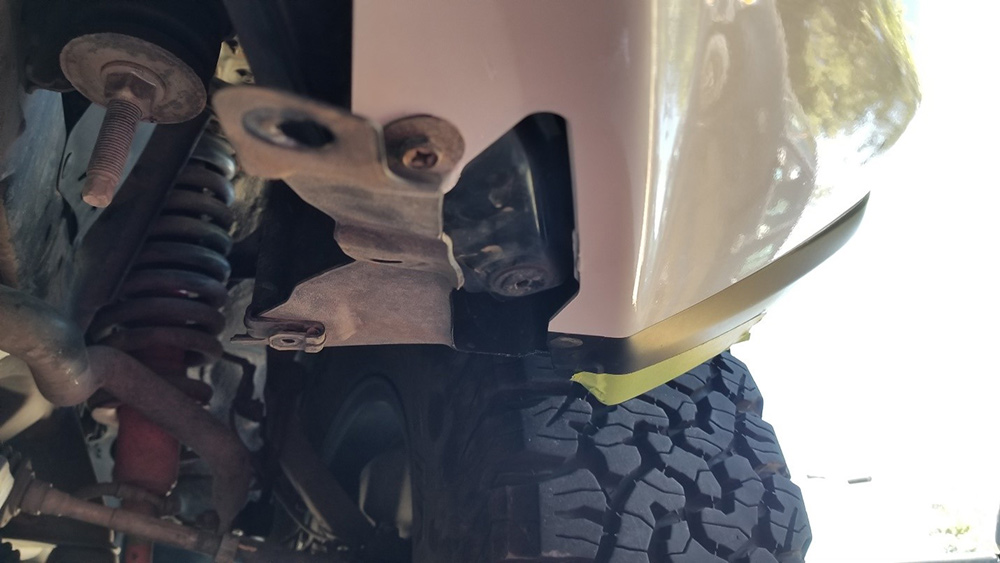
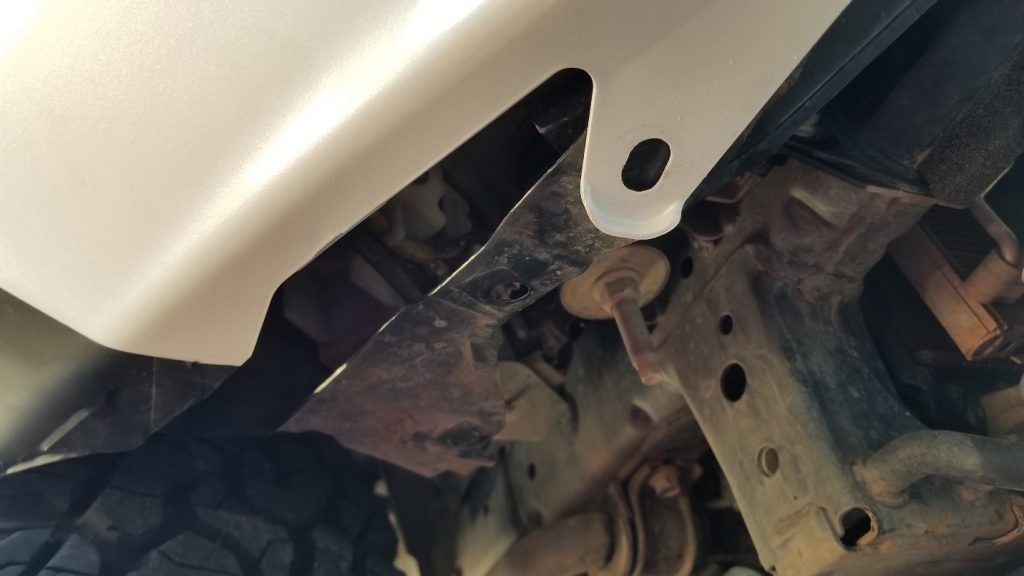
Bumper support and splash pan
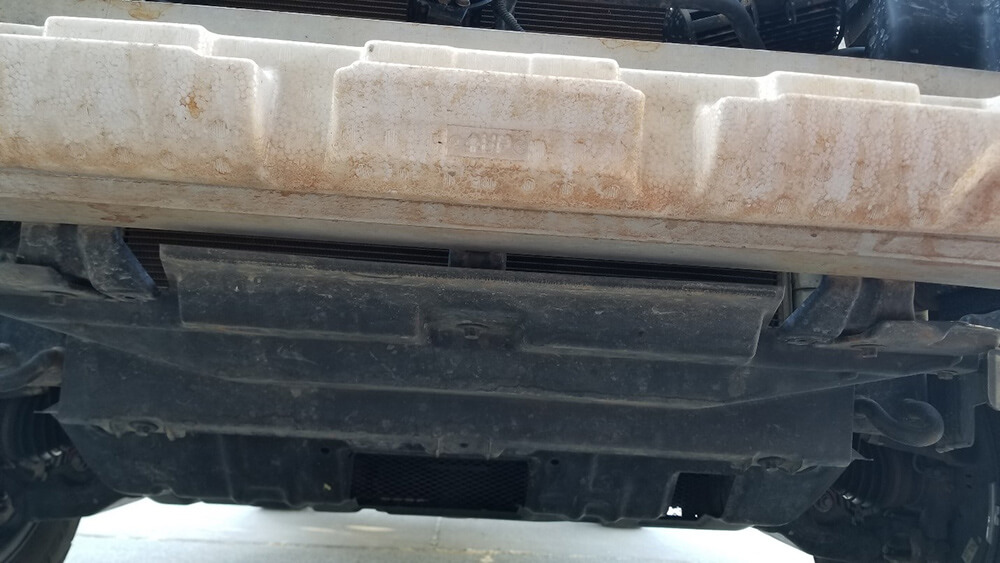
Removing the bumper support you will have to go back underneath and remove the three bolts with the 10mm holding on the splash pan to the brackets attached to the bumper support.
On the bumper support there are four 14 mm bolts on each mounting post holding it in place. You will need a breaker bar for these. There are catch tabs on this piece to prevent it from falling.
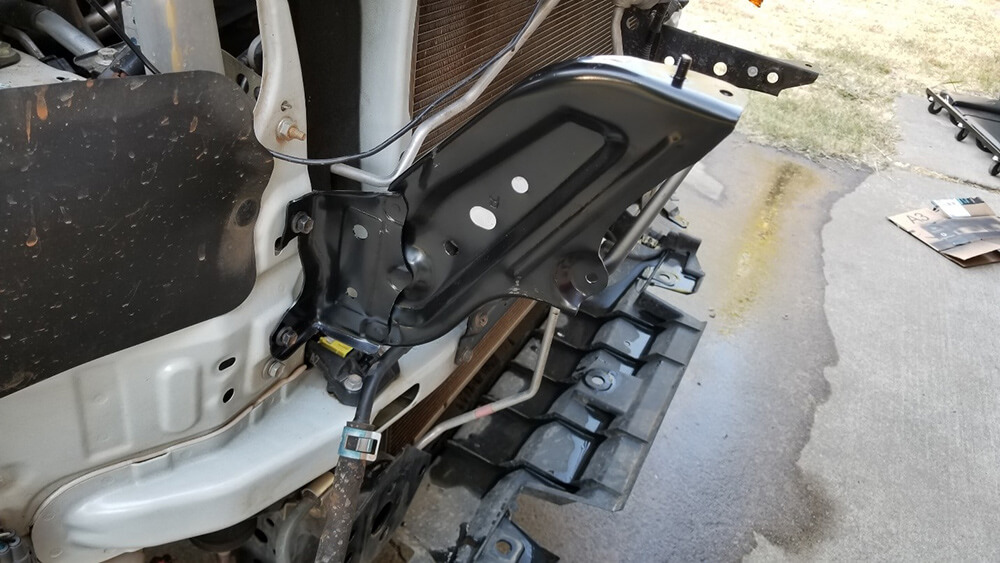
Bumper plastic trim pieces
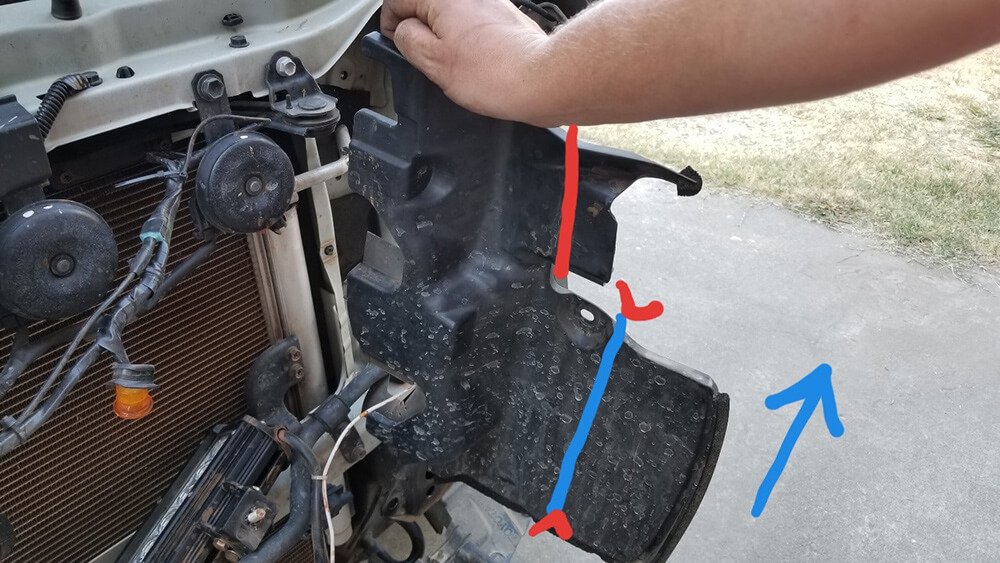
Remove the two plastic trim pieces that are between the radiator and where the headlight assemblies were. Simply wiggle it forward. These can be modified to work if you want to save $150. Cut the top piece off and notch the top and bottom of the other mark. With a heat gun warm along the blue line area and bend towards the outside to about a 45-degree angle.
Optional Cleaning

Now that you’ve removed everything it would be a good idea to clean it all off before you put on any of the new parts. I took this time to paint any parts that will be noticeable black.
2014+ Bumper Installation
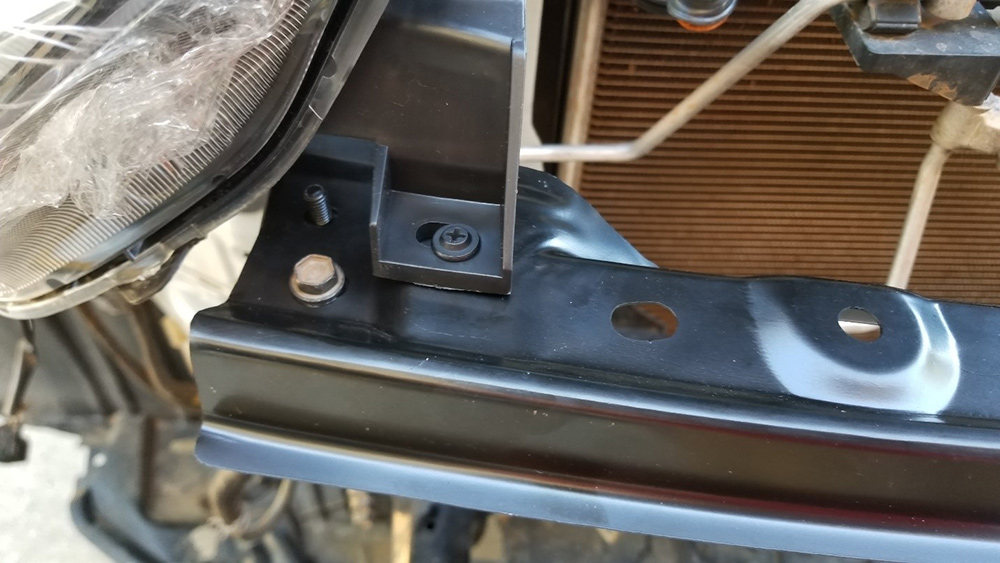
Reconnecting Metal Bracket
Putting on the bracket that was attached to the bottom of the headlight assembly I had to ream out the bottom mounting hole, it was a little small for some reason.
Using the two bolts that came out, attach the brackets. Do not over tighten the bolts as they will break off. If this happens the center bolt that came off the center bumper support bracket is not reused and is the same size.
Mount the center bumper support bracket with the two outer 10 mm bolts.
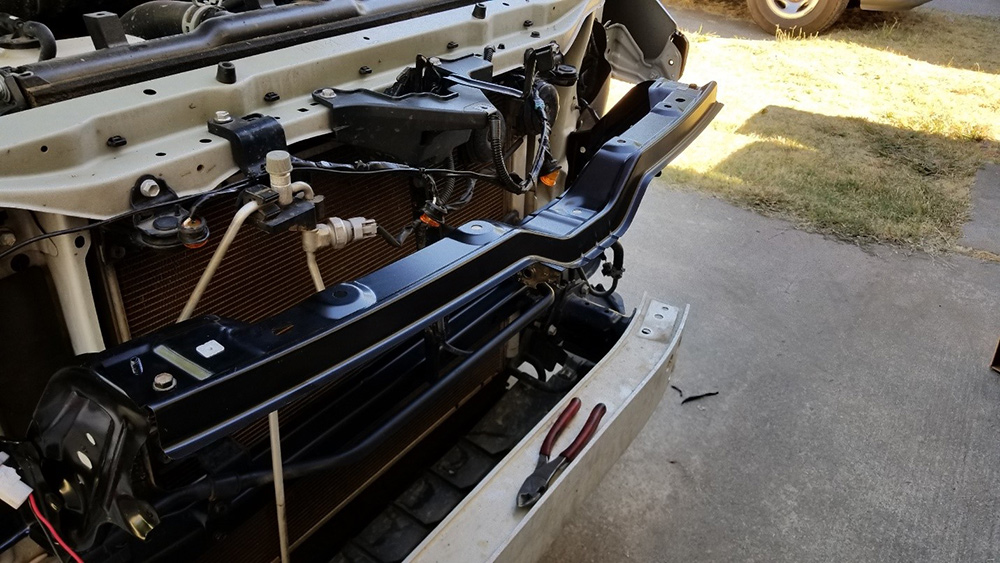
Bumper beam and mounting brackets

If your bumper beam and the mounting brackets for it came separate, then mount the brackets first using the four old 14mm bolts (per side), then bolt on the bumper support beam with the three 14mm nuts (per side). Next put the Styrofoam piece into the bumper beam support. This goes in with the flat side up.
The wiring going down to the fog lights and the turn in the bumper will be Too Short if you leave them as is. you have to cut the harness, separate the turn signal wires and pull them up to the top.
Electrical Tip
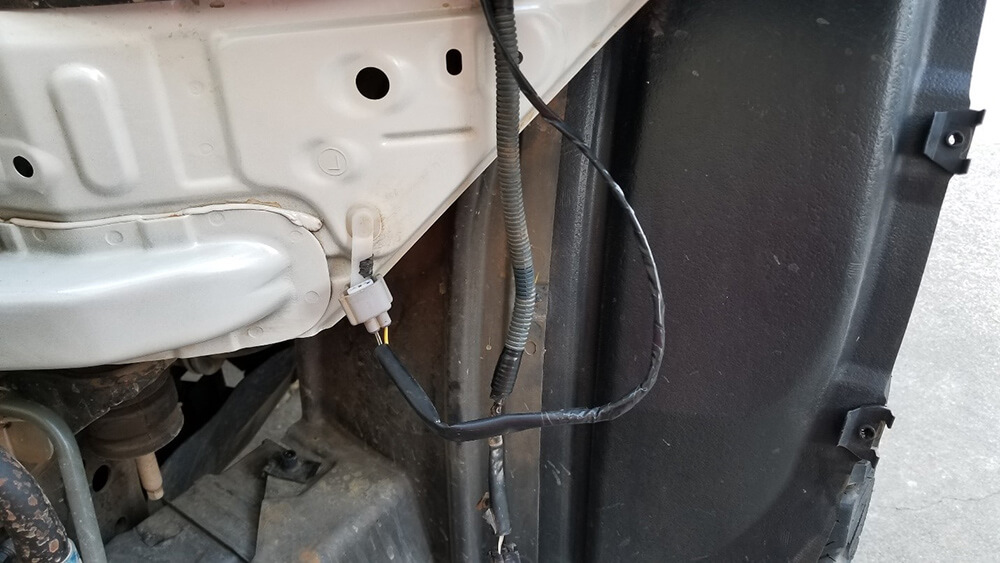
Be careful not to cut any of the other wires. Rewrap the wires with electrical tape when you’re done.
Headlights
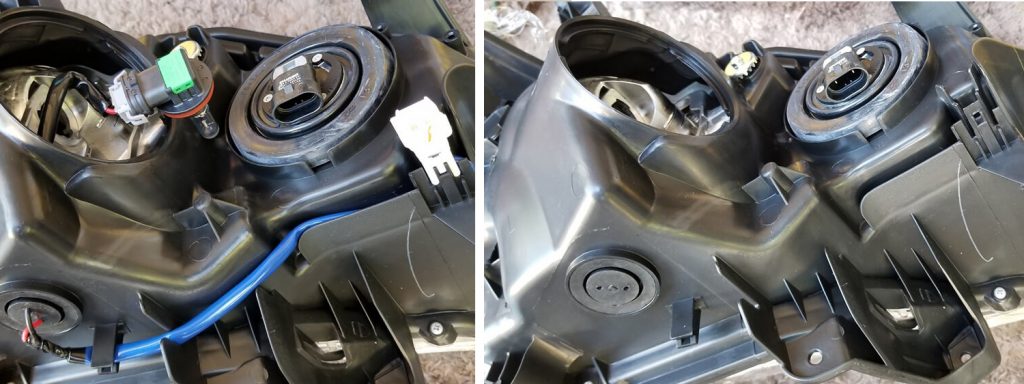
Put your desired bulbs into new headlight assembly if you haven’t already. The low beam comes pre wired to a plug that you do not have. Simply unclip the connector, take off the housing cover, unclip it from the bulb, and pull out the grommet. Cut the wires at the grommet and pull the other side thru. Keep this wire harness for the next step. Put the grommet back in place.
The new headlights come with a three wire connector for the turn signals/running light. The current wiring only accommodates two so you have to buy the adapter to convert it over or make up a connector that utilizes all three terminals.
Headlight Wiring/Terminals/Connectors
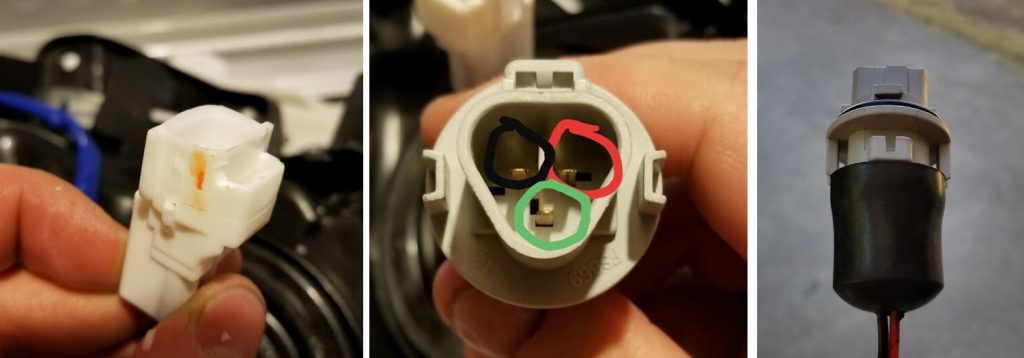
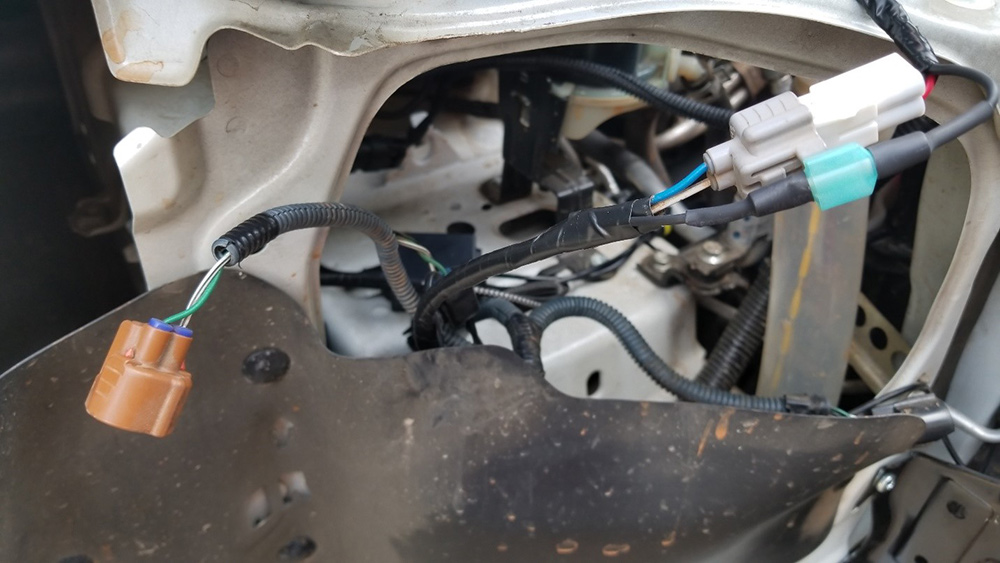
To do this take the removed wires from each headlight and using the connector that was on the outside of the housing, trim the lock tab back and remove the 2 tabs on either side. This allows it to plug into your existing plug and gives you 2 wires.
I attached two small female spade terminals to these, ran them thru a 3/4 rubber cap and attached them to the terminals inside the connector. Looking at the connector (2 on top 1 on bottom) I placed the black wire to the top left and the red to the top right.
The bottom connection will be wired for the running lights (daytime, if you do the switchback, led mod). To get power for this tap into the green wire going to the parking light (outer light) on each side. I put an inline spade connector in case I ever need to disconnect it later and wrapped it with the other wires going to the connector using electrical tape.
Mounting the Headlights
To mount the headlights, you will first need to mount the side bumper retainers. Line up the center piece and push it in place. Install the 10mm bolt on the tire side to secure it in place. The second bolt that came out of the original one can’t go in until you have the headlight in place.
Headlight grommets
To mount the headlight to the center support bracket you’ll need to put the headlight grommets in first. I used nylon nuts.
Install Headlights

To install the headlights simply set them in place, keeping an eye on the fender side, and secure the mounting tab over the plastic ring on the fender.
Keep a hand on the headlight assembly and put the two 10mm top bolts back in but do not tighten just yet. The headlight assembly has a little plastic nipple that needs to line up and go into the side bumper retainer.
Once that is done you can put in the last bumper retainer bolt and then tighten the upper bolts. Last mounting point for the headlight is the screw that secures it to the bumper center bracket.
Bumper Installation
I suggest putting painters tape on the side closest to the fender liner so that you avoid any scratches or sharpie marks later. Also, put something underneath where the bumper is going to be sitting in case it slips before you have it secured.
Lift the center of the bumper up and over the center bracket. Line up the holes and using the four retainer Clips that came out, secure the bumper to the center bumper support.
Go To Each corner of the bumper and snap it into place. Remember to pull back on the top of the bumper corner like you did to remove to get it in place on the bumper retainer. Simply push the bumper in to lock in the other tabs.
Upper Grill
Align the two tabs on either side with the bumper and slide the upper grill into place. On the back side there are four black plastic clips that also go through the top of the bumper, make sure those are in place as well. Install the two retainer Clips and one 10mm bolt on the top of the upper grill.
At this point you want to test fit everything and close the hood make sure clearances are proper.
Make sure you plug in your fog lights if you haven’t already.
Trimming the fender liners
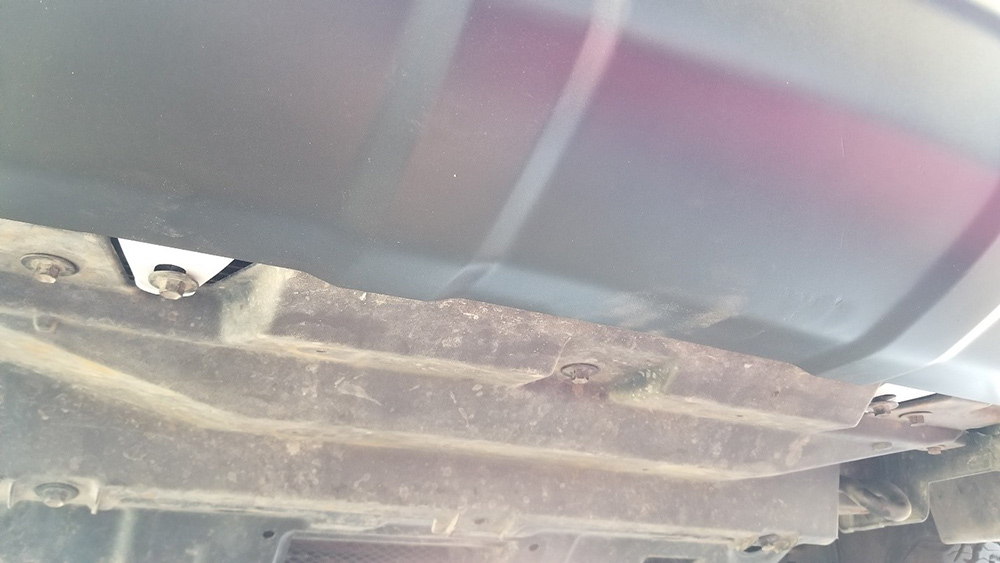
Go underneath the vehicle and put in the three 10mm bolts that secure the splash guard to the bumper support. You can also put in the two 10mm bolts for the bumper to the bumper support along with the one for the bumper to support bracket on the driver’s side.
There are splash covers underneath that are bolted in on either side with three 10mm bolts. These pieces will not be used and need to be removed. Keep one of the bolts for later.
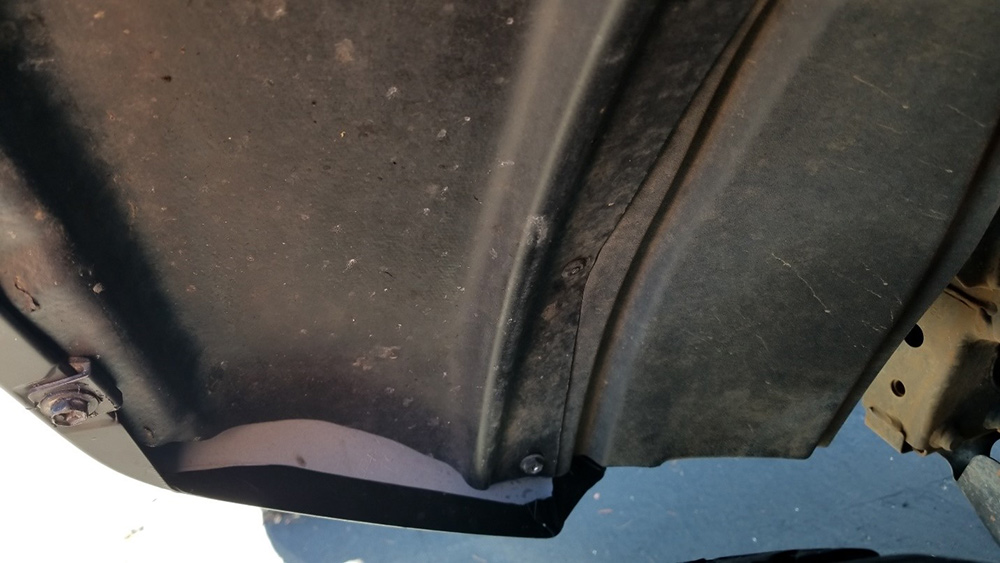
Fender liner cuts
Next, pull the fender liner up to the bumper and mark with a pen to show where you need to trim. Keep in mind that the fender liner goes inside the bumper so you’ll want to cut it about a 1/4” in from your line.
Do NOT cut all the way down
When you come to the first little lump in the plastic, cut straight down and out so that you can test fit the outside. You will come back to this after.
Two plastic fender liner clips
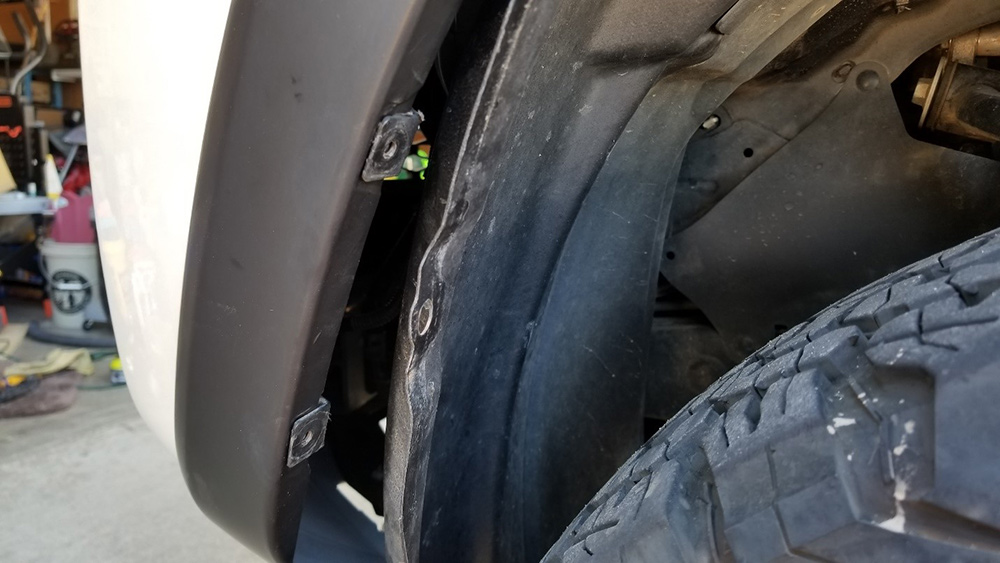
Before you put the fender liner back behind the lip of the bumper make sure to put on the two plastic clips (per side) that secure the fender liner to the bumper. New holes will have to be made into the fender liner to accommodate this new location.
Bumper Screws
Put in the top screw that holds the bumper to the bumper retainer. Next put in the other two screws that will hold the liner in place to the bumper. On the driver’s side the liner is two pieces that over lap.
You will need to secure those two pieces together with either a screw or rivet. You can use one of the bolts that came off the splash pan piece you removed earlier. It’s not a pointed screw so make a pilot hole.
Plastic Strip on driver side
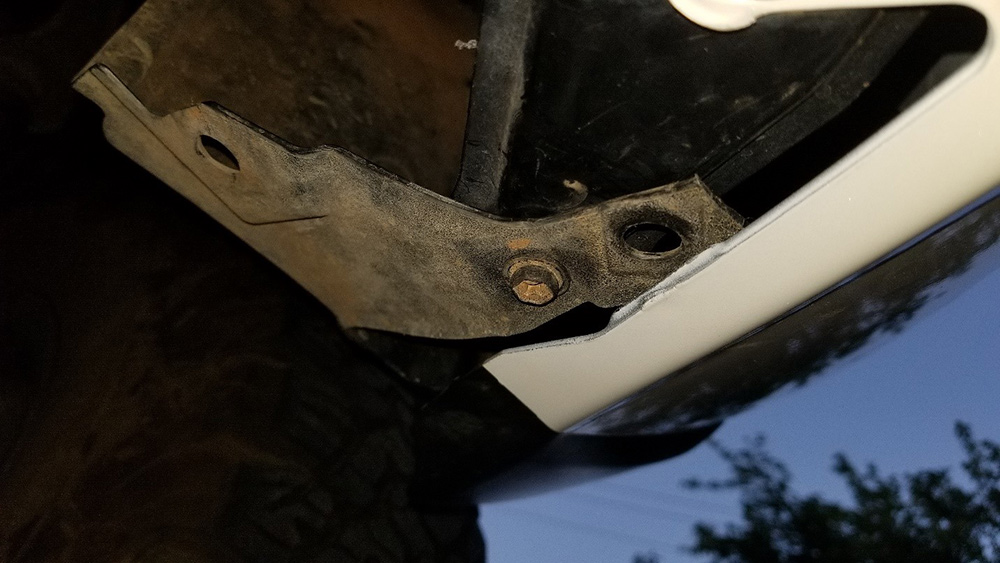
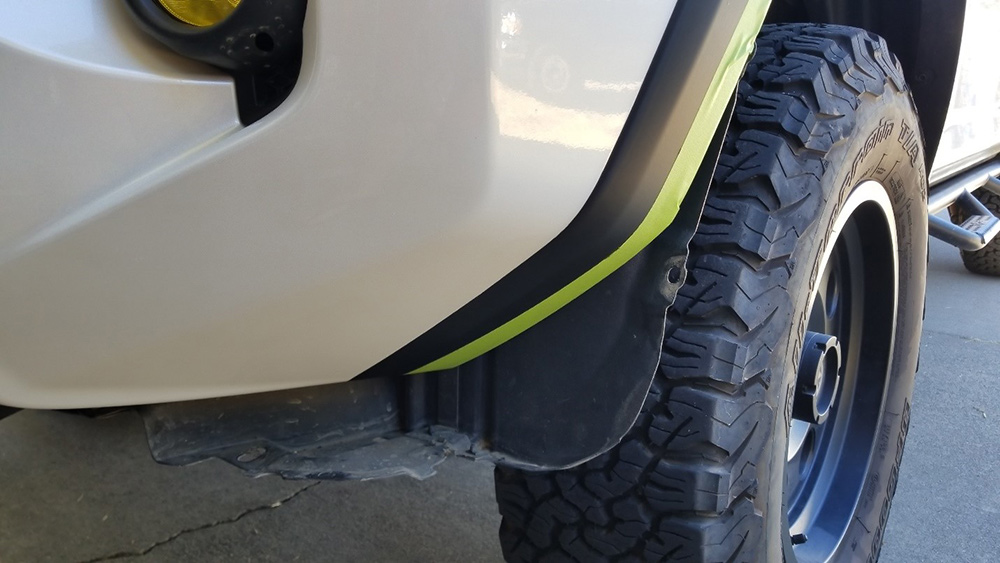
On the driver side leave a strip of the flat plastic to secure to the hole on the bracket coming off the bumper beam. Trim the remainder of the fender liner to look clean. To prevent tire rub, on the strip of plastic you left make a new hole behind the current one about 1/2 past the step in the plastic.
Leave the same strip on the passenger side
This side does not have the same mounting point as the other side does so you’ll have to secure the plastic strip that you leave behind to the bolt for the bumper. Put the strip between the bracket and bumper then push it forward. Mark it with a pen then pull it down and drill a hole big enough for the strip to fit over the raised plastic on the bracket. Secure down the 10mm bolt.
When you have the fender liners in place push them back and forth to see if there is any rubbing on the bumper. Trim as needed.
Reinstall any lights or wiring you had from before. Before you install the radiator cover, make sure to readjust your headlights.
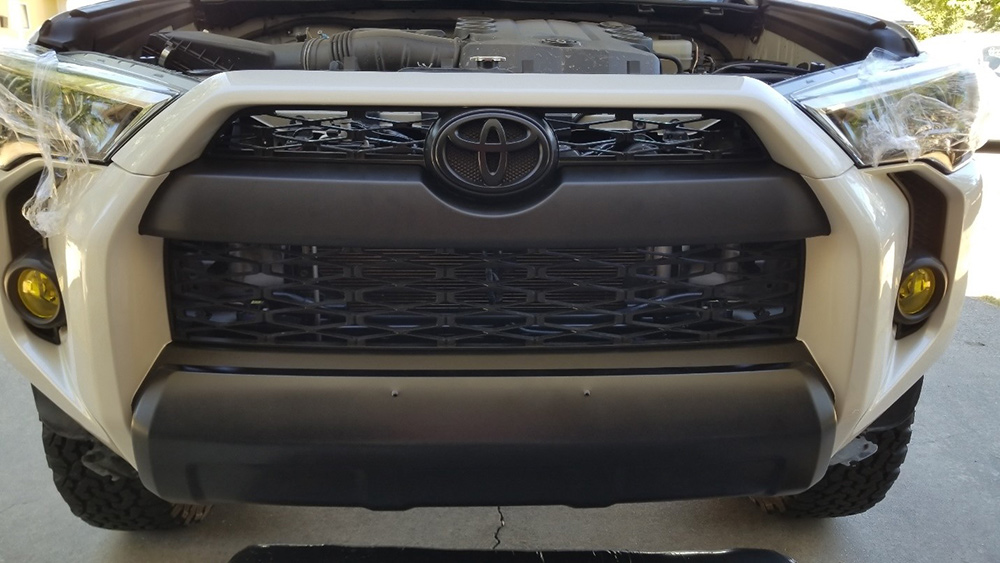
Reinstall the top radiator cover and shut the hood. You are done!
Before

After

Hi if your still here got a question I have a 2013 SR5 will the 2014 TRD or trail front bumper fit everything I see it’s the same I have already bought everything except the front bumper I see a few videos of them being converted over even yours did it fit with no problems
Hi,Kevin I have 2013 4runner trail so I see you black fender and bumper flares did you put them back on two sided tape or how?
Hi Kevin,
What kind of paint did you used for the fender flares? Did you removed them to paint them or just tape around them? They look really close to the ones on the trail package.
Thanks!
Kevin I sadly just smashed my 2012 have ability to purchase newer model bumper for 100. I have the time and you have in spirec me to take on this challenge. Girl in 👠 or not I’m about to hopefully get my girl as pretty as yours. Little scared 🤯😳 but I’m sure your detailed information will hopefully be more than enough to get me through! Amazing description and process
Where can I purchase these parts to convert 2011 to 2014
Hi
i did the conversion on my 2013 4runner SR5 and I ended up having a short fender liner instead of it being longer. Did I do something wrong or am I missing something ?
Hey Kevin nice writeup convinced me into getting a 2010 SR5 with 63K miles. Days after reading this post lol. Few days later bought some used taillights and headlights from some kid that upgraded his 2019 lights. Installed the taillights soon as I got home the next day from the dealer with the harnesses. I do have a question however. I see in your writeup you mention you replaced the front impact bar but the impact bar brackets are the same through all 2010-current 4runners. Did you actually notice a difference in your impact bars? Just trying to save over $400 if my current impact bar can work. That and I plan on doing the low pro SSO bumper which eliminates the impact bar but that’ll be after first I want to get the bumper on and situated. I went to the dealer earlier to pickup my title and the parts guy told me the impact parts on a 2015 SR5 we got a VIN for and my 2010 VIN had different impact bar part numbers. I figured the only difference may be the placement of the holes which the absorber sit in. If this is the only difference then we may be able to simply drill holes in place for the new absorber. Do you happen to have pictures of your impact bars, possibly while on the vehicle?
Hey Christian, did you ever figure anything out about the impact bar? Looking to save money as well on my 2010
Nothing yet to be honest. I’m still sourcing parts for my conversion.
Hey Christian, I don’t know if you already got that figured out but to my knowledge they are different part numbers. The 2010 SR5 bumper bar comes up as part number 52021-35180 in my parts catalog, while the 2015 without the Limited Package uses part number 52021-35140.
Greetings Kevin:
Agree it’s an awesome job, thank you very much for posting it. What lift kit did you install on your limited please and do you recommend it? I’ll need this too.
Regards,
David
Hi I just bought a 2011 4runner sr5 and I want to upgrade it a little bit. Where can I buy al those materials needed? Like the bumper. I’m from Canada btw. Thanks
How much to do my 2013
If doing this on a 2020 Limited, the headlights wouldn’t need to be changed out correct?
Hello,where c’an i get the upgrade kit for 4 runner
If converting from a 2010 SR5 to a 2014+ front end…are the valances and valance retainers needed? I assume not, but you know how that goes.
I’m looking for a 2014+ front end for a conversion. If anyone has these parts for sale, please reply!
the splash guard underneath the front of a 2018 limited bumper will bolt on to a trd pro bumper tab? the piece where a skid plate would be
The first time I read it few weeks ago I didn’t even know that the conversion to my 2011 is possible. Finished my 2014+ conversion last night and I love it! One comment though – 2 Wire Turn Socket # 90075-60028 doesn’t work with the headlights. Was hoping for no “hackery” with the wiring but that ended up doing the dorman caps too. Otherwise I love the DYI. Help me a ton! Thank you.
Im doing my conversion 2010 to 2014+ and am having trouble with the headlights. any way you can send some pictures of how you made yours work? would greatly appreciate it.
Just about ready to do the swap but I’m missing one side retainer (which is on back order from Toyota). Do you think it’s possible to modify the existing one to make it work?
Just wondering what your final cost was and if it was as simple as described above?
Now that you’ve changed to the new grille, are you going to do the Southern Style Off-road Bumper conversión with the wings? That’s what I want to do and add the winch!
That was the one I planned on getting but found a used C4 lo pro on Craigslist for $350. I did do the high clearance bumper cut mod. https://trail4runner.com/2019/01/08/high-clearance-bumper-cut-5th-gen-4runner/
……
just wondering because they look the same on the pictures he posted up there. I see the bar going on ebay for $250 used. I will probably have to look at junk yards.
The extensions I got looked identical to the ones I took off. Not sure what year they came off of. The reinforcement needs to be replaced and the Styrofoam support on front of it. If you plan to do a low profile bumper you will end up removing all of these items. If that’s the route you plan on going I would price out both options and see if you should just go that way now. This site has some good reviews on different options.
btw, thank you KEVIN for creating this site for people like us that are interested in doing these type of conversions!!!!
I’d love to take credit for this site but I just did a few writeups. It is awesome to know my writeup has been so helpful for others. This site is amazing. Every search I do for 4Runner stuff brings up Trail4runner.com. There is so much helpful info here.
Do I need to buy the reinforcement? Or can I just use the one I have on my 2011 forerunner?
hello buddy
I am beginning the same project, I have a question for you, what is the height of both shocks? My vehicle is 2011 limited.
Regards from Colombia.
Is there a video online I could use to do this?
Sorry, I was doing it by myself so I wasn’t able to make a video. If you have any questions just let me know.
Hi Kevin,
I am doing the conversion on my 2010 but have a little trouble with the headlights. any way you can send me some info or pictures on how you did yours? would greatly appreciate it.
thanks.
Thanks for the reply your article is super helpful and can’t wait to switch to the new front
I like that upgrade I am hoping to change my 2011 bumper to a 2014 + Bumper
I am willing to buy swap or how ever it would be best for whoever can accommodate this transformation.
(any suggestion will be greatly appreciated)
thank you.
Hey Kevin, did you have to repaint the bumper you got? How did you find an sr5 bumper in blizzard pearl? If you did repaint, how much did it cost?
Landon, I had to have it painted along with the upper grill surround piece. I paid $250 to have both pieces painted.
Could you clarify what is needed for the turn signals? Just the Dorman model number you posted one for each side?
Hey ,
This is all great info on the retro facelift.
I have a question for you and maybe some knowledgeable other members. At this point I have a Gen 5 2010 SR5 and Gen 5 2016 Trail.
Here is what I’m wondering:
The 2010 – 2013 Trail is pretty good looking. (Not as great as the 2014 facelift by any means) I would like to make my 2010 SR5 look sort of like a 2010 Trail. When I look at the regular 2010 bumper it almost looks like if you could cap or paint the center section in black and then maybe add a lower black valance piece you could make a 2010 to 2013 SR5 look similar to a 2010 Trail. I have looked high and low and I haven’t seen anyone that makes a piece to maybe add to the center section of the main bumper. And no luck on that lower valance piece that is on the trail that is black also.
Seeing as there’s about 100,000 2010-2013 4Runners out there it’s surprising to me that I can’t seem to find anything to mod that bumper without totally replacing it. (Other than a bull bar)
Any ideas from anyone?
Many thanks for the input!
(Last …I have never been up close on a 2010-2013 Trail but I’m going to guess that bumper is not just a regular trail bumper with a cap in the center but a unique bumper that somehow receives a center black section. And then the question would come up that you could replace a the SR5 bumper valance to a Trail valance and add some other parts and make it look like a 2010 era Trail other than the 2014 facelift)
If you look at the Toyota parts catalog, they have an SR5 bumper that’s like the Trail bumper but simpler. The bumper cover is part number 52119-35908. Is that kind of what you’re looking for? I recently converted my 2012 SR5 to that front end. Looks much better, and I did the black fender flares too.
Can you walk me through how you did the fender flares? I’m looking into doing that right now
I know this is off topic but there is a hybrid bumper I want from C4 Fab that they stated would only work with 2014+ 4runners.
Seeing that you just converted yours from old to new what would be the major differences stopping me from being able to mount this bumper
.
It’s mainly just the headlight and upper grill. Some full bumpers do require you to cut and use parts of your old bumper and some replace all of it.
Hi Kevin I have 2013 Trail.I am doing conversion you have same black flares.How did you do flares black on new bumper?
I used matte black vinyl and wrapped my flares. Used the wire trim tape (for vinyl) to get a clean edge on the bumper portions.
Mounting the C4 to the 2010-13 front end? Mounting wise it would be the same. Remove the bumper support and brackets and bolt it up. The main issue is the angles of the C4 match to the 14+ so you would have to figure out where to cut and would have to work the plastic (heat and shape it) to get it to look good. A high clearance chop may help it blend better too.
I am curious about this as well. There are a lot more bumper options for the 14+ and I’m curious why? Is it because of the plastic around the headlights or because of the hardware behind the plastic bumper?
Can this conversion be done in reverse? Can I convert a 2019 to say 2013-2010?
Hi George, I was wondering if you are still looking for someone to swap front ends with. I have a 2012 SR5 and I would be definitely looking to swap. Let me know if you are still looking for someone.
hey if you want we can swap things
Kevin – appreciate the response, that is good to know I have also written Toyota with the same question for the 2020. I ask because the custom build I am trying to do requires a 2013 or older front end.
Kelyn – Assuming we are close enough to make the trade when I make my purchase and you have not already found someone else by that time, I will be interested. Seeing as I am after the 2020 to do this conversion on it could be a while before I am able to make such a trade.
Yeah George just let me know. I’m in Northern California
Hey George I have a 2012 4Runner that I want to upgrade my front bumper to the current model. Would you be interested in trading bumpers/lights etc?
Sure you can. Easiest way to do that would be find someone that wants to swap your way. You would need the finder liners from the 10-13 too because they hang lower.
Are the bumper rail extensions the same from your original 2010 to the swapped out ones from the 2014+?
Yes they are. If you plan to do a hybrid bumper at the same time you will not need the bumper rail or the extensions.
How much did the conversion cost? This is exactly what I want to do to my 2012
Kelyn, Did you do it?
Leonel, no I didn’t. Once I lifted my 2012 I actually liked the front end a lot more, so I just swapped out for HID lights, and going with an aftermarket bumper later this year
Cool.
Buying everything needed new you would be looking around $2k. If you can find someone (possibly like George s Devoll below) wanting to swap down then you could be looking at a straight swap, if it’s the same color.
In the end I only spent $300. I found someone that did a full steel bumper and they gave me most the stuff. Then I sold all my old parts for $500.
Nice job!
Wow, wow, wow !!! Thank you so much, I have been looking for this conversion for months and I haven’t found anything. And it’s been here the entire time. I have been on this site quite a bit reading and learning tons. Thanks again for all of this help ( :
This was awesome and great! Thank you for the detailed step by step project with pictures.
Mahalo and Mele Kalikimaka to you
Noa
24DEC18 09 :13 AM
I hate to say it but I think I like the before better. I know – maybe I’m weird…
Thank you so so much for this. You helped me tremendously on doing this conversion