
Overlanding is all about access – access to a new trail, access to your favorite camping spot, or even access to your gear. That’s where a rear ladder comes into play. Whether it’s to assist with opening your rooftop tent windows or grabbing gear off your roof rack, ladders can really come in handy when you’re spending time off the beaten path.
There have been numerous ladders to hit the market over the years. For the most part, ladders have generally hung around the same design with a few offering attachment mods here and there.
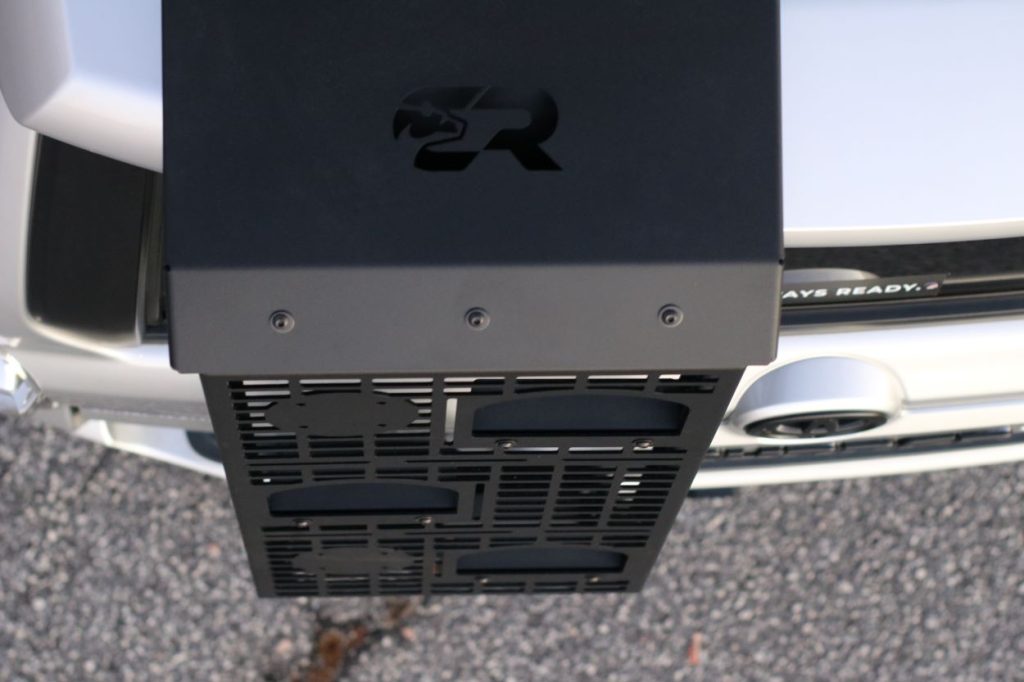
So what if the rear ladder and the ubiquitous molle panel had a baby? Enter the Cali Raised MOLLE Ladder.
Find It Online:
- Cali Raised Molle Ladder (2010-2024): Check Price
Table Of Contents
Overview

Cali Raised is no stranger to the off-roading community. Offering anything from lighting to trail armor, they’ve had you covered since their inception in 2014. Based out of Fort Worth, Texas they proudly manufacture and distribute their products in the US and all over the globe.
Fresh to the market is their new MOLLE ladder. They use both 5052 Aluminum and 10 GA steel to ensure both durability and functionality. Additionally, this is an easy-to-install item (I actually installed it without instructions… more on that later).
Unlike anything on the market, they introduced the limitless storage capabilities of a MOLLE panel. It’s more off-road accessibility than a ladder, but why can’t you have your cake and eat it too? It’s already set up to mount RotopaX, quick-fist clamps, or just about anything you can think of.
Disclaimer: They do note on their website that with the weight, you will need heavy-duty liftgate struts (stock 4Runner struts won’t cut it). Brenan did an article a while back on replacing your liftgate struts. You can find that article here. I didn’t weigh the fully assembled ladder (and they don’t post details on the website just yet), but it definitely won’t blow away in the wind.
Had they elected to use all aluminum, you may have gotten by with a little liftgate sag; however, I don’t think that was the intent. Again, this is more off-road, quick-access storage, as well as a ladder. As such, durability was a critical component in designing this ladder.
I’ve spent a lot of time researching ladders. I even set out to build my own aluminum one via aluminum brazing. I got pretty close to completion before getting my hands on this ladder, but the design (and personal failed attempts) allowed me to appreciate the details put into this ladder, and that it was built to last.
Without further ado, let’s dig into the install.
Installation
Tools and Materials:
- Standard Socket Wrench Set
- Standard Allen Wrench Set
- Flathead Screwdriver
- Masking or Painter’s Tape
Step 1. Prep For Assembly

I was surprised with how well Cali Raised packed all these pieces to avoid scratching any of the steel (or aluminum for that matter) and remove any of the powder coating. Unlike other products received, they have a little card with a QR code to find instructions on how to assemble their items.
Since this product is new, they have not posted instructions at the time of this article, but I was able to figure out how to put it all together without too much trouble (and learned a few dos/don’ts along the way).
Step 2. Mount Support Brackets

Install the two steel support brackets with an Allen wrench. The support bracket labeled with a “2” will go at the top, and “1” will go towards the bottom of the ladder. You can also confirm this by the size of the cuts or notches they put into the pieces to match the aluminum ladder.
Step 3. Mount Steps

Install the steps with an Allen wrench. What’s neat about what Cali Raised did is they went ahead and installed the screw assembly into the steel pieces such that you aren’t having to fiddle with a ton of nuts/bolts. Instead, all you have to worry about is dropping a washer in the button-head screw and tightening it up.
One thing I noticed since they came out with this, is a quick production mod that I think pays off big. In their pictures online, all the step pieces are bent at 90 degrees. However, what was sent to me had the (3) top pieces angled at about 70 degrees allowing the slanted portion of the ladder to have the steps closer to 90 degrees upon stepping (it’s the little things).
Step 4. Prep Roof Surface For Tape

Go ahead and clean off your roof where the top plate will be installed. I recommend marking off the limits of the top plate with masking or painter’s tape. You’ll want to have the left edge of the top plate just to the right of the indention of the rear spoiler. This is done so that it will be uniform and flat when installed.
The left side of the top plate has a slant, but this will be about 2″ from the top and 1.25″ from the bottom of the left side of the top plate in the taped area marked above.
Step 5. Apply Tape

Install the provided tape. There are two schools of thought with this… you can go ahead and drop the tape on the roof and gently place the top plate or place the tape on the top plate. I went with the former, and in hindsight should have placed it on the top plate first. The reason for this is that you can help ensure the proper position against the lip of the liftgate.
This is a really important step because if you don’t catch the corner of the top plate against the edge of the liftgate, the ladder will be using the tape to support itself instead of the lip of the top plate. If you happen to mess up when installing… have no fear! Simply grab a heat gun or blow-dryer and start heating the top plate while slowly pushing up. The provided tape will start to give and you should be able to readjust and install properly (I speak from experience).
Tip: On other ladder installs, I’ve seen folks use a piece of cardboard between the liftgate crack to help ensure a tight lip connection. I didn’t do this, and it seemed to work fine.
Also, I ended up having to use a piece of 3M VHB tape I had on hand because the shrink wrap had grabbed a piece of the provided tape. There was no way of getting it off so I simply cut it (that stuff is STICKY).
Once the top plate is on, make sure you press for at least 30 seconds (if not a little longer). You want to ensure a good bond because you will be relying on this later when it’s hanging as you install the lower bracket.
Step 6. Hang Ladder & Add Hardware

Once the top plate is on, hook the ladder through the provided slots in the top plate. Grab the provided bolts and run a washer on each side of the top plate. I would recommend loosely installing the nuts at this point so you can make adjustments later.
Step 7. Install Bottom Bracket

I went ahead and (loosely) installed the bottom bracket. The reason for this was I wanted to see how the bottom bracket would align with the bottom plate (what will be installed to the bottom of the liftgate). Go ahead and install your washers and bolts as noted in the previous step.
Step 8. Remove Liftgate Handle

Next, you’ll need to get access to inside the liftgate. To do so, you’ll need a flat-head screwdriver to work your way around the handle until it pries loose. I tried to use my trusty car trim tools; however, because the handle is so tight, be prepared it may snap the tip of your pry tool (mine started to crack).
Before you start prying, I’d recommend grabbing a stepstool with a blanket or similar to help support your liftgate open now that it’s got some weight on it.
Step 9. Prep For Drilling

Now you need to figure out exactly where you will be drilling the two holes into the bottom of the liftgate. The trick here is you want to help ensure that the ladder is level, but will need to hold the bottom plate against the liftgate and bottom bracket to see where the holes are.
This ended up being about 1/4″ from the center of the liftgate handle for the left hole. Mark them with chalk, paint pen, etc., and set aside the bottom plate. Drill the holes to match the button-head bolt diameter, which is 1/4″.
Step 10. Attach Bottom Plate & Weather Strip

Once drilled, attach the provided weather strip in alignment with where the bottom plate will go. Make sure you push it all the way in. If it’s colder outside, you may want to warm it up real quick with a blow dryer. Once the weather strip is installed, slide the bottom plate bar into the liftgate. Align the holes with the bottom plate and tighten down with an Allen wrench.
Tip: I’ve seen this done with other ladder installs… you may want to consider grabbing a Toyota paint pen or similar agent to touch up where you drilled to help ensure it won’t rust.
Step 11. Attach Bottom Plate To Bottom Bracket

Now that you have the bottom plate secured to the liftgate, you’ll need to attach it to the bottom bracket. The important thing here is to ensure there is a tight fit against the liftgate door.
What Cali Raised did was combine several methods for installing the bottom of a ladder to the liftgate. Some companies use what I call a “pinch plate” while others drill into the bottom of the liftgate. I was a bit leery of drilling when building my DIY ladder and was going with the “pinch plate” design. However, after seeing what Cali Raised did, I think this is the best option.
Toyota designed for some water to get inside the liftgate (which is why there is a vapor barrier on the inside of the liftgate). This is also evident with the handle that was popped out not being sealed. As such, I’ve felt more comfortable about drilling into the bottom of the liftgate because it’s out of sight and will provide a more secure finish.
Cali Raised seemed to do both the “pinch plate” and drilling method to ensure a tight grip and base, which I think is ideal.
Tip: If for some reason you ever want to remove the ladder and don’t like the holes there, simply put in rubber grommets.
Step 12. Tighten All Bolts

Tighten all bolts throughout the ladder. The bottom bracket does have slots, so if your ladder is a little out of line, now’s the time to ensure that everything is straight and ready to go.
Step 13. Add Step Plate

The steel step plate definitely adds some weight to the ladder, but it adds a ton of protection as well. I like to call this the “turtle shell”. What this top plate “turtle shell” does is help protect the liftgate from putting all your pressure on the spoiler and causing severe strain in a localized area.
Instead, the steel plate helps distribute the load down through to the ladder and subsequently the bottom bracket & plate. As an engineer designing my own DIY ladder, I wouldn’t have thought in a million years to do this, but I think it’s a great idea as you throw gear on top to ensure durability.
Step 14. Test Your Ladder!

Once installed…test it out! I had an eager QC manager wanting to evaluate the ladder… it passed with flying colors. I think you’ll find it easy to navigate the ladder with a lip that wraps around the sides for a better grip.
Step 15. Add Your Gear

Again, the options for gear are limitless. I just grabbed a few items I’ll typically take on the trail to see what it was like to mount. Needless to say, I was very pleased.
Final Thoughts

Is this the sleekest option on the market? No. But is this the most utilitarian ladder? Absolutely. With a family of five, space is pretty limited, especially with an RTT and three car seats, so I jumped at the chance to add more storage capabilities and have something built to last. From an accessibility perspective, this checks all the boxes… and I think it would do the same for you.
Contrary to other comments I think it looks great. Fits well with all my other Molle mods on Midnight Black Metallic and red accents. Sweet. And I know it looks good as I keep getting comments that its actually beautiful so I don’t think folks are just saying that.
I am all for a good functional product but this one is a bit over the top for me. How much does this thing weigh? Cali Raised doesn’t even mention the weight on their site. I bet that thing is crazy heavy.
I am glad Cali Raised took my suggestion from December:
https://www.4runners.com/threads/cali-raised-5th-gen-4runner-molle-ladder.35376/#post-523197
Its definitely more useful with a functional ladder rung!
Great write up!
Cheers
Mike
Great write up. Liked the QC manager. Sturdy and functional design.
That’s the ugliest ladder and 4runner accessory I’ve ever seen. Pretty disappointing coming from cali raised led. I have their rock sliders and rear window storage. I’d expect better from them. Nice write up tho!
Great writeup! This has to be the most heinous ladder I’ve ever seen though.
Great review of a well thought out and designed ladder option. I would like to see a less slippery surface on that steel step plate. For those of us using this ladder to access our rooftop top tent, that added grip would be appreciated when entering/exiting our tent.
I suppose some skateboard tape could also be used.
i’m looking to add a mount for a 5lp propane tank! one that is easily dropped from the mount for firepit/ campstove! I saw this MOLLE design and i’m intrigued!
i have roof rack, interior molle panel with attic, and dash mount from Cali LED! kinda dropped into their ecosystem, but pricing is good, quality is good, so this will be next!
i didnt know they were based out of FortWorth! I figured the name CaliRaised they were out of California! eh, what?
Cali Raised is based in Cali. Cali Raised LED is in FW.
That axe is giving Final Destination vibes…
Great write-up. I just received mine. I’ve been looking for something for awhile. I like this so far. What 3M VHB tape would you recommend (thickness). The tape I got in my box was pretty unusable from the packaging.