
If you haven’t heard, Cali Raised LED offers quite the array of rock slider options for the 5th Gen 4Runner. In this post, we’ll walk you through a detailed step-by-step installation and provide an in-depth review of the Trail Edition version.
If you’re unfamiliar with rock sliders, they serve as essential armor to safeguard the vulnerable rocker panels of your vehicle from potential damage while out on trails. Cali Raised LED is renowned for its commitment to producing top-quality aftermarket off-road accessories and has established a well-deserved reputation in the industry.
Let’s get started!
Note: Typically, Cali Raised lead times are very good for the industry (currently 0-4 weeks).
Find It Online:
- Cali Raised LED Trail Edition Bolt-On Rock Sliders: Check Price
Table Of Contents
What Are Rock Sliders?

Rock sliders are designed to provide protection to the vehicle’s vulnerable rocker panels and lower body when off-roading.
They are typically made from steel, making them reliable protection when off-roading. Rock sliders are engineered to withstand impacts from rocks, tree stumps, and other obstacles off-road. Reputable ones can also support the entire weight of your vehicle.
The primary function of rock sliders is to act as a shield for the vehicle’s lower body. When traversing uneven or rocky terrain, there is a risk of the vehicle’s rocker panels getting damaged and scraping against rocks or tree stumps, which may cause significant damage. Rock sliders create a protective barrier and absorb the impact. As the name implies, they allow you to “slide” off obstacles without harming the body.
Sliders can also provide a convenient stepping area for easier roof access and passengers’ ingress and egress.
Are Rock Sliders Necessary?

Just as investing in skid plates, such as the Cali Raised full skid plate set, protects vulnerable components underneath, adding armor to the sides of your truck helps safeguard your door panels.
When you’re off-roading, your 4Runner is exposed to many elements that can cause body damage. This can come from rocks, stumps, or other trail hazards. Installing rock sliders minimizes the risk of damage that may result in costly repairs.
Rock sliders can also serve as a functional aid, especially when navigating challenging terrain. They provide a solid platform to slide over rocks and obstacles. Have you come across a narrow section of trail with a tree stump on one side? With the correct line, rock sliders can help alleviate that anxiety by allowing you to slide over or pivot around it.
Available Options

There are two rock slider options for the 5th Gen 4Runner: the Trail Edition and the Step Edition.
Both variants are 100% bolt-on and have identical materials, quality, and craftsmanship.
Here are the main differences…
Trail Edition:
- 20-degree angle for a tighter fit to the vehicle & maximum clearance
- Not meant to be a step
Trail Edition Bolt-On Rock Sliders: Check Price
Step Edition:
- A 0-degree angle for better protection against side impacts
- Functions as a step
- Includes filler top plates meant to fill all the gaps on the slider, allowing them to become functional steps. The filler plates come in three finishes: raw, powder-coated, or bedliner. This finish does not need to be the same as the slider itself, allowing you to mix and match. The filler plate is made of 0.09” 5052 aluminum, making it lightweight yet durable.
Step Edition Bolt-On Rock Sliders: Check Price
Materials
Cali Raised uses DOM (drawn over mandrel) tubing (1.75″ x 0.120″). Going one step further, it is also put through a secondary process, resulting in a more consistent and stronger tube. The only drawback of this material is that it is much more costly than other types of steel. However, Cali Raised doesn’t add any crazy upcharge as part of their commitment to value.
The plates that attach the slider to the frame are made from 3/16″ steel. These sliders come with all the necessary hardware for installation.
Additional Configuration
Both sliders also come with the option of adding a kick-out or coming without a kick-out. There is no extra cost for either option.
There are also three finish options, including raw, powder-coated, and bedliner:
- Raw – Great for those looking to customize their sliders before installation.
- Powder Coat – More resistant against scratches, chipping, and general wear and tear compared to normal paint, making it a great option for those looking to put the sliders to the test.
- Bedliner – Has a grip-like texture and a non-slip surface. This finish is very durable and can withstand a lot of abuse.
Depending on the finish you pick, there will be an added cost.
Kick-Out Vs. Non-Kick-Out

Cali Raised LED offers both sliders with or without kick outs. What’s the difference between these two, and why should you choose one over the other?
Kick-Out
Kick-out sliders have an extended portion toward the rear that creates a “kick-out” effect against obstacles. These are great for those who may get stuck on obstacles or need to use the slider to pivot. Kick-out sliders offer several advantages.
- The kick-out can be used as a pivot point during maneuvers by utilizing it as a contact point. This helps navigate tight spots.
- Provides additional coverage and protection to the vehicle’s rear fender, rear quarter panel, and doors.
- Larger step area for roof access.
No Kick-Out
Rock sliders with no kick-out (straight) are more suitable for those wanting a cleaner look and don’t need the added functionality of a kick-out. Here are the advantages of no kick-out:
- Maintain a more compact and streamlined profile while still maintaining rocker panel protection.
- Often favored by those seeking a cleaner aesthetic look and a more minimalist design.
Ultimately, the choice between kick-out and non-kick-out sliders depends on your needs. If you enjoy pushing the limits of your truck and tackling challenging obstacles, kick-out sliders are extremely versatile. They offer enhanced functionality and additional protection.
On the other hand, if your main focus is on aesthetics and having an extra step for convenience, non-kick-out sliders are a more suitable option. They still provide great rocker panel protection.
I will note that Cali Raised LED tends to prioritize producing sliders with kick-outs. So, it may take a bit longer to receive non-kick-out sliders. I recommend getting the kick-out because of reduced lead times and the extra protection at no additional cost.
My Configuration
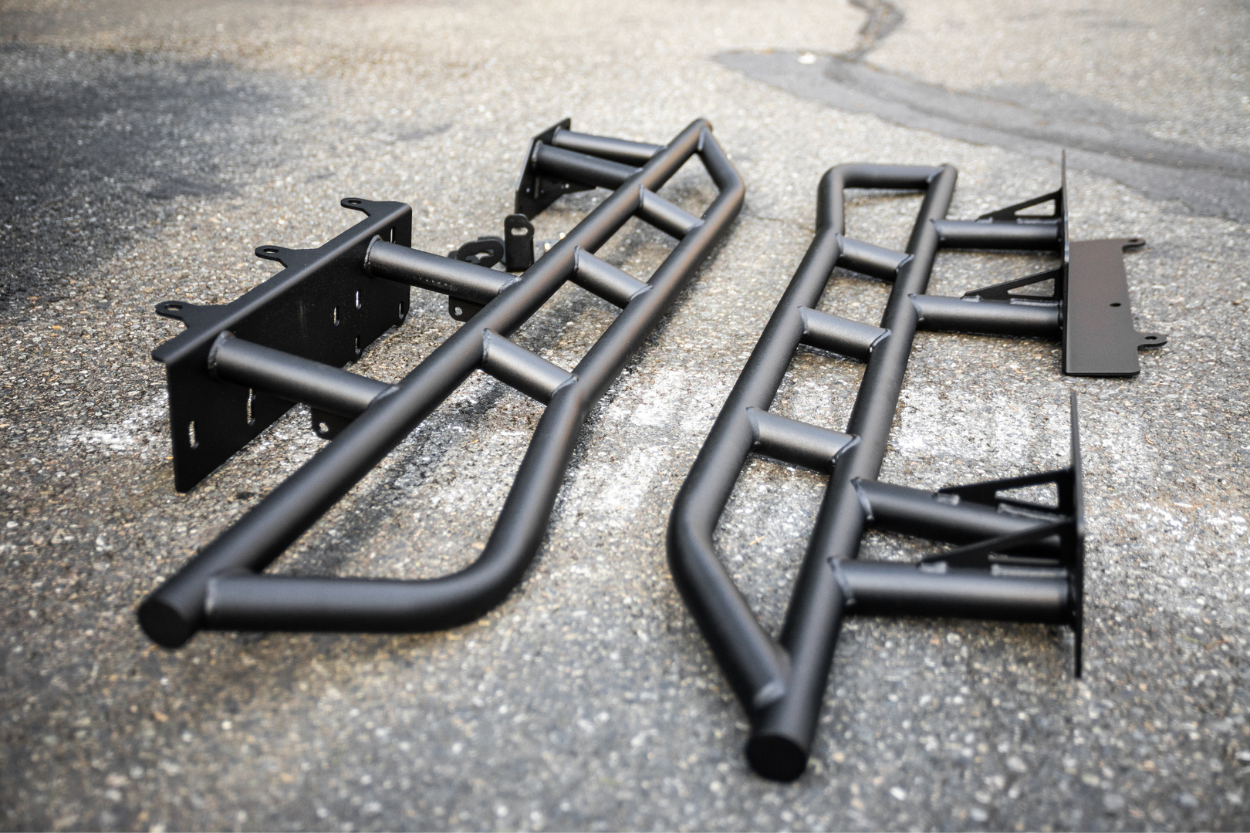
I’m sure you can tell by the photos, but I went with the Trail Edition sliders with the kick-out option in the powder-coat finish. I decided to go this route for a few different reasons.
The first is that I do a good amount of off-roading. This meant I needed something suitable for all the adventures I go on. The Trail Edition immediately stood out as the ideal option for my needs.
I specifically chose the Trail Edition over the Step Edition because I appreciated its angled design. This angled profile provided a more understated appearance, ensuring the sliders didn’t excessively stick out from my truck. I wanted the added protection of sliders without them being too obvious.
Initially, I chose the non-kick-out option to avoid the sliders extending too far from my truck, as I was concerned about the visual impact. However, after thinking it over, I realized that having the added functionality and protection offered by the kick-out outweighed the aesthetic concern. Ultimately, I decided to go with the kick-out option.
Surprisingly, now that they are installed on my 4Runner, I hardly notice that they are there. The angle at which the sliders are positioned creates a subtle and seamless integration with the vehicle.
Finally, I went with the powder-coat finish because I wanted the finish to match other parts of my truck. My Cali Raised Stealth bumper is also powder-coated, so matching them only made sense.
Installation

Prior to the installation, there are a few things that you can do to get yourself prepared. These are optional, but if you want the process to go as smoothly as possible, they will help.
Organize Hardware
Our hardware came in a huge bag and was all mixed together. Taking a few minutes to organize all the hardware into categories saved us a lot of time. Even adding the washers onto the bolts beforehand helped expedite the installation.
Second Set Of Hands
While it is not necessary, having a second set of hands makes the installation much easier and quicker. However, installing the rock sliders with just one person is still possible. If you can’t get a second set of hands but are still looking for extra help, use a jack to hold the slider in place.
Tools Needed:
- 12mm, 14mm, 19mm Sockets & Ratchet
- 19mm Open-Ended Wrench
- Extendable Magnet (Optional)
- Flat Head Screw Driver
Step 1. Remove E-Brake Lines

There will be one emergency brake line on both the passenger and driver sides. Use a 12mm socket to remove the bolt that attaches the brake line to the frame. Both sides will reuse the plastic clip; however, only the passenger side will reuse the original bolt. You can also reuse the driver-side bolt, but a new one is provided.
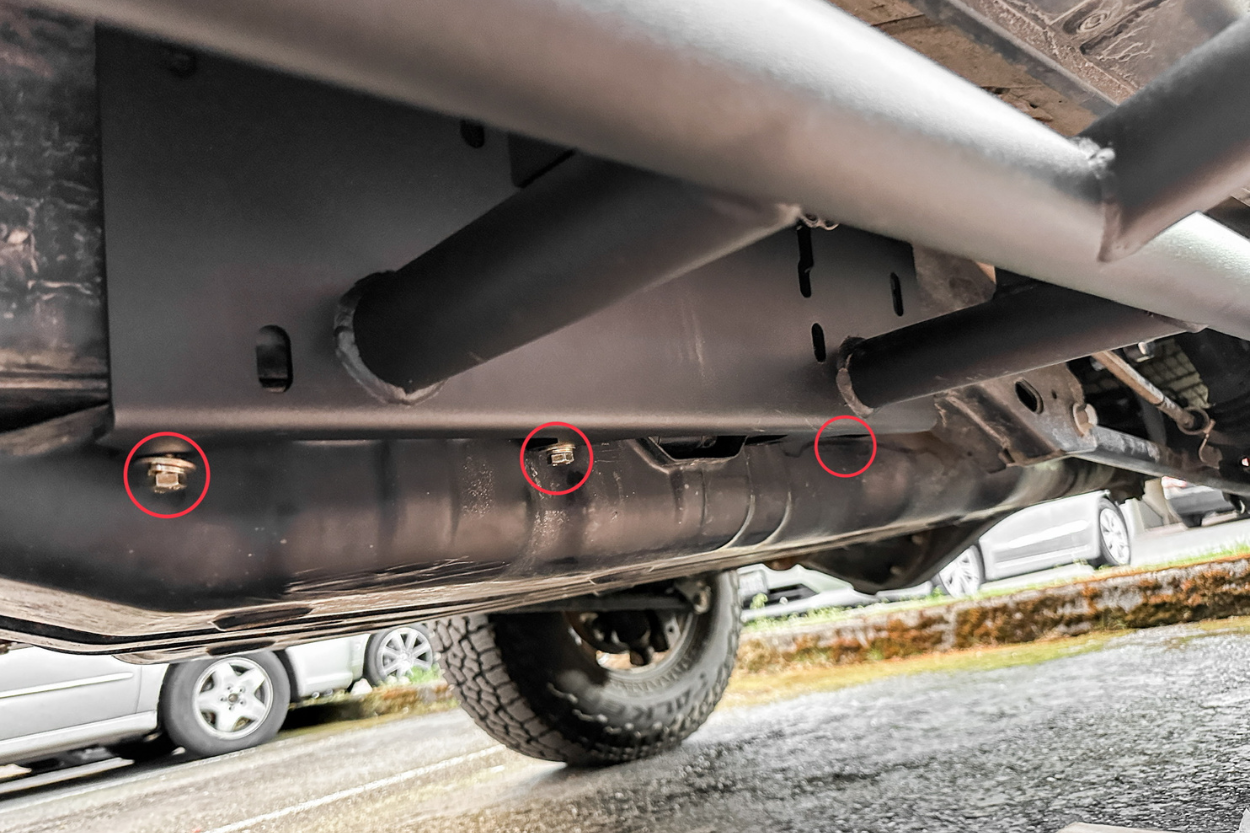
Step 2. Remove Gas Tank Skid Bolts

To install the driver’s side rock slider, you will need to remove the three bolts on the outside that secure the gas tank skid, as the slider will be positioned over the gas tank skid. Use a 12mm socket to remove the three bolts that attach this skid to the frame. These bolts will not be reused.
Step 3. Install Driver’s Side Rock Slider
It’s important to note that the sliders are side-specific. If your sliders have kick-outs, it’s easy to identify the correct side by looking at the kick-out. However, if your sliders don’t have kick-outs, you can identify the driver’s side slider by locating the larger plate with three holes extending outward.

You will need (x12) M8 bolts, a locking washer, and a regular washer. If you haven’t already done so, place the washers onto the bolts, ensuring the larger washer faces the bolt’s outer side.
Next, line the slider up with the pre-drill holes on the frame. Use a 12mm socket to install the bolts.
To hold the slider in place, we fully tightened the (x3) M8 bolts that connect the slider to the gas tank skid. Make sure that the slider goes over the top of the skid. Next, proceed with loosely installing the rest of the bolts. This is important so you can step back and re-adjust it if needed.
An alternative approach to installing the bolts is to use a sequencing method. Start with one bolt on one side and another on the opposite side, gradually working your way inward. Sequencing can assist in achieving a more level installation. However, it’s still important to step back and make any necessary readjustments.
It’s important to note that some of the holes on the frame are not threaded. The threaded ones will be the ones you will want to install the sliders on.

There will be two mounting plates on the slider that you need to install the bolts through. The first plate will be closest to the front and have (x3) M8 bolts connecting the slider to the frame.
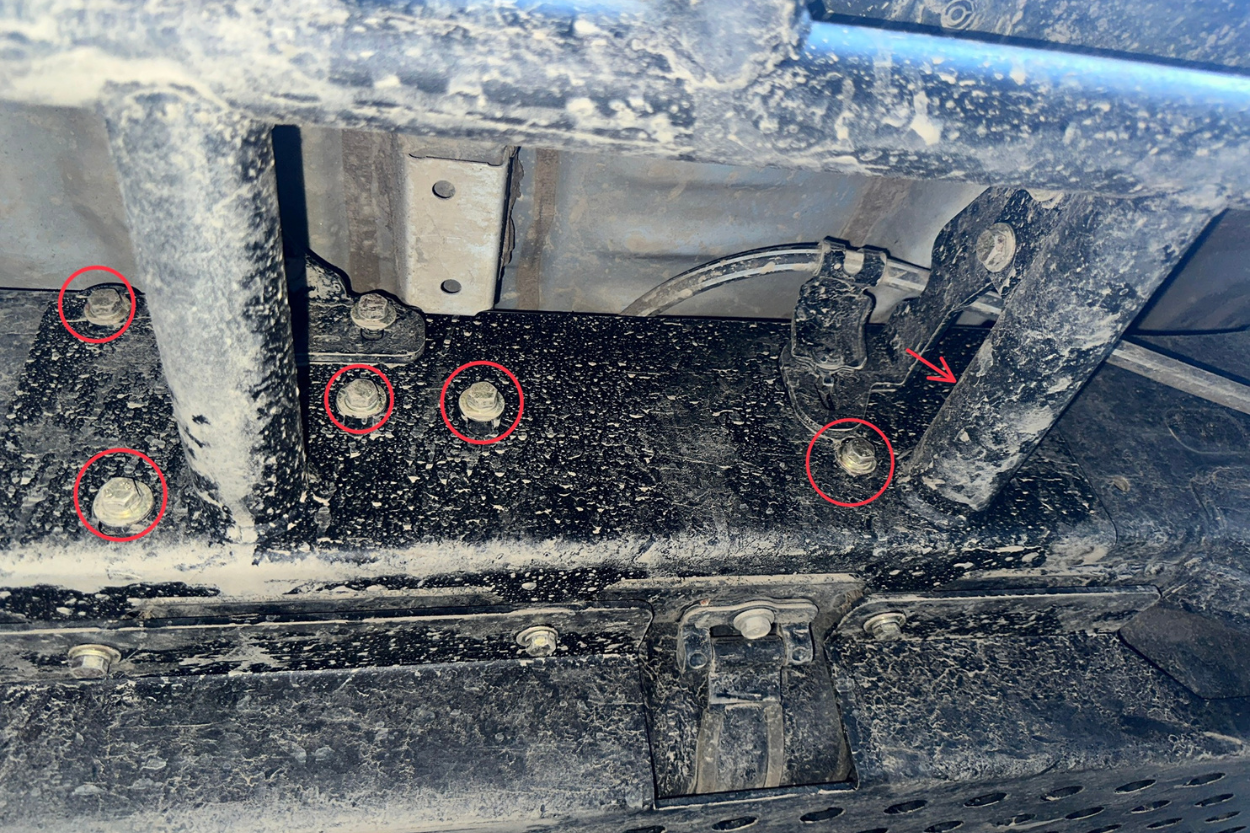
Next is the larger bracket toward the rear end of the slider. This bracket will use (x6) M8 bolts. You will also see a large S-shaped hole where the other bracket will go.
There should now be a total of (x12) M8 bolts installed on the driver’s side.
Step 4. Install Driver-Side Brackets

To complete the installation of the driver-side slider, you will need to install two brackets. There is one bracket with an S-curve hole and one with an oval hole.

Two bolts in the hardware kit will look similar to the other M8 bolts but will be slightly longer. Pair these bolts with the smaller washers and use a 14mm socket to secure the brackets to the frame.

There will also be (x4) additional bolts that are a bit wider. Install washers on each of these bolts. Once installed on the bracket, secure them with the provided nuts. These bolts will be installed on the lower sides of the bracket and on the slider using a 14mm socket.
Straight Bracket

You can start with either bracket; however, the straight one is much easier. Attach the bracket with the oval hole to the frame rail on the 4Runner with (x1) of the longer M8 bolts. Then, secure the bracket to the slider with (x2) thicker bolts. In total, you should use three bolts for this bracket.
Curved Bracket

The next bracket should be attached using the same bolts as the previous one. However, the installation is a bit different.
First, it will be attached to the rear plate of the slider. You’ll notice a curve; this will cup underneath the brake line. To confirm that it is the correct bracket, look for an s-curve hole on the bracket that aligns with the s-curve hole on the slider.
Grab the clip attached to the brake line and place it over the brake. You will notice a small clip at the bottom of the brake line clip; make sure this goes into the hole. Then, secure it with the longer M8 bolts. Once secured, you can finish securing the bracket to the slider using the thicker bolts. In total, there will be (x3) bolts used.
Before moving on, it’s a good idea to take a moment to ensure that each bolt is tightly fastened. Additionally, put some weight on the slider to confirm it is firmly and safely secured.
Step 5. Install Passenger Side Slider

To secure the passenger side slider to the frame, we decided to use (x1) a shorter M8 bolt in the middle with a 12mm socket. Fully tighten this bolt so it keeps the slider in place.
Next, place (x13) M8 bolts (shorter ones) and washers, and hand-tighten them.

Again, you will have a front plate and a rear plate to attach the slider to the frame. The front plate will be smaller and require (x4) M8 bolts.

The rear plate will be much bigger and have two holes extending inward for the longer bolts in the next step. This plate will need to have (x6) M8 bolts installed on the plate, plus (x3) connected underneath.
Take a moment to step back and assess the slider’s positioning. Make any necessary adjustments to ensure it is properly leveled. Then, use a 12mm socket to tighten all the bolts.
Step 6. Install Long Bolt & Spacer (Passenger’s)

The final step for the passenger side slider is installing the largest provided bolts to the inner part of the frame. There is a bit of maneuvering involved in this step, but it’s all easily doable.
This was probably the hardest step of the installation because you have to make sure that the metal claws (L-brackets) don’t fall into the frame. Unfortunately, we had one drop in the frame, but we were able to fish it out with an extendable magnet. I would suggest having one handy, just in case!
Remove Tabs From Inner Frame

You will notice two square tabs on the vehicle’s passenger side. One tab is near the car’s front, while the other is behind the muffler. Use a flat-head screwdriver to carefully remove these tabs. Once removed, you can discard them as they are no longer necessary.
Set Up The Bolts

This is how these bolts will be assembled once they are on the 4Runner.
Note: The claws will be pointing down, not up – I found that out later.
The order of assembly is as follows:
- Long Bolt
- Washer
- Metal Sleeve
- Claw
- Washer
- Nut
I suggest having all of these ready to go for the easiest installation.

For this step, you must install two bolts: one towards the front of the slider and another next to the muffler. These bolts will go through the two inward-extending holes. You will secure them using the metal claws that fit through the holes where the plastic tabs were previously located.
There are several approaches to installing this particular bolt. We found the easiest method was to start by threading the bolt through the bottom of the slider with the washer on top of it. Then, add the metal sleeve on top so it sits above the opposite side of the hole. Finally, attach the claw and install the last washer and nut at the top.
After hand-tightening all the components, use a 19mm socket on the bottom of the bolt and a 19mm open-ended wrench on the top nut to fully tighten them. Next, repeat the same steps with the bolt behind the muffler.
Step 7. Reinstall Passenger’s Side Brake Line

Finally, your last step is to reinstall the passenger-side brake line using the original hardware. Now is the perfect time to double-check all of the bolts you’ve installed. Take a moment to ensure that each bolt is tightly fastened. Additionally, stand on the slider to confirm that it is firmly secured in place.
Initial Thoughts

I’m absolutely stoked about these rock sliders! I never expected to like them as much as I do, and they have easily become one of my favorite additions to the truck. Cali Raised totally nailed the design, and I couldn’t be happier with the result.
First things first, these sliders have seriously amped up my protection. They act as a sturdy shield, protecting the vulnerable lower sides from potential damage. It’s been great knowing they will stop obstacles from damaging my truck. They’re also great for everyday situations, like if someone opens their door too wide in the parking lot, where they’ll hit the rock slider instead of the side of my truck.
But here’s what truly blew me away: these sliders don’t compromise my truck’s performance. They seamlessly integrate with the body lines and maintain a good amount of clearance, as I had before. That has allowed me to navigate tight and tricky spots. This was really important to me because I like the profile of my truck, and I didn’t want to mess with the look. Thankfully, they don’t stick out too much!
Let’s talk about the added practicality these bolt-on rock sliders bring to the table. I now have an extra step to easily access my roof rack or lend a helping hand to anyone trying to hop into the truck! Those little details make a world of difference.
Off-Road Durability
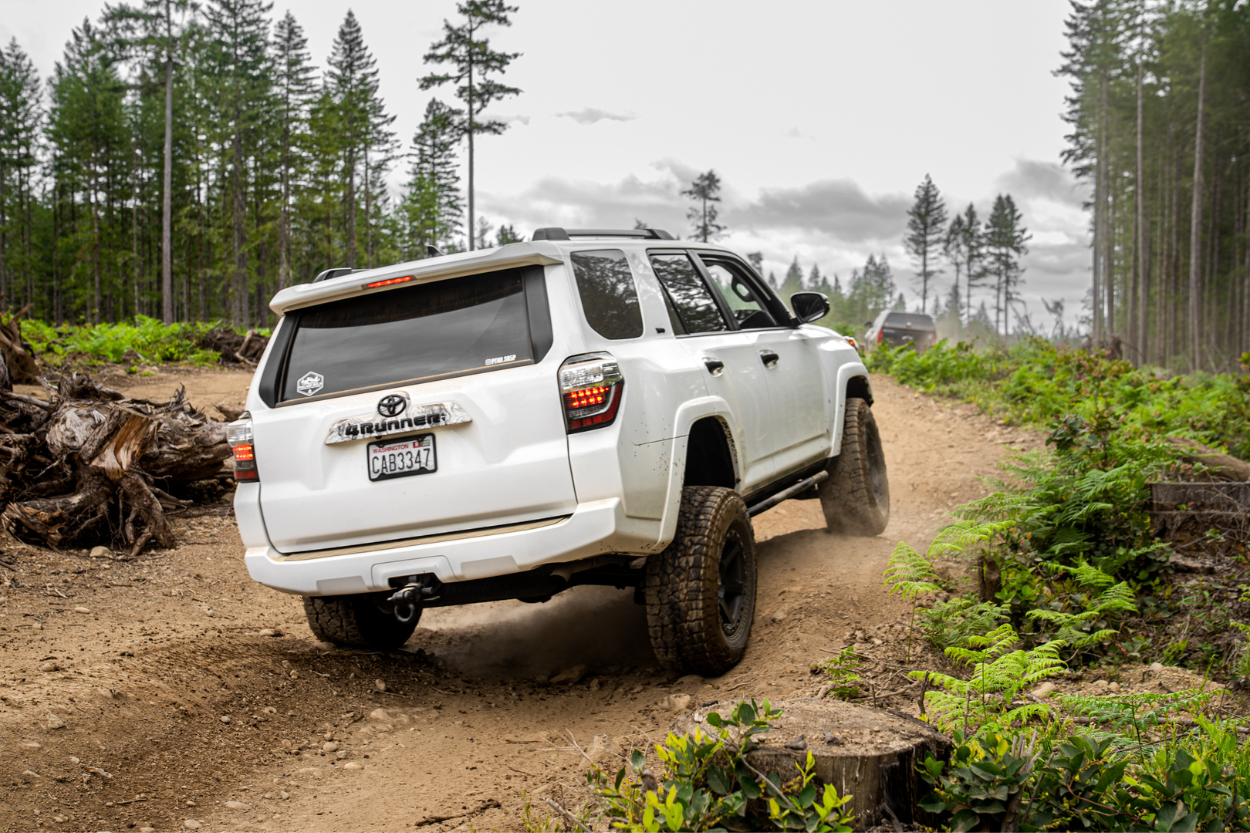
These sliders have been an absolute game-changer for me. They offer robust protection to my truck’s rocker panels and lower body. During our trip to Tahuya ORV Park, they were incredibly useful when navigating various stumps and rocks. I could confidently move around the park without thinking twice about obstacles.
Even when I did hit something, it was easy enough to get through. The best part is that the sliders didn’t come out with any extreme battle scars; they look good as new!
Their durability gives me peace of mind and allows me to push the limits and explore without hesitation. I know that moving forward, I won’t have any issues when it comes to tackling technical obstacles out on the trails.
Final Thoughts
The Trail Edition sliders have exceeded my expectations. Not only do they enhance the overall aesthetic of my 4Runner, but Cali Raised has done an exceptional job in designing these sliders with durability and functionality in mind. As an added bonus, my son can now hop in the 4Runner without help!
Please comment below if you have questions. I’ll be more than happy to provide additional information and assist you in any way I can.
Overall, I highly recommend these sliders for their outstanding performance, aesthetics, and the peace of mind they offer on the trails!
Very cool! Considering this. Btw, what’s your front bumper in the pics? Looks great… Thank you!
Alright – have we decided – J Clamp Down or J Camp up. Also, Brackets over or under the gas tank skid plate? Seems this install is like the HArd Boiled Egg of 4Runner Mods. There are different instruction from everyone!