
The Cali Raised LED Stealth Bumper is an off-road bumper designed to offer maximum protection to your 4Runner while tackling tough terrain. Made of heavy-duty steel, this bumper provides excellent protection from rocks, debris, and other road hazards. In addition, it comes equipped with mounting locations for various off-road accessories such as lighting, winches, and D-rings. These features make it trail-ready right out of the box!
In this post, we’ll take a closer look at a detailed installation and comprehensive review of the Cali Raised Stealth Bumper for the 5th Gen 4Runner.
Note: There’s currently a 3-4 week lead time for the Cali Raised LED Stealth Bumper.
Find It Online:
- Cali Raised LED Stealth Bumper: Check Price
Table Of Contents
Installation Notes
Installing the Cali Raised Stealth Bumper is relatively straightforward. I followed the step-by-step tutorial provided by Cali Raised LED (seen above). However, I will mention a few additional tips that were not included.
If you plan on doing the installation by yourself instead of hiring a shop, I highly suggest that you have at least 2 people to attach the bumper to your 4Runner. This bumper is heavy, especially if you plan to add a winch and a light bar. So, the extra hands will make the installation a bit more hassle-free.
As someone who’s never installed a front bumper, or any bumper for that matter, I can attest that the bumper cut may seem daunting at first. However, it’s much easier than it appears. While having experienced friends assisting is beneficial, Cali Raised has made their cutting instructions a breeze. It’s as simple as following the lines around your bumper. While we chose not to tape off the bumper prior to the cut, feel free to do so for extra peace of mind.
Finally, if you have a viper cut or a high clearance cut, this installation may look different for you than for those who haven’t cut their bumper. If that’s you, I will note the steps you can skip over.
Installation

There are a few things that you can do before the installation to make it easier. I suggest doing all these steps as preparation to make the process as seamless as possible.
Lay Everything Out
When you receive your bumper, familiarize yourself with all of the various hardware. Ensure all the bolts are present and double-check that your accessories fit in the bumper. We ran into a bit of trouble when installing my particular winch (Ironman 4×4), but we were able to troubleshoot fairly quickly and continue the installation. Ensuring the fitment of everything prior to making the cuts will save a lot of time and frustration.
Dedicate A Space To Hold Your Bolts
When you do the installation, you’ll be taking out a bunch of bolts – some you’ll reuse, and some you won’t. With that being said, dedicating a space to hold your bolts will make your life a whole lot easier.
Install Your Accessories First (Optional)
If you are adding a winch or a light bar, you’ll need to install these on the bumper before it goes on your 4Runner.
Now, if you’re not planning on adding a winch or a light bar, feel free to skip this step.
Here’s a friendly suggestion – if you have plans to add them in the future and have the means to do so now, consider doing it all at once to avoid the need for removing and reinstalling the bumper later on.
Tools Required:
- 10mm Socket
- 14mm Socket
- Ratchet Wrench
- Flat Head Screwdriver
- Pry Tool
- Needle Nose Pliers
- Cutters (optional)
- Eye Protection
- Dremel (or preferred cutting tool)
- Sander (optional)
Step 1. Remove Radiator Cover

To access the front end of your 4Runner, you’ll want to start by removing the plastic radiator cover. Start by pulling out the 13 plastic clips circled in red above.
Push down on the center of each clip to remove and pry them out with a flathead screwdriver. Once all 13 have been removed, set the cover and clips aside.
Step 2. Remove Plastic Clips Behind Grille
Next up, you will be removing the upper part of your grille. Underneath the radiator cover, you’ll find six more clips. The first two clips are located on the upper left and right sides. The other four clips are located further in the engine bay and hold the bottom part of the upper grille.
Note: You’ll again need to lift the head with a pry tool to remove these clips and pull them out.
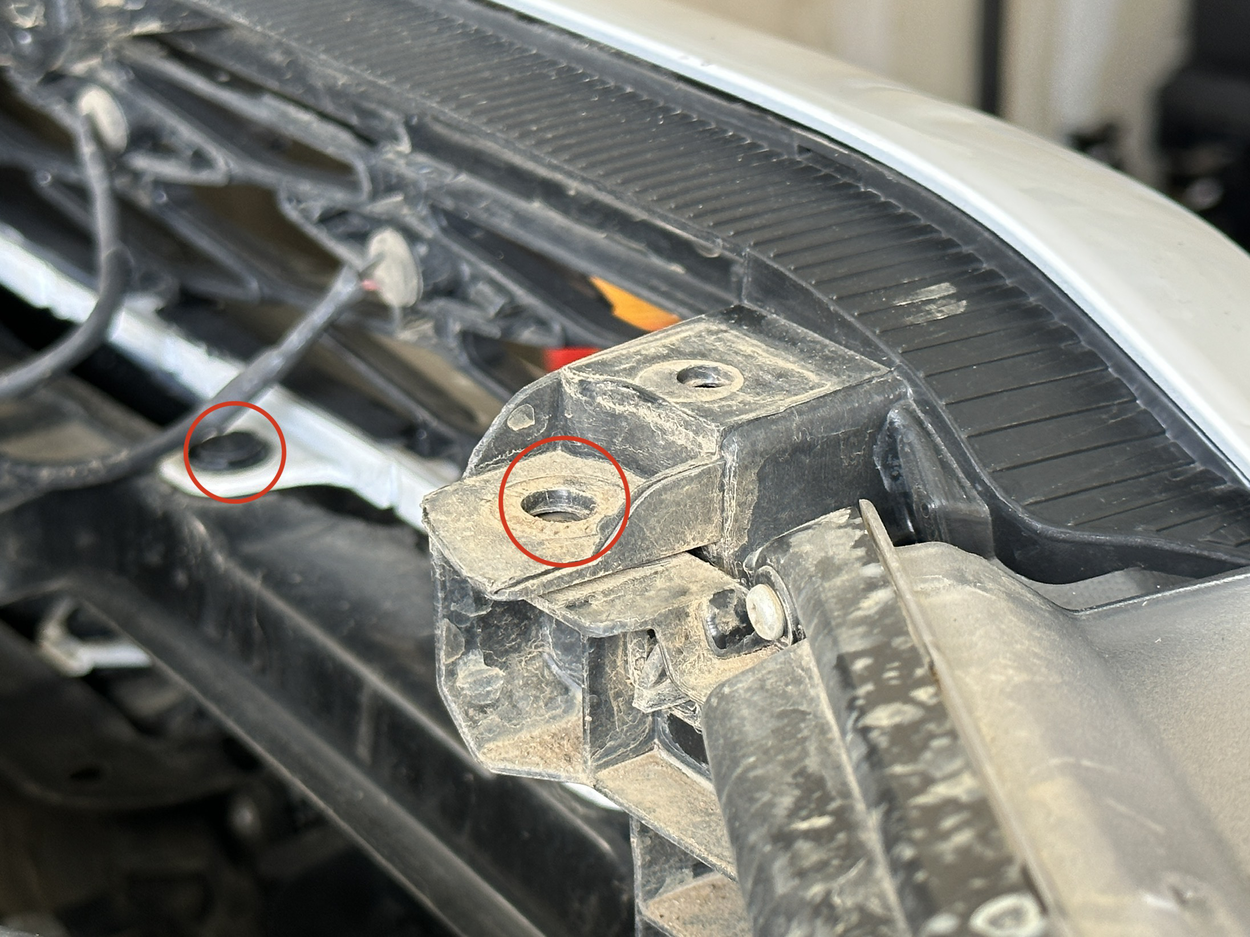
Step 3. Disconnect Wiring

If your 4Runner came equipped with Toyota Safety Sense or a front camera, you will need to unplug these. These must also be unplugged if you have installed any aftermarket products, such as raptor lights.
The Toyota Safety Sense can be disconnected via the clips in the engine bay behind the sensor (circled in red above).
Step 4. Remove Center Bolt

The final bolt you will need to remove in the engine bay will be in the center of the grille at the top. Use a 10mm socket to remove this bolt.
Step 5. Remove Bumper Cover Bolts

Moving down to the wheel well, you will find three bolts that connect your bumper cover. These bolts will be located on both the passenger and driver sides. Use a 10mm socket to remove these six bolts and set them aside.
Note: The longest of the three bolts goes at the top, with the two shorter bolts on the bottom.
Depending on whether you have a viper cut (high-clearance cut) and how high you made your cut, you may or may not have the bottom bolt. For example, I only have two out of three of the bolts.
Next, use a 10mm socket to remove the seven bolts on the bottom of your bumper. You will find two bolts on your bumper’s bottom, one on the outer passenger side and one on the driver’s side. The other three bolts will be in the middle of your bumper’s underside.
Again, if you have a viper cut, you may or may not have the outermost bolts. In my case, I only removed five bolts.
Step 6. Remove Bumper Cover

Now it’s time to begin removing the bumper cover. Move over to the front passenger side wheel well. Right behind the outer part of the bumper, you will find a plastic pin that sits above the wheel well. Using either a flathead screwdriver or your hands, gently lift it up to remove it from the wheel well. Being too rough with the plastic piece can cause it to break off.
Below you will find two additional plastic clips that need to be removed. They can be popped out using the flathead. Remember, you may not have both of these clips if you have a high-clearance cut.
Now that everything is loose, you can begin to pull the bumper outward. As you begin pulling it up, it will be held in with tension clips, so just give it a pull, and it will come loose.
Don’t forget to unplug your fog lights. Simply disconnect the harnesses to avoid having to take your whole fog light out. Depending on whether you have a high-clearance cut, it may be easier to do this at the beginning of pulling off your bumper or once it has been detached from the cover.
Finally, repeat these steps on the other side, but ensure you hold the bumper when removing it, as once it is detached from the other side, there will be no additional support holding it to the truck.

Once you have completely removed the bumper, you will notice some wiring at the bottom. Unclip it and set it aside because it will need to be rerouted higher up after installing the new bumper. We decided to zip-tie it on the grille.
Step 7. Remove Crash Bar

Next, you will remove the crash bar. This piece will not be reinstalled, so go ahead and toss it after removal.
Note: If you have the TRD skid plate, you must remove it before uninstalling the crash bar.
Use a 14mm socket to remove seven bolts on both the passenger and driver sides. On both sides, the bolts are separated, with one bolt on the inner side and the other on the outer side. The last three are located on the crash bar.

Starting above the bumper, use a 14mm to remove the inner bolts.

Then you can move over to the air dam and remove the other three 14mm bolts.
Finally, you will want to remove the bolts located directly on the crash bar. Once you have completed both sides and removed all 14 bolts, you can remove the crash bar.
Remove Valance Cover (optional)
If you have a TRD model, you will have a silver or black valance cover. This will need to be removed in order to cut the bumper cover. To do this, flip over the bumper cover and pull out the white clips. This part will not be reused, so you can either toss it or find someone in need of one.
I do not have a TRD model, so my installation did not require removing the valance cover.
Step 8. Cut Bumper Cover

It’s time to begin cutting the bumper cover!
Before you begin cutting, there are a few things to note. If you are nervous, you may mess up. If so, tape off the bumper to make the cuts. Remember, even if your cuts are uneven, don’t worry too much because this bumper was designed to hide all of the cuts.
Another thing to note is that it’s very important to wear eye protection while cutting. There will be plastic pieces flying everywhere, and you do not want to get anything in your eyes. Finally, when you are finished cutting, let the bumper cool down because the plastic may get warm.
Cali Raised made it incredibly easy to cut this part. Simply follow the lines of the bumper cover, leaving part of the bumper cover intact to avoid gaps between the bumper and the grille.
Starting from the sides, you will see an outer and inner crease. You will want to cut on the inner crease (the one closest to the bumper). As you get to the top again, you’ll see an outer and inner crease; cut the inner crease. Ultimately, you want to leave some of the bumper cover in that area to ensure a seamless look when the bumper is installed.
We used a Dremel to cut into our bumper, but feel free to use any other tool that can do the job. Start from the outer corners, working your way up over the top of the bumper cover and back down on the other side. Once you have made the cut, clean up the edges and remove any excess debris.
Step 9. Remove Plastic Air Dams

Next, it’s time to remove the plastic air dams. These plastic parts stick out towards the bumper’s lower passenger and driver sides and will prevent the installation of the bumper.
You can remove them by unclipping the plastic clip on each side, twisting it out of place, and pulling it out. Or, you can do what we did and just cut off the area that sticks out. It honestly doesn’t matter whether or not the whole thing is removed, so long as it doesn’t get in the way of the bumper installation.
Step 10. Reinstall Bumper Cover

We reinstalled the front bumper cover before cutting the air dams; however, this step can also be completed after removing them.
Now it’s time to reinstall the front bumper cover. You’re essentially going to want to reverse the removal steps above. To begin, realign your bumper cover on the front end of the 4Runner. Once you have it aligned, attach it using the two top plastic clips that were removed in Step 2. This will make the rest of the installation a lot easier.
Following that, reinstall everything in this order:
- Reconnect both of the fog lights.
- Mold the cover back into place and get all the tension clips reinstalled.
- Moving down to the wheel wells, put the fender lining back into place by gently putting the pinches back in. Just like it was a hassle taking them out, it may be a hassle putting them back in, so take your time and push it back in gently.
- Reattach the 10mm bolts in the outer wheel well. The two short bolts will go in the middle and on the bottom, and the long one will go on top. Remember, you may not have all of these bolts if you have a Viper cut.
- Move up to the engine bay and reinstall your four clips that are located behind the grille.
- Reinstall the last 10mm bolt back in the center behind the grille.
- Finally, if you unplugged any accessories, make sure to get those reconnected.
Step 11. Install New Stealth Bumper

If possible, now is when you will want a few other people to come and help with the installation.
Before you begin bolting the bumper on, note a few things.
First, when aligning the bumper onto the bumper cover, ensure that the cover is tucked underneath your Cali Raised LED Stealth Bumper to achieve a seamless look.
Second, install the bolts loosely at first so you can make adjustments afterward.
Finally, if your 4Runner comes equipped with the TRD skid plate, this bumper will install over it.

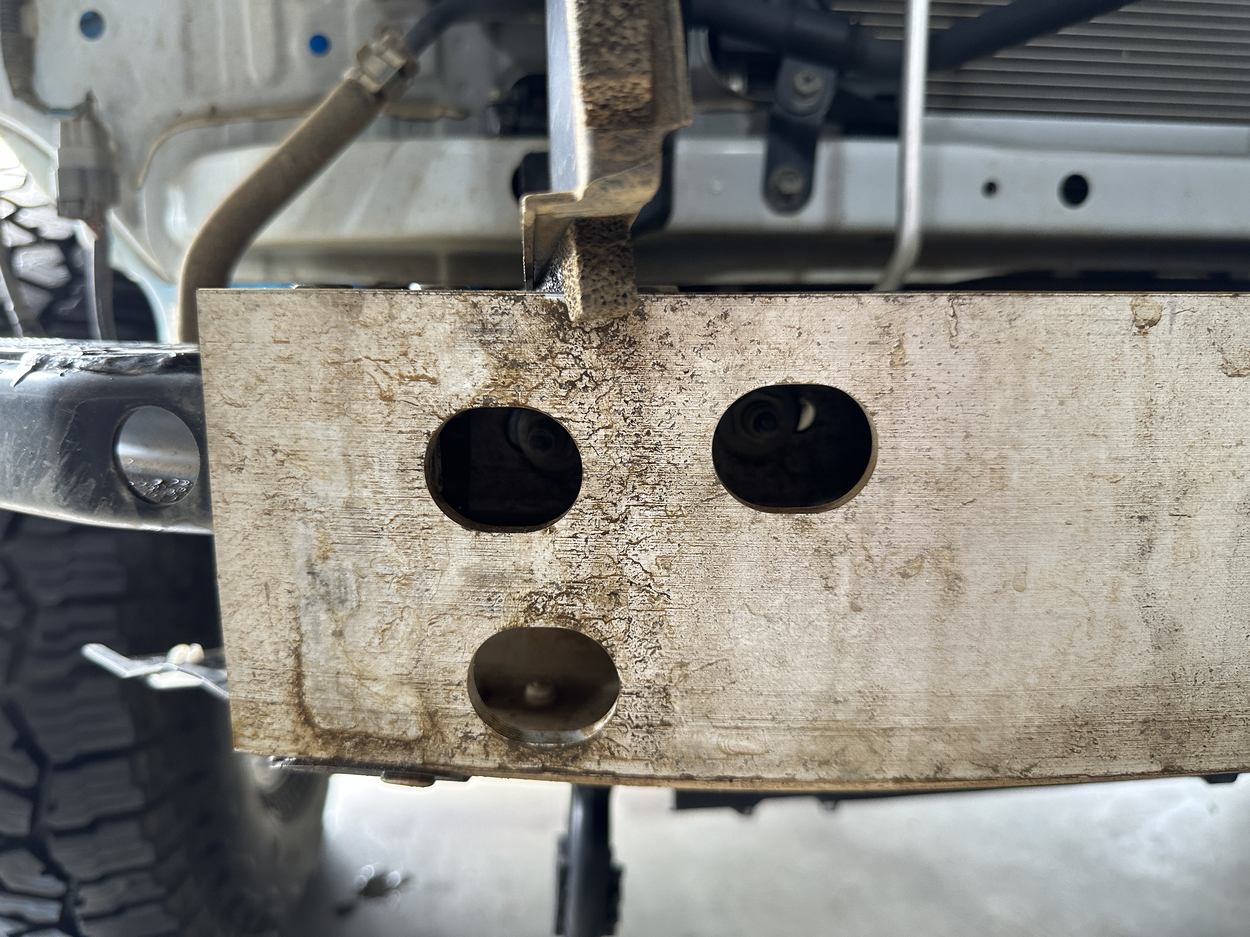
On the back of the bumper, you will see four holes on each side. Four corresponding bolts will go in on each of these sides. Because the bumper is so heavy, start by installing one bolt on each side. I suggest installing the middle inner one as well so that it can hold the bumper’s weight while you finish the installation. However, feel free to install a different one if that is easier. The goal is to make sure the bumper doesn’t fall off mid-installation.
You can access the inner middle bolt through the engine bay, and the outer three bolts can be accessed by going under the bumper.

Use a socket to install the first bolt on both sides. Once you have the first bolt installed on either side, proceed with installing the other three bolts. If you have trouble feeding the bolts in, lift the bumper a bit more so the holes align better.
Step 12. Make Final Adjustments

Now it’s time to make some adjustments to make sure your bumper is evenly positioned. With the bolts loosely installed, take a step back and check the bumper’s alignment and adjust accordingly.
Step 13. Install Bumper Cover Mounts (optional)

The bumper cover mounts prevent it from flapping around.
Important: The mounts are side-specific, with the lips pointing up and facing the front of the truck.
Before installing the mounts, make sure that they are over the top of the bumper cover so they can be secured properly. There will be three 10mm bolts that need to be attached. The two bolts on the sides will attach to the Cali Raised LED bumper, and the other one will attach to the bumper cover.
If you have a viper cut, you can skip this step because there will be nothing you can attach to the mount.
Wire Your Accessories (optional)
If you are installing any accessories with your bumper, now is the time to wire them up. Depending on what you are installing, follow the instructions provided with the accessories to get them set up properly.
The final step is to reinstall the plastic radiator cover. Replace all 13 plastic clips to secure the cover.
Initial Thoughts
Initially, I’ll admit that it took me some time to adjust to the idea of adding a bumper to my build. I always had a vision of a minimalist setup, with only the necessary modifications installed. I even considered skipping the bumper altogether, despite frequently hitting the trails with others who already had bumpers, winches, and other recovery gear.
At the time, I felt that my personal recovery kit was enough to suffice for what I was doing. Eventually, I came around to the idea of having a front bumper and realized its various benefits.
Once I had the bumper installed, I did a complete 180. I found that it was a fantastic upgrade to my build, both functionally and aesthetically. Not only did the bumper provide me with everything I needed to tackle challenging off-road terrain, but it also added a sleek and stylish look that complemented the black-and-white theme of my truck.
All in all, I came to appreciate the practicality and visual appeal of the bumper, making it a valuable addition to my off-roading setup.
Off-Roading Durability

Since the installation of the Cali Raised LED Stealth Bumper, I have only been off-roading once. While I have yet to put the winch into action, the bumper looks and holds up great.
What is so great about this low-profile bumper is the fact that it gives the 4Runner an OEM+ look while providing extra protection to the front end. The bumper sits much closer to the ground than stock bumpers, providing better clearance and protection for the vehicle’s undercarriage.
Now it’s time to take the 4Runner rock crawling and see how it holds up there!
On-Road Performance

As an owner of a 4Runner, like many others, I was initially concerned about the potential impact on my vehicle’s fuel efficiency when I installed the bumper.
Given that it adds some weight on its own, and that I had added a winch and light bar, I ended up adding around 150 pounds to the front end of my vehicle. I was apprehensive about potential negative effects on my MPG and overall driving experience, especially since I hadn’t installed a new suspension system.
However, after driving with the bumper for about two weeks, primarily on-road, I have not observed any significant difference in my fuel efficiency. My MPG still falls within the same range of 13-15 in the city as it did prior to the installation. Additionally, to my pleasant surprise, there hasn’t been a noticeable impact on the acceleration or handling of my truck.
Overall, I am glad to report that the performance of the bumper has met my expectations and has not posed any significant issues to my driving experience.
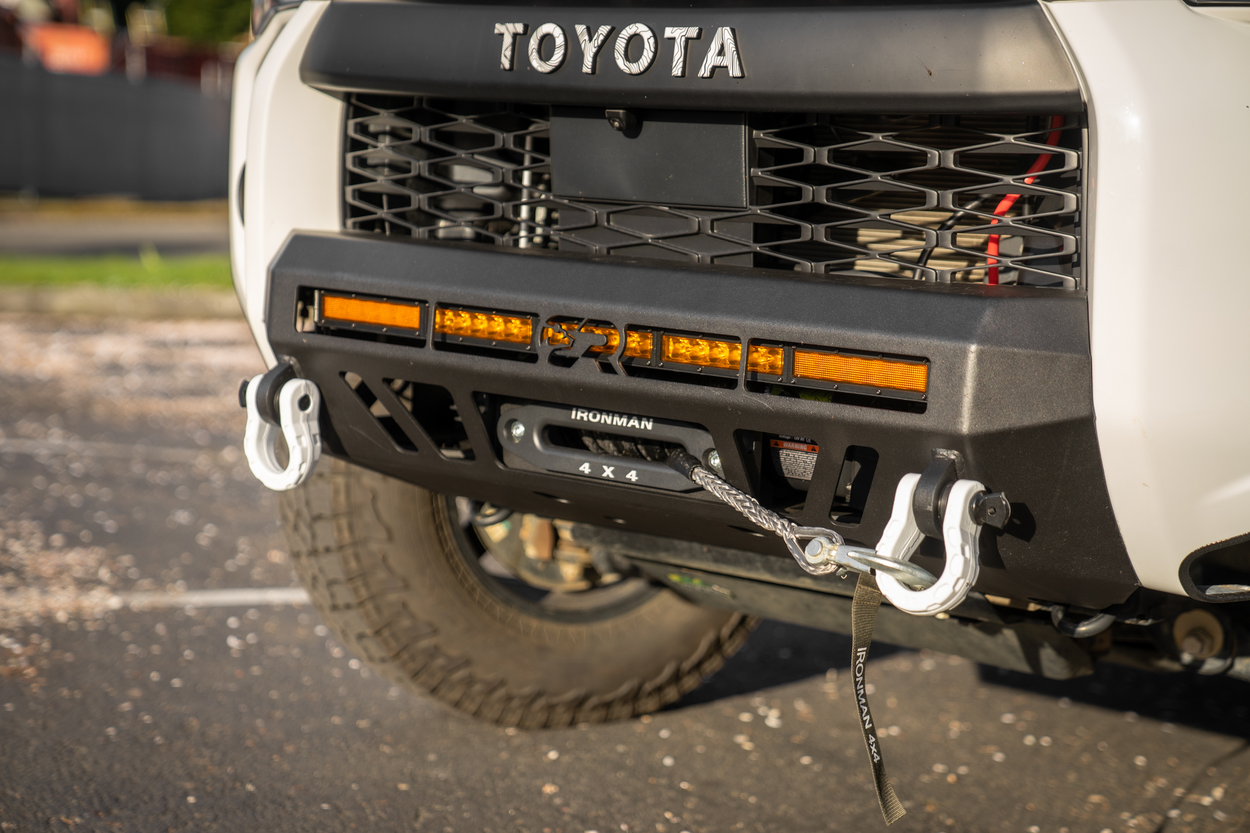
Light Bar & Winch Setup

The Cali Raised bumper comes with space for a 32″ light bar and a winch of your choosing. I opted for the Diode Dynamics Stage Series 30″ Amber Light Bar (with the brackets attached, it is 32″) and the Ironman 4×4 Monster Winch 12K LBS 12V Electric with Synthetic Rope.
You can choose whichever light bar and winch setup you would like; however, I chose these due to personal preference. All of my exterior lighting is from Diode Dynamics, so I knew I had to get a matching lightbar. In my opinion, they are a great lighting company and their products are well-made and modern-looking, which I appreciate.
I decided to go with the Ironman 4×4 winch over other bigger-name brands for a few reasons. The most important being the 5-year warranty. Many other winches had between 90 days and 2 years’ worth of warranty. I knew that if there was something that went wrong with the winch, I could always reach back out to Ironman 4×4.
Another big factor for me was that it was rated at 12K lbs, it had wireless (usable up to 100 ft away) and wired remote connection, and it had a synthetic rope, which is safer and more lightweight than steel cables. Another selling factor is that the motor is wrapped in a watertight housing, which is very important for me, considering I live in the rainiest city in the world.
Cali Raised has made it super easy to access my winch with the additional cutouts. Not only can I easily wire up my remote if needed, but I can also loosen the winch line by reaching in and turning the knob. There’s no need to pop the hood and access everything!
Final Thoughts

When I first got my 4Runner and began modifying it, I had zero intention of installing anything remotely close to a bumper, let alone an actual bumper. As I began to off-road more frequently, I quickly realized that they serve a very beneficial purpose: protecting your car and, of course, providing proper front recovery points and more.
This bumper accomplishes these things perfectly. And with the addition of the light bar, I have better visibility in inclement weather.
I’m super impressed with the bumper, and while the installation looked pretty daunting at first, it proved to be pretty simple.
Your article stated :”The bumper sits much closer to the ground than stock bumpers, providing better clearance and protection for the vehicle’s undercarriage.”
Do you mean to say you lost ground clearance as a result of installing this bumper ?