
Over the last year, I swapped out the head unit in my 2019 TRD Off-Road twice; twice. First, I installed the Dasaita Vivid11 in an attempt to convert the small OEM screen into something more substantial while also obtaining wireless Apple CarPlay.
While that worked and I was overall happy with the upgrade, CarTrimHome then released the highly anticipated knobless and color-matched T10-v3. This brought forward an even larger screen size, wireless Apple CarPlay, and a more OEM look than the Dasaita.
The significant downside with both radios was the Bluetooth microphone quality. Both radios came with a built-in microphone and an aftermarket 3.5mm plug-in microphone. Since both radios were designed for the 5th Gen 4Runner, it was a bit perplexing as to why they’d include a generic double-sided tapped microphone that takes away from the OEM aesthetic.
I may be overexaggerating, but with the kind of tech packed into both of those radios, the microphone quality was almost a complete failure. Friends could hear me on phone calls, but the quality was poor, even with the aftermarket microphone mounted right next to the armrest.
It wasn’t until “Jim” (a follower of the site) commented on my Dasaita Vivid11 post and said to check out Enfig. It turns out that this company makes a mic that replaces the one in the overhead console. I immediately went to their website and placed an order.
Find It Online:
- Enfig MIC-TOY1 – 4Runner (2010 – 2019) Factory Fit Custom Microphone: Check Price
Table Of Contents
Installation

Enfig sells their “factory-fit” aftermarket radio microphone with a standard 3.5mm male plug on the end. For those with 2.5mm microphone inputs (like most Pioneer radios), you’ll need an adapter. Fortunately, Enfig sells that as well.
Installation is pretty straightforward and if you’ve installed your own aftermarket radio, you’ll need to pop it out once again to make the microphone connection. Since I’ve installed and uninstalled many aftermarket radios in the 5th Gen 4Runner, this was just another day at my house. It probably won’t be the last time either!
Tools & Materials Needed:
- 8mm socket wrench or Philips head screwdriver
- Flathead screwdriver
- Wire fish
- 1 or 2 zip ties
Step 1. Remove Crawl Controls Or Sunglass Holder

For those with crawl controls on the overhead console, a slight tug is all you need to pop them out of place.
Unplug the crawl controls and set them aside.
For those without crawl controls in the overhead console, Step 2 below should contain similar hardware removal steps that are necessary to remove the overhead console. However, the sunglass holder should pop out of place with a slight tug.
Step 2. Remove 8mm Bolts

With the crawl controls out (or behind the sunglass holder), remove the two (2) 8mm bolts holding in the overhead console. Both bolts can also be removed with a Philips head screwdriver.
Step 3. Remove Overhead Console

Towards the upper portion of the console are two (2) retaining clips keeping everything in place. As with most of the 4Runner’s interior, the console can be “popped” out of place once the 8mm bolts have been removed.

Give the console a gentle tug and unclip the primary harness (should be the largest harness behind the console). Depress the clip and remove the harness.
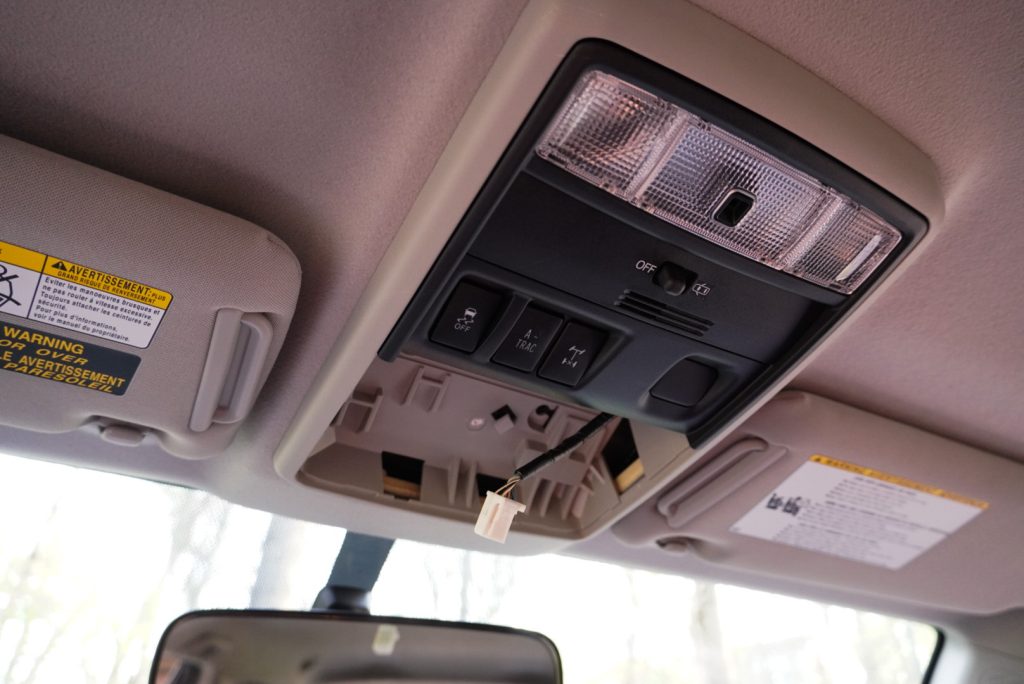
Step 4. Depress Microphone/Overhead Light Control Cover

With the overhead console completely removed, it’s time to remove the OEM microphone. In full transparency, I had no idea that’s exactly where the microphone was. I assumed it was there, but I wasn’t 100% sure.
When I popped the console off, the tiny yellow wire and the black rectangular box were a dead giveaway that this is where the Enfig MIC-TOY1 needed to eventually go.

The panel has two (2) tabs on each corner; press each one with the flathead screwdriver, then press on the OEM microphone to remove the plastic cover on the front of the console.
Step 5. Remove OEM Microphone

Unplug the microphone harness and remove the OEM microphone. While I don’t like using a flathead screwdriver against plastic, the microphone is held in by two very small tabs and some gentle wiggling removed it from the housing fairly easily.
Step 6. Insert Enfig MIC-TOY1 Microphone
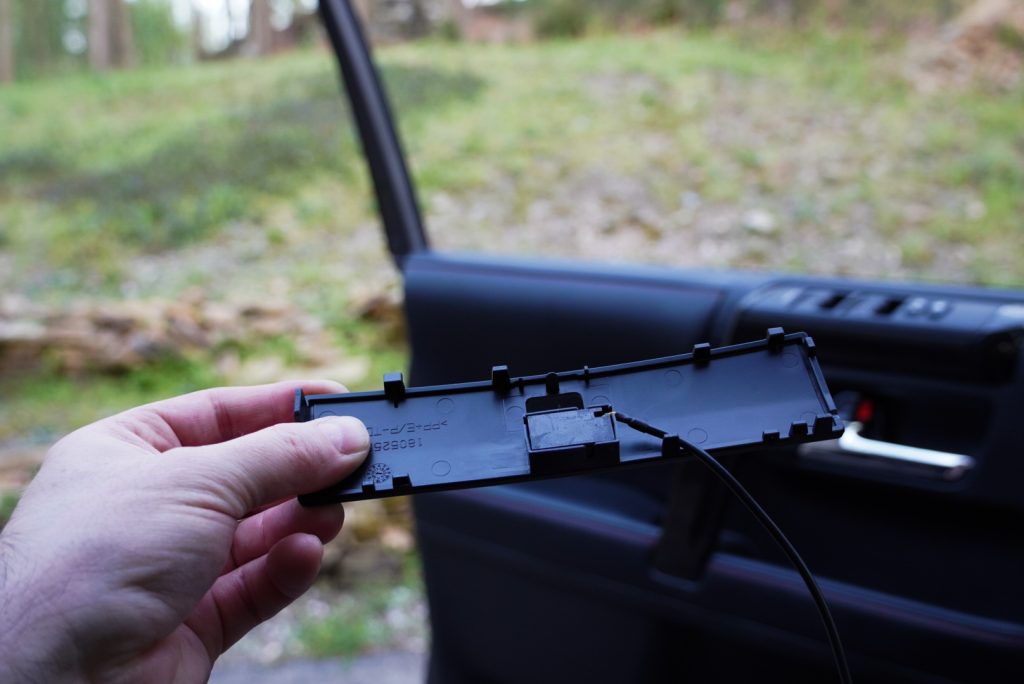
Next, insert the Enfig microphone into the OEM housing. Each corner has a small slit to route the small microphone wiring so it’s not pinched between the plastic when the panel is reinstalled.
As far as I could see, the orientation shouldn’t matter, but I installed the microphone with the opening facing toward the plastic grates.
Step 7. Reinstall Panel & Fish Wire

Fish the MIC-TOY1 wiring through the overhead console and reinstall the panel.

I looped the wiring from behind and had it follow the power harness for the crawl controls. Then, through one of the two openings on the bottom of the console.
Step 8. Re-Mount Overhead Console & Fish Wire Forward

First, fish the microphone wire through the front of the headliner. I was able to run the male end of the wire to the front, pulled the excess through, and let it hang while I reinstalled the overhead console.
From there, reconnect the primary power harness, clip the overhead console back into place, install the two (2) 8mm bolts, and reinsert your crawl controls (without forgetting to plug in the harness) or your sunglass holder.
Step 9. Fish Wire Behind Headliner

Now, start to fish the wire down the driver’s side A-pillar, tucking it behind the headliner. The headliner has a bit of a lip to the front of it, so you likely don’t have to “secure” the wire to anything behind the headliner; it should stay in place. The headliner has a fair amount of insulation so the wire will not vibrate around.
Step 10. Fish Wire Down A-Pillar

A few months ago, I installed KTJO4x4’s driver’s side grab handle. As such, I loosened the handle without completely uninstalling it so I could pull it back just enough to fish the wire behind where the A-pillar meets the headliner.
Next, I pulled back some of the door weather stripping and continued to feed the wire down the A-pillar through to the driver’s side floor.
Step 11. Remove Kick Panel & Fish Wire To Head Unit
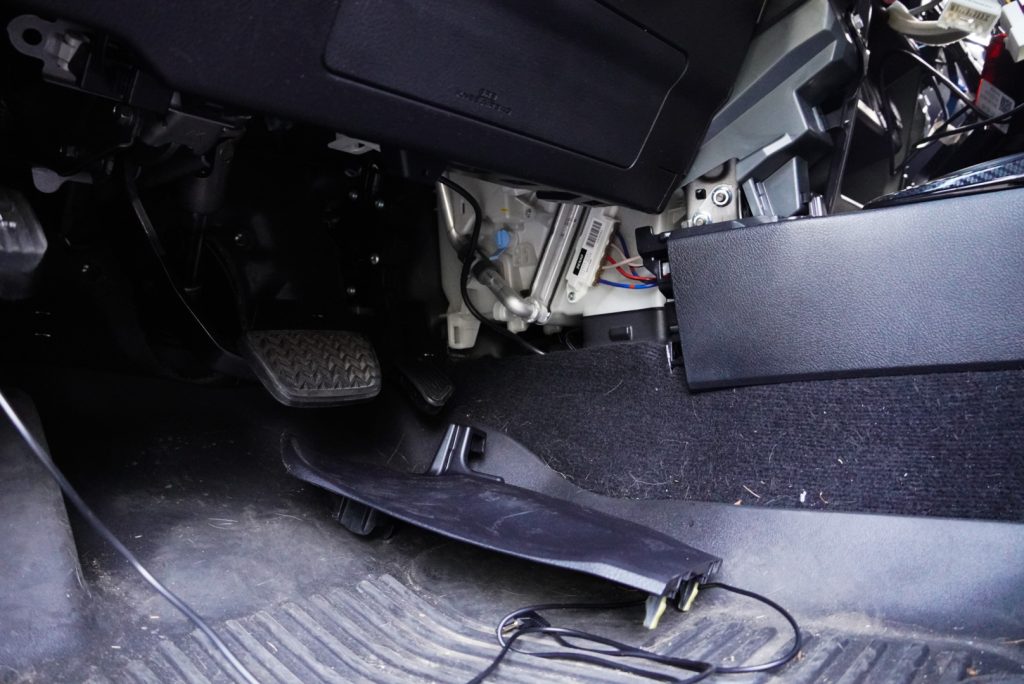
Next, remove the kick panel to the right of the driver’s side footwell. This requires no tools and, as expected, it “pops” out of place. Be sure as you pull the wire through and that there’s no excess behind the pedals.
Once everything is installed and you have all the excess pulled to the back of the radio, be sure to come back to this area and zip-tie the wire wherever possible to ensure no slack droops down into the footwell.
Step 12. Pull Microphone Wire To Radio

Last but not least, this is where I used the wire fish. With the radio removed, I ran the fish down to the driver’s side footwell area, grabbed the male end, and pulled it through.
Next, connect the male end of the 3.5mm plug into the back of your radios microphone port (or into the 2.5mm converter and then, into the microphone port). Before you reinstall your radio, make a test phone call and confirm the audio is working accordingly.
Finally, reinstall your radio and any removed plastic panels, and zip-tie the excess wire.
Final Thoughts

If the image above doesn’t excite you because it looks like your typical 5th Gen 4Runner overhead console, it shouldn’t; and that’s the point. This seemingly simple and very affordable microphone brings OEM call quality (and possibly improves upon it) to your aftermarket radio.
This mod brings zero flare, but that’s also the point. I love that this upgraded microphone fits perfectly into the OEM microphone housing in your overhead console and maintains the factory look. I hated seeing the bulky two-sided tape microphone sitting awkwardly on my center console, and often times it would come loose. Unfortunately, that was the only and best option I had until installing this.
The call quality on Enfig’s MIC-TOY1 is exceptional, it maintains the OEM look, and the fitment was nothing shy of perfect. To me, there’s no mod better than OEM+ where factory appearance meets improved function. This aftermarket radio microphone does both flawlessly! It is without question one of my favorite creature comfort mods to date!
guess their website ceased to exist after the new year.
I have the Dasaita Vivid11 and have installed the Enfig microphone but I cannot figure out how/where to plug in the microphone into the back of the unit. The Vivid 11 has a built in microphone. Do I need to disable the built in microphone on the Vivid 11 or is there something that I’m missing? Thank you for your help!!
We are purchasing a 2010 SR5 4Runner for our son. I just barely looked in the inside but it does not have navigation – just the small radio they had. Will the Dasaita work in this model or since she did not have a screen we can’t use it? Also, I’m not sure if there was a microphone in there or not, (I don’t think so), can we add this w/the Enfig if there currently wasn’t a microphone? Just trying to figure out what is the best option so he has hands free calling and would be nice to have Apple Carplay.
Attempting install on T10 V2 and trying to find the 3.55mm jack to plug the Enfig into. Does anyone have a pic or insight? I’ve read its on the main harness but I’m not seeing a female 3.55mm location.
Were you able to figure this out? I’m trying to attempt the same install.
Do you have to do anything with the T10 unit or will it automatically use the external mic?
A friend installed this on his Dasatia Vivid11 and it sounds like he had to switch which microphone would be the primary within the UI. Some of these radios have microphones built into the dash surround and an aftermarket 3.5mm plug-in microphone, so you may need to check the settings for what will serve as the primary microphone. For me, it automatically connected as the 3.5mm/MIC-TOY1 was already the primary.
I have the Rhino Radio T10. Any idea where in the UI the setting is for prmary mic? TIA
I saw some guys popped the internal mic off the board for the T10. Did you do that or did it work well just by installing this mic?
Does this improve the OEM mic quality?
Are you asking if the quality is better than the OEM microphone? Personally, I think so. Is it better than anything that comes with an aftermarket radio? 100000000%.