
It’s really hard to put together a snappy intro paragraph when the opening image is of a massive screen replacing what otherwise is a very, very dated-looking Toyota infotainment system. I mean, look at it. It’s huge!
Over the years, I’ve swapped out my fair share of head units in the 5th Gen 4Runner. At this point, I could probably disassemble and reassemble the dash with my eyes closed. Each time, I pursued a larger screen with more features than the OEM head unit.
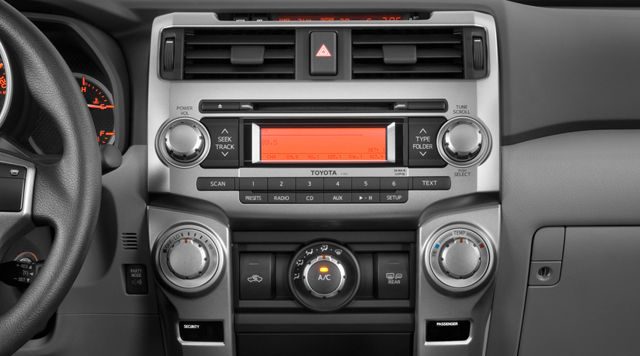
In fact, my 2010 Trail Edition came with the most basic head unit known to man. I mean, it’s honestly a relic at this point. And for those of you who don’t know what CDs are, they are these flat, donut-shaped plastic discs that allow you to listen to music. The ’10-’13 model 4Runner radio (pictured above) had a single-color orange screen, one of those CD player things, and various physical buttons.

Then came the 14+ (v2) upgrades, including a redesigned infotainment system. From 2014 through present models, the infotainment system has seen several changes, and more recent models included the Apple CarPlay update. However, the screen size still pales in comparison to what you’ll find in newer cars and it still contains several buttons and knobs that keep the radio in the 20th century.
Automotive manufacturers are increasingly focusing on the in-car experience, with modern conveniences and dashboards resembling the large tablets seen in Teslas. For all of its glory, the Toyota 4Runner has continued to lack in this area. With what we see in the redesigned Tundra and Sequoia, Toyota will no doubt make changes to the highly anticipated 6th Gen 4Runner’s infotainment system.
For now, the answer is simple: wait for the 6th Gen to deliver a better infotainment experience or upgrade your current head unit at a fraction of the price! While you have many options, the recent release of the Car Trim Home T10 v3 might be your best option.
Note: This head unit now has a v4 version, but the installation and feature overview below should remain largely the same.
Table Of Contents
Installation

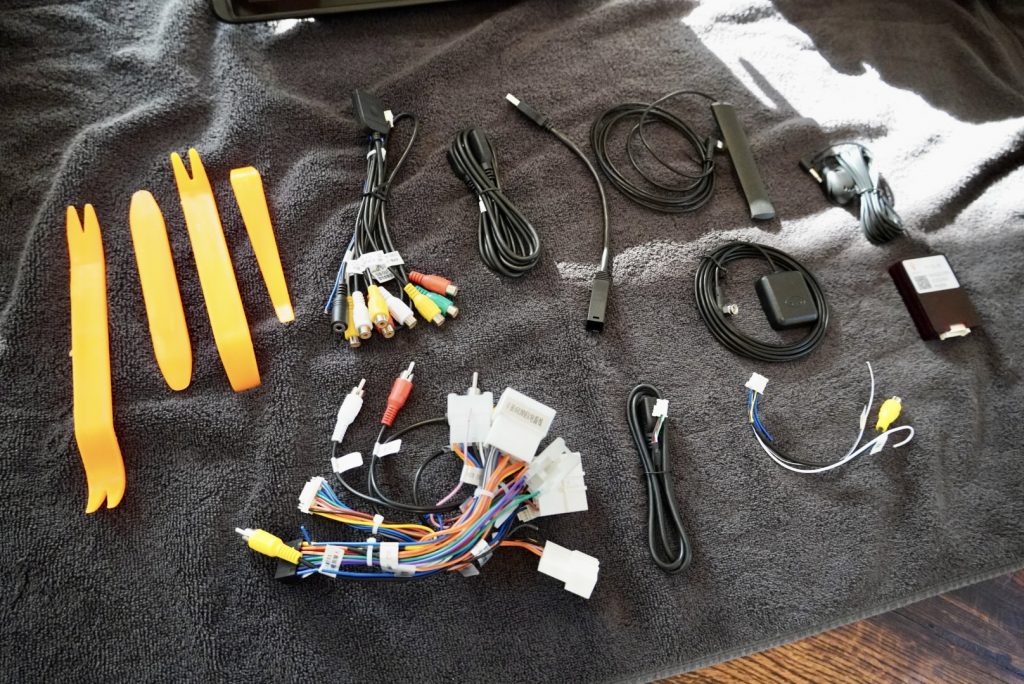
From start to finish, expect installation to take 1-2 hours to get the head unit installed and powered up. Customizing the interface can take hours, if not weeks! Since the head unit is built on the Android platform, you can download a plethora of apps outside of Apple CarPlay to make the experience that much better.
Tools Needed:
- Plastic pry tool (included)
- 10mm socket and wrench (w/ socket extension)
- 8mm socket and wrench (w/ socket extension)
- Standard size Phillips head screwdriver
- Smaller size Phillips head screwdriver (something like you’d use to repair glasses)
- Smaller size flathead screwdriver
- Towel or blanket to lay both head units on
Step 1. Disassemble OEM Dash Elements
If you’ve never removed parts from your interior or dash before, you’ll be surprised by how much plastic can be removed just by giving it a good tug.
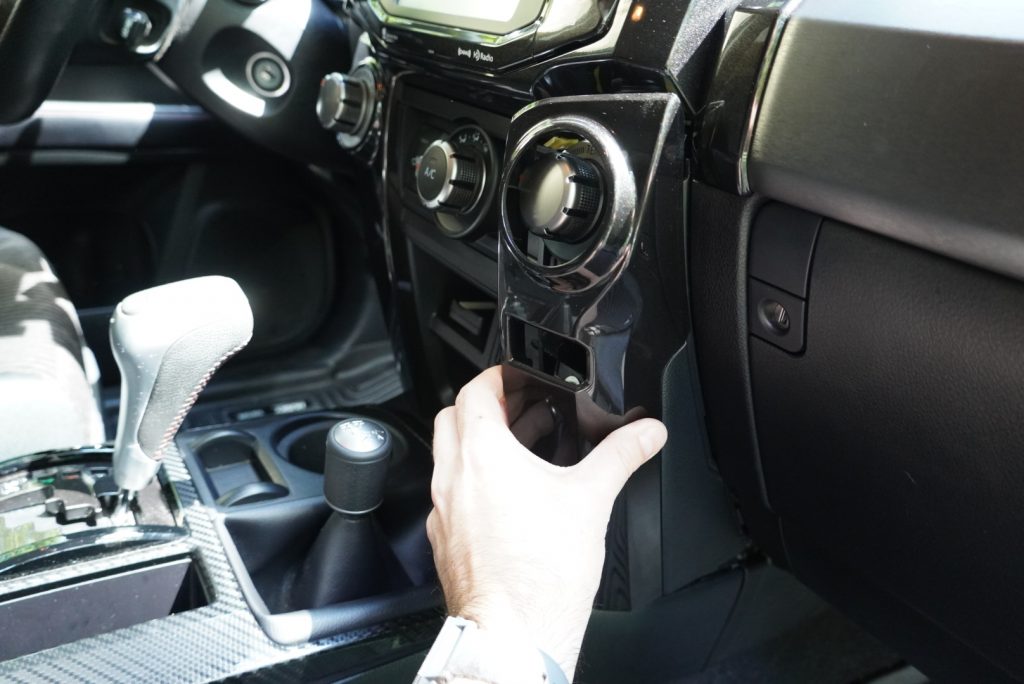
Start by removing the plastic surrounds the climate control knobs, pulling them from the inside out. An optional step here is to remove the plastic surrounding the center console. However, I always found this to be an unnecessary step.
Slowly pull the climate control knob surrounds from the inside out. Keep your hand on the bottom to avoid scratching any pieces during this step. Set both pieces aside.

Next, remove the climate control knobs by similarly giving the unit a good tug. I held down both of the outer knobs and pressed down. You’ll hear and feel the module unclip itself.
As you pull out the climate control module, unplug the harness from the rear and depress the wiring clip. Set this piece aside so that it won’t interfere with your installation.

Using your 10mm socket and wrench, remove the (4) mounting bolts holding the head unit in place. None of these bolts will be reused when replacing the head unit.
Step 2. Remove Factory Head Unit

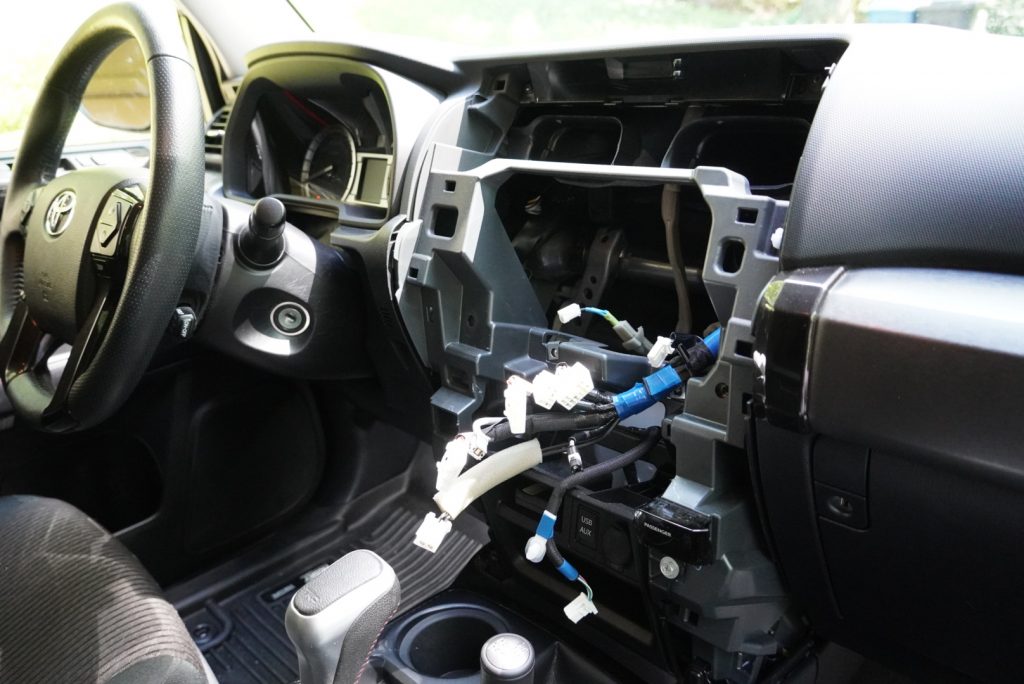
With the plastic dash elements and mounting bolts removed, it’s time to remove the factory head unit.
As described above, gently tug the head unit from the underside while keeping one hand on the top. It should now free itself from the plastic clips keeping it in place.

Gently lay the head unit down on one hand and begin unplugging all wiring harnesses connected to the back of it.
With unplugged wire harnesses, you can bring the head unit inside to prepare the T10 v3 head unit.
Step 3. Remove Factory Head Unit Elements

Before installing your new Car Trim Home T10 v3 head unit back into the 4Runner, you’ll need to swap out some parts from the factory one. Start by removing the passenger-side steel bracket from the head unit.
Using your 8mm socket and wrench, remove the (4) bracket bolts
Note: One is hidden behind the hazard light bracket.

For the fourth bolt, you may need to move around the hazard light wiring. Using a socket extension or just a long sleeve helps.

As you remove the passenger-side bracket, you’ll want to disconnect the hazard light harness from the back of the head unit and remove it entirely from the mounting bracket.
Slide your smaller flathead screwdriver beneath the clip, which should pop off. Pinch the plastic clip holding the wiring into place, and the harness should free itself from the bracket. This will not be reused on the new head unit.

Now, remove the four yellowish clips on the back of the factory head unit and transfer them to the new one.
So as not to break the clip, I found it best to start one side with my plastic pry tool, hold my finger underneath, and move the other side. They should pop right out (and maybe fly across the room).

Next, use your Phillips head screwdriver to remove the top flat plastic plate from the factory head unit. Again, this will be reused, but set it aside for the time being.

Now, pop out the hazard light from the back of the head unit towards the front. Set this aside, as it will be reused.

Now it’s time to remove the factory AC/heating vents. This can be tricky at first, but not impossible. First, use your smaller Philips head screwdriver and remove the two screws holding the vent open/close frame in place.
Next, remove the vents. Essentially, there are four clips on each side of each vent. Be patient, and do not pull too hard. Using your smaller flathead screwdriver, loosen and gently pull each vent corner. As you repeat this process on each side, the vent will eventually become loose.
On the upper side, you’ll notice a bigger retaining clip that must be pressed open. I found that the plastic pry tool worked best here. Remove both vents and put them aside.
Step 4. Swap Factory Pieces To the T10 Unit

Now that you’ve stripped down all the essential elements on your factory head unit, it’s time to put the remaining components back onto the T10 v3.
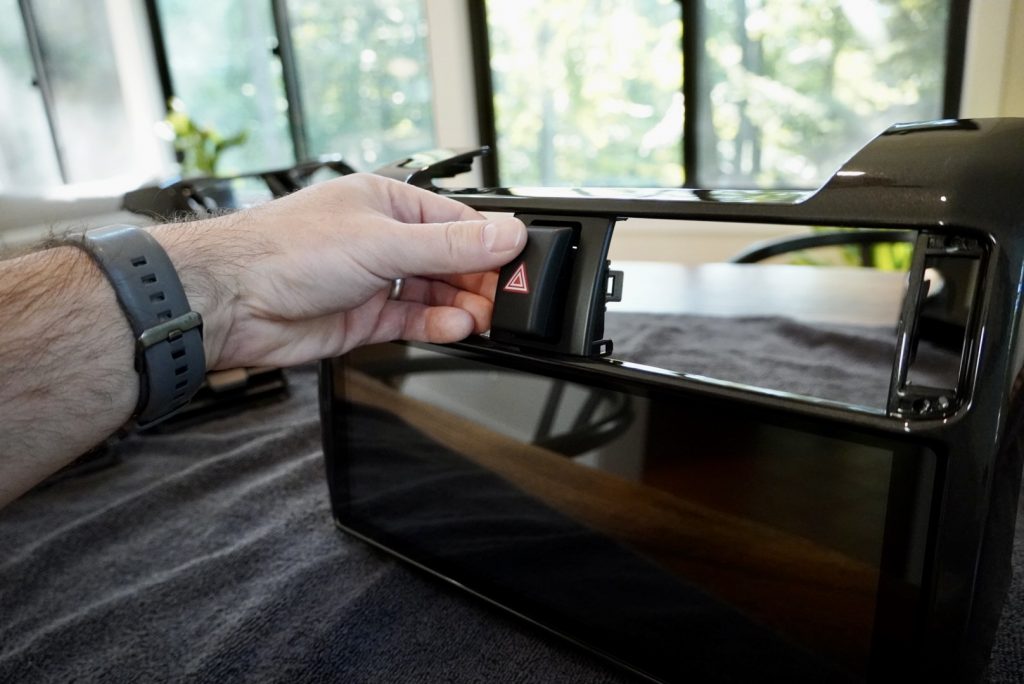
Snap in the factory hazard button from the front side of the head unit. It should just click into place.

Place the appropriate vent open/close frame back on the front and screw the plate in.

These tiny screws can be a pain to keep on your smaller Philips head screwdriver. I used the tiniest amount of grease on the end to keep the screw on the driver after the screw fell off ten or so times!
If you have a magnetic screwdriver, you should be good to go.

Snap the appropriate AC/heating vent into place. You’ll know immediately if you’re putting the wrong vent into the wrong spot, so don’t force it!

Lastly, reinstall the matte black shelf that sits on top of the head unit reusing the (2) screws removed from the OEM radio.

That’s it; everything is swapped, and you’re ready to get this wired up and installed!
Step 5. Wire It Up
As I mentioned above, everything is plug-and-play. To say you need to “wire up your head unit” should be more appropriately phrased as “plug everything in.”
I won’t go into painstaking detail here explaining which needs to go where because each harness is unique and only has one location. Don’t go shoving things in with force because you can easily bend or break the pins. If it doesn’t fit easily, it’s in the wrong spot.

I know; it looks like a bit of a rat’s nest. That’s okay because nobody will see this once everything is tucked behind the dash and plugged into the appropriate spots.
One thing worth mentioning is that in order to retain your factory backup camera, you’ll need to properly connect the red, yellow, and white AV cables. All of them are labeled, and it’s fairly straightforward. I only call that out because I forgot to do it in my haste to check out the new head unit! Make these connections before you bring the rat’s nest of wires out to the 4Runner.
Additionally, the Car Trim Home T10 v3 head unit includes a harness for connecting any additional sound system upgrades you may have made to your 4Runner, such as a subwoofer or even a DVD player.
Step 6. Connect Harnesses & Mount Head Unit

Last but not least, it’s now time to mount your new T10 head unit. Having a second set of hands to hold the head unit while you make all the connections will make things much easier.
Make all of your connections by again matching port-for-port. There are two smaller factory plugs/harnesses that aren’t used if you’re going with the standard setup. If you’ve decided to wire in a front-facing camera, you can do so and the T10 v3 includes the necessary plugs/harnesses for that.
Gently sit the head unit in place (or have that second set of hands hold it) and turn on the car. You should have power to the unit immediately. I cycled through the radio to ensure I got audio, then turned off the car to complete the installation.
Mount the head unit in its final resting spot and install the (4) mounting bracket bolts using your 10mm socket wrench. The holes may not be completely aligned with the bracket holes, but the steel has some flex, and everything should mount up just fine.
Connect your climate control module to the dash, making the necessary connections.
Snap all the plastic interior panels into place, and your new Car Trim Home T10 v3 head unit installation is complete!
Initial Impressions

So, how does it compare to the Dasaita Vivid11 I just installed a few weeks back? Well, that depends on a few factors. Let’s take a look at some key differences below.
Wireless Apple CarPlay & Android Auto
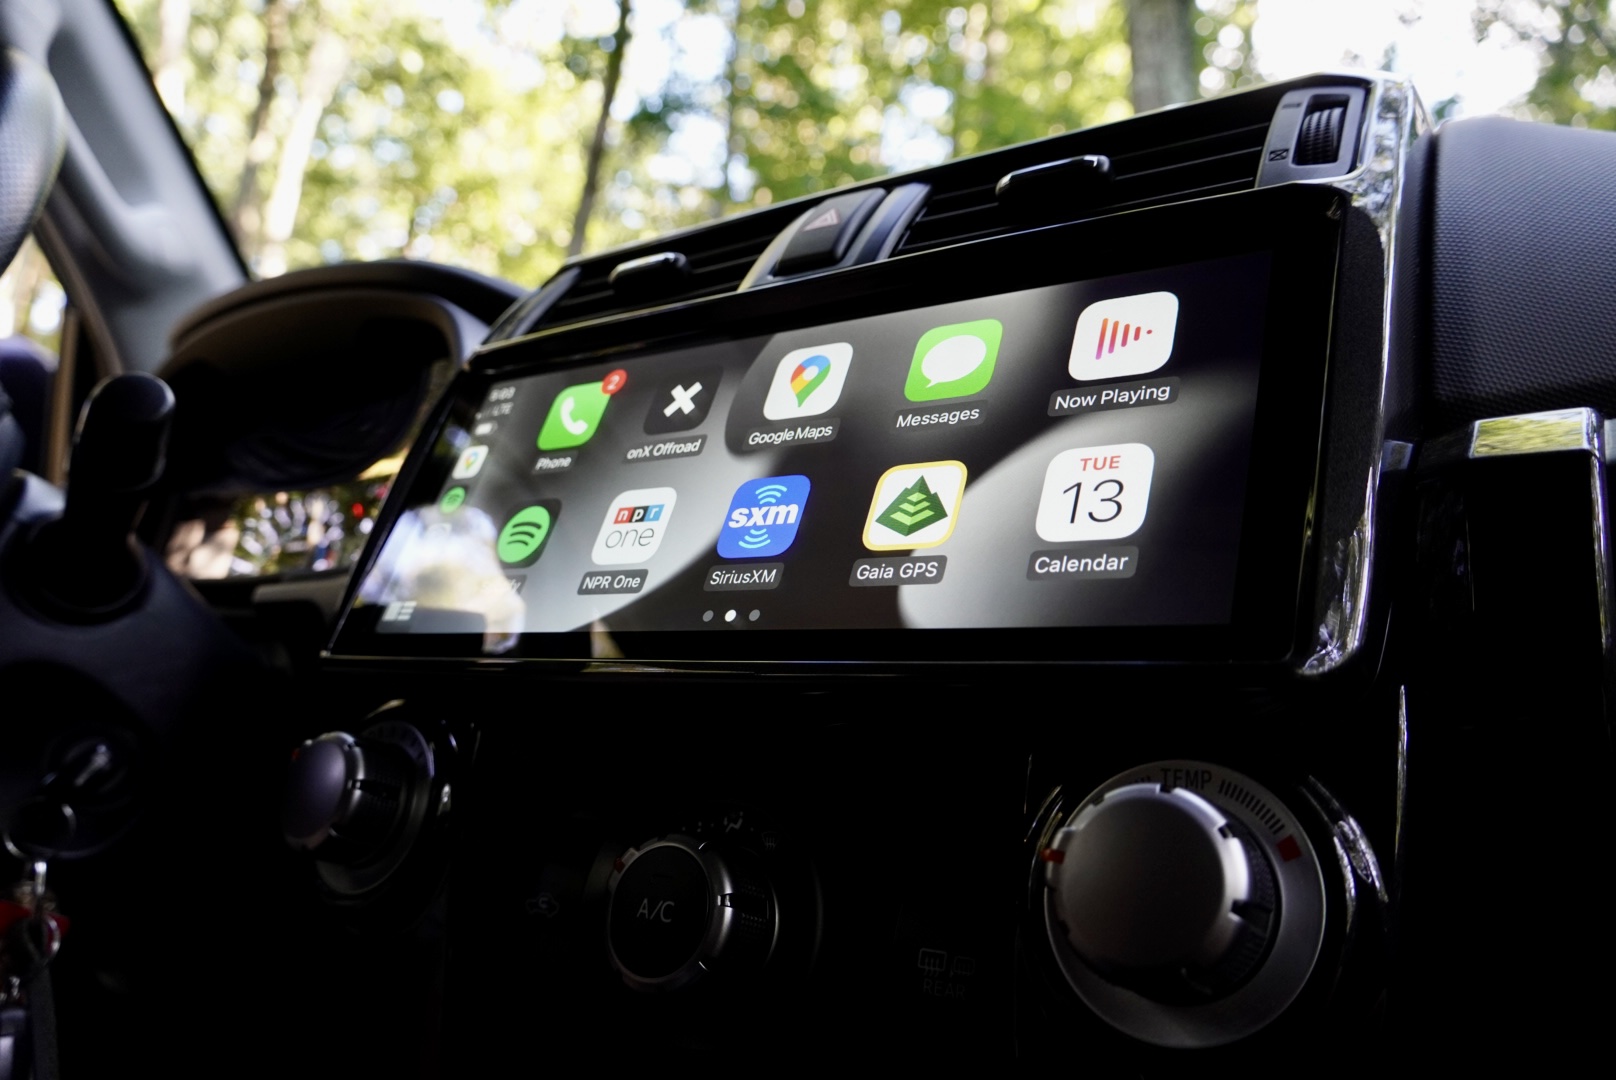
Dasaita uses the ZLink app, and the T10 v3 uses the TLink app to wirelessly connect to Apple CarPlay. I’ve found the TLink app to work better and with fewer hiccups. Since both radios are built on the Android OS, I’m sure you can download TLink and potentially have an easier connection process.
Back-Up Camera
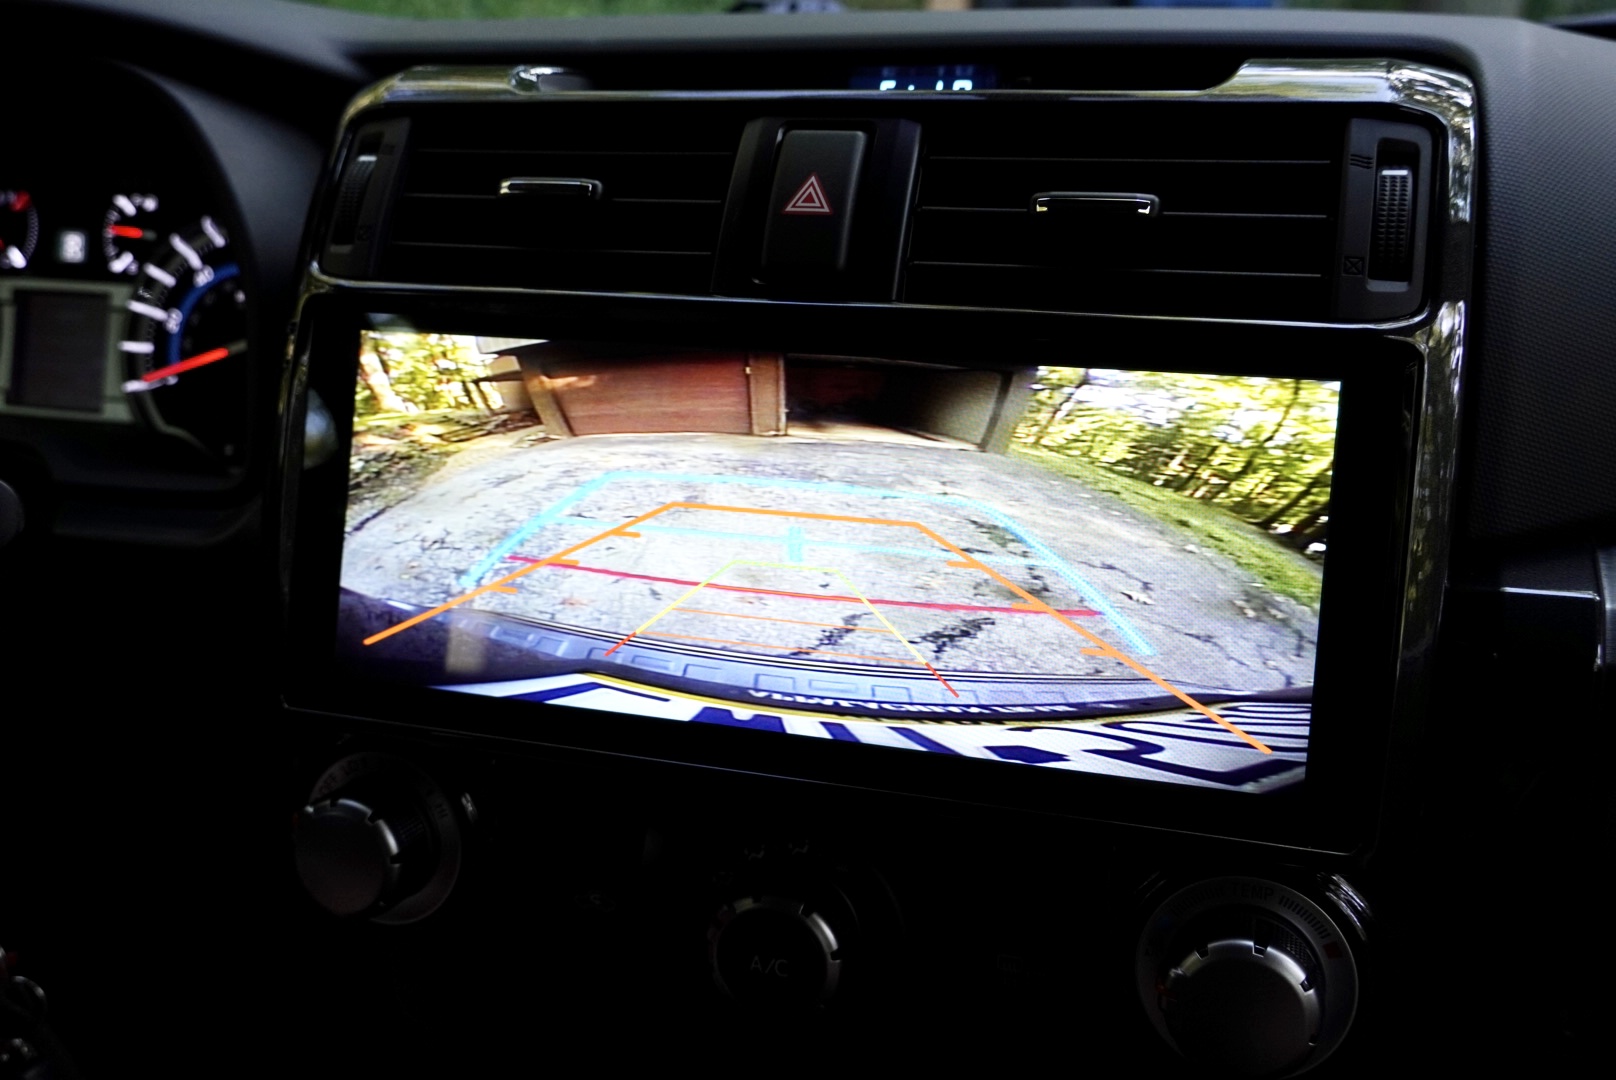
As I had mentioned with the Dasaita Vivid11, you’re stretching an image to reflect on a wider screen. The camera isn’t bad, but it wasn’t designed to be stretched this wide. So, you’ll lose some clarity due to the distortion.
For whatever reason, the T10 v3 (using the same OEM backup camera as the Dasaita radio) produced a higher-quality output. I can’t put my finger on it, but it just did.
Screen Size
Both aftermarket radios offer a larger screen size than the OEM radio, but the T10 v3 is bigger. The Dasaita head unit comes in at 10.25″, and the T10 v3 at 12.3″. However, what makes the T10 v3 size more noteworthy is that touchscreen side buttons or any radio dials/knobs don’t encumber the screen dimensions.
Color Match

The T10 v3 is finished with the same magnetic gray metallic (MGM) flake as the current dash surround pieces. The color match is indistinguishable. The downside of the Dasaita head unit is that it only comes in matte black (and silver). The T10 v3 also comes in the silver finish that some models still sport and works for both the 2010 – 2022 models (2023 pending when this post was published).
Radio Dash Surround
The wild part about the T10 v3 is that the manufacturer thought outside the box and broke boundaries, literally. It seems like every aftermarket manufacturer tried to increase the screen size while still staying within the confines of the OEM dash surround. The T10 v3 respects the OEM look but stretches each lower corner to create a perfect rectangular shape along the bottom. No knobs. No side touch screen buttons, just a screen for days.
The best part is that the radio surround overlays the climate control “columns” ever so slightly, it doesn’t effect adjusting the knobs, and it just looks like it was always supposed to be that way. Major kudos here.
Final Thoughts

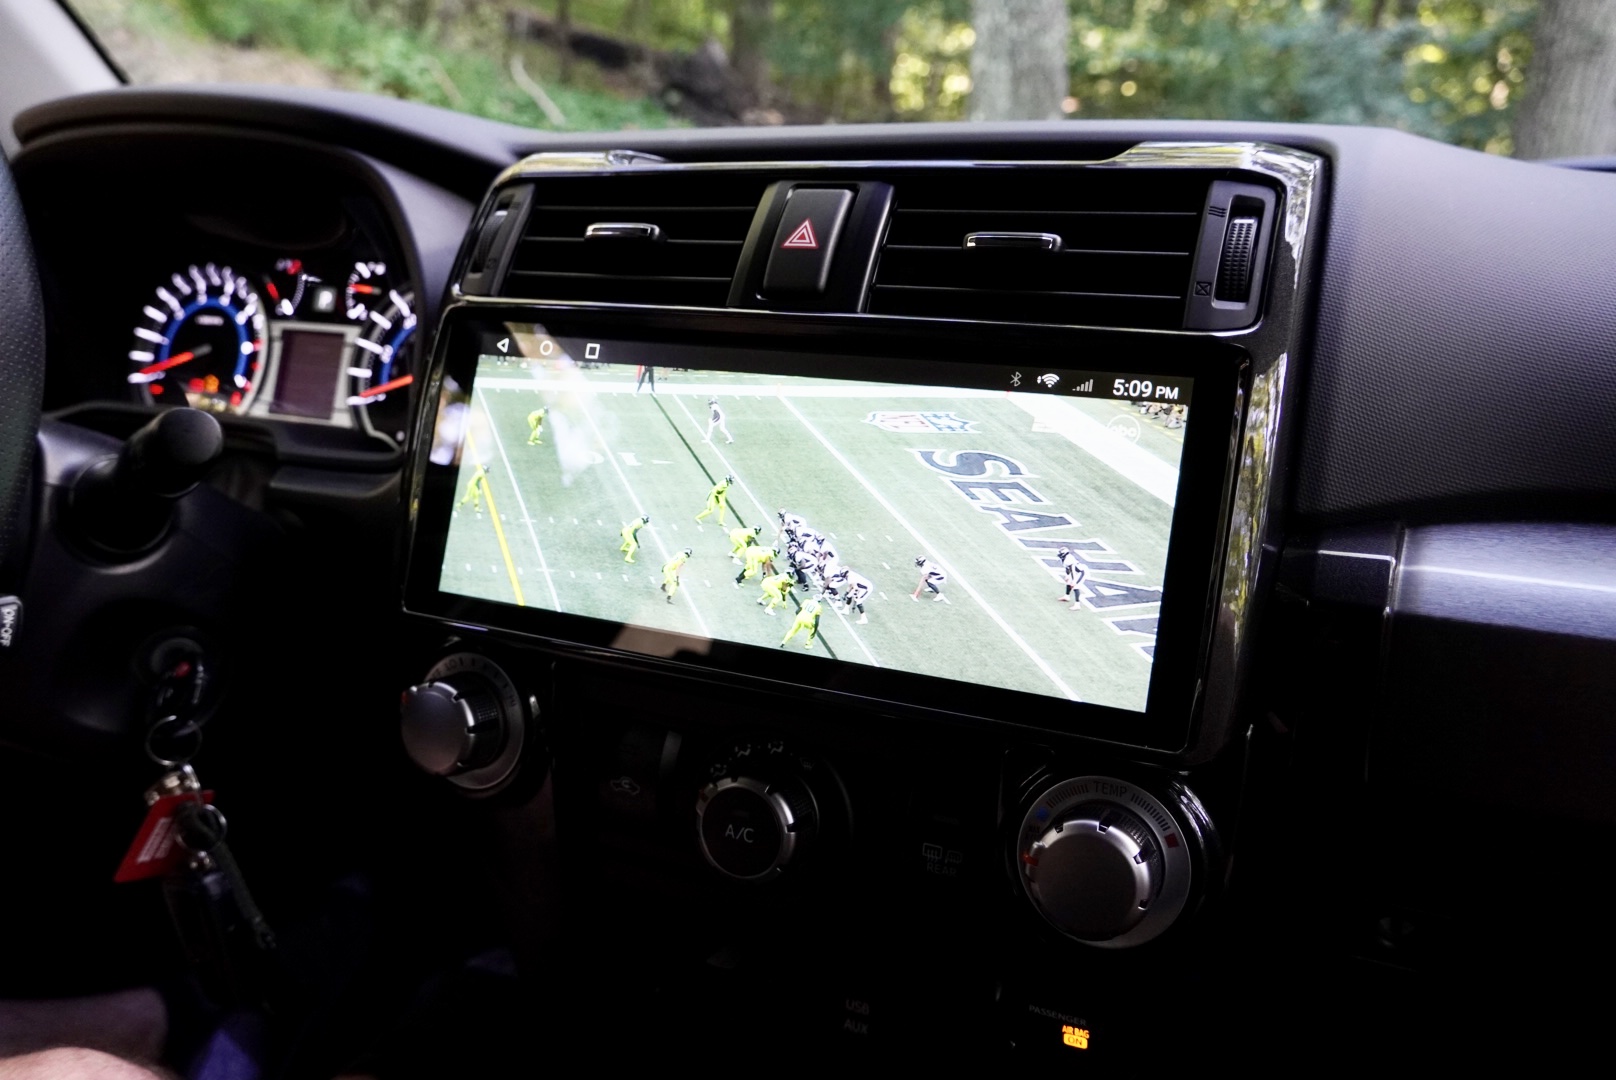
The bottom line is that this head unit is no joke and has endless features. I’ve been able to stream YouTube TV, HBO Max, and NFL Red Zone directly on this radio. Safe? No. Wild? Yes.
If you’re in the market for a new radio, or, as Brenan puts it, if you want to “actually feel like you’re in the 21st century when you’re in your 4Runner,” you need to seriously consider the new T10 v3.
Anyone having problems with the Bluetooth mic cutting in and out while the car is moving?
but working fine when the car has stopped, I checked al he connections and wire and everything is looking good. all other features work no problem.
We have installed the unit and it is working except we cannot get the steering wheel control to work. You mentioned a dongle connection in your video. Our installation included a canbus that is supposed to wirelessly connect to the wheel, but it isn’t a direct connection to the oem cable. Did you have a canbus to or a direct connection?
There are 2 connections for the steering wheel controls. The canbus attaches to one cable and the other end of the same set of wires tucked in the harness connects to one of the harnesses coming out of the dash. Mine worked first time right out of the box.
I just installed the T10 V3.1 this past weekend and so far everything works perfectly.
How do you watch hbo max and other streaming appa with Apple CarPlay on the head unit?
my backup camera on my t10 v3 head unit is upside down. What’s the fix?
How do i get the screen to look like this ?
blob:https://trail4runner.com/5ff3b6ed-d334-4ec6-84b8-a2dede355ea5
How do you get apple car play to display on the screen ?
Thank you
So, after reading all your articles on these head units… Can I get your final opinion before I pull the trigger? T10 – v3 or the Dasaita Vivid?
Mainly, I am looking to use it for Wireless Carplay and hoping for minimal to no bugs.
what did you end up going with?
Get the T10 V3.1. The wireless CarPlay is great and mine connects almost instantly. Recommend buying it from CarTrimHome and use code KinSev7 for 7% off. You can also join the CTH 4Runner group on FB. It is a big community and all the support you could need is available there.
I haven’t. I am terrified to get a unit with bugs and little to no customer support. I never heard back from Ryan on his final choice between the two. I am now considering the alpine Halo iLX-f509.
Don’t buy the Alpine Halo in my opinion. I’ve hated it. Can’t see the screen very well in sunny conditions, it’s bulky and blocks ur AC vents. Don’t waste ur time.
Thank you for the great write up.
I am considering a 2022 limited that does include the arial 360 camera (PVM) as well as backup camera. I did see you can order this radio for the 2022 model year. My question is do you think the 360 view (PVM) would still work? Any thoughts would be appreciated.
Physical knobs and buttons are not primitive, the notion that everything must be a touchscreen is silly. Yes, the head unit can be primitive, but touch screens and physical knobs, dials, and buttons should complement each other. Tesla’s idea of making the whole dash a touchscreen is (IMO) stupid, same as their pop-out door handles and F1 style steering wheel.
To your point, it’s a matter of personal preference. I like the look of no buttons/knobs. The con is if passengers want to adjust the volume but on Apple CarPlay, there’s a hover-over button to adjust the volume down that can be dragged anywhere on the screen.
Does this support screen mirroring?
Yes the T10V3.1 supports screen mirroring.
Has anyone had issues with local radio reception being trash? I just installed the T10. Everything else works great.
How about aftermarket mounts? It appears you can’t attach anything to it bc support bolts are not used. I have an ICS Fab mount that holds my Zoleo, Phone and Charger, and a mount for my GMRS radio face plate and mic. Is there a way to mount these to the T10 V3?
Is there anyway i could add a manual volume knob (near the center console or something). I’m thinking something similar to Audi where their screen is knobless, but still includes a knob near the shifter.
Any updates on the bugginess of this unit?
I see the T10 does not bolt into the dashboard. Would this become an issue if installing a dash mount? (ICS, Rago etc.)
Yes, this is the reason I did not buy this unit. There is no way you can use an ICS or Rago mount with this
I just received my CTH T10V3.1 but I cannot get Android Auto to work. I kept messing with the setting and might have deleted apps I needed, I screwed up. I need help. Has anyone factory reset this unit? Or have the necessary download apk needed? What apps worked for your 4runner?
Just installed the other day. Took a lot of screwing around to get it to work. I have it connect to that tlinks/tlink5 (sp?) app on the unit from my pixel 7. The Bluetooth connection is carkit_blink.
Yes it took me a lot of different version of tlink5 until I found one that finally worked. So I’m happy about that. But now I need a recommendation of screen mirroring app. The tlink5 that did work for me, doesn’t support the updated Android Auto v6.6 and gives me a blank black screen. What Screen mirroring app is everyone using?
I just installed the cartrimhome t10 V1 headunit and have a question I am hoping you can answer. I cannot seem to find an answer for this one. Can this unit play XM radio? If so, can you tell me how i can get to it on the screen? Thank you very much.
This unit cannot play XM radio. You do not connect the satellite antenna up. There is not satellite radio. Most brand name head units have an external device you can connect to the head unit for satellite radio. The T10 series do not have this feature. You’ll read you can use an app but then you are not connecting via satellites but thru WiFi or 4G or your phone. Hope this helps.
Can anyone walk me through like a giant baby to get CarPlay to work. I just can’t seem to figure it out
Is there a mute button? It seems like you’d want a fast and easy way to turn it down when needed.
Great write up!
Cheers,
Mike
Mine uses same steering wheel mute button
I’ve owned all models of these units.
simply stated. They are very bad and a waste of money.
I have a T10 for sale if someone wants it.
I’ll take it.
Lol… “they are very bad and a waste of money… anyone want to buy mine? You’ll love it!”
Can this be installed in Canadian 4 runners as well?
Yes, I installed and operate mine with no issues. Hamilton Ontario
Thanks for the review. When purchasing you have two options, 4+64G / 6+128G. What’s the difference between the two?
It refers to 4 gigs or 6 gigs of ram, meaning more ram faster processing
Similar to buying an iPhone; the radio has it’s own memory/hard drive space and you can buy one with more or less. If you’re just using Android Auto or Apple CarPlay on this head unit, I would go with the cheaper of the two. If you’re not using either of the phone-specific apps mentioned above, and you plan on customizing the hell out of your head unit with different apps and such, it may make sense to go with the 128G.
To confirm what I got out of the review of the T10V3 above is:
This is an excellent review and I want this look, but I need to be sure it is truly Plug and Play with my 2022 4Runner Limited with
Thanks for the help and review with Q&A.
You CANNOT use the OEM satellite radio with the T10. You can use the Sirius xm app, but if you get out of cell service then no more XM radio. This is honestly the one thing that keeps me from buying it other than also just being buggy for a lot of people.
Ryan, just received an email with your comments above. Thanks for replying. As I just got my 4Runner a few weeks ago, I was let down as I began to explore and learn my infotainment system. The screen color(s) are a real letdown. Your video was great to show me there is great units to be had. Knowing/learning about the maestro unit included in the harness is great – now I need to learn some about the displaying of that info.
Thanks again – I’ve got your video saved to my playlist on YouTube and will refer to it more to learn more.
Merry Christmas!!!
You mention reinstalling the 4 10mm bolts. Is this correct? It looks like the T10v3 doesn’t use the brackets like Dasaita does, only the yellow clips. That’s one reason I’ve avoided ordering so far. I’m not sure it would be secure to hold my dash mount/phones with only the clips (at least not safely).
I’ll have to update this post but for the T10v3, you don’t reinstall the bolts. I can assure you it’s very secure with just the yellow retaining clips. It’s super thin and has almost no weight to it.
Does it retain the steering wheel controls?
Where’s the best place to buy this?
It comes with Maestro built in so you retain all the steering wheel controls.
Does this headunit still have the Toyota maintenance app? Or something similar to track oil change/tire rotation by mileage?
You can install just about any app you can think of. Just go the Google Play store and search the app you want. Here is the Toyota app.
If for some reason, you accidentally delete the T-Link app for apple carplay from the head unit, here is a link to download the T-Link app for the CarTrimHome T10 V3 Knobless. You will need to download it straight to the head unit. I emailed the link to myself and then accessed my email through WIFI on the head unit. Once you have downloaded the link to the head unit, it will automatically download the T-Link app. Now just restart the head unit and you have reinstalled the T-Link app. Here is the link: https://cartrimhome.cn/our_dw/TLINK_dw_1.8.9.apk
Is there USB port for music?
The OEM usb input connects to this radio, so yessir.
Thanks for posting this, it came in handy when making my decision and installing my new T10 V3, it’s awesome!